Many related organizations, small businesses, and even individuals need to streamline their audio-related projects in their daily routines. Also, only some of the available audio streaming software offer that many options, and one often needs to switch tabs to handle multiple tasks. However, REAPER resolves all these issues in no time by offering a wide range of features.
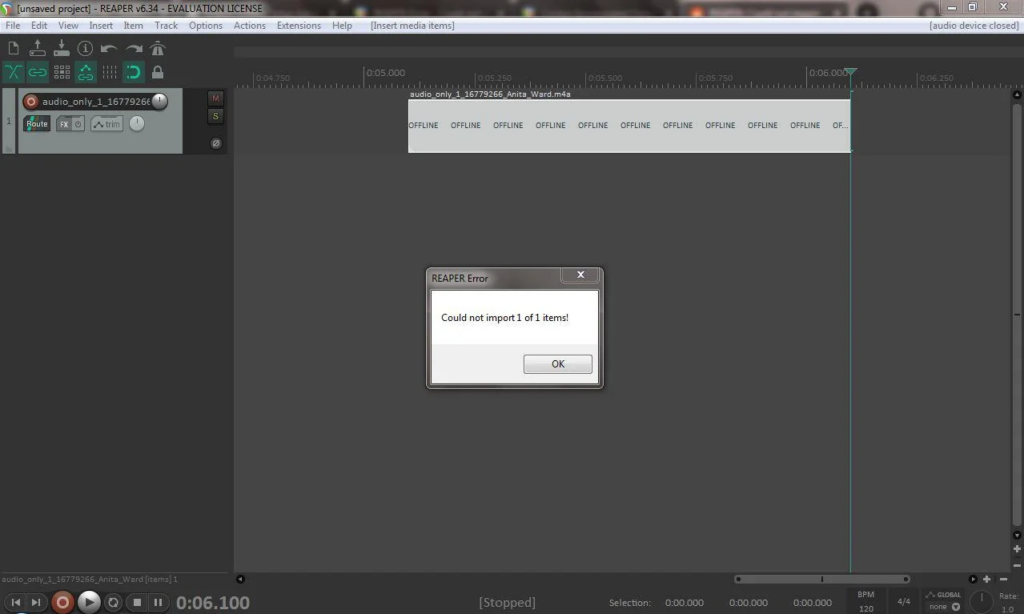
Now, it is very easy to edit, produce, transform, and customize audio using this all-in-one software. Moreover, it even allows you to import, resize, crossfade, resize, and overdub audio files. However, many users have recently reported facing a REAPER error on importing 1 of 1 item. There could be multiple reasons behind this, so here in this guide, we will outline some fixes to help you overcome this error.
5 Fixes to REAPER Could Not Import 1 of 1 Items Error
There could be multiple reasons behind facing an error related to importing 1 of 1 item. A corrupt file is the most prominent issue of the unsupported file type error, along with the incorrect file name and incomplete download file. But all of these issues are resolvable if taken care of accordingly. Read some of the fixes below and try importing files once again:
Fix 1. Troubleshooting and Importing an Acceptable File
So, facing “REAPER Error: Could not import 1 of 1 items!” requires some troubleshooting to fix the issue. The first issue could be that the file you are trying to import is corrupt or not saved properly. In such a case, reaching out to the source and extracting the file again could resolve the issue.
In fact, if you are collaborating with someone, you can ask them to email the file again and download it properly. Here, you can also use some of the best file repair software to fix the original file version. We have listed a few software below so that you can start fixing files easily.
Fix 2. Unsupported File Type
Another reason behind this error could be an unsupported file type. REAPER only supports specific types of file formats. The possible fix to this issue is to either get a supported file type or change your current file to the required file format.
For example, if you have recorded vocals or an audio interview using the Hollyland Lark M1 and imported the file on the new track of the Reaper. You can be assured of running the file smoothly on Reaper because the software supports WAV audio files, and all Hollyland microphones capture audio in the WAV audio format to ensure delivering Hi-Fi sound quality.

Wireless Lavalier Microphone with High-Quality Audio.
The whole point is that you should use devices to capture audio supporting the same format as the Repear. So you can easily import the track without facing errors like the 1-of-1 item. Moreover, to better understand supported file formats, you can check the list on their official website using this link.
Additionally, if your file format doesn’t fall in that category, you need some file converters to assist you in getting out of this trouble. Check the software and tools listed below and convert files easily:
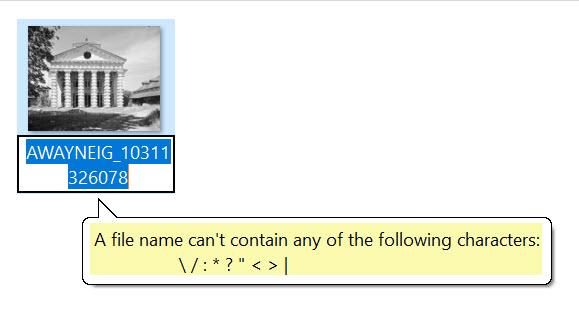
Fix 3. File Name Containing Accented Characters
The other possible reason could be that your file is saved with accented characters. These characters have diacritics appearing above them. To resolve this, you will need to change your file’s title to plain English alphabets, and you will be all set to import the file again without any REAPER error.
Fix 4. Enhance Your Audio File with VLC
Sometimes the audio files you are trying to import might not be supported in the media player on your device. So this makes it difficult for REAPER to select the audio directories as the output format. In such a case, explore your browser and download the VLC media player. This media player supports a wide range of audio formats and acts as the best tool to run audio.
Fix 5. Make Changes to the REAPER Resource Path
There might be some issues with the REAPER’s resource path, which can also be the case behind the audio file import error. However, there is a valid fix to get this issue resolved. For this, you will need to download some ffmpeg files via gyan.dev website.
Here, download the “Latest Release” under the “Release Builds” section and then extract those files to the REAPER resource path and try importing audio files again.

Frequently Asked Questions
1. Does REAPER have any limitations on the trial version?
No, there aren’t any limitations on the trial version, as REAPER offers full-fledged features to its users. However, if you face any limitations using the trial license, this could be due to not installing the software completely. Here, re-install the software entirely and try using the trial version again.
2. What file types are the easiest ones to import in REAPER?
The most common file types that show no import error are WAV and MP3. However, dozens of file options, such as audio, videos, music, image, and MIDI, can be easily imported. But among all of them, MP3 and WAV files only show an import error once and if they are fully corrupted.
3. How to change render to file settings to check if REAPER supports the new ffmpeg codex?
Checking whether REAPER supports the new ffmpeg codex is easy using the render settings. For this, access your device’s REAPER software and head to the “File” tab in the upper left corner. From the drop-down list, choose the “Render” option to open the render options menu.
There, hit the “Primary Output Format” tab and change the “Format” to “Video (ffmpeg/libav encounter)” to access further options. Next, change the “Format” below to “QT/MOV/MP4” and make sure that “Video Codec” is set to “H.264.” Afterward, hit the “Save Settings” button, re-open REAPER, and check importing files.
Conclusion
REAPER, as discussed, is the most productive software to handle all types of audio-related projects. Whether it is about producing, customizing, or overdubbing audio files, this tool always stands out as the best. So, if you are still facing any issues with file import, check out the five fixes mentioned in this guide. These fixes will quickly resolve your issues to help you manage audio projects easily.