A lavalier microphone, also known as a lapel microphone, is a small and discreet type of microphone that is typically worn by the user on their clothing.
It is commonly used in various settings such as presentations, interviews, video productions, public speaking engagements, and broadcasting.
The name “lavalier” originates from the French word “lavallière,” which refers to a pendant or necklace that hangs from a chain, like how a lavalier microphone is worn.
In this article, we will delve into the technical details of a lavalier microphone, its different types, and how to effectively use it for optimal audio capture.
What is a Lavalier Microphone?
A lavalier microphone, also known as a lapel microphone, is a small and inconspicuous type of microphone that is designed to be attached to the user’s clothing, usually near the collar or lapel, using a clip or pin.
It is typically connected to an audio recording device, such as a camera, smartphone, or audio recorder, via a cable or wireless transmitter, allowing for hands-free operation while capturing clear and natural audio.
How to Use Lavalier Microphone?
- Choose the Right Lavalier Microphone: Select a lavalier microphone that is compatible with your recording device and suits your recording environment. Consider factors such as the type of connector (TRS, TRRS, XLR, etc.), pickup pattern (omnidirectional, unidirectional, etc.), and any additional features such as built-in windshields or gain controls.
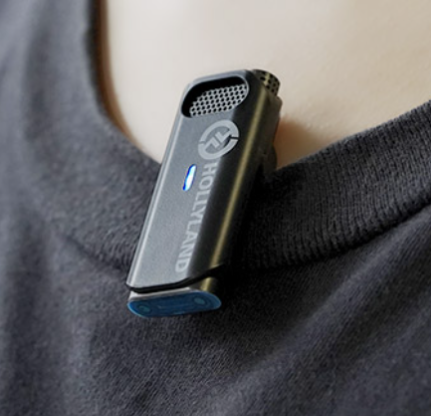
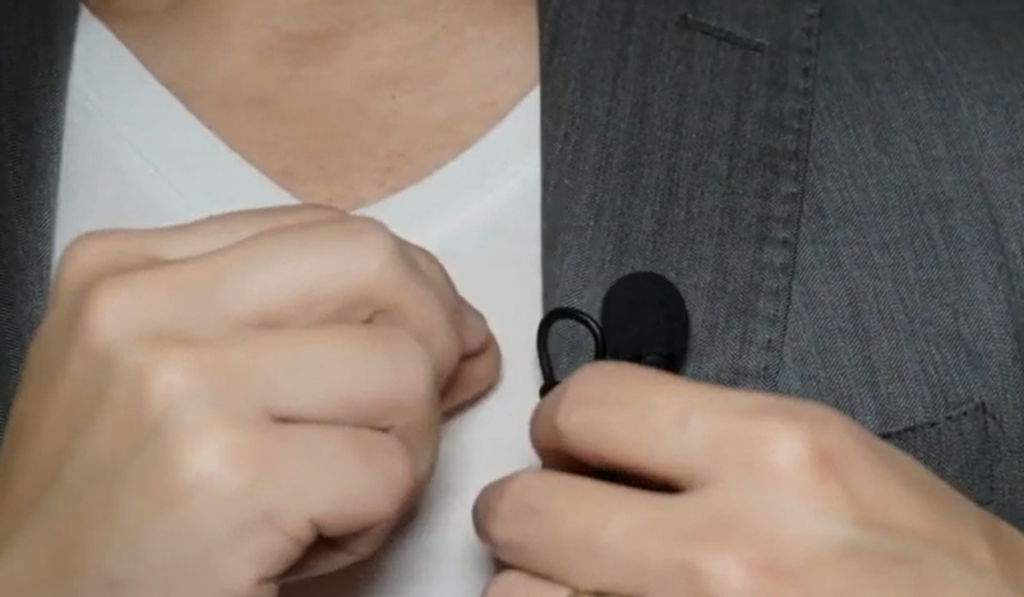
- Attach it to the User: Clip the lavalier microphone securely onto the user’s clothing, typically around the chest area, using the included clip or other means of attachment. Ensure that the microphone is positioned close to the mouth for optimal audio capture.
- Connect to a Device: Connect the lavalier microphone to the recording device using the appropriate cable or adaptor. This may involve plugging the microphone directly into the recording device’s input jack or using an adaptor for devices with different types of connectors.
- Check Audio Levels: Adjust the audio levels on the recording device to ensure that the audio from the lavalier microphone is clear and not too loud or too soft. It’s important to monitor the audio levels throughout the recording to ensure optimal quality.
- Minimize Handling Noise: Avoid unnecessary movement or rubbing of the microphone against clothing, as this can create handling noise that may affect the audio quality. Use additional clips or mounts to secure the microphone and minimize movement.
- Monitor Audio Quality: Keep an ear on the audio quality throughout the recording to ensure that the captured audio is clear, free of distortion or interference, and matches the desired sound levels.
- Consider Wind Noise: If recording outdoors or in windy conditions, consider using a windscreen or windshield over the lavalier microphone to minimize wind noise and maintain audio clarity.
- Follow Best Practices: Follow best practices for microphone usage, such as speaking clearly and facing the microphone, avoiding sudden movements, or rustling of clothing, and maintaining a consistent distance from the microphone for optimal audio quality.
- Review and Edit the Recorded Audio: After recording, review the recorded audio and edit as needed to ensure the best possible audio quality for your specific purpose.
How to Position a Lavalier Microphone?
- Choose the Right Side:
Consider the speaker’s dominant hand and the direction they will be facing during the recording. Attach the lavalier microphone to the side of the clothing that will provide the best audio capture without obstructing the speaker’s movements or causing discomfort.
- Place It Near the Mouth:
The ideal position for a lavalier microphone is about 6-8 inches below the speaker’s mouth, pointing towards the mouth. This placement ensures that the microphone captures the speaker’s voice clearly and minimizes background noise.
Avoid placing the microphone too close to the mouth, as it may cause plosive sounds (pops) or distortions.
- Use a microphone clip or pin:
Attach the lavalier microphone securely to the clothing using a microphone clip or pin. Ensure that it is positioned firmly and securely, but not too tightly, to prevent any unwanted movement or noise during recording.
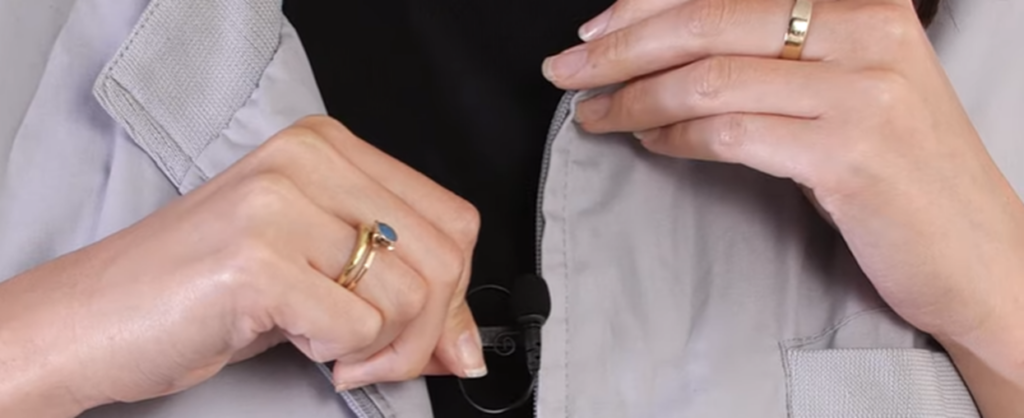
- Hide the cable:
If using a wired lavalier microphone, route the cable discreetly along the clothing, preferably on the inside, and tuck it behind buttons or under the clothing to keep it out of sight. This prevents the cable from rubbing against clothing or creating unwanted noise during recording.
- Use a windscreen:
If recording outdoors or in a windy environment, consider using a windscreen or windshield on the lavalier microphone. This helps reduce wind noise and improves audio quality by preventing wind from directly hitting the microphone capsule.
- Check audio levels:
Once the lavalier microphone is attached, check the audio levels on the recording device to ensure that the audio is being captured at an appropriate level without distortion or clipping. Adjust the gain settings on the recording device or the lavalier microphone, if necessary, to achieve optimal audio levels without any distortion.
- Test audio quality:
Before starting the actual recording, conduct a test recording and listen to the audio to ensure that the lavalier microphone is capturing the speaker’s voice clearly and without any unwanted noise or distortion.
How to Connect a Lavalier Microphone to a Recording Device?
Connecting a lavalier microphone to a recording device can vary depending on the type of device you are using.
Here are some specific instructions for connecting a lavalier microphone to different types of recording devices:
- Computers and Mobile Devices:
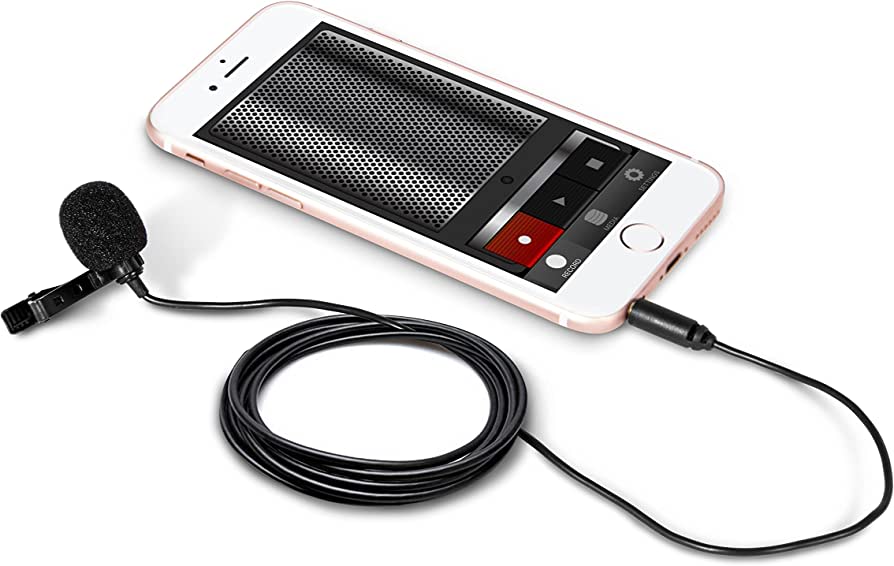
For devices with a 3.5mm TRRS (Tip-Ring-Ring-Sleeve) jack, simply plug the lavalier microphone’s TRRS connector into the jack.
For devices with separate microphone and headphone jacks, use a TRRS to dual TRS (Tip-Ring-Sleeve) adaptor. Plug the lavalier microphone’s TRRS connector into the adaptor, then plug the adaptor into the separate microphone and headphone jacks on your device.
- Cameras:
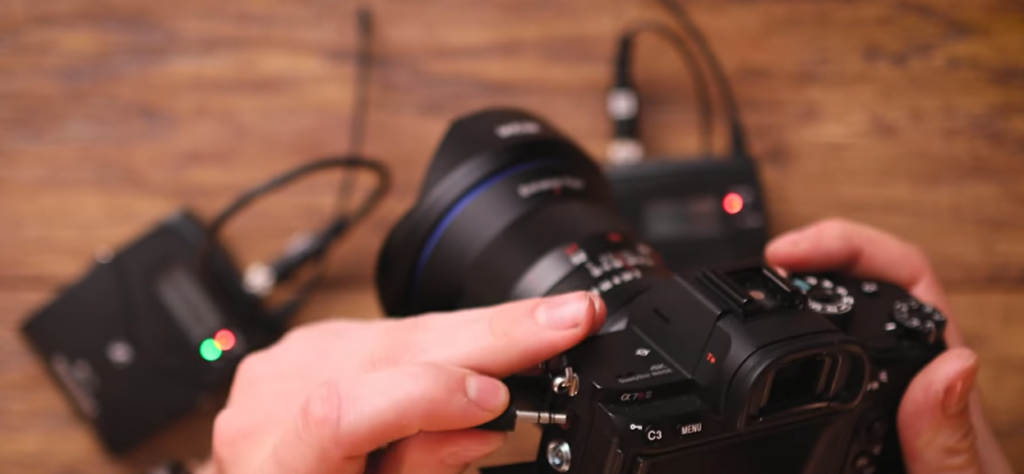
For cameras with a 3.5mm TRS jack, plug the lavalier microphone’s TRS connector into the jack.
For cameras with XLR inputs, use an XLR to TRS or XLR to TRRS adaptor. Connect the XLR end of the adaptor to the lavalier microphone, then connect the TRS or TRRS end of the adaptor to the camera’s XLR input.
- Going Wireless:
If using a wireless lavalier microphone system, follow the manufacturer’s instructions to pair the microphone with the receiver and connect the receiver to your recording device. This may involve using a TRS or XLR cable to connect the receiver to the recording device, or using a wireless transmitter that connects directly to the recording device.
- Using TRRS to TRS Adaptors:
Some lavalier microphones come with a TRRS connector, designed for mobile devices but may not be compatible with all recording devices. In such cases, use a TRRS to TRS adaptor. Plug the lavalier microphone’s TRRS connector into the adaptor, then plug the adaptor’s TRS connector into the recording device’s input jack.
What are The Uses of Lavalier Microphones?
- Lavalier microphones are commonly used in broadcasting and journalism for interviews, live reporting, news segments, and other on-camera situations where the presenter needs to move freely while maintaining high-quality audio.
- Lavalier microphones are widely used in video production, including filmmaking, documentary production, vlogging, and YouTube videos, to capture clear and professional audio for dialogues, voiceovers, and narration.
- These microphones are popular for presentations and public speaking engagements, allowing the speaker to move around the stage or podium while maintaining clear audio for the audience.
- They are commonly used in events and performances such as conferences, panel discussions, lectures, speeches, theatrical productions, and musical performances to ensure that the audio is captured clearly from the presenters or performers, even when they are moving or performing on stage.
- They are also popular for the voiceover recording, and other audio recording scenarios where a hands-free and unobtrusive microphone option is desired.
- Lavalier microphones are used among fitness instructors, coaches, and presenters for fitness classes, sports demonstrations, and instructional videos as well, allowing them to move freely while maintaining clear audio for their instructions.
- They professionally used for corporate settings for presentations, training sessions, and workshops, allowing the presenter to move and interact with the audience while delivering clear audio.
- Lavalier microphones are often used in worship services and religious events for capturing clear audio from the clergy, speakers, or performers, enabling them to move around and interact with the congregation.
Pros and Cons of Lavalier Microphones
Pros
- Hands-Free Operation
- Discreetness
- Omnidirectional Pickup
- Mobility
Cons
- Limited Sound Quality
- Placement Challenges
- Limited Range
Final Words
In conclusion, lavalier microphones are small, clip-on microphones that offer versatility and convenience for capturing clear audio in various professional settings.
They are widely used in broadcasting, journalism, video production, presentations, events, podcasting, fitness instruction, corporate training, worship services, and more.
While they have limitations such as potential background noise and sensitivity to clothing rustling, lavalier microphones are preferred for their hands-free design and ability to deliver professional audio quality.
When used appropriately, lavalier microphones can be a valuable tool for capturing clear audio on the go.
Frequently Asked Questions
Q: How do I properly position a lavalier microphone?
It should be clipped to the clothing of the speaker or performer, preferably near the mouth or chest area, and positioned away from clothing rustling or other potential sources of noise. Experimenting with different positions and angles may be necessary to achieve the best results.
Q: Can I connect a lavalier microphone to my smartphone for recording?
Many lavalier microphones are designed to be compatible with smartphones and tablets, especially those with a TRRS (tip-ring-ring-sleeve) connector. However, you may need to use a TRRS to TRS (tip-ring-sleeve) adapter if your device has a TRS input. Also, some devices may require external power or an additional app to enable recording with an external microphone.
Q: Can I use a lavalier microphone wirelessly?
Many lavalier microphones come in wireless configurations, where the microphone is connected to a transmitter and the audio is transmitted wirelessly to a receiver, which can be connected to a recording device or sound system. Wireless lavalier microphones provide greater freedom of movement for the speaker or performer, but they may require additional setup and management of radio frequencies.
Q: How can I minimize background noise for a lavalier microphone?
Background noise can be minimized by selecting a lavalier microphone with good noise-cancelling or directional characteristics. Additionally, proper positioning of the microphone away from potential noise sources and using windshields or pop filters can help reduce background noise.
Q: Can I use a lavalier microphone for recording instruments?
While lavalier microphones are primarily designed for capturing speech and vocal performances, they may not be suitable for recording instruments or other sound sources due to their limited frequency response and sensitivity.
Q: How do I care for and maintain my lavalier microphone?
Proper care and maintenance of your lavalier microphone can ensure its longevity and optimal performance. This may include cleaning the microphone element, connector, and cable regularly, avoiding rough handling or pulling on the cable, and storing the microphone in a safe and dry environment when not in use.