.png)
.png) Français
Français .png) Deutsch
Deutsch .png) Italiano
Italiano .png) 日本語
日本語 .png) Português
Português  Español
 The microphone present in your mobile may stop working after getting clogged with dust or dirt. It is also possible that conflicting apps or outdated software can cause malfunctions in your mic. All these problems are solvable with simple tips and tricks to get your microphone to start working again. Here, we will introduce various methods to help you solve mic-related issues and begin recording audio content again.
Method 1. Check Microphone Hardware
You can start the diagnosis by checking the microphone hardware for clogging or damage. Upon identifying the issue, you can apply the suggested remedies to get a perfectly working mic. Go through the following section to learn about the hardware you need to check for mic-related issues:
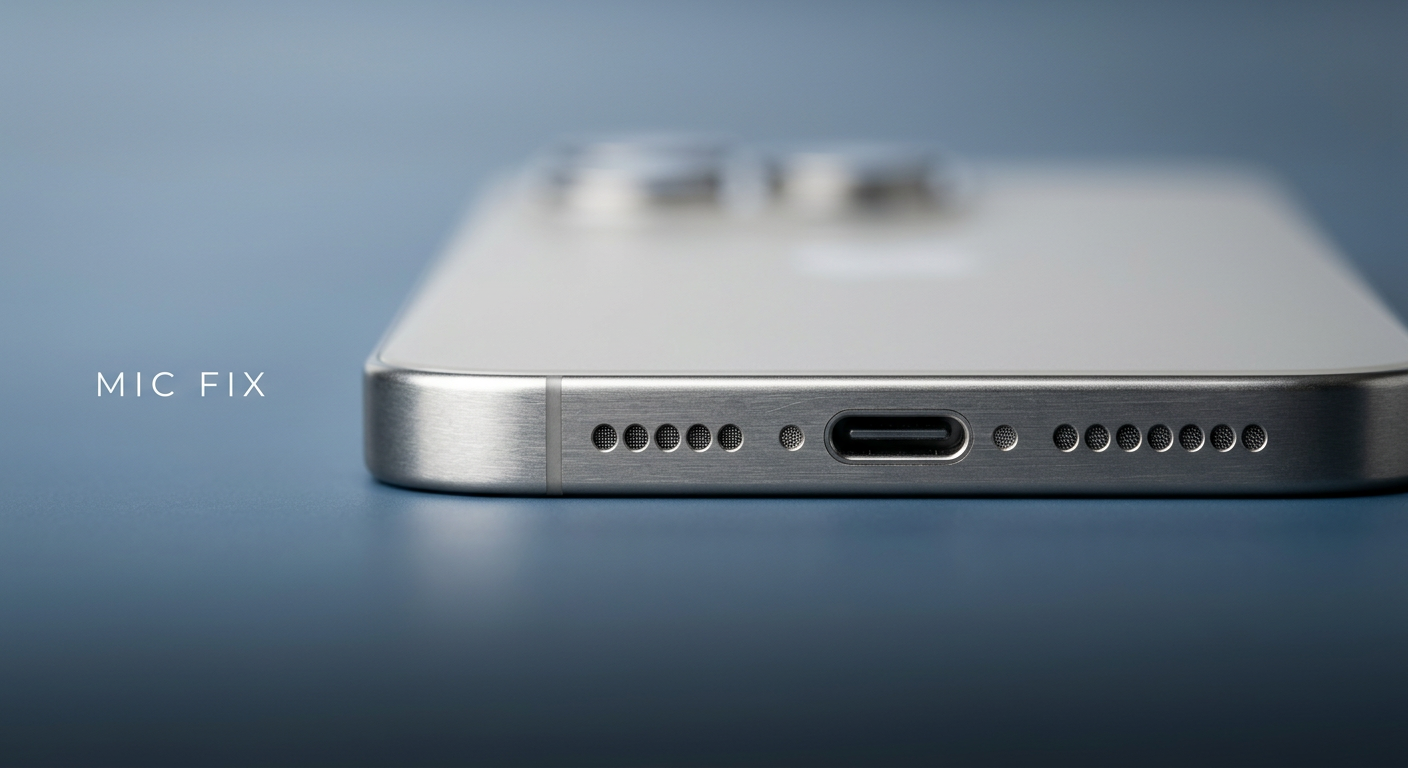
- Physical Damage: Mobile users should carefully inspect every corner of their device for any sign of physical damage. Even the slightest knock can potentially affect your microphone’s functionality. In addition to that, you need to look for any liquid or waterdrop marks, as they have the chance to make your mic stop working.
- Dirt and Debris: It is also possible that your mic hole will get blocked with outside dust particles. After diagnosing this issue, gently clean the clogged area with a small soft brush. Other than that, you can also use compressed air for cleaning purposes.
- Headphone Jack: Sometimes, dust particles in your phone’s headphone jack can trick the system into thinking headphones are plugged in. As a result, your phone microphone will get disabled due to this confusion. Therefore, users must keep their headphone jacks clean to avoid this mic-related problem.
By the way, you can also connect an external microphone to check it. Hollyland Lark M1 is a good choice, here are steps to test:
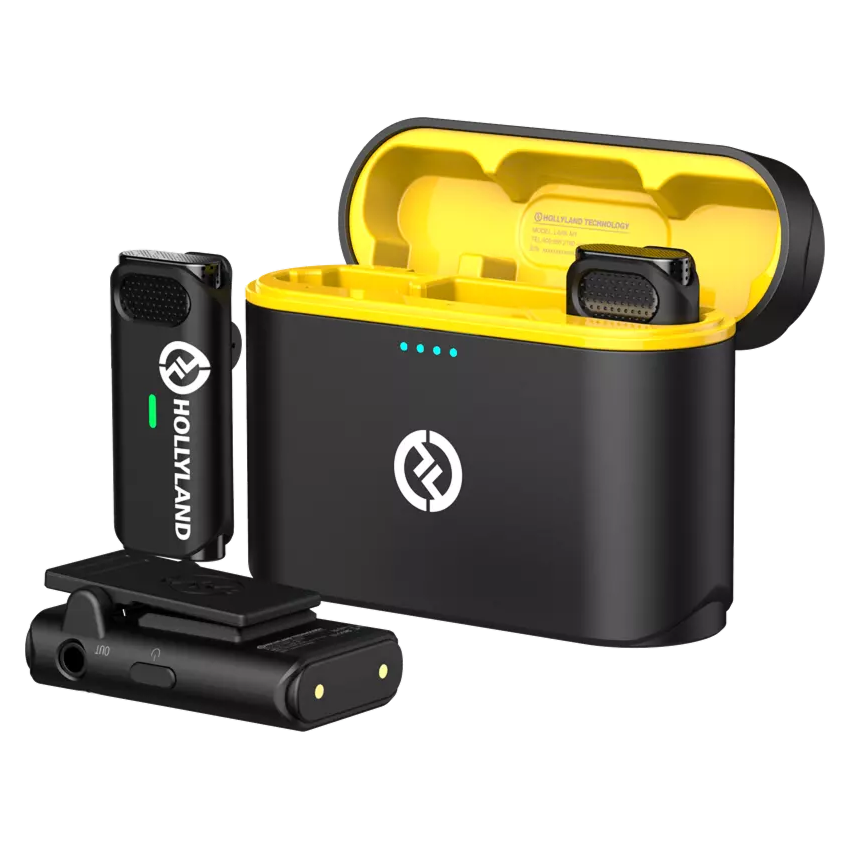
Hollyland LARK M1 - Tiny Wireless Microphone
A lightweight and user-friendly wireless microphone with one-click noise cancellation.
Key Features: Hi-Fi Sound Quality | Tiny & Light Design | Plug and Play
Certainly! Here are the simple steps to test your Android or iPhone microphone using the Hollyland Lark M1 microphone:
For Android:
- Charge the Lark M1 transmitters and receiver.
- Connect the receiver (RX) to your Android phone:
- If your phone has a 3.5mm TRRS port, use the 3.5mm TRRS to 3.5mm TRS cable.
- If your phone has a USB-C port, use the USB-C to TRS cable.
- Turn on the transmitters and receiver.
- Clip the transmitter to your clothing near your mouth for the best audio pickup.
- Adjust the volume on the side of the receiver to the right level (1-3 levels).
- Record a video or audio clip using your phone’s camera or voice recorder app to test the microphone quality.
For iPhone:
- Charge the Lark M1 transmitters and receiver.
- Connect the receiver (RX) to your iPhone:
- Use the Lightning to TRS cable.
- Turn on the transmitters and receiver.
- Clip the transmitter to your clothing near your mouth for the best audio pickup.
- Adjust the volume on the side of the receiver to the right level (1-3 levels).
- Record a video or audio clip using your iPhone’s camera or voice recorder app to test the microphone quality.
Make sure to check the audio quality of the recording to ensure the microphone is functioning properly. If you encounter any issues, refer to the user manual or contact Hollyland support for assistance. Enjoy your recording!
Method 2: Resolve Software-Related Issues
When your hardware has no issues, it is time to rectify the software-related problems. For this purpose, you can apply the following methods to get your microphone to start recording audio.
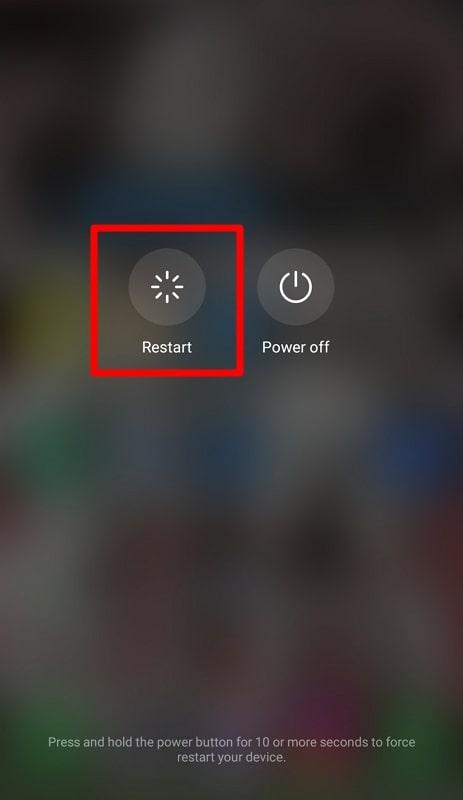
1. Restart Your Phone
You can get rid of temporary software glitches, including microphone issues, by simply restarting the phone. However, the steps to undertake this procedure may vary a bit based on the model of your device. Follow these general steps to restart your phone to get the microphone running.
Instructions: First and foremost, press the “Power” button on the right side of your mobile to access the power screen. On this screen, you need to tap the “Restart” button to complete this operation successfully.
2. Check Microphone Permissions
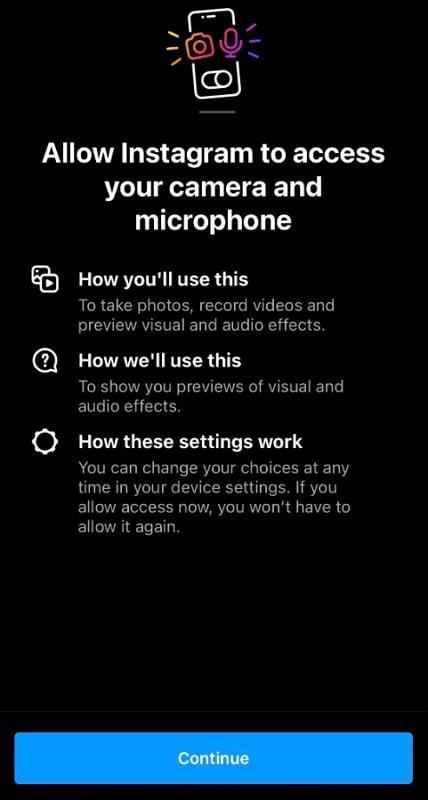
While using the microphone on a particular app, you first need to allow the app to access the mic. For this purpose, you can access the permission settings using the following steps.
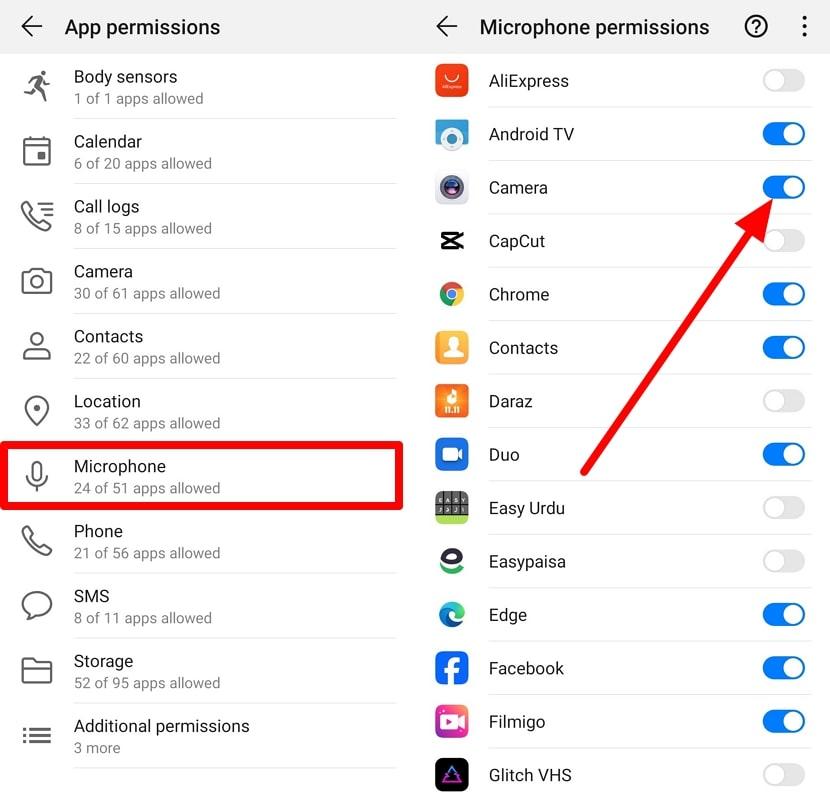
Step 1. To start the process, access “Apps” from the “Settings” application to reveal a set of app management options. From here, you need to tap on the “Permissions” option to explore several in-app permissions.
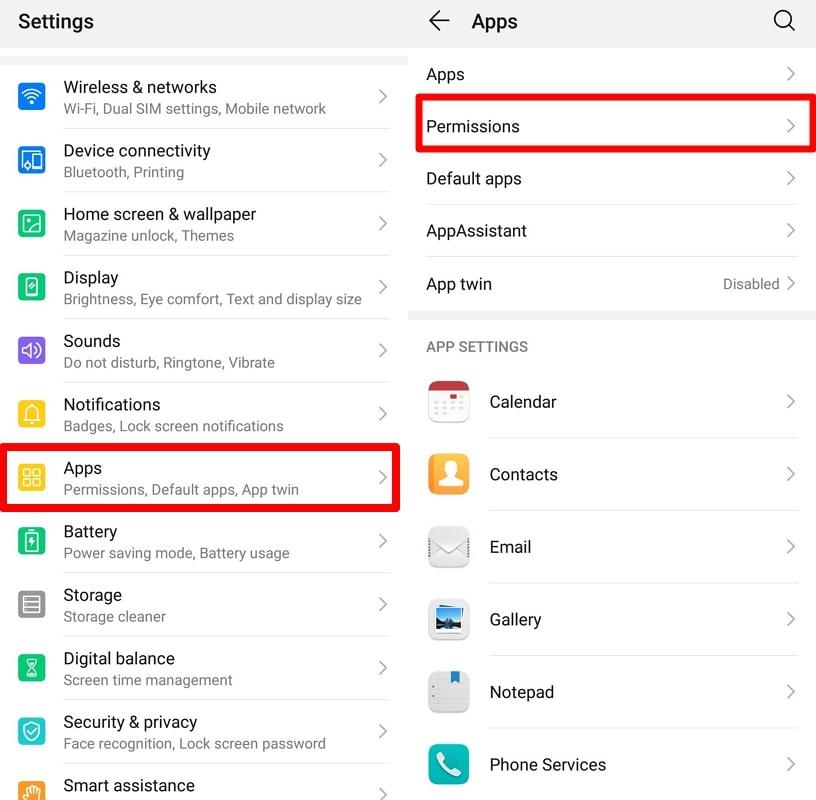
Step 2. Now, choose the “Microphone” option to move forward and enter the mic permissions settings on your mobile. Finally, enable the toggle in front of the application from which you want to access the microphone to finish the process.
3. Update Your Phone
Users will also be able to solve software problems related to microphones with a simple upgrade of the Android version. You need to check if the phone is working on older versions and perform these simple steps to upgrade the device to avoid incompatibility issues.
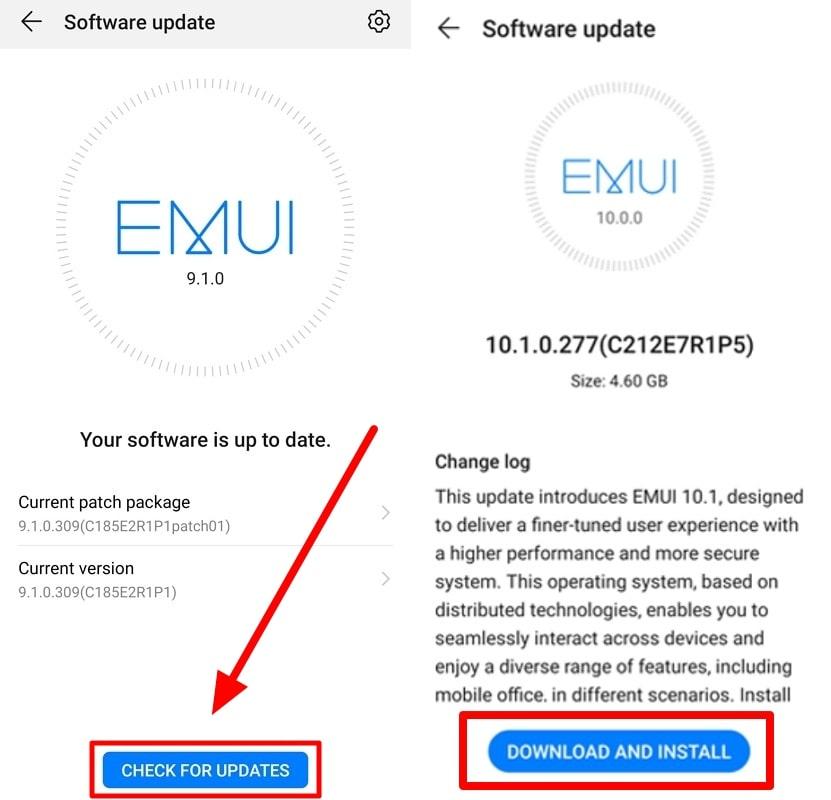
Step 1. Upon opening the “Settings” application, hit the “System” button to reveal new system settings. After accessing the System settings, choose the “Software Update” option to proceed.
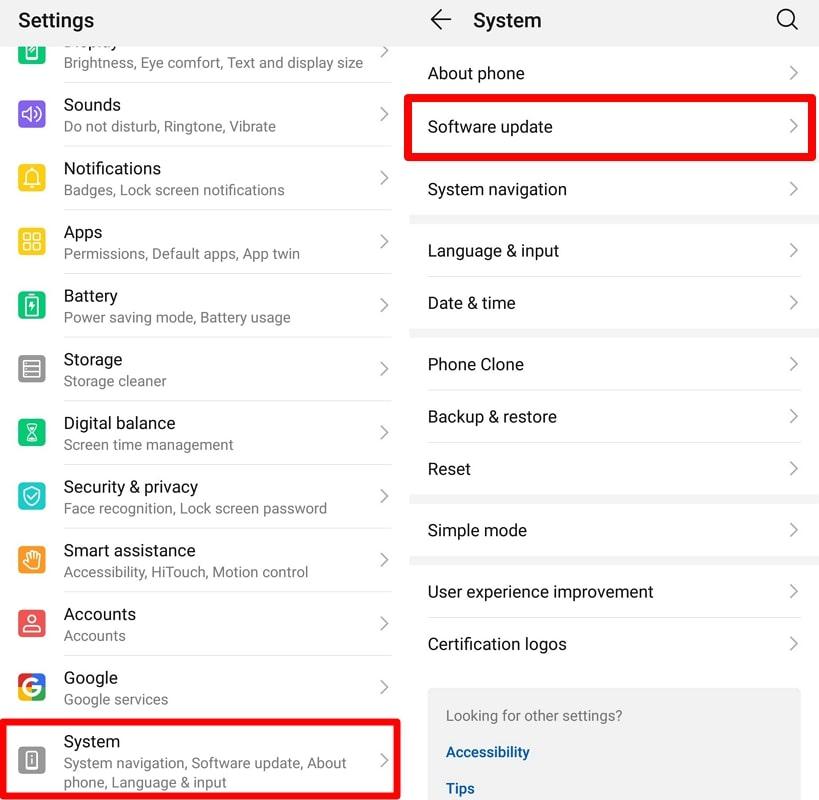
Step 2. Following this, tap on the “Check for Updates” button to let the system identify any software update that is available. Once the check is completed, press the “Download and Install” button to get your phone updated.
Method 3. Identify App-Specific Troubles
Sometimes, the underlying problem may be with the application, causing the microphone to misbehave. You can resolve the app-related issues by applying the following methods.
- App Issues: Microphone problems can arise due to the outdated version of the apps you are using. There may be bugs present in the applications that are causing the microphone to misbehave. In this case, you have to update the application from the Google Play Store to avoid any issues because of the application version.
- App-Specific Settings: Some applications require you to permit the use of a microphone from within the app. Therefore, users need to double-check the app they are having trouble with to ensure the microphone isn’t disabled within the app itself.
- Conflicting Apps: In rare cases, third-party apps can clash with the microphone settings to cause the problem. If the issue has started after installing a new app, try uninstalling it to see if that fixes the microphone.
Method 4. Check for Conflicting Apps
When you are confused about the conflicting apps causing mic issues, we recommend rebooting the device in safe mode to see if the problem persists. After restarting the mobile in this mode, all the third-party applications will be disabled automatically. Now, you can check the performance of the microphone in the absence of applications. Anyone can undertake this process by following the steps explained below:
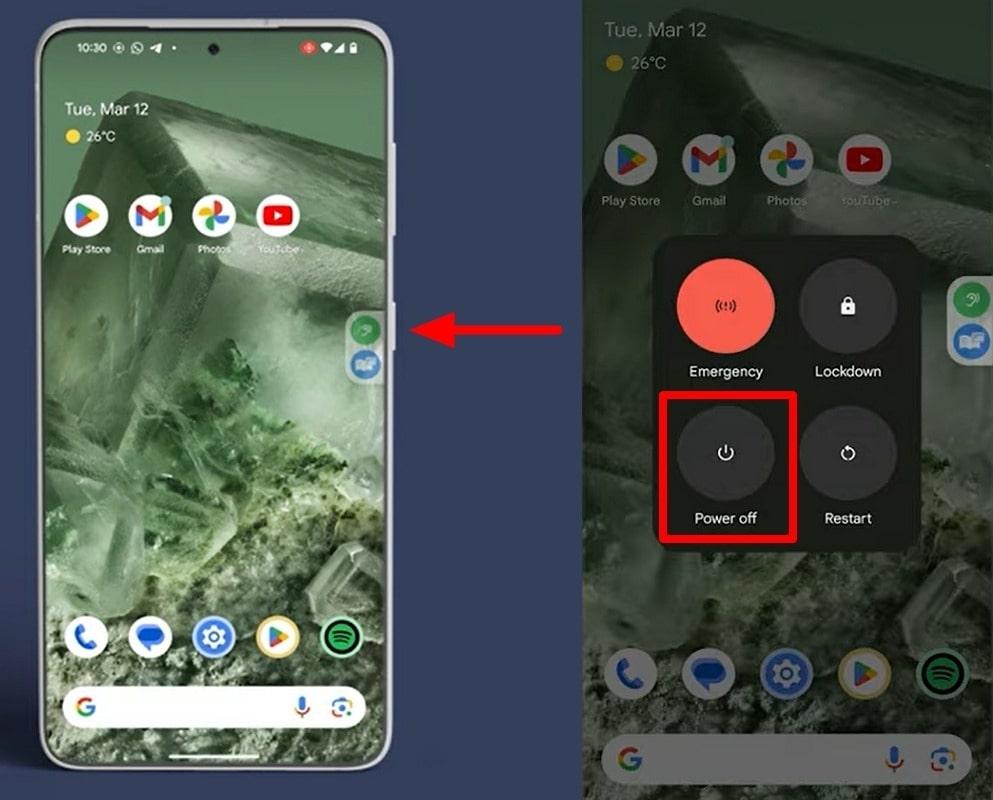
Step 1. Begin the process by pressing and holding the “Power” button to access the power screen. On this new screen, press and hold the “Power Off” button for a few seconds until a safe mode message appears on your screen.
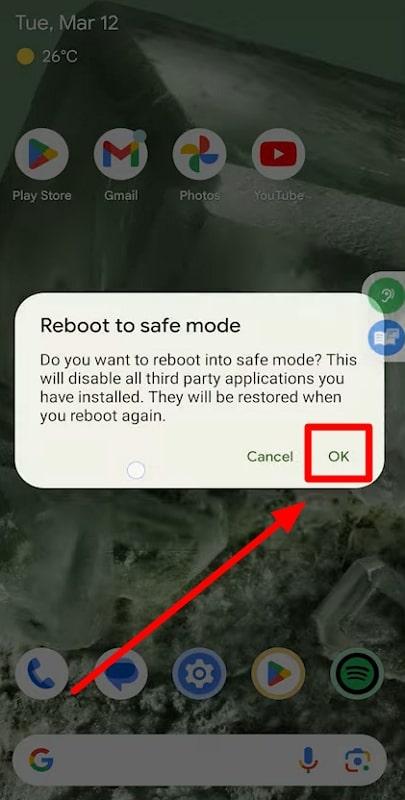
Step 2. Upon accessing the “Reboot to Safe Mode” confirmation message, tap on the “OK” button to restart your mobile in safe mode.
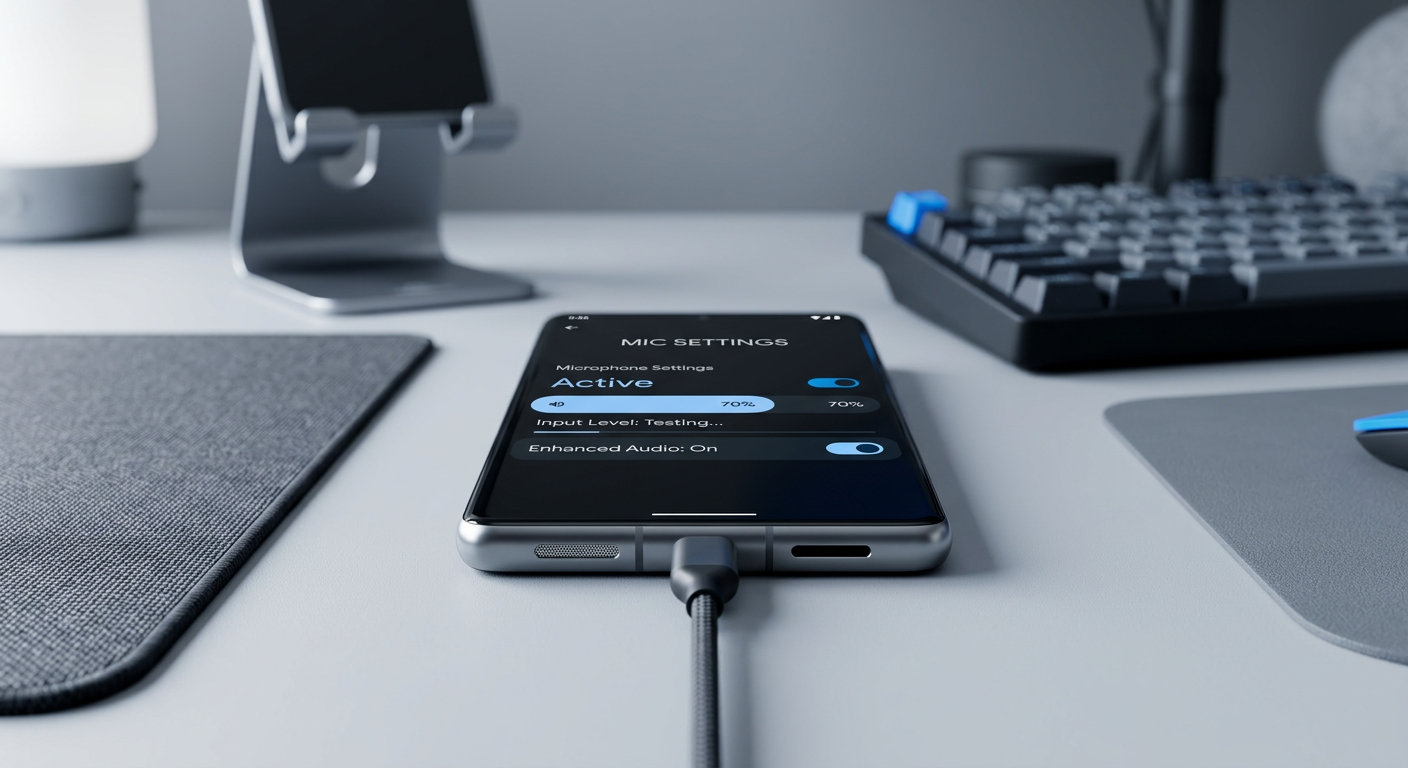
Method 5. Test the Microphone
Content creators need to test their mics from time to time to avoid any sudden microphone dysfunction. For this purpose, they can adopt a variety of ways to check if their mic is working properly or not. So, go through the testing methods explained below to identify any issues related to the functionality of the phone mic.
1. Utilize Voice Recorder
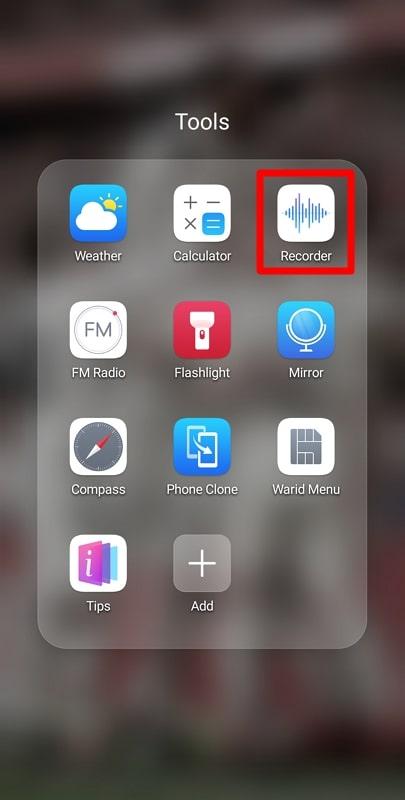
Every mobile has a built-in voice recording application to let users test their microphone and record audio. You can find this application in the “Tools” folder of your Android device, along with other utility apps. So, follow the instructions given below to record your voice using the Voice Recorder present on your mobile.
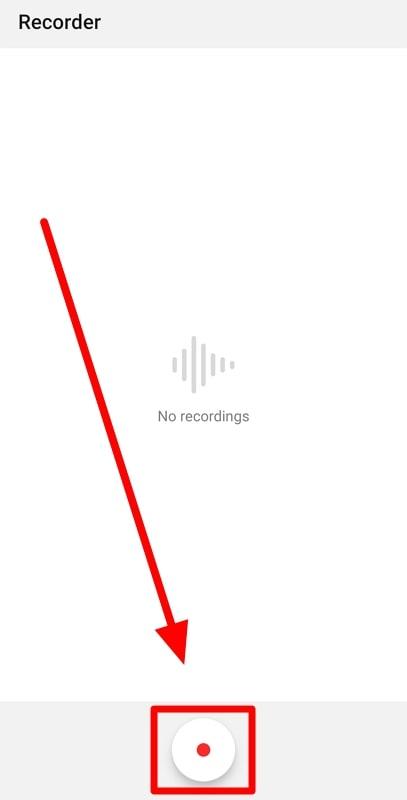
Step 1. To start the process, you need to locate the “Tools” folder on your device to get access to different utility apps present in it. Now, tap the “Recorder” app to enter this voice-capturing tool to test your microphone.
Step 2. Upon entering this application, press the “Record” circle button present at the bottom of your screen and start speaking close to the mic.
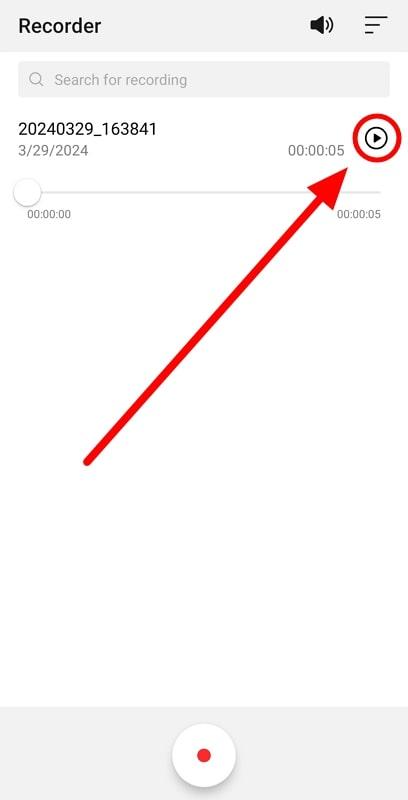
Step 3. Now, stop the recording after a few seconds and tap the “Play” button to hear if the microphone has done its job successfully.
2. Run Diagnostic Tests
There are several ways you can try to diagnose any issue with the mobile microphone. For this purpose, you can utilize built-in diagnostic tools on your device. In addition to that, you can seek help from user manuals to diagnose the specific problem in your mobile, including microphone issues. Using these simple instructions, you will be able to check if there are any issues with the functionality of your mic.
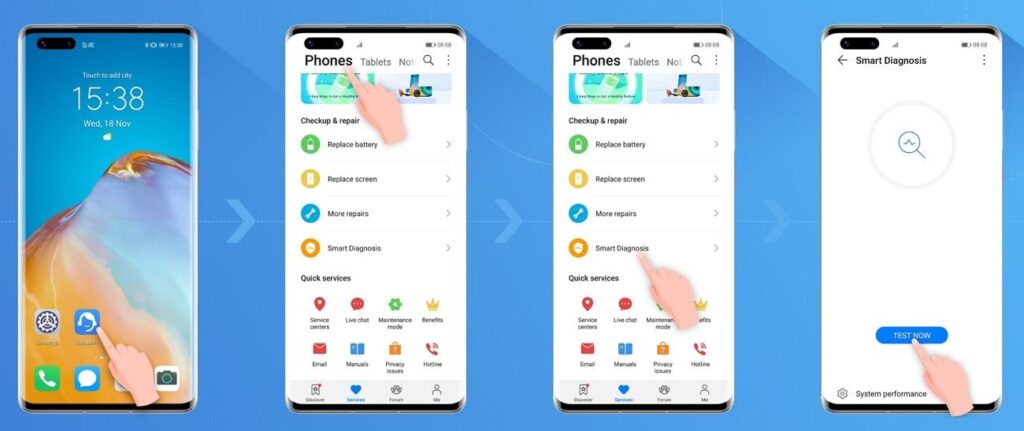
Instructions: Start the process by accessing the “Support” application on your device and switching to the “Phones” tab. Now, hit the “Smart Diagnosis” option to access a new screen from where you have to press the “Test Now” button to run a diagnostic test for mic-related issues.
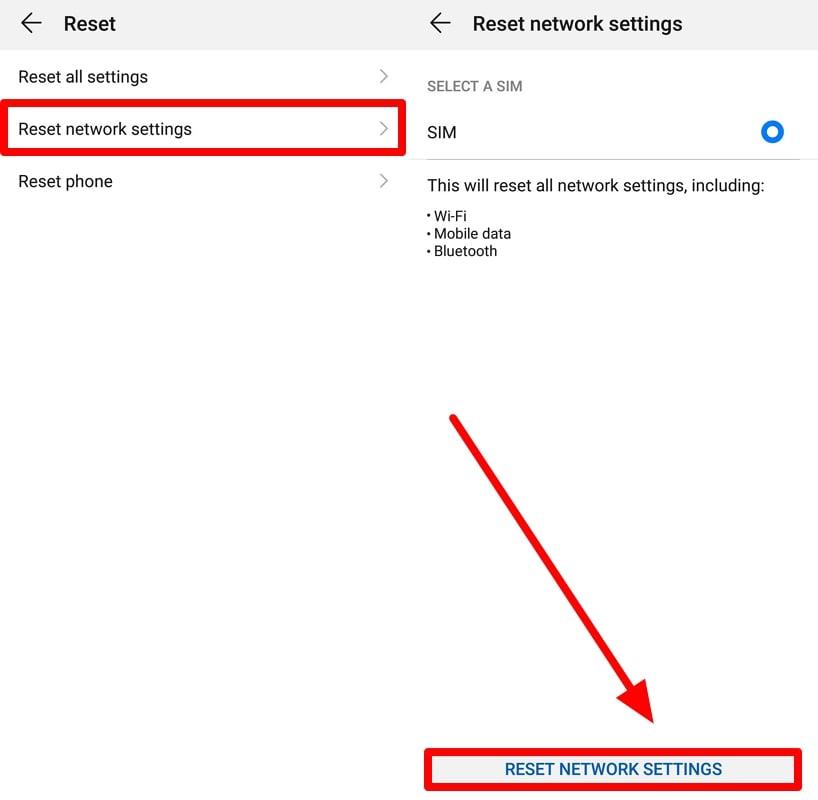
Method 6. Reset Network Settings
When the applications having microphone issues are network-based, you should try resetting network settings to see if the problem gets resolved. By doing so, you can erase all the previously saved Bluetooth, Wi-Fi, and other such settings. Take guidance from the steps explained below to rectify mic issues in the network-based apps.
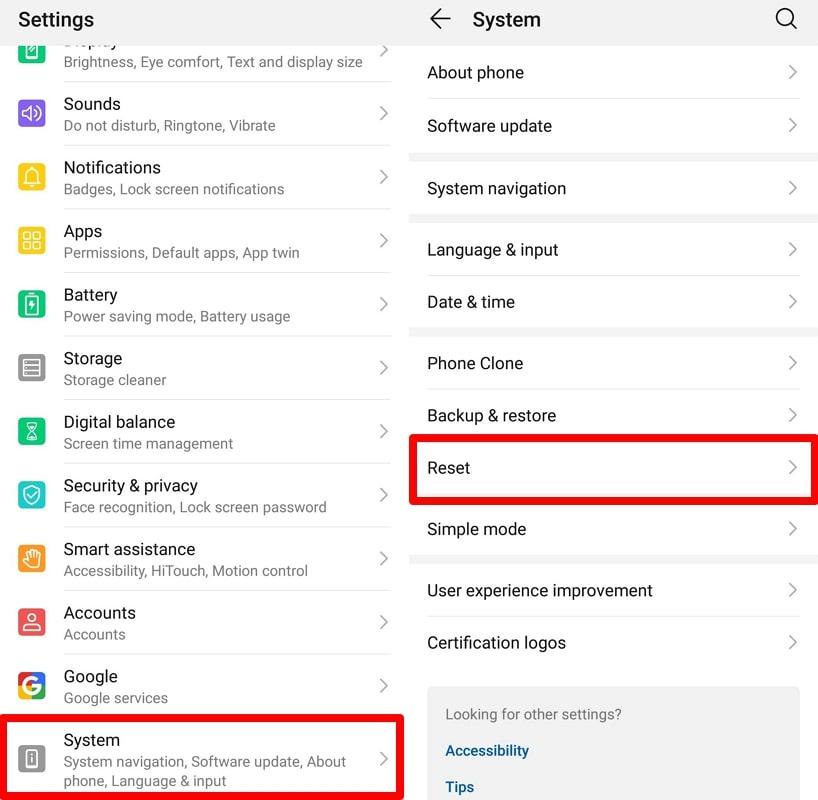
Step 1. After accessing the “Settings” application, scroll down to open the “Systems” settings to reset. Then, tap on the “Reset” button to access three different reset options for moving forward.
Step 2. From here, choose the “Reset Network Settings” option to reach a confirmation screen. After reading the instructions, hit the “RESET NETWORK SETTINGS” button to complete this process.
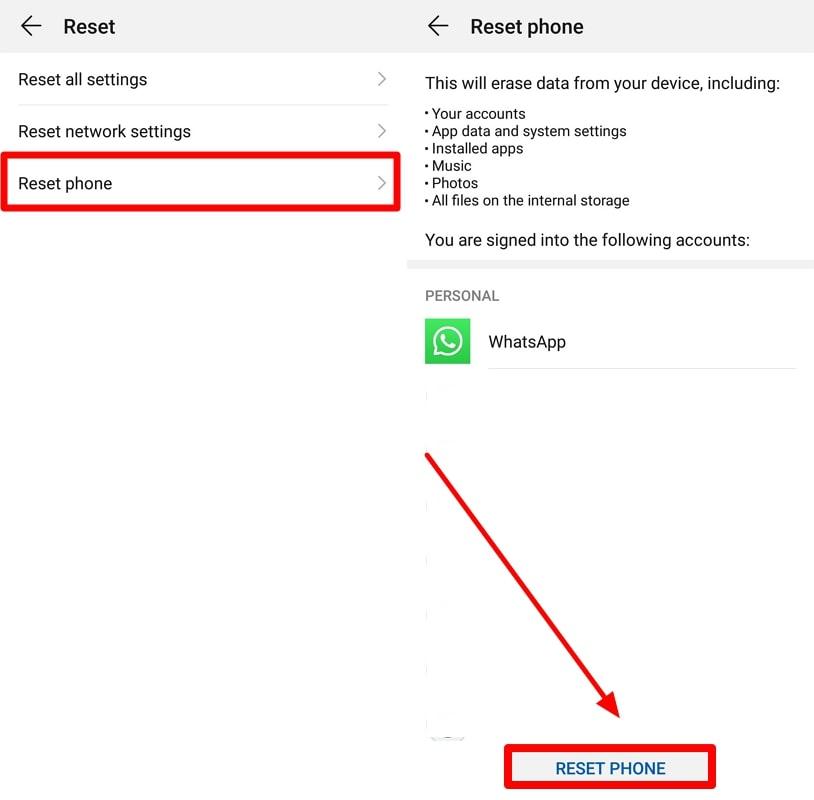
Method 7. Perform Factory Reset
After failing to get the results from all the above-explained methods, the ultimate solution will be to factory reset the phone. While performing this process, all your data will get removed from the device, so back up the data. Once all your data is backed up, perform the steps given below to resolve your mic-related problems.
Step 1. Within the “Settings” application, access the “Systems” settings of your Android device. Now, a new screen will appear from where you have to choose the “Reset” button to access factory reset settings.

Step 2. On this new window, tap on the “Reset Phone” button to enter the relevant settings. Finally, press the “RESET PHONE” option on the confirmation screen to perform this factory data reset to solve mic issues.
Method 8. Seek Professional Help
When none of the software solutions work, the issue will most likely be hardware-related. In this case, you need to contact phone manufacturers or a certified repair center to get your mobile phone repaired. After getting your mobile fixed, check for any pre-existing faults before getting the phone back from the repairer.
FAQs Related to Microphone Issues on Phones
Q1. How can I clean my phone’s microphone?
There are several different methods you can apply to clean the microphone present on your mobile device. Users can clean their mic using soft brushes or air compressors to take out any dirt stuck in the phone. In addition to that, they can use sticky putty and toothpicks to dig out the debris.
Q2. Can a software update fix my microphone problem?
Yes, it has the potential to fix your mic when the issue is related to your phone’s software. Simply updating the software version of your mobile will most likely fix any issue with your mic.
Q3. How do I know if my phone’s microphone is physically damaged?
Start by checking any mark of damage around the microphone area to assess if your phone has taken a hit. Other than that, you should check for debris and dirt gathered into the microphone port to rule out any physical obstruction to microphone functionality. After clearing up all these doubts, test your mic by recording a video or audio to check if it is working properly.
Q4. What should I do if only one app can’t access my microphone?
If you fail to access your microphone on one application, try to check the permission settings for the microphone. Upon entering the mic permission settings, allow this app to use the microphone to resolve this issue.
Q5. How can I test my phone’s microphone functionality?
You can apply several ways to check the working of your mic, including phone calls and video recordings. However, the best way to test this functionality is to open the built-in voice recorder on your mobile and start recording your voice. Finally, you can play the recorded voice to check if the output is perfect without any distortion.
Q6. Will a factory reset definitely fix my microphone issue?
Yes, there is a strong possibility that factory resetting your microphone will fix the software-related mic issues. However, if the problem is with the microphone’s hardware, you have to send the phone to a certified repairer to resolve this problem.
Q7. How do I boot my phone into Safe Mode?
As we know, rebooting your phone into Safe Mode can help you detect mic issues due to third-party apps. To perform this reboot, you have to long-press the “Power” button and then hold the “Power Off” option until the confirmation of safe rebooting mobile appears on your screen.
Q8. What are the signs that my microphone issue is caused by a third-party app?
When your mic issue starts after installing a new app, the problem is most likely caused by a third-party application. Moreover, situations where the mic is working on some apps and not in others may show that the problem is due to the app.
Q9. Can water damage affect my phone’s microphone?
It is highly possible that even a drop of water can affect the functionality of your phone mic. Nowadays, you will see that most mobile devices claim to be water-resistant. However, there are still chances that water drops or other liquids can damage your microphone.
Q10. Can I replace my phone’s microphone if it’s not working?
Individuals with experience as mobile repairers can replace their microphones by themselves. However, there is always an option available to contact phone manufacturers or certified technicians for microphone repairs.
Conclusion
Throughout the article, we have discussed different ways to help you facilitate the workings of your mobile microphone. Any of these methods can assist you in repairing the mic for proper functioning. However, if the problem persists, contact mobile manufacturers or professional repairers to resolve your issues.