.png)
Connecting a microphone to your Windows or Mac computer is an easy process until you experience technical difficulties. But have you ever thought about why the issues exist when most mics claim to have a plug-and-play functionality? They are supposed to be working right after you plug them into the PC. Wait! That may be the right information but it is an incomplete one. Microphones come in various types and connectors, which may require adding additional equipment to make them work.
So, in this article, you will learn how to connect a microphone to a computer in seven different steps. You will explore the microphone types based on their connectors, setup, and audio settings to ensure you enjoy optimal performance of the mic on your system.
7 Steps to Connect a Microphone to a Computer
Here’s the comprehensive guide to connect your microphone to your Windows or Mac computers.
1. Know Your Microphone Type
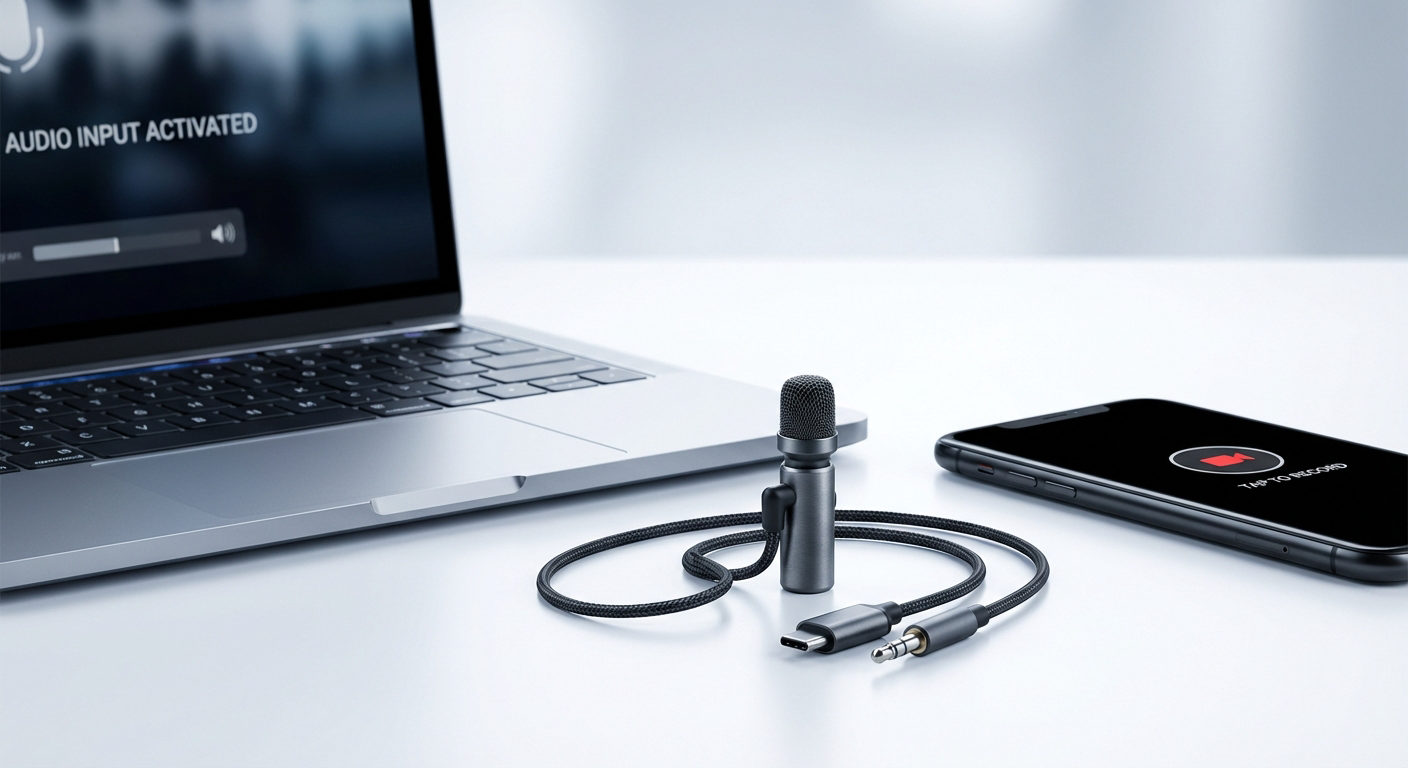
Microphones have different types of connectivity. A wired microphone may have a USB, XLR, or 3.5mm connector that connects to your PC. If you have a wireless microphone like the Hollyland Lark M2, it comes equipped with versatile connectivity options, such as USB and 3.5mm on the receiver (RX) unit that connects to your computer’s USB or 3.5mm mic port.

Hollyland LARK M2 - Mini Lavalier Microphone
An incredibly lightweight and compact wireless button microphone that captures high-fidelity audio.
Key Features: 9g Button Size | 48 kHz/24-bit | 40 Hours Battery
Let’s learn about each type of microphone in a little more detail.
a. USB Microphones
USB microphones have been in the limelight for many years. They are suitable devices made to capture audio. Like most microphones, these mics don’t have any built-in system for playback, and their simplicity lies in the capability to solely record sound by connecting them to your computer. This connectivity allows for various placement possibilities, permitting you to keep them on a table or a computer desk without additional equipment.
b. XLR Microphones
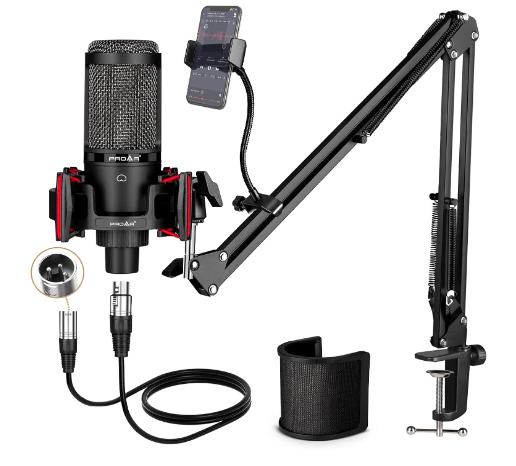
XLR mics are usually professional-grade devices that capture high-quality audio, making them a common microphone type in broadcasting, live events, and studios. They differ from USB and 3.5mm microphones because the larger XLR connector provides improved and reliable audio.
So, if you want to connect a microphone to a computer, you need an audio mixer or an audio interface. These two devices work as a bridge between your PC and microphone and make a successful connection by converting the microphone’s analog audio signals into digital signals that a computer can comprehend.
c. 3.5mm Microphones
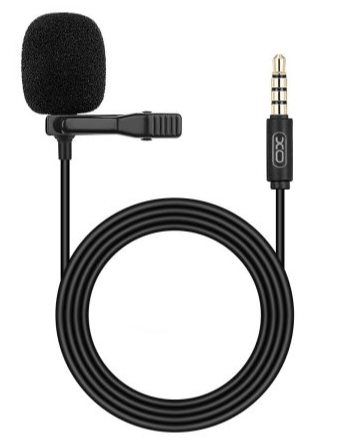
A 3.5mm microphone is a standard device for chatting, podcasting, voice recordings, and everyday use. The reason why it’s called a ‘3.5mm’ mic is because of its plug that goes into your PC’s port. You can connect it to your computer through the dedicated microphone or headphone port. However, not all computer headphone ports recognize a 3.5mm connector as a microphone plug. Nevertheless, once a 3.5mm microphone is connected to a PC, it transmits audio signals to the PC to allow voice recording.
2. Connecting a USB Microphone to Your Computer
USB microphones are one of the simplest choices for PC connection because of universal compatibility. It only requires a working USB port to connect USB microphones effortlessly.
Moreover, unlike other types, a USB microphone may not require any external sound cards or adapters, making it an easy device to use. All you need to do is plug in the mic, and you’re all set. This convenient connection makes a USB microphone suitable for professionals and beginners.
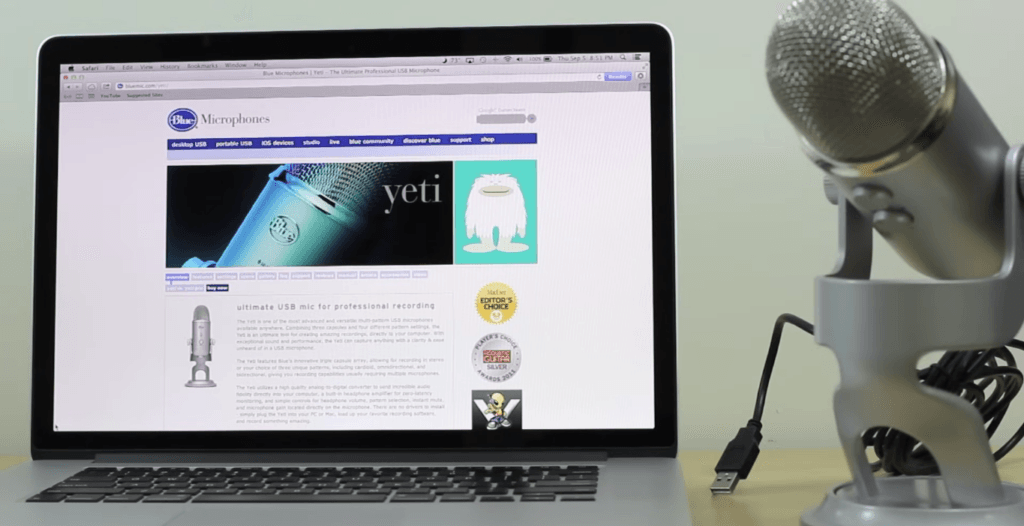
So, assuming you have a USB microphone, like the Blue Yeti, and want to connect it to your computer, here’s what you should do.
- Step 1: Unbox the microphone and set it next to your computer or laptop, as you can see in the image below.
- Step 2: One end of the USB cable goes into the USB microphone like this.

- Step 3: Once you have plugged the USB cable into the mic, take the USB connector on the other end of the cable and plug it inside the USB port.
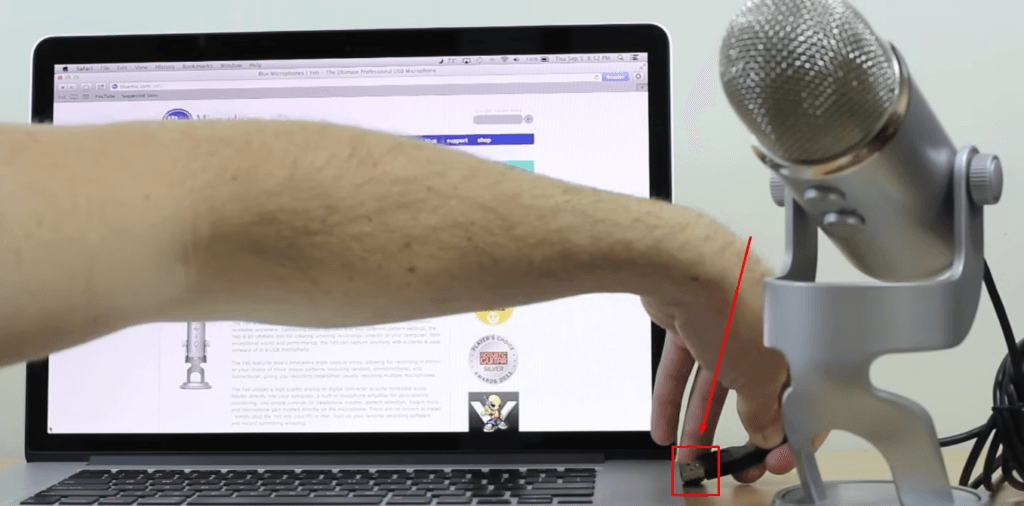
- Step 4: Make sure the USB connector fits firmly into the port without a loose connection.
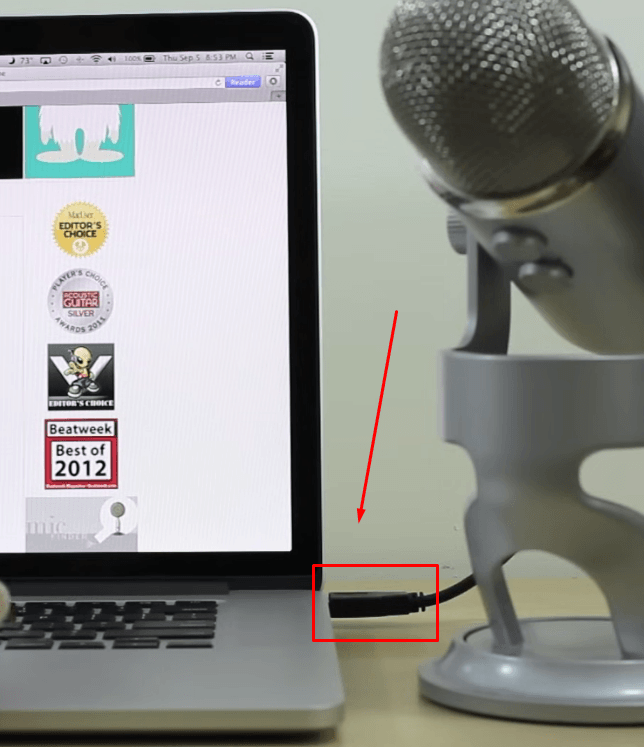
Your computer should automatically detect the USB microphone. However, if the manufacturer requires it, you may need to install a driver. In most cases, USB mics are plug-and-play.
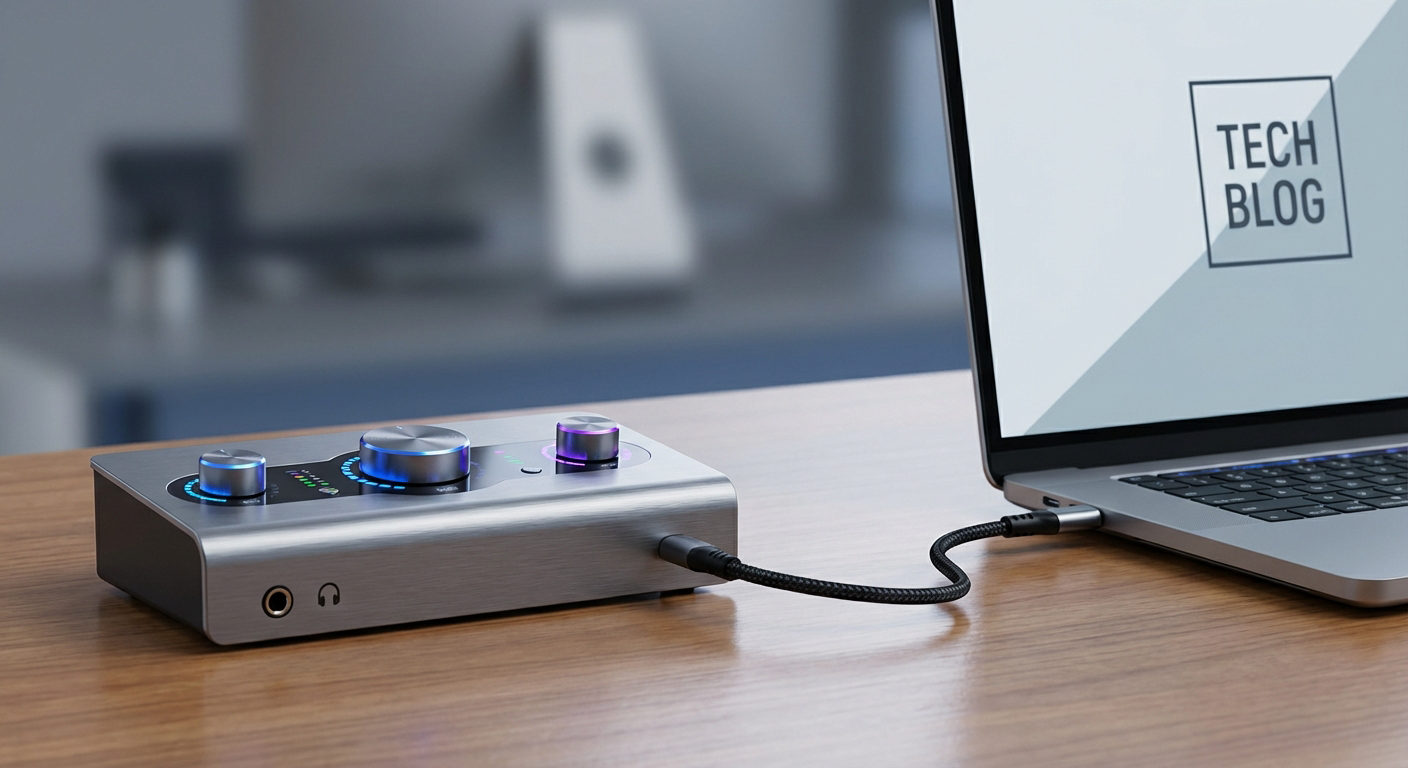
3. Connecting an XLR Microphone to Your Computer
As established earlier, unlike USB mics, XLR microphones need an audio mixer or interface to connect to your PC. This mediatry connectivity is necessary because XLR cables have three pins for transferring balanced audio signals for reduced interference and high clarity of sound. Computers usually have a 3.5mm audio jack designed for unbalanced audio signals. Because of the difference between balanced and unbalanced connectors, it becomes difficult to directly connect an XLR mic to your PC.
While audio mixers or interfaces convert audio signals, which computers can read, they also offer essential functionalities, including phantom power, preamplification, and signal processing.
So, here’s how you connect an XLR microphone to your computer.
- Step 1: First of all, you should gather all the required equipment for connection. This includes the following:
An XLR microphone.
XLR cables (with male and female connectors on each end) and a USB audio interface.
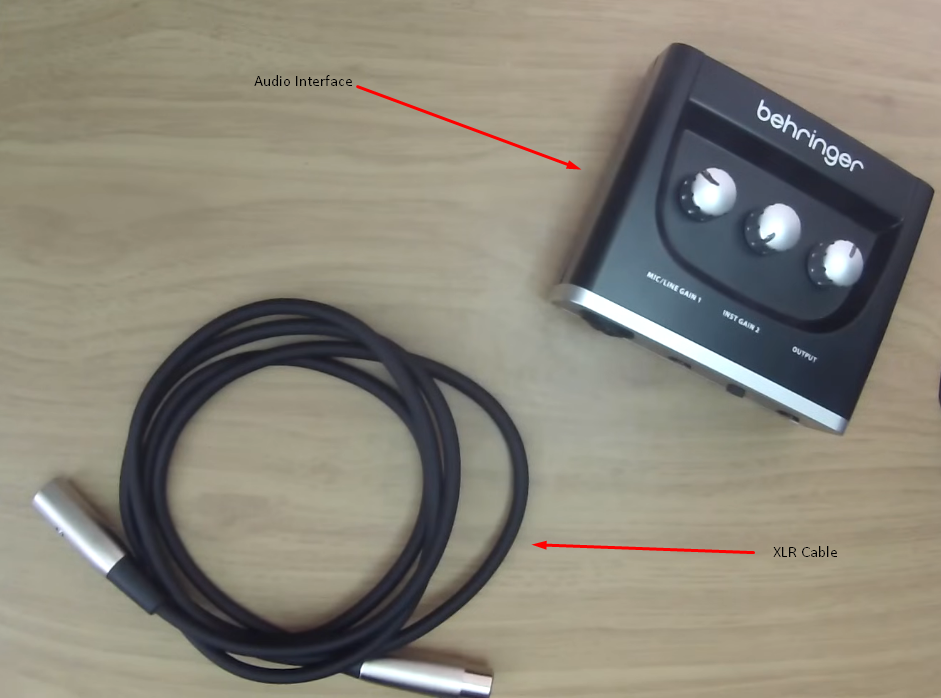
Note: Remember, audio interfaces can be connected to your computer via USB or a 3.5mm connector. So, it is suggested that you buy a USB audio interface for quick setup.
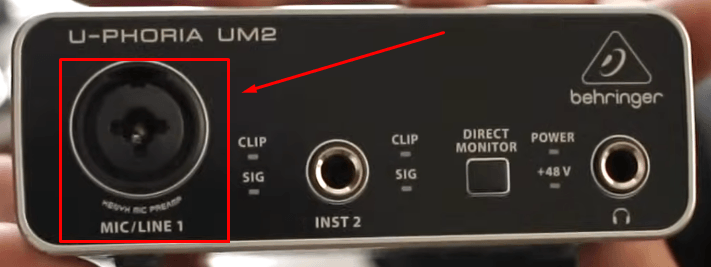
- Step 2: Insert one end of the USB connector into your audio interface and then plug in the other USB connector to your PC. You can insert it directly into your computer’s USB ports or use a USB switch.
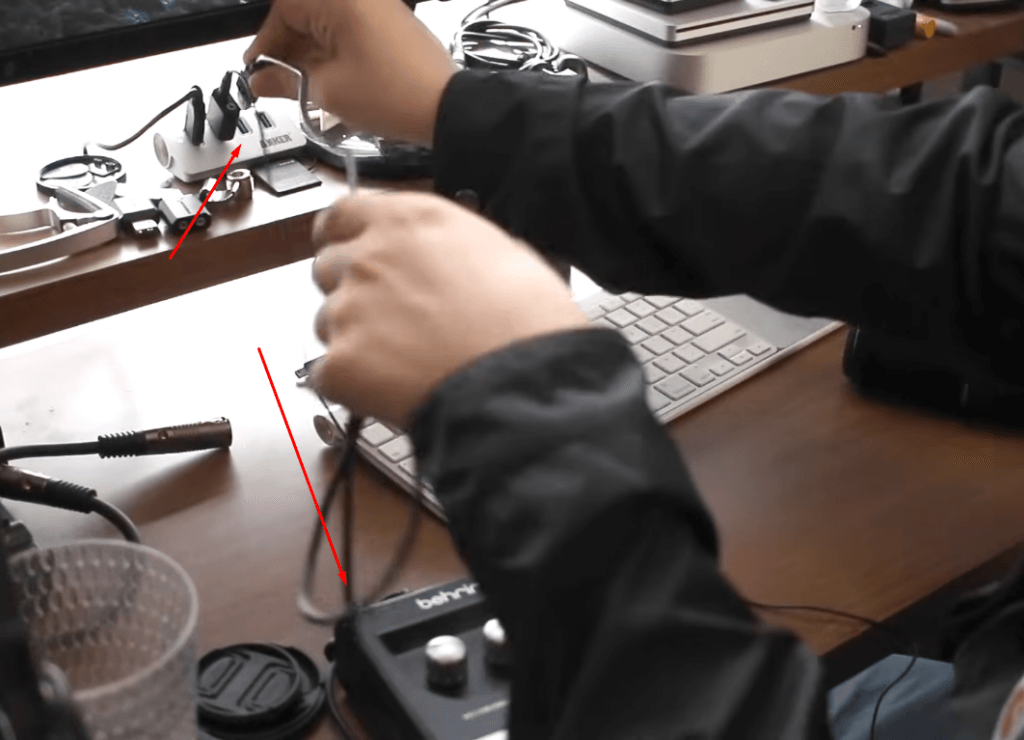
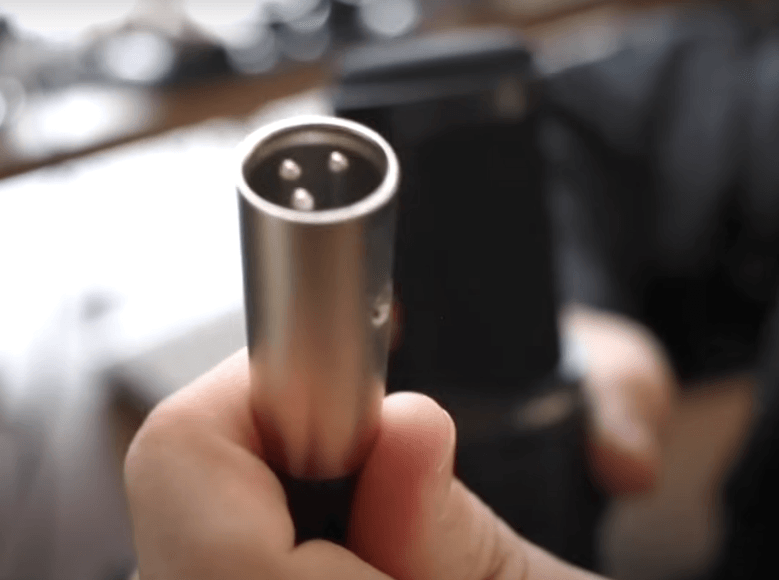
- Step 3: Grab the XLR cable, insert the female XLR connector into the microphone, and make sure it sits correctly.
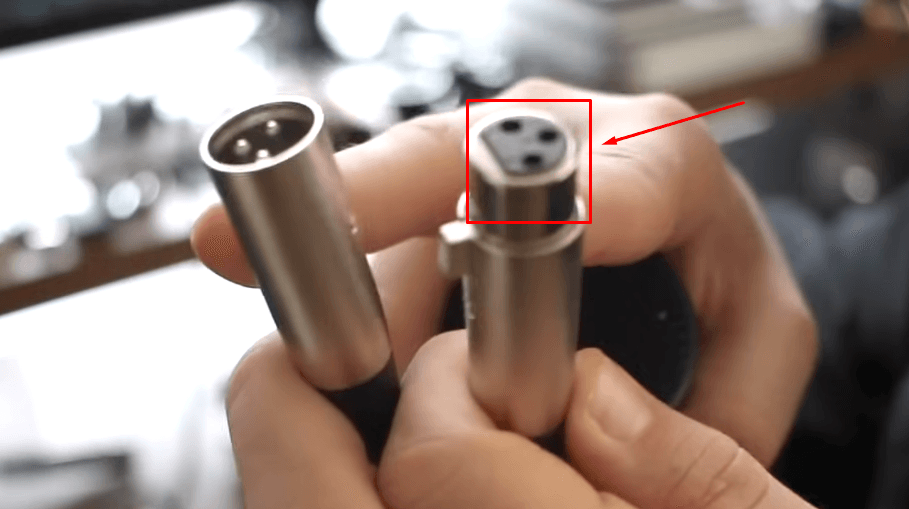
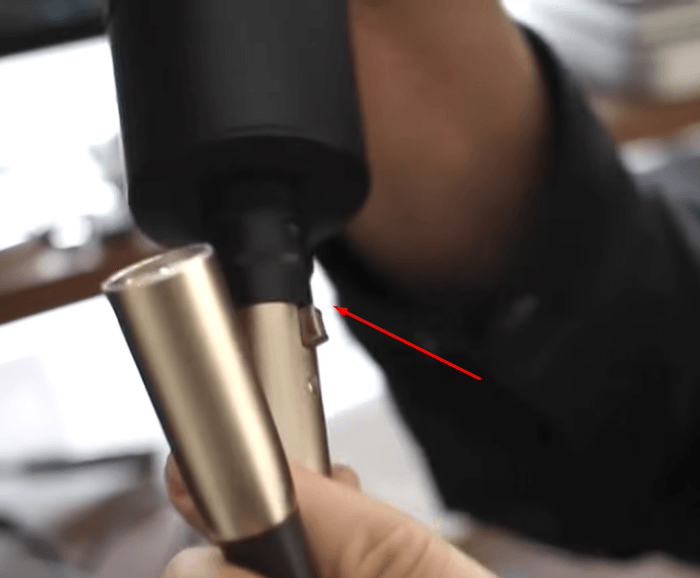
- Step 4: Then insert the male XLR connector into the audio interface.
At this stage, the entire setup is complete.
- Step 5: Press the ‘Power’ button on the audio interface. You may also need to install drivers for the audio interface. However, most interfaces don’t require any software.
4. Connecting a 3.5mm Jack Microphone to Your Computer
One of the most popular and extremely familiar microphone connectivity options is a 3.5mm jack. 3.5mm mics are also plug-and-play devices, which don’t require any third-party software for functionality. These microphones seamlessly connect to most laptops and desktop computers without additional equipment.
However, the only thing that concerns most users is the compatibility of the 3.5mm connector to the PC’s microphone or headphone port. Some computers have a standard built-in sound card with separate ports for headphones and mics. Others may have non-standard sound cards with a single port that entertains both headphones and mics.
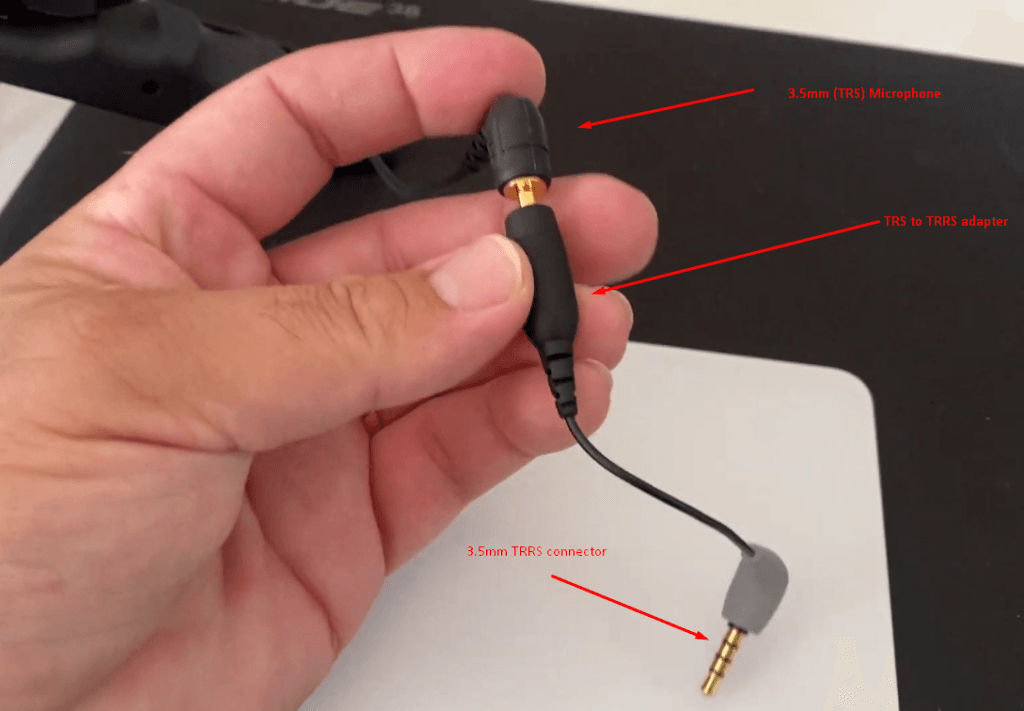
Therefore, computers with non-standard ports may not recognize a 3.5mm mic without an adapter. Why so? Because non-standard ports can pick 3.5mm TRRS connectors whereas most 3.5mm mics have a TRS connector. That is why an adapter is required to convert TRS to TRRS. Contrarily, a separate port for the microphone in your PC can detect a 3.5mm TRS device effortlessly.
In simple words, if your PC has a TRRS port and the mic has a TRS 3.5mm connector, or vice versa, you will need to plug the microphone using p
an adapter (TRS to TRRS or TRRS to TRS).
To understand the setup of a 3.5mm mic, here’s a step-by-step guide to connect Rode VideoMic Pro (it has a 3.5mm TRS connector) to a computer.
- Step 1: Place your 3.5mm microphone near the PC’s microphone/headphone port. Ensure the mic’s cable easily reaches your computer’s jack.
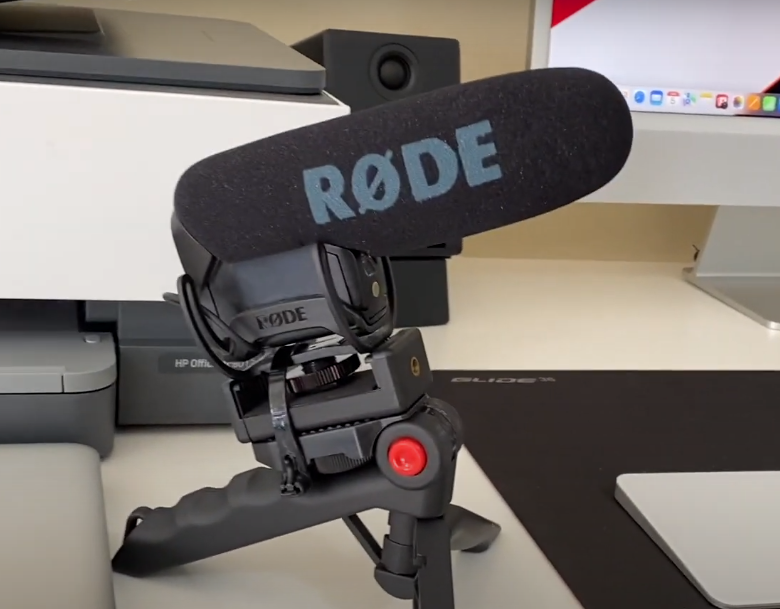
Since the Rode VideoMic Pro is taken as an example, you can see that it has a 3.5mm TRS connector (Tip, Ring, Sleeve).
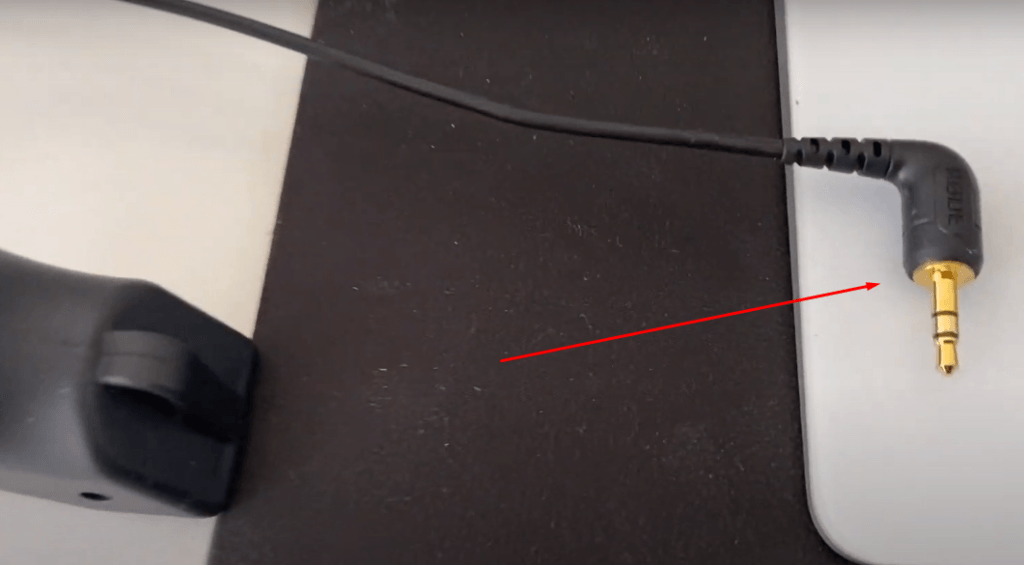
- Step 2: Plug the microphone’s connector into your computer’s mic port.

If you have a non-standard port, your computer will not recognize the microphone connection.
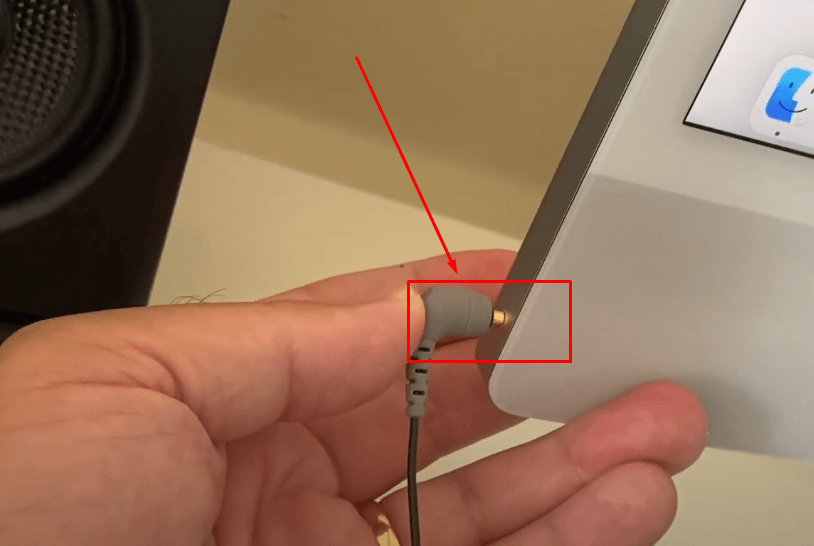
- Step 3: Assuming you already have a TRS to TRRS adapter, insert the 3.5mm TRS connector into the adapter cable to make it detectable by your PC and then plug in the microphone into your computer’s headphone jack/microphone port as shown in the two images below.
5. Setting Up Your Microphone
Once you have connected the microphone to your Windows or Mac system, you will need to make a few changes in the audio settings, even if the computer has detected the microphone. Here’s how you can do it.
Microphone Setup for Windows
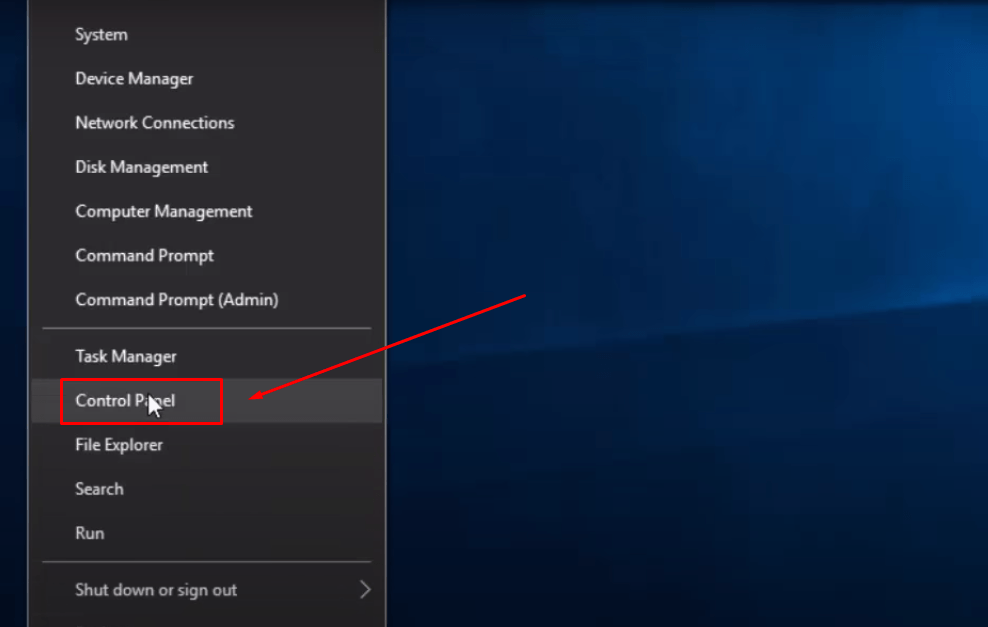
- Step 1: Turn on your Windows PC and click the ‘Windows’ icon.

- Step 2: You will see a menu with different options. From there, select ‘Control Panel.’
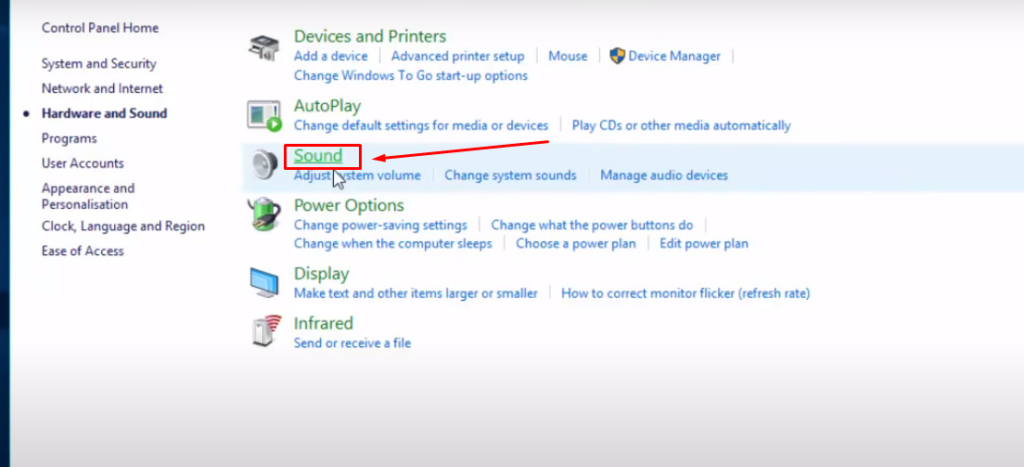
- Step 3: As soon as you click the ‘Control Panel,’ you will find the settings related to your computer. Click the ‘Hardware and Sound’ option.

- Step 4: Click ‘Sound’ to view all the settings related to audio playback and recording.
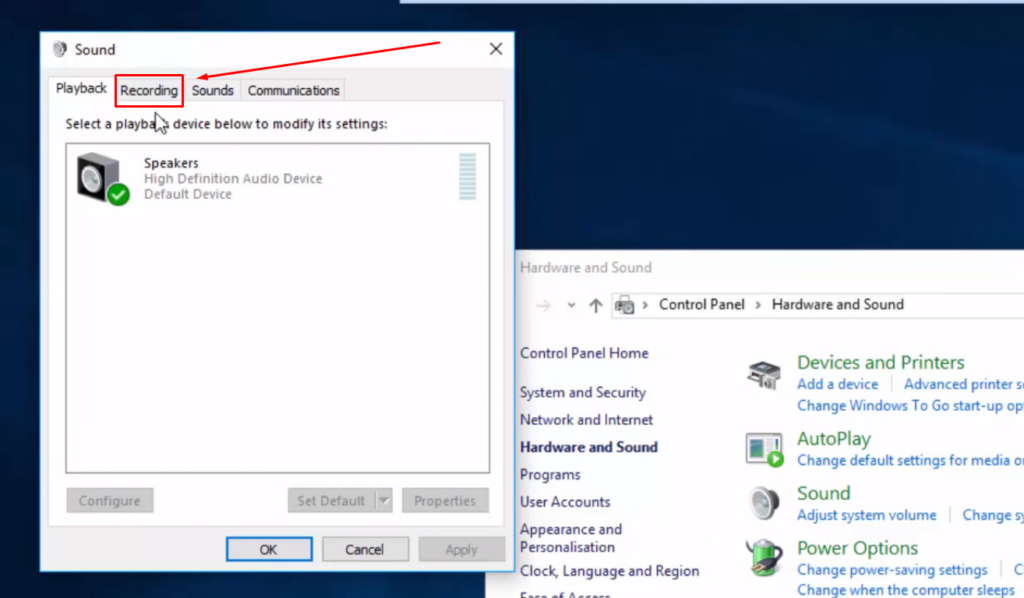
- Step 5: When a new small dialog box appears, look for the ‘Recording’ tab at the top and click it.
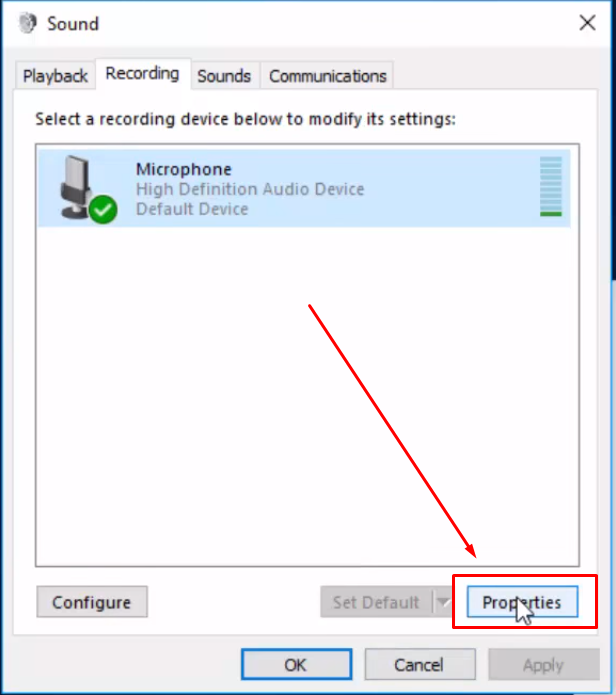
- Step 6: Since you have already connected the mic, you will be able to see the name of your microphone in the popup window. So, first, select the mic by clicking once on the device name. When it is highlighted in ‘blue,’ you will notice that the ‘Properties’ option will be enabled, which is usually greyed out when the device is not chosen. Now, enter ‘Properties’ by clicking on the button.
- Step 7: After entering the ‘Microphone Properties,’ click the ‘Levels’ tab.
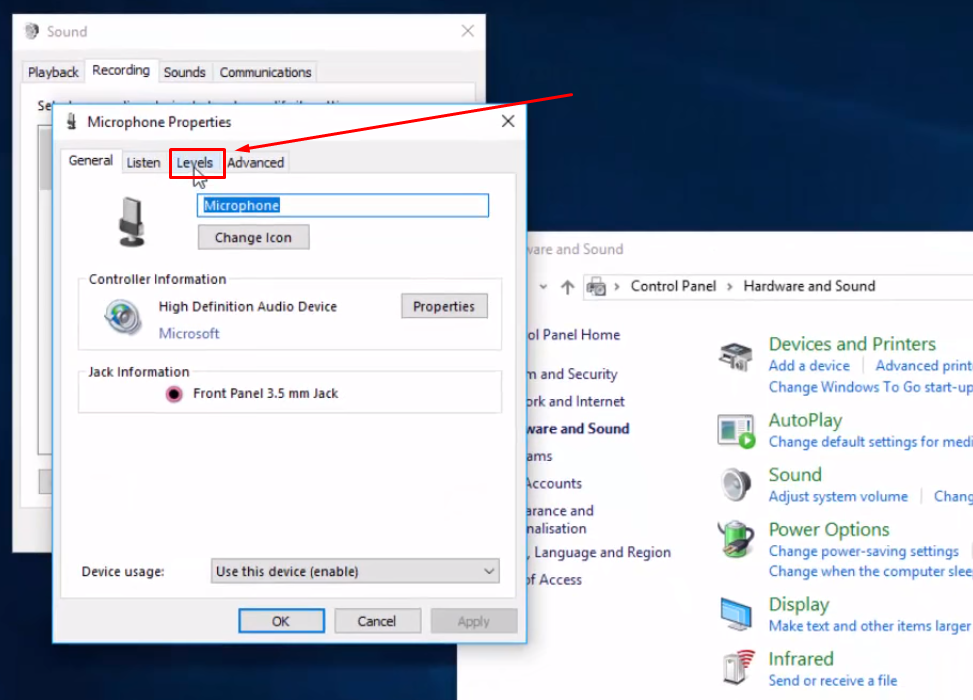
- Step 8: Under the ‘Levels’ tab, you will see the ‘Microphone’ section with a slider and ‘number’ value for level adjustment.
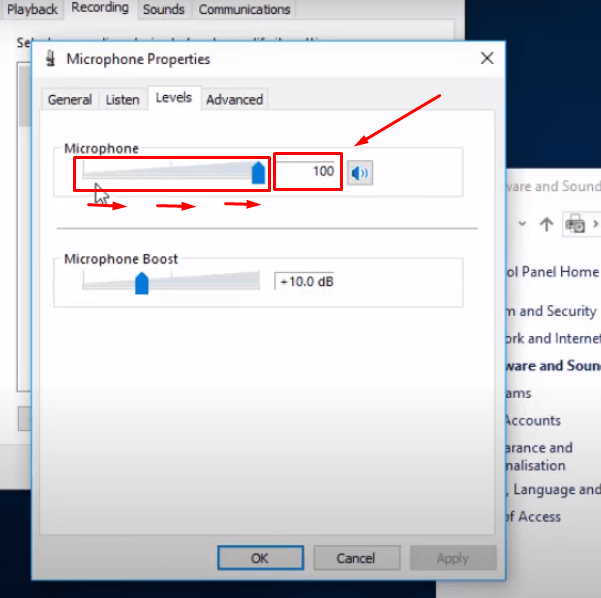
Click the slider and increase the level to the fullest. You can also enter the ‘100’ value.
- Step 9: Save the microphone settings by clicking the ‘Apply’ and ‘OK’ buttons.
Microphone Setup for Mac
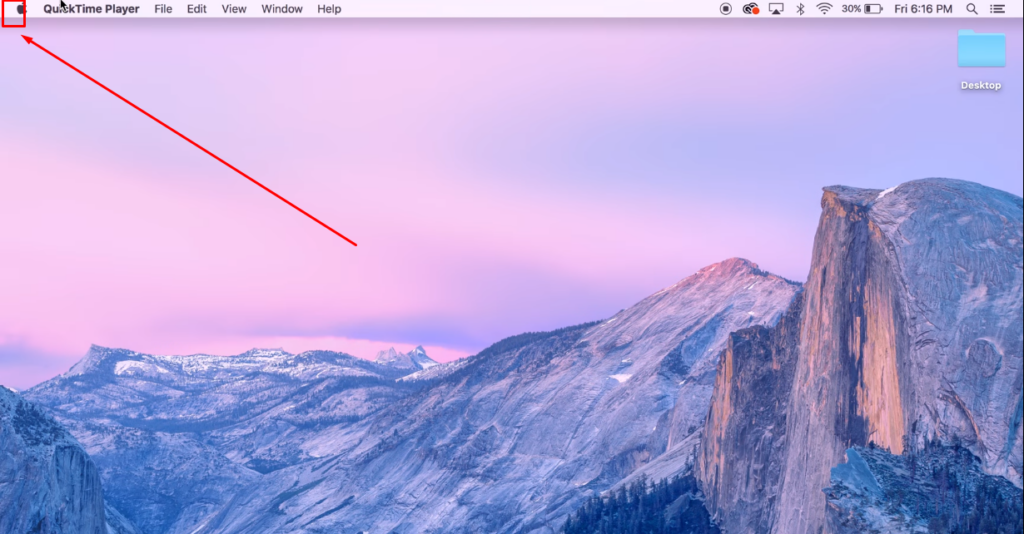
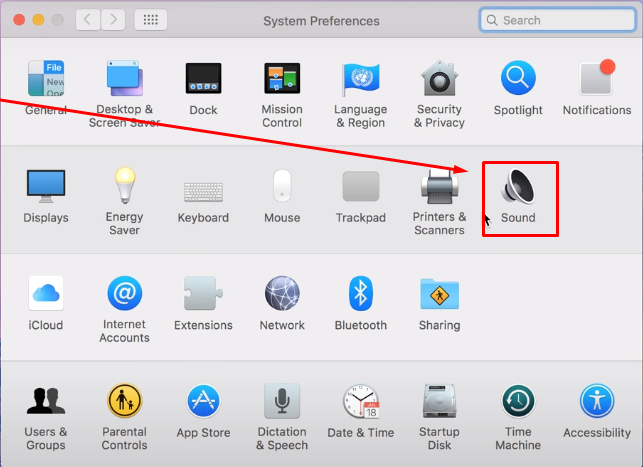
- Step 1: After connecting the external microphone to your Mac, click the ‘Apple’ icon on the top-left corner of the screen.
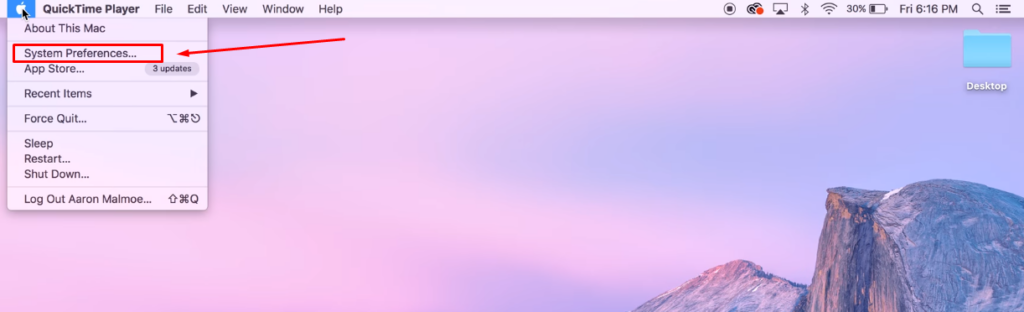
- Step 2: Doing so will open a menu list with different options. Select the ‘System Preferences…’
- Step 3: You will find various icons related to the hardware settings of your Mac. Look for the ‘Sound’ option with a speaker icon and click it.
- Step 4: In the ‘Sound’ settings window, click the ‘Input’ tab. You should be able to see the name of your external microphone under the ‘Select a device for sound input.’
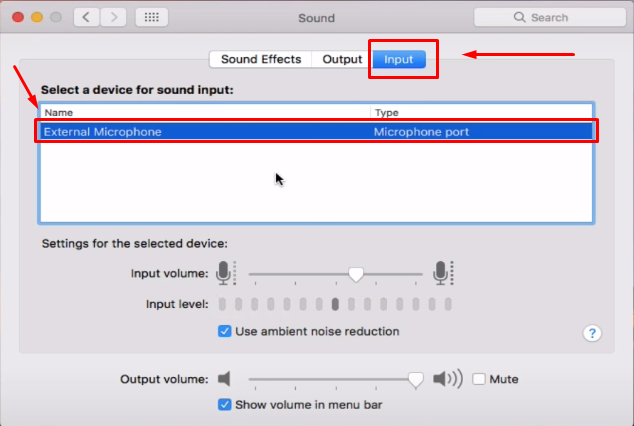
- Step 5: If you have multiple microphones connected to your Mac, make sure to select the desired device for making changes in the microphone settings.
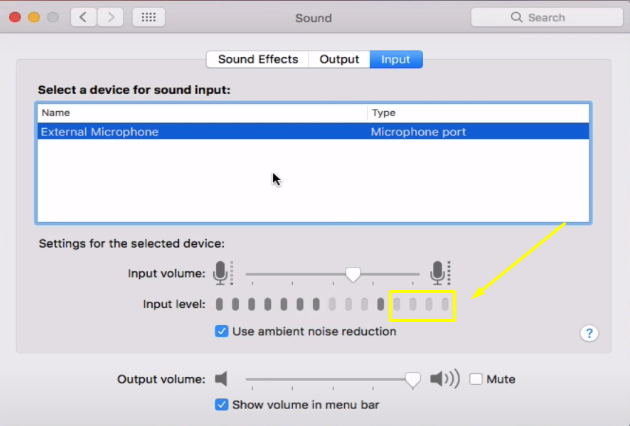
- Step 6: Use the slider to increase the microphone’s ‘Input volume.’
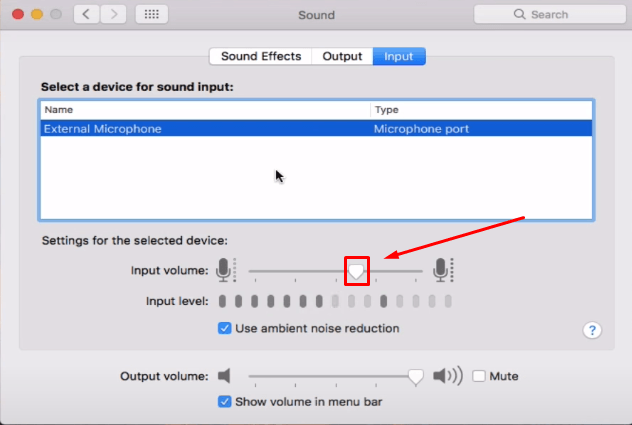
Note: It is suggested not to increase the ‘Input volume’ level to the fullest to leave the headroom for better audio quality.
6. Testing Your Microphone
Every computer may have a built-in sound recording application. It can help you test your voice once the mic is connected and the levels are adjusted. For instance, if you are using a Windows PC, you can search for the ‘Voice Recorder’ or ‘Sound Recorder’ app to record a few seconds of an audio clip. Here’s how to look for the app and use it to test the mic.
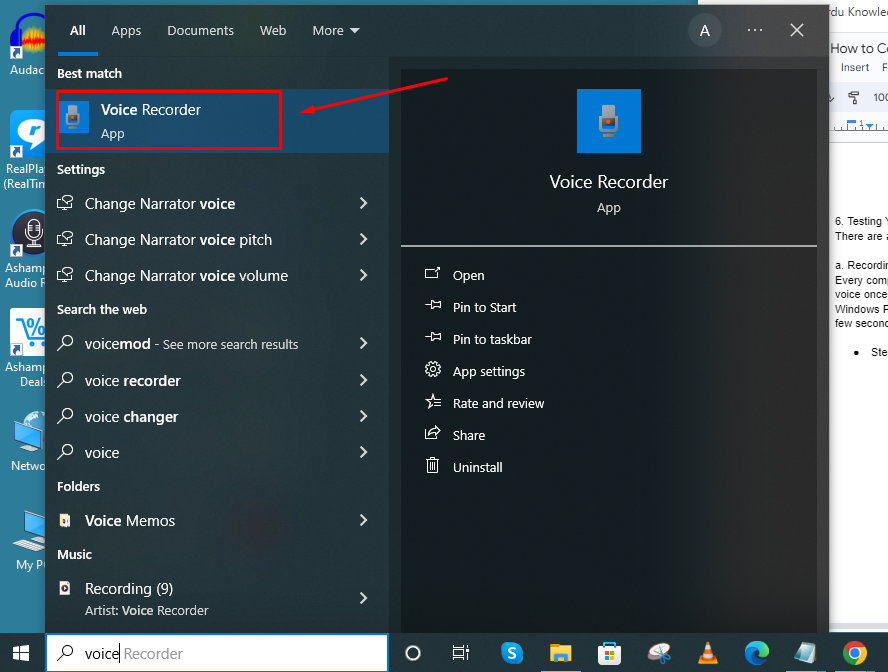
- Step 1: Go to the search bar next to the ‘Windows’ icon.

- Step 2: Click on the white search area to type the name of the voice recording app. For example, in Windows 10, the built-in recording tool is called ‘Voice Recorder.’ So, click on the application’s name when you find it in the search menu.
- Step 3: Once the application is launched, click the record button to begin recording. In the case of this tutorial, you can see a blue button with a microphone icon.
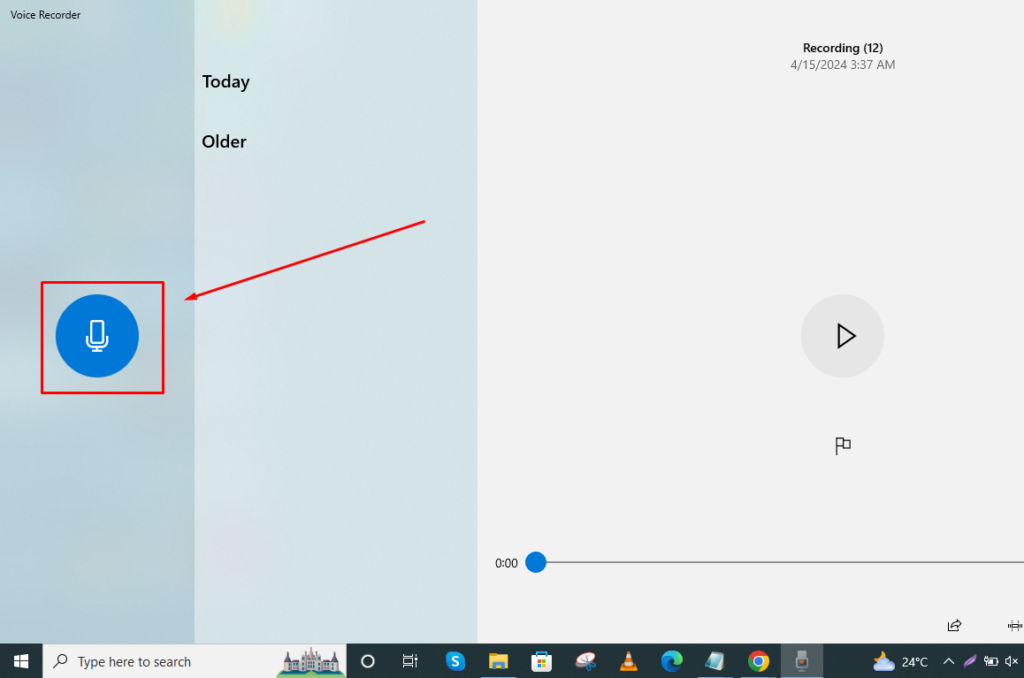
And you can see that the recording process has been started already.
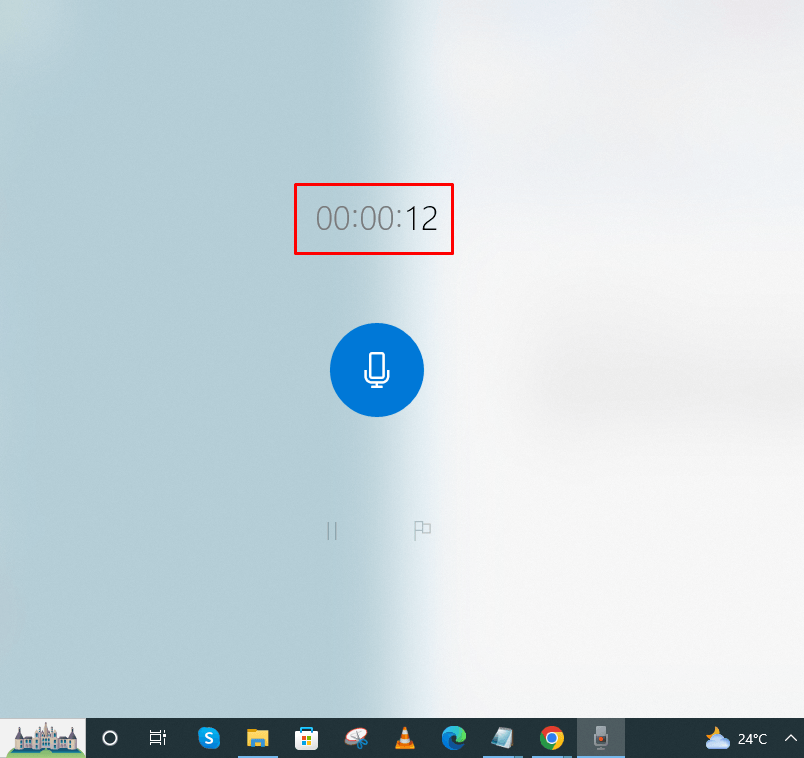
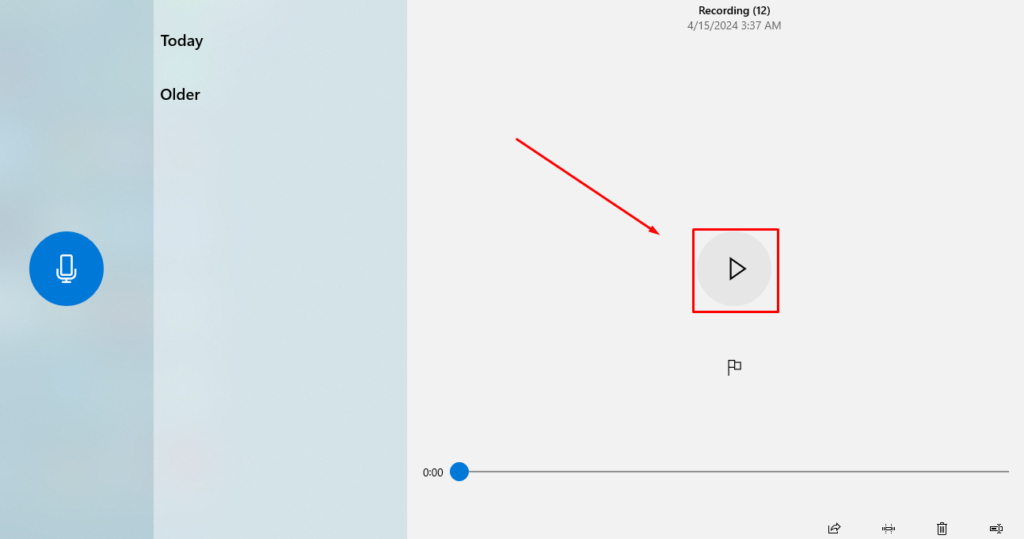
- Step 4: After recording for a few seconds, click the ‘Microphone’ icon (or the ‘Stop’ button) to end the recording. Next, click the ‘Play’ button to listen to the recorded audio.
You can also check your microphone’s performance using online websites. Many platforms allow you to test the mic free of cost. Here’s a step-by-step tutorial for testing a microphone on one of the popular sites, ‘MicTests.’
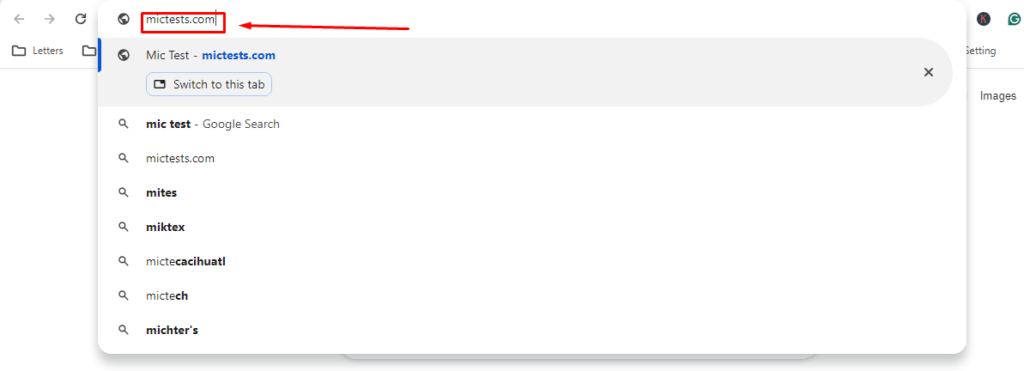
- Step 1: Open a new tab on your browser and enter the website’s name as you can in the image below.
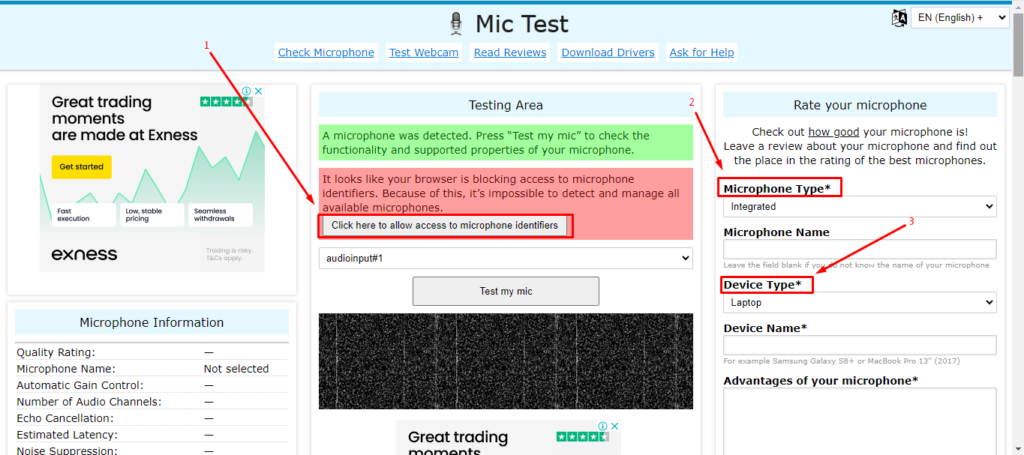
- Step 2: After visiting the website, make sure you have allowed access to the microphone. Also, if there are options to choose your microphone and device types, select the right ones.
For example, in this screenshot, you can see that the website is asking for permission to access the microphone (See pointer 1). Similarly, the site has dropdown menus for microphone and device types (See pointer 2 and pointer 3).
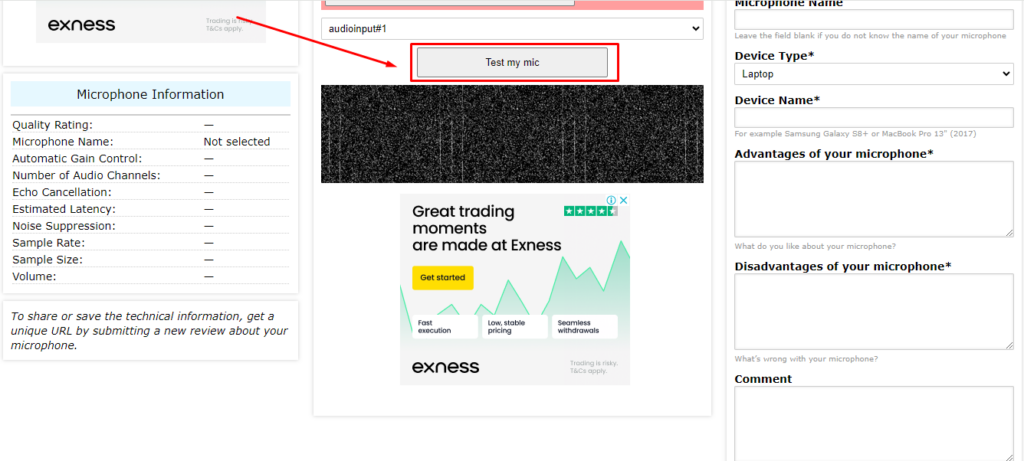
- Step 3: Once you have followed the instructions mentioned in the previous step, click the ‘Test my mic’ button. This will let you record audio. And you can also playback the recorded sound from the same site.
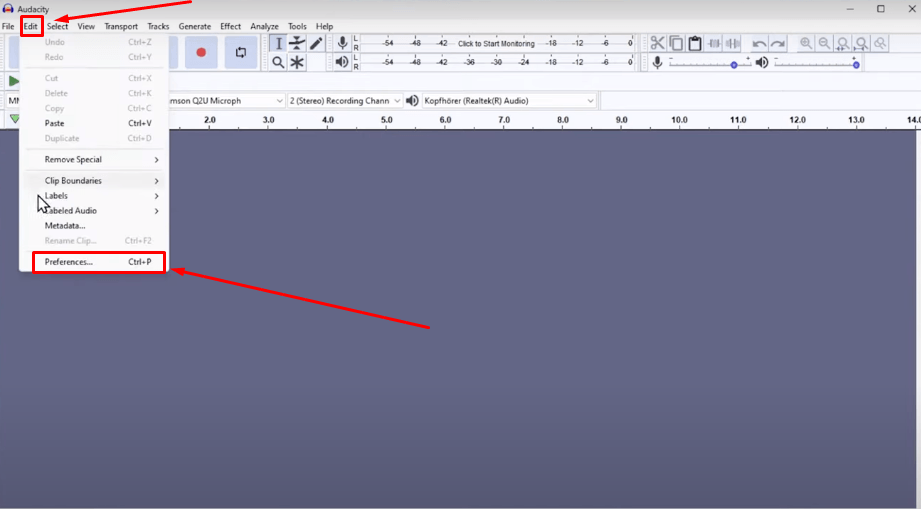
Note: If you are using professional audio recording software, like Audacity, to test your microphone, you may need to choose your microphone as an ‘Input’ device. In Audacity you can do it by following the steps below.
- Step 1: Open Audacity, click the ‘Edit’ tab from the top menu, and choose ‘Preferences.’
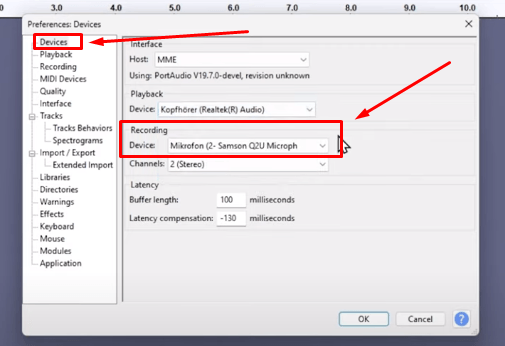
- Step 2: A new window will open with a list of options on the left side of the screen. From there click on ‘Devices’ to open the device menu. Then, under the ‘Recording’ section, click the dropdown menu to choose your microphone as an input device.
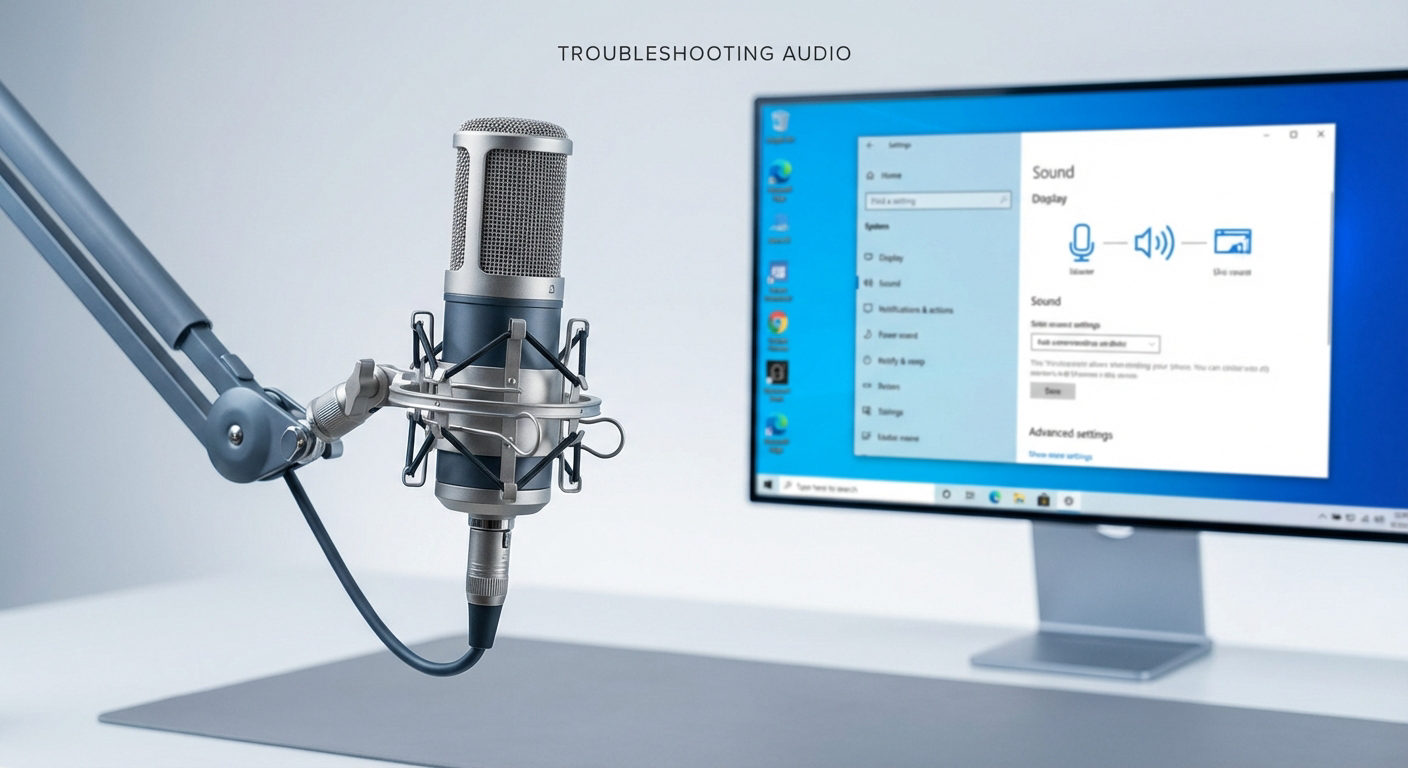
7. How to Fix Some Common Microphone Issues
Sometimes, you may experience some common microphone connectivity problems despite following all the steps correctly. For example, the computer fails to recognize the mic, the audio quality is not up to the mark, or there is no sound from the mic.
To overcome these issues, you can try these troubleshooting methods.
a. For an Undetectable Microphone
If your PC is unable to identify your microphone (wired or wireless), it is suggested to double-check the connection to ensure it is securely plugged into your computer. Many times, a loose connection leads to recognition problems. If you are using an audio interface for the XLR mic or have a USB microphone, delete their drivers and reinstall them. Since drivers allow smooth communication between the computer and microphone, reinstalling them can usually resolve minor glitches or compatibility issues
b. When the Microphone has Low Sound Quality
If the microphone has a low audio quality despite being an excellent and highly recommended mic, it means there can be some obstructions preventing the device from giving its 100% performance. These obstructions can be a bad cable, a damaged port, or anything interfering with the audio transmission. Therefore, check the wires, connectors, and microphone ports and replace them if they are broken.
Similarly, when speaking into the mic, maintain a suitable distance where your mouth is not too close or too far from the microphone. Otherwise, you may get distorted or compressed audio output.
c. If the Microphone has No Sound
If you cannot hear any sound from the mic when you speak, you should check whether or not the mic is selected as a ‘Primary’ recording device. Also, ensure adjusting microphone levels correctly, as sometimes, the microphone volume is turned off unintentionally, resulting in no audio.
Conclusion
You should know the microphone type before connecting it to your computer. While you can directly plug the USB and 3.5mm mics into the PC’s ports, you will need an audio interface for XLR microphones. Similarly, you are required to make adjustments in the audio levels and select the microphone as the main audio input when using recording software. It is also important to check the microphone connection by testing the device online or using your computer’s built-in voice recorder.
Frequently Asked Questions (FAQs) about How to Connect a Microphone to a Computer
Q1. What is the best way to connect a professional microphone to a computer?
Professionals often prefer using XLR microphones. Therefore, to connect them correctly, you will need an audio interface for successful connectivity and smooth signal transmission. For example, a USB audio interface acts as a bridge to link a Windows or Mac operating system with a microphone. The mic’s cable goes into the audio interface and the interface connects to a computer through a USB cable. Then, you may also need to install the audio interface’s drivers to activate the microphone. Contrarily, you can also use an audio mixer to connect the XLR microphone to your computer.
Q2. Can I use an XLR to USB cable to connect my microphone?
An XLR microphone works on analog signals, whereas USB mics operate on digital signals. You can use an XLR to USB cable for connecting the mic to your PC, but you will need an analog-to-digital adapter. The adapter will transform analog signals from the CLR microphone into digital signals to make them compatible with your PC’s USB connectivity. If you directly plug the XLR to USB cable into your computer’s USB port without an adapter or audio interface, the setup may fail to provide high-quality audio or not work entirely.
Q3. Why is my computer not recognizing my USB microphone?
If your USB microphone is being unrecognized by your computer, ensure you are connecting the microphone with a USB cable that came with the package. If the microphone doesn’t come with a USB cable, try to get one that has positive reviews and is tried and tested by several users. You should also check that the USB connector is securely inserted into the port and has no loose connection. Moreover, try using other USB ports to connect the microphone to determine whether the port you are frequently using to link the mic to your PC is working. Lastly, connect the microphone to another PC to check if it works there.
Q4. How do I improve the sound quality of my microphone?
To improve your microphone’s sound quality, ensure the place of recording is quiet and has minimal noise factors. Avoid using the microphone in a room where the sound echoes. Use a pop filter when recording or streaming live. It is also essential to maintain a proper distance, as being too far can mitigate the sound quality, especially if you have a beginner-level device. It is also noted that audio interfaces can enhance audio quality, so use them if you can. Most importantly, invest in a microphone that has a noise-canceling functionality, like the Hollyland Lark series.
Q5. Is it possible to connect multiple microphones to one computer?
Yes, you can connect two or more microphones to a PC. However, you will need a USB audio interface with multiple microphone preamps. For instance, if you want to connect two mics, the audio interface should have two slots for the mic input. The same goes for three or more mics. After connecting the microphones to the interface, connect it to your computer’s USB input. But make sure you choose the microphones as your recording devices on Audacity or any other recording software. Otherwise, the setup may not work.
Q6. How can I reduce background noise in my microphone recordings?
Ideally, you should get a microphone with an Environmental Noise Cancellation feature to reduce unwanted background sounds from interfering with your audio recording. Try to get closer to the mic, but not too close to distort the audio. Additionally, use a pop-filter to prevent plosive sounds from the audio. It is also suggested to use a good quality microphone stand, as it can save the recordings from handling noises. Moreover, your mic’s cables and other equipment, such as phantom power and audio interfaces, should be in good working condition. Besides, choose a quiet room for recordings and adjust gain levels to mitigate background noises.
Q7. Why does my microphone sound echoey, and how can I fix it?
The mic may pick up your speakers’ volume, creating an echoey sound if the volume is loud. So, turn down the volume and check if the problem is solved. Furthermore, move your microphone away from the speakers if it’s too close to them. On the other hand, adjust the audio input levels, as sometimes increased levels can also create the echo effect. Also, use acoustics in your room, especially if there’s less furniture, as an empty room contributes to echoes. If the issue persists, try restarting your microphone and computer, and check again.
Q8. Can I use a gaming headset as a microphone on my computer?
Yes, you may use a gaming headphone as a mic. However, gaming headsets are usually designed for in-game chat and day-to-day communication, such as Zoom calls. So, you can’t expect their audio quality to be as excellent as professional microphones. So, if you want to record professional voiceovers or singing vocals, you will need an external microphone that captures high-quality audio.
Q9. What are the differences between dynamic and condenser microphones for computer use?
Whether a dynamic or condenser microphone, both can be connected to a PC. The primary difference between them is the usage. If you are more into live performances, a dynamic microphone can be a suitable pick as it goes with different ranges of the PA system. On the other hand, condenser microphones can be used with computers for audio recordings in controlled and quiet environments.
Q10. How do I connect a wireless microphone to my computer?
A wireless microphone is simple to connect to a PC or Mac. Let’s take an example of the Hollyland Lark M2. This wireless mic comes with one receiver (RX) and two transmitters (TX) and uses 2.4GHz wireless transmission technology. The RX unit connects to the 3.5mm port of your computer through a cable (included in the package). The speaker wears the TX (microphone). Once both units are paired and active, they create a connection between them. When the speaker talks into the TX, the RX receives the audio signals and transmits them into the audio recording device (computer).