.png)
A parabolic microphone is a great source to capture far-distance sounds. However, a professional-quality parabolic mic can be costly. So in this article, you will learn 6 easy DIY methods to make an excellent parabolic microphone system. All the materials used in all six cases are inexpensive, and some of them might be available at your home.
Case 1: DIY Parabolic Microphone
Here’s the first way to make DIY parabolic microphone yourself.
Materials
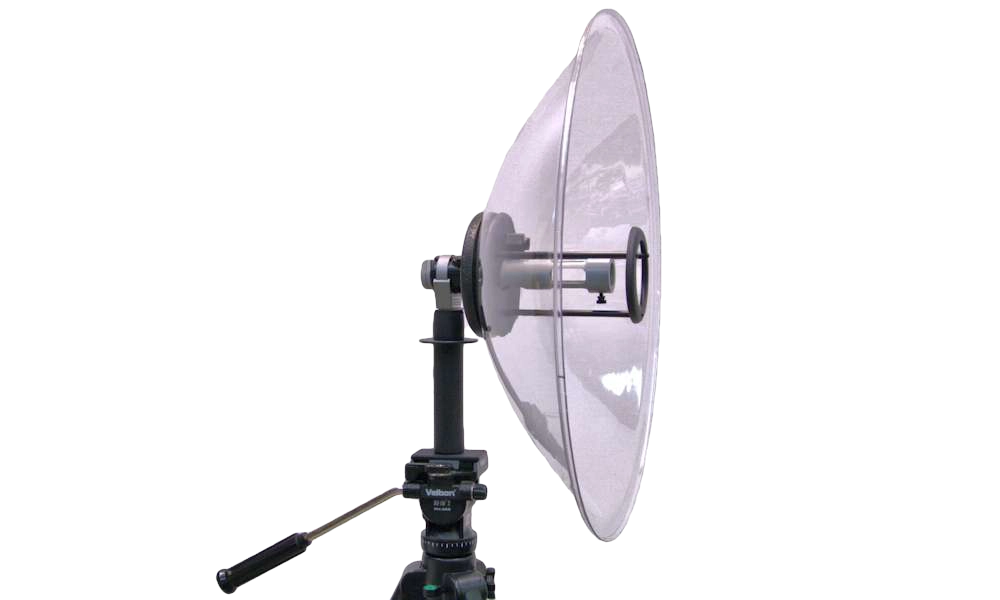
1. The first you need is an actual parabola. This is the most important material to get if you are building it through case 1. Also, it is the most expensive part of your overall budget. But here’s the good news. Wildtronics offer budget-friendly unassembled parabolic dishes. It appears like a Caesar salad bowl but a bigger one with a hole right in the center.
Wildtronics offers three parabola models:
- Clear Polycarbonate (Standard model 1.5mm thick)
- Clear Polycarbonate – Feather Light model (0.76 mm thick)
- Black ABS – Black Ops model (available in 1.5mm to 0.7mm thickness ranges)
For this tutorial, the feather-light version is selected.
2. The second thing you need is a microphone. You can go with any clip mic since it’s super handy in this and later projects. For this project, Clippy XLR EM172 is used.
3. Two microphone stands with mic clips, such as LANIAKEA mic table.
4. 5/8- inches male to 1/4-inches female Camvate microphone screw adapter.
5. Viltron portable folding tripod (mini size)
Step-by-Step Method of Assembling
- Step 1: Unbox the two LANIAKEA table stands. Keep the plates aside.
- Step 2: Each box has an extendible tube to screw on its plates. This long tube is telescopic and made from two smaller tubes. Therefore, separate the small one and keep it aside.
- Step 3: If you look at the microphone holder, you will find a plastic adaptor. Unscrew it from there and screw it at any one of the bases.
- Step 4: Now take the other base and screw it in the 5/8 to 1/4 Camvate adapter.
- Step 5: At this stage, your plates should be ready. So tightly attach them together and drill three holes through the plates to bolt them.
- Step 6: Set the parabola by squeezing them through the two plates. Bolt these materials so they won’t move. Also, make sure the Camvate adapter is fixed to a plate that remains outside your parabola.
- Step 7: Screw the Viltron tripod to the Camvate adapter to have a firm handle grip.
- Step 8: Take the small tube you put aside in Step 2 and screw it to the other plate to make a perfect holder for your Clippy microphone.
Now let’s jump to case 2 to learn to make a parabolic mic using a trash lid.
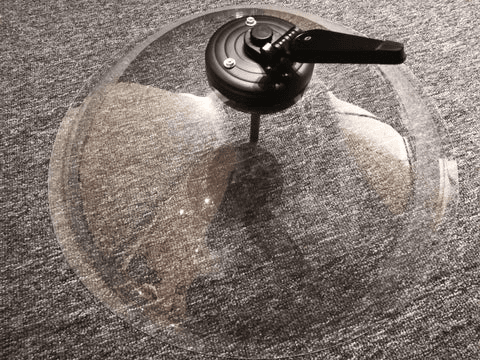
Case 2: DIY Parabolic Microphone using Trash Lid
This case is not only amazing, but it is extremely fun to do. You will learn to make a parabolic microphone with the help of a trash lid. And guess what? You can also apply the same steps to create a parabolic mic on other materials, such as:
- A 6-inch omelet pan
- 10.5 inches aluminum shop light holder
- 12 inches plastic bowl
- 45 inches golf umbrella
The reason for using a trash lid is that it gives the best results due to its big diameter, perfect curve, and plastic manufacturing. Moreover, the overall cost of this project is around $25, excluding the price of a wireless lavalier microphone. However, you should remember that whatever mic, make sure you fix it on the dish’s focal point.
For example, in this tutorial, the lavalier mic is mounted on a dowel and strap. So take your time taking the correct measurements before you apply the steps.
Materials
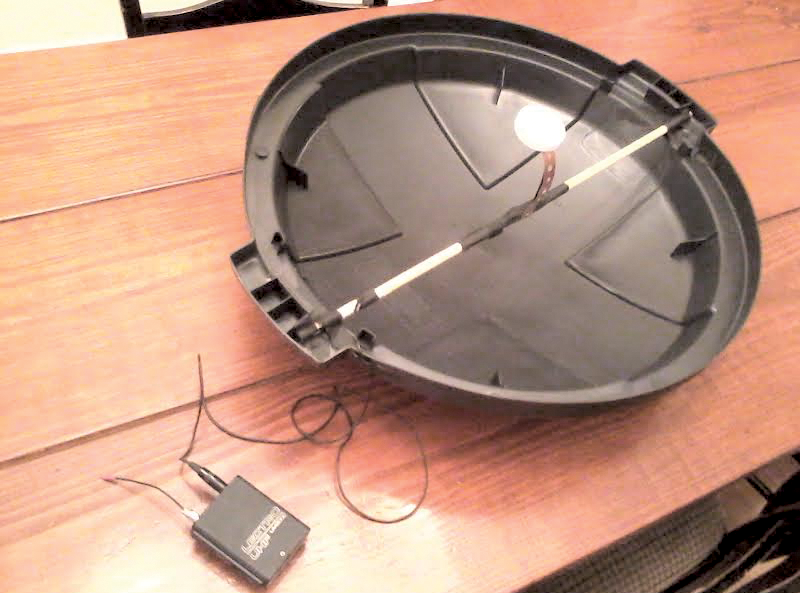
1. 22-inches plastic trash lid (to be used as a parabolic dish)
2. 24 inch x 1/4 inch wooden dowel
3. 6 inch strap of 1/2 strip flexible and wide metal strap
4. Metal snips
5. Gaffer’s tape
6. 1/4 inch dowel
7. Wireless lavalier microphone
8. Milk jug lid
9. Hacksaw
Step-by-Sep Method of Assembling
- Step 1: Cut a piece of 1/4-inch wooden dowel using a hacksaw equal to the lid’s diameter so it can easily fit into the molded notches of the handle.
- Step 2: After positioning the dowel, use gaffer’s tape to hold it firmly. The crossbar should face the south center on the lid, spanning the dish 1 1/4 inches off the center line.
- Step 3: Cut a 6 inch piece of metal strap using metal snips. This metal strap will act as your extension to hold the microphone.
- Step 4: Wrap one end of the metal strap around the center point of the dowel using gaffer’s tape. Shape it slightly curved and position it up and a bit out from the dowel’s line.
- Step 5: Tape your wireless lavalier mic’s pickup component to the mount. And wrap the cord, dowel, and the back of the dish with gaffer’s tape. Also, don’t forget to leave a wire to connect the transmitter to the operator’s belt.
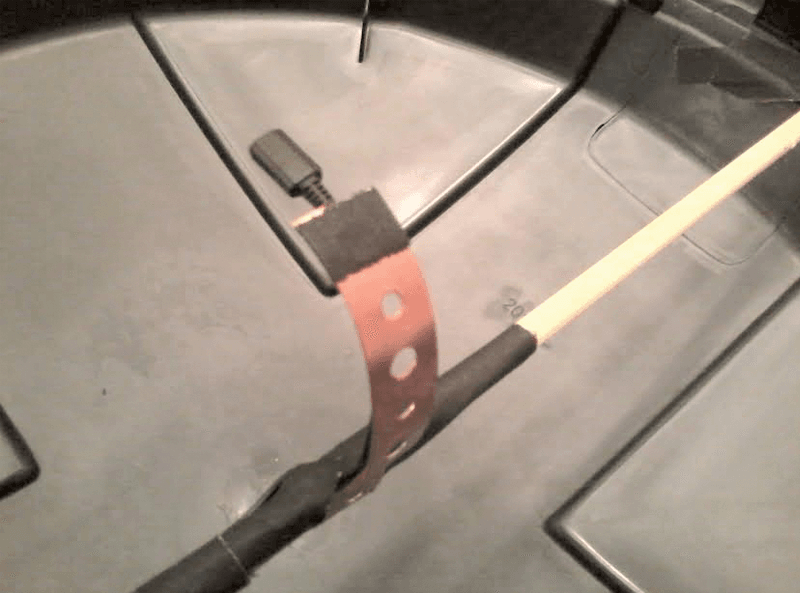
- Step 6: Attach a 2 inch milk jug’s lid to the back of the lavalier microphone mount. This will allow the mic to pick omnidirectional sounds in the dish.
- Step 7: Connect the jack to the transmitter to start receiving sound.
Note: For best results, listen to the sounds using headphones. Because that’s the only way to know whether or not you are capturing solid and clear signals with your DIY parabolic mic dish.
The next case will teach you to make a parabolic microphone using a pair of microphone capsules.
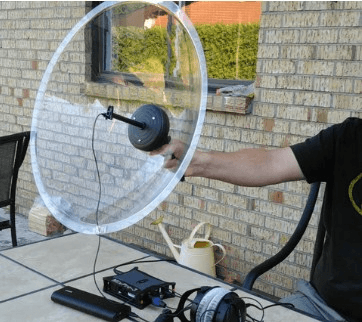
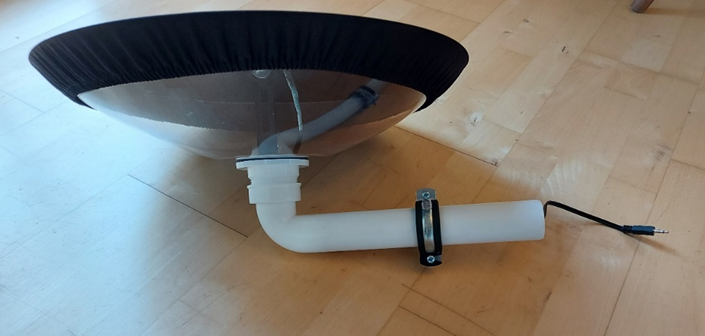
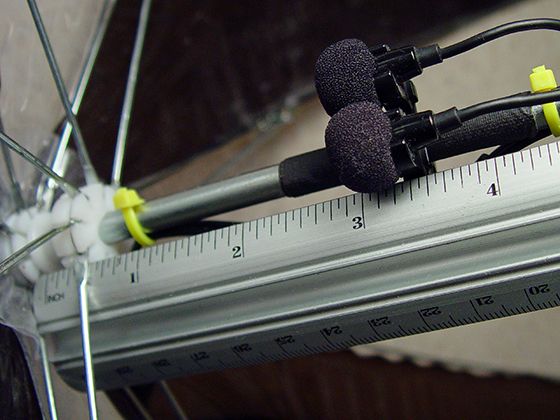
Case 3: DIY Parabolic Microphone with Single or Double Capsules
You can make a parabolic mic using a single or double pair of microphone capsules. So in this step-by-step tutorial, you will learn how to make a parabolic mic using a single pair of capsules. And you can repeat the same steps for making a parabolic microphone with double pair of capsules.
Materials
1. Parabolic dish (with a 40cm diameter)
2. 2 or 4 AOM-5024 capsule microphones
3. Microphone handle and holder
4. Windshield (a normal plastic covering)
5. Screws
6. Chair angle
7. Solder kit
8. 3.5mm Audio jack
9. Sink Strainer
10. Siphon (to be used as microphone handle and holder)
Step-by-Step Method of Assembling
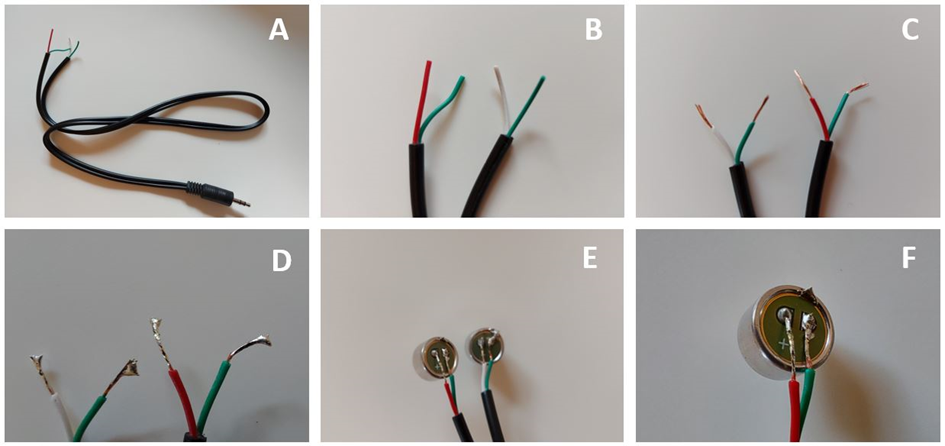
- Step 1: First, you need to solder the microphone capsules. In this case, AOM-5024 are used. To do that, cut the 3.5mm audio jack cable so you can see the internal wiring.
- Step 2: Remember, the green wire is negative, whereas the white and red wires are positive. Now strip about 1cm of the insulation from both wires.
- Step 3: Apply a lead-free solder on both copper wires’ ends that looks like a small layer. Keep the solder temperature between 260 to 280 degrees.
- Step 4: Carefully solder the audio jack wires to each capsule. On capsule 1, solder the red wire to the capsule’s positive terminal. Then, solder the green wire to the negative terminal of the capsule.
- Step 5: Fix a 1 ½ inches sink strainer into the central opening of the Audubon dish. Ensure the strainer goes inside the dish so the screw faces downwards.
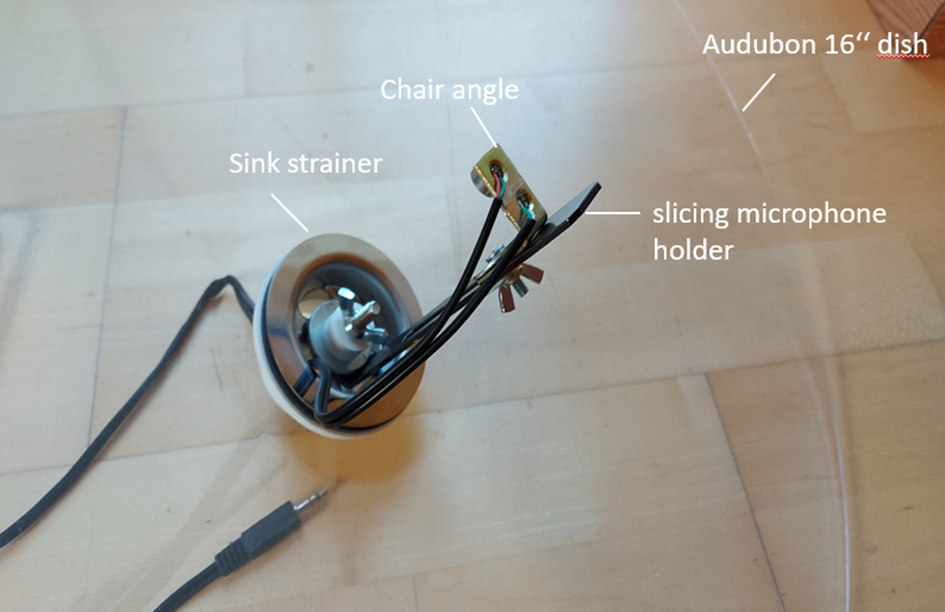
- Step 6: Then place your mic holder on the strainer’s screw and screw the holder firmly on it.
- Step 7: Now, fix a chair angle on the microphone holder.
- Step 8: Fix the soldered capsules with the audio jack wire to a chair angle.
- Step 9: Cover the mics with a thin plastic cling film that works as your windshield.
- Step 10: Fix a PVC pipe or any other material with 1 1/2 inch screws on the outside central opening of the parabola dish. It will make a tunnel, as well as a microphone handle from the jack and wire will come out.
Note: Use the same steps for creating a double capsule parabolic mic. However, you can fix one pair inside the dish and one pair a bit outside the dish. The internal pair of mics will help you capture local birds’ sounds. Whereas the external pair will increase your chances of recording the sounds of migrating birds.
Now let’s have a look at the fourth method to make a parabolic mic from affordable materials that cost around $1.
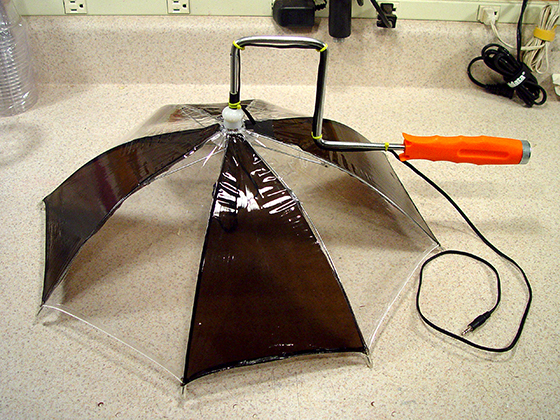
Case 4: DIY Parabolic Microphone from Dollar Shop Materials
In this case, you will learn how to make a parabolic microphone at home without spending much on things. As a matter of fact, it is one of the easiest DIY that works.
Materials
1. Small size vinyl hat of folding umbrella
2. 9-inch paint roller handle
3. Small microphone (Clip-on mic is great)
4. Side cutter
5. Hammer
6. Razor saw
7. Sharp knife
8. Gaffer’s tape
9. Permanent marker
10. Cable ties
Step-by-Step Method of Assembling
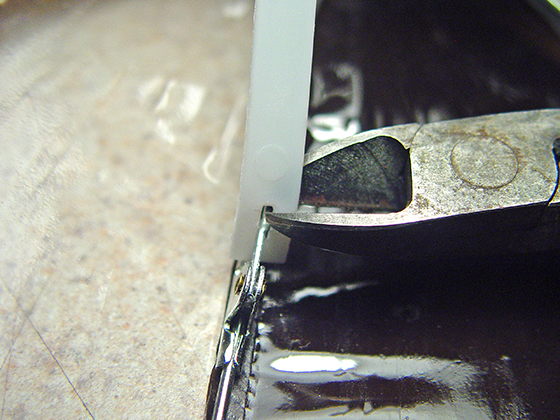
- Step 1: First, you need to remove the hat band from the umbrella. You can do it by snipping away all the plastic holders with the help of a side cutter.
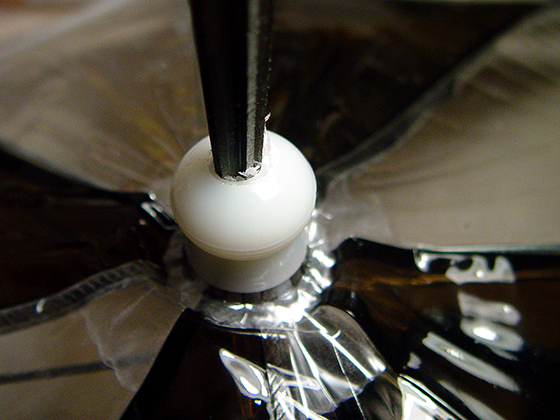
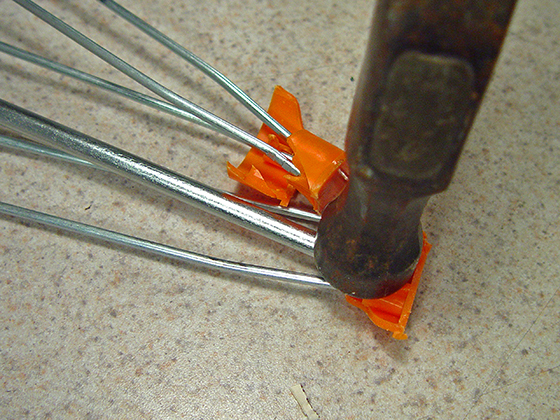
- Step 2: Look at the top center of the umbrella hat to find a little knob. Now, take a razor saw to slice it off in a way that the surface becomes flat. Make a hole using a sharp knife.
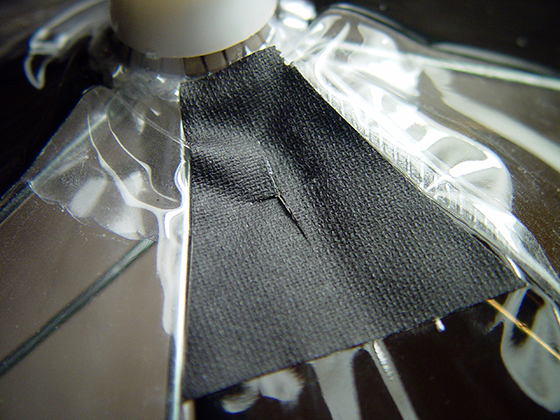
- Step 3: Cut the gaffer’s tape into a triangular shape and stick it outside the umbrella’s hat. Stick it firmly on the vinyl surface and make a few small cuts. These cuts will serve as a passage for the mic’s wires.
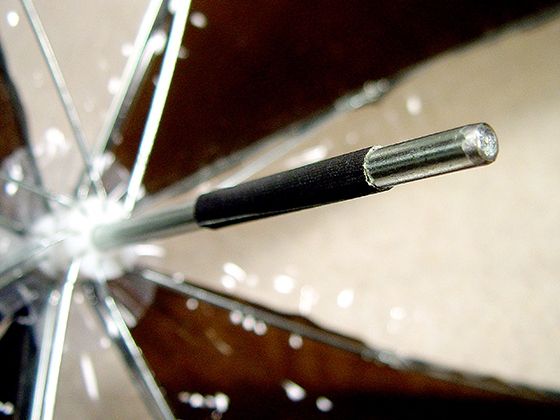
- Step 4: Make a stand out of the paint roller. To do that, remove the frames and cap from the roller to get a ready-made handle. You will need to use a hammer to do this job.
- Step 5: Remember you made a hole in the knob? Well, now it is time to insert the paint roller handle through it. Just put the front shaft of the handle into the hole until a 6-inch part of it comes out inside the interior.
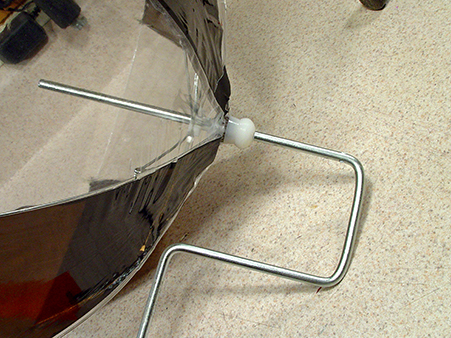
- Step 6: Once you have positioned the handle, wrap the part that lies outside the umbrella over the knob with the gaffer’s tape to keep it from slipping. Also, put a cable tie on it for extra rigidity. Next, wrap the tape on the shaft to make a grip for the microphone.
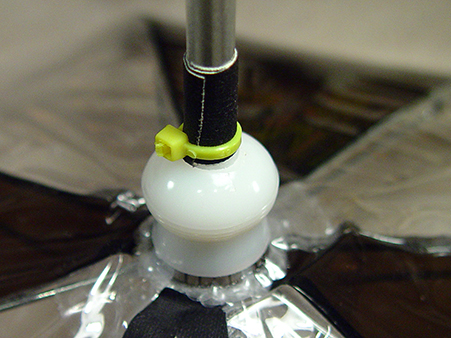
- Step 7: Clip your mic to the shaft and pass its cable through the cut you made in Step 3. Use cable ties over the cable so it doesn’t move. Also, ensure that the mic is facing inwards towards the umbrella and there is a 3 inch distance between the microphone and the umbrella’s surface.
- Step 8: Apply a few more cable ties around the mic cable and holder to give it a neater look.
- Step 9: Your parabolic microphone with dollar shop items is ready. Plug it into your recorder and use headphones to identify the best sound signals.
Let’s uncover how you can make a parabolic microphone with anything round in your home and a rod handle in the upcoming case.
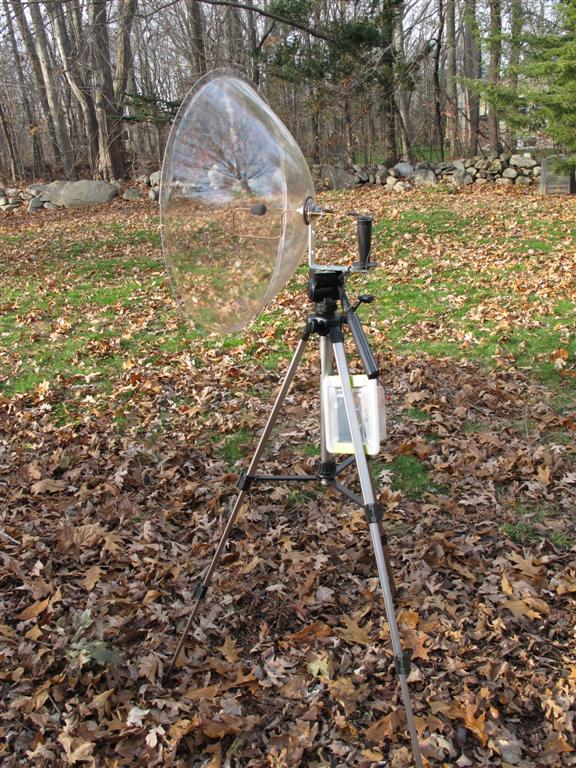
Case 5: DIY Parabolic Mic with Closet Rod Handle
This case is similar to case 1. But the only difference is that it gives you options in choosing the material for the parabolic dish. Moreover, the handle is made from closet rods (you can also use coat hanger wires).
So let’s get started with this.
Materials
1. Parabolic dish (made of work lids, salad bowls, umbrellas, barbeque lids, etc.)
2. Rod (closet rod preferred) for holding the microphone
3. Microphone output (recorder or amplifier)
4. Microphone (Omnidirectional clip-on mic)
5. Tripod mount
Step-by-Step Method of Assembling
- Step 1: Find the focal point of your parabolic mic. To do that, place the microphone right in the center of your dish. Face the dish towards a sound source that is away from it.
- Step 2: Adjust your mic’s distance by placing it in the center. Once you get the best sound quality, it means you have found the focal point.
- Step 3: After finding the focal point, it is time to attach your mic arm. For that, you need a rod passing through the middle of the dish. Assuming you have a closet rod, pass it through the center hole of the parabolic dish.
- Step 4: Attach your microphone at the end of the rod that has struck through the inside of the dish. Make sure you are attaching the mic to the exact focal point area.
- Step 5: Attach a handle or a tripod mount to the remaining piece of rod that comes out from the backside of the dish for a firm grip.
- Step 6: Lastly, connect your mic to your recorder or amplifier to make it functional.
Read the next interesting case to learn how to create a parabolic mic with your old satellite dish that might be somewhere on your roof.
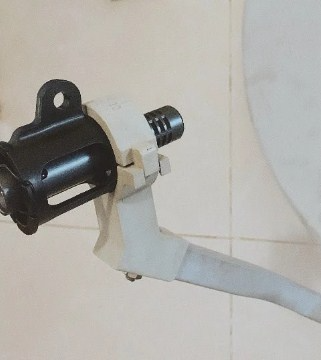
Case 6: DIY Parabolic Mic with Old Satellite Dish
If you have an old satellite dish, you can create a great parabolic microphone from it. Although these dishes aren’t exactly curved like a parabolic dish, you can still use them for a DIY project.
Materials
1. Old satellite dish (with receiver mount)
2. Microphone (Sennheiser e614)
3. Microphone stand
4. Spray paints (not compulsory)
Step-by-Step Method of Assembling
- Step 1: Start by finding the focal point of the satellite dish. Usually, the receiver mount is directed towards the focal point. If not, point a laser torch at the dish from a distance. The point where it reflects the mount’s shaft will be the focal point.
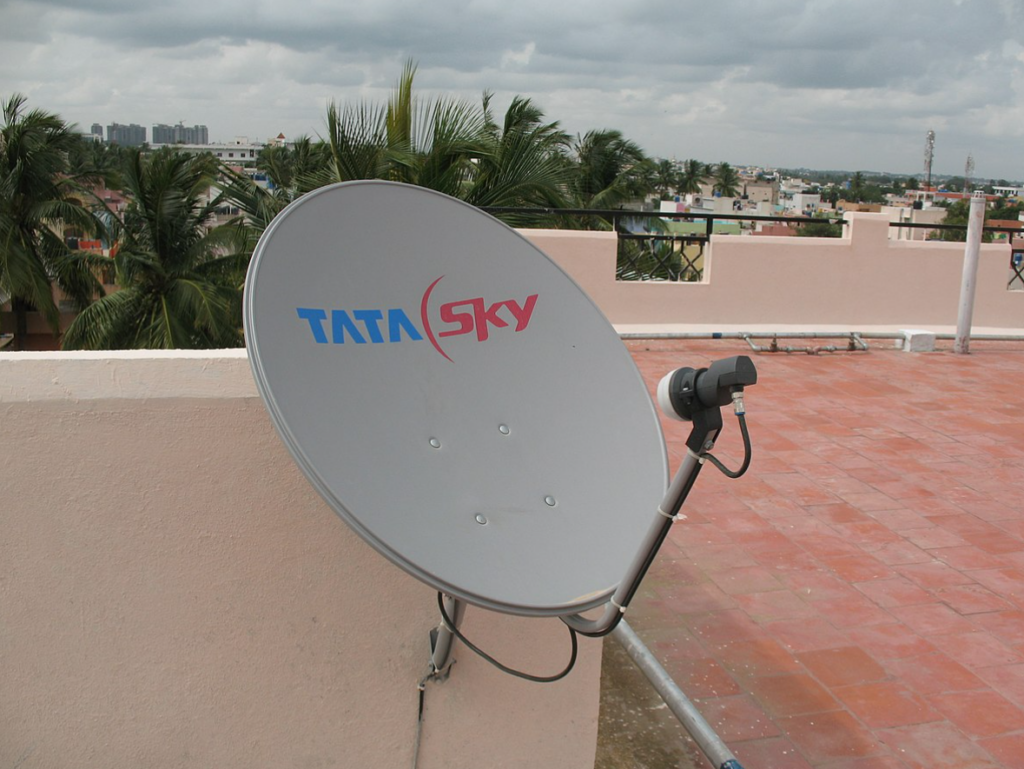
- Step 2: Remove the old receiver and attach your microphone to the mount facing towards the focal point.
- Step 3: At this point, you are already halfway there to make your parabolic microphone. But if you want to make the old dish look new, feel free to spray-paint it with your desired color.
- Step 4: Erect the dish on a custom mic stand and you are all done.
Conclusion
There are 6 ways to make your own parabolic microphone at home with economical and daily-routine things. For instance, you can order inexpensive parabolic dishes and a few supplies from online stores to build a parabolic mic. Likewise, you can turn a trash lid into a powerful parabolic system.
On the other hand, you can also attach microphone capsules and cover them with a plastic sheet to make a great parabolic microphone. Or, you can use an umbrella head to make this mic. At the same time, things like closet rods and old satellites can also be converted into excellent parabolic microphones.
While DIY parabolic microphones enhance your long-distance audio capturing, sometimes portability and convenience are equally vital for quality recording. For quick setups and reliable audio performance, complementing your gear with a wireless lavalier microphone can be a smart solution.