.png)
Reaper is one of the most popular versatile DAW (digital workstation tools) that offers an extensive range of features, including audio mixing, editing, and production. And to make your audio tracks more professional, fade in and fade-outs work as a fantastic technique.
Fade-in and fade-out are primarily used to avoid abrupt volume functions and provide smooth transitions at the beginning and end of the audio regions. As a result, listening to sound becomes more enjoyable. So, having the interest to learn how to add fade in and out in Reaper is a definite thing.
In this article, I will walk you through the step-by-step instructions to add fade in and out in Reaper, covering tools and ways to use it.
Let’s dive into it!
What does Fade-in and out mean in Audio?
Fade-in is the gradual increase in the volume of an audio signal, whereas Fade-out is the gradual reduction in the loudness of an audio signal.
Sounds unclear? Let me explain in detail.
When you set a piece of music (or background noise, or even dialogue) to fade in, it won’t immediately begin playing loudly. Instead, for many seconds, the loudness of the sound will increase gradually until it reaches a stable level.
The same principles apply when a track is fading out, but just at the end. It doesn’t stop suddenly; instead, it gets progressively quieter until you can’t hear it anymore. It frequently uses in songs with a chorus that repeats at the conclusion.

What should you know before using Fade-in and out in audio?
Before using Fade-in and out effects in audio, make sure you have understood the following key aspects:
- Understands the Fade-in and Fade-out use.
- You must check the audio format you are working on.
- Adapt the use of editing software like Audacity or Adobe Audition.
- Make your audio selection clear to avoid any problems.
- Decide the fade duration to make outstanding audio.
- Perform testing before saving and exporting the audio.
But, most importantly, it is crucial to use a high-quality microphone with noise-reduction capabilities, mainly when recording vocals, to get the most out of the fade-in and fade-out effects. When the audio has fewer unwanted background sounds, you will experience the fade-in and fade-out more clearly.
This is because when the audio has loud environmental sounds, they are noticeable in the track, especially when you apply fade-in. But an excellent mic with noise-canceling functionality, like the HearClear Noise Cancelation feature in the Hollyland Lark M1, can mitigate the intensity of noises from the raw audio, allowing you to enjoy the fade in/out more effectively.


Besides these checks, here are a few questions you need to answer.
How long should a fade last?
In most cases, a fade-in is set to be shorter than its equivalent fade-out. Setting your fade-in and fade-out to five seconds will ensure a smooth outcome.
How long should your audio be for a Fade In/Fade Out to function?
Ensure your audio file is, at most, your video clip if you add a separate audio file to your video editor. For instance, if your video clip is a minute long, the audio you want to fade in shouldn’t be more extended. This will permit a smooth fade-out of your music. To get your audio tracks in shape, you may frequently need to cut them.
How to Fade in and Fade Out Tracks in Reaper
Now, you have understood what fade in and out is, its importance, and usage tips. Thus, it’s time to inform you about the best tools that help you fade in and out tracks in Reaper.
Let’s start with fade-out tracks in Reaper.
Item Fades
Well, it is the most used way of fading tracks. If you’re ready to try this, remember this will work only if your song or audio is an item. Either you rendered it into a file, or it was a recording from the beginning.
So, here’s how you can use it.
By default, Reaper adds brief fades at the beginning and end of every item. But you may modify this setting in the Preferences.
Step 1: Hit Ctrl + P on a computer’s keyboard or Cmd+ on a Mac.
Step 2: Select the Media Item Defaults tab.
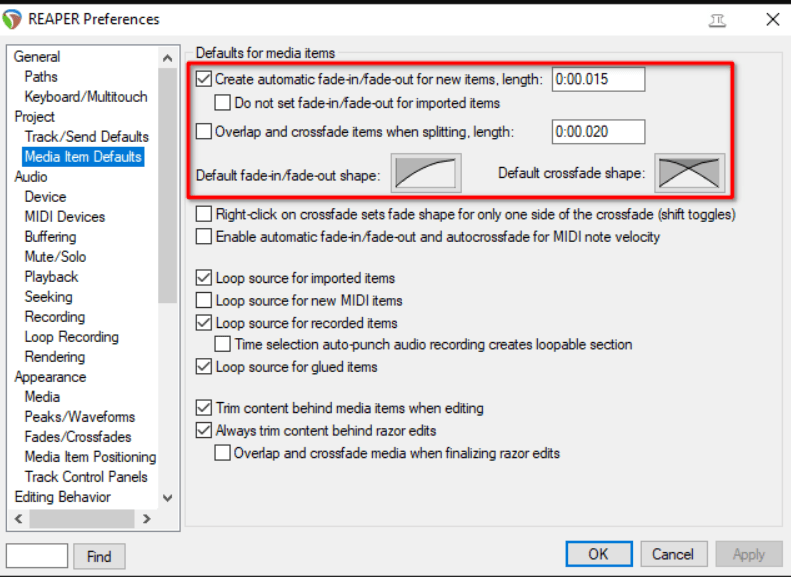
Step 3: Deactivate the auto fades and change the item’s default fade length or shape as per your preferences.
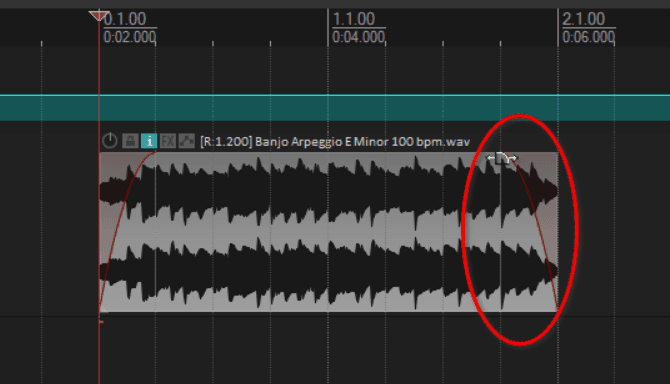
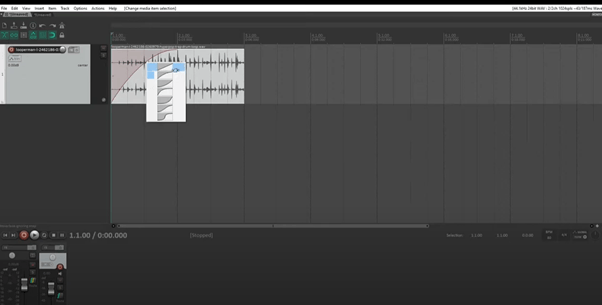
Pro Tip- By dragging in from either the top corner of any object, you can add, or change fades to already-existing project pieces.
Step 4: Create fades as long as it does not meet with another fade and the item allows. Remember, when you drag one fade to another in the same item, the first fade will push the latter.
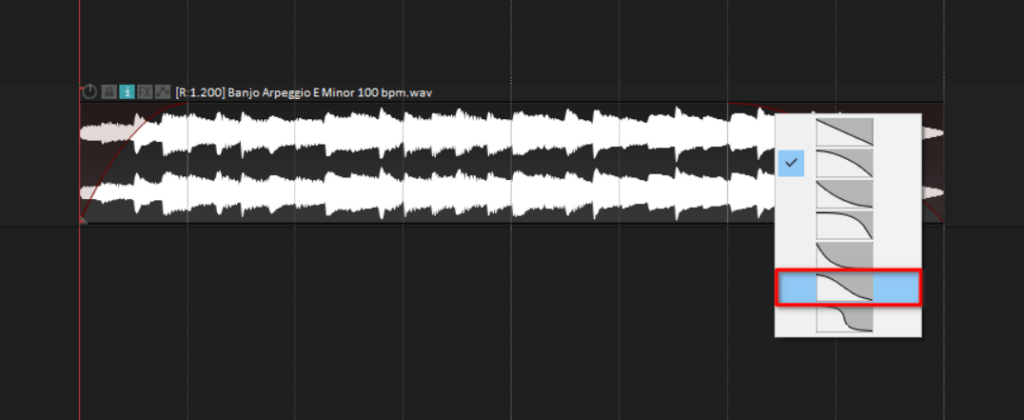
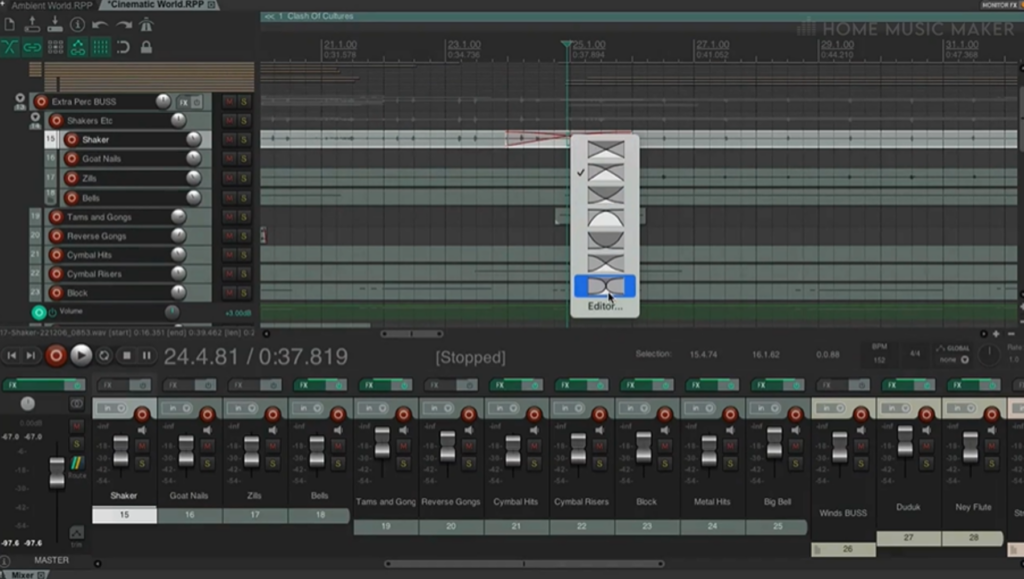
Step 5: Right-click over the fade once you have one to change its shape, if the app asks for it. In this case, I’ll utilize a soft, mellow start and end contour for this piece.
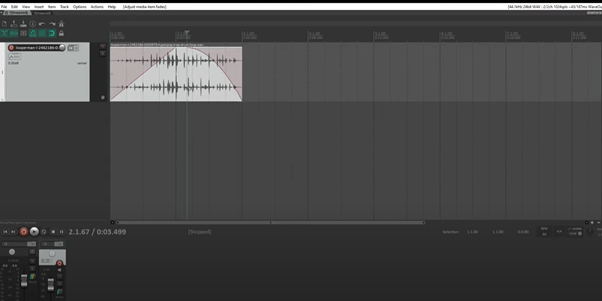
Within seconds, you will find Reaper is automatically updating the waveform to the fade changes you are making in a real-time.
Automation
If you want to fade in and out of the virtual instrument, it is not an effective way to render it and edit the generated file afterwards. Therefore, it is crucial to use Reaper Automation/envelope features to archive this. Here’s how to use it.
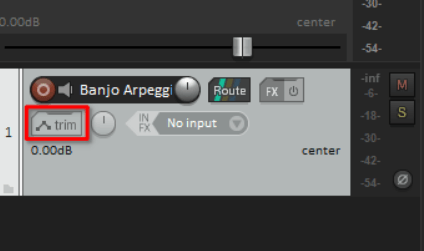
Step 1: Look at the automation features that Reaper offers. Now, click the Trim button on the track to display the automated settings for each track.
Step 2: Following functions, you must adjust in the automation mode.
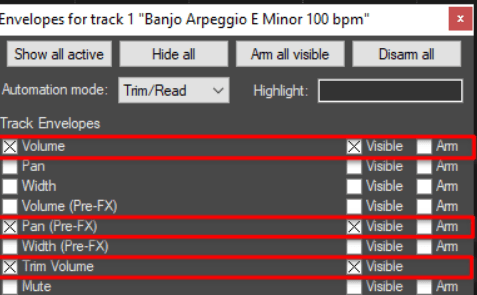
Volume: Although the Fader will cut what you write or draw on the lane, volume is your standard fade automation.
Set the Automation mode to Read if you want the Fader to move following what is printed in the envelope lane.
Pan (Pre-FX): This function works like automating a gain or trim plugin before all of your FX. The waveforms of your track items will display any automation moves made in this envelope lane.
Trim Volume: Trim Volume is a second Volume envelope lane that never causes your fade to reflect movement on it. Very similar to employing a gain or trim plugin for automation at the end of your FX chain.
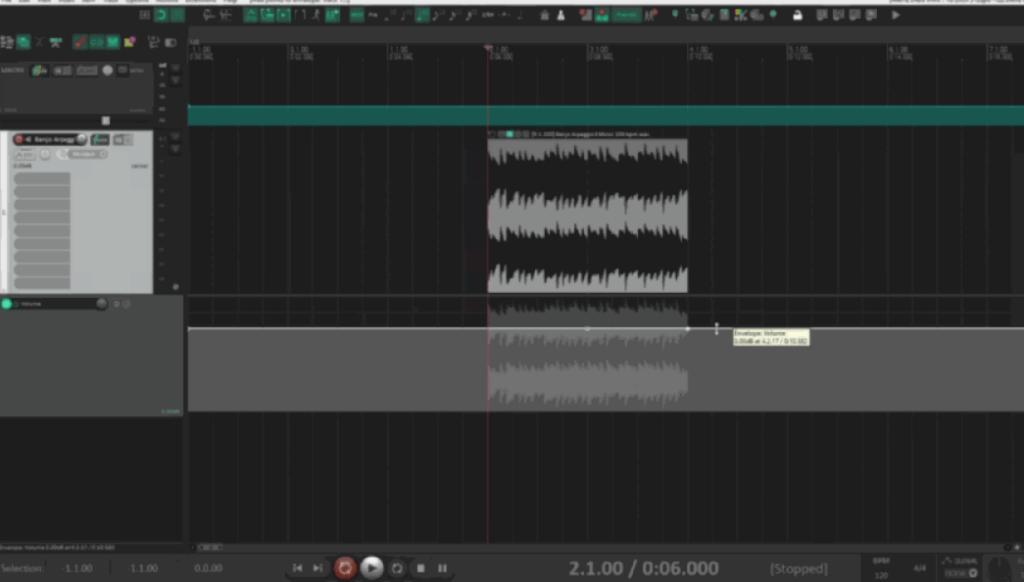
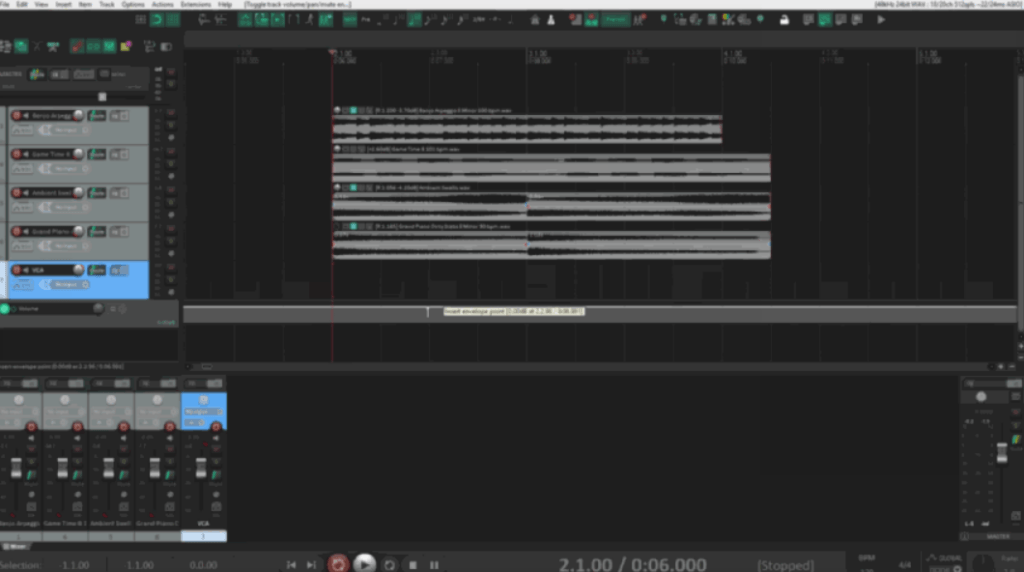
In this situation, I’ll utilize standard Volume automation. To do this, open the Envelope track settings window and select the checkbox next to the name. You can also choose the track and press V to display the lane.
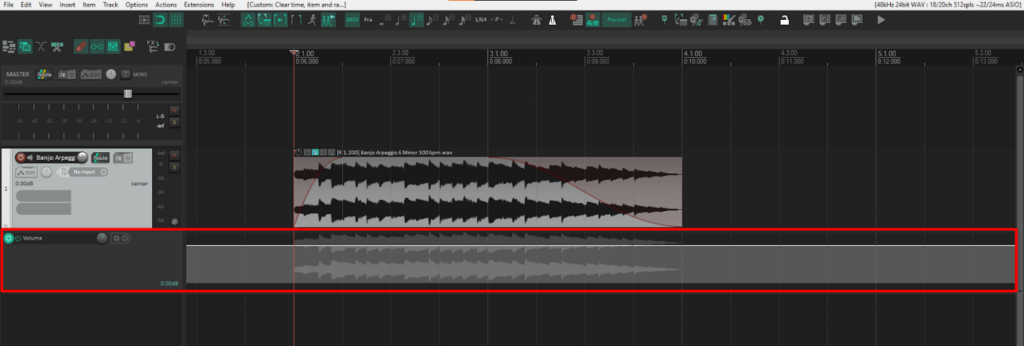
Next, create an Envelope point, hold shift, and click over the envelope plane.
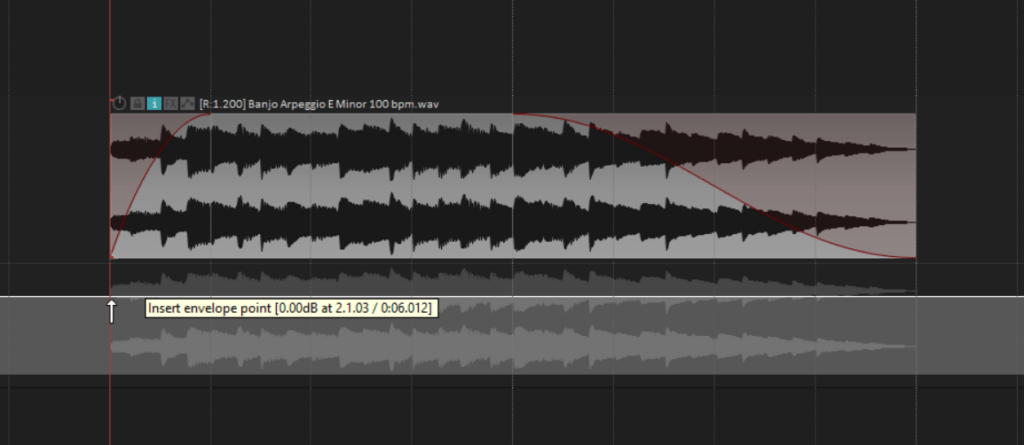
Now, you are ready to create envelope points as much as you need to create fades.
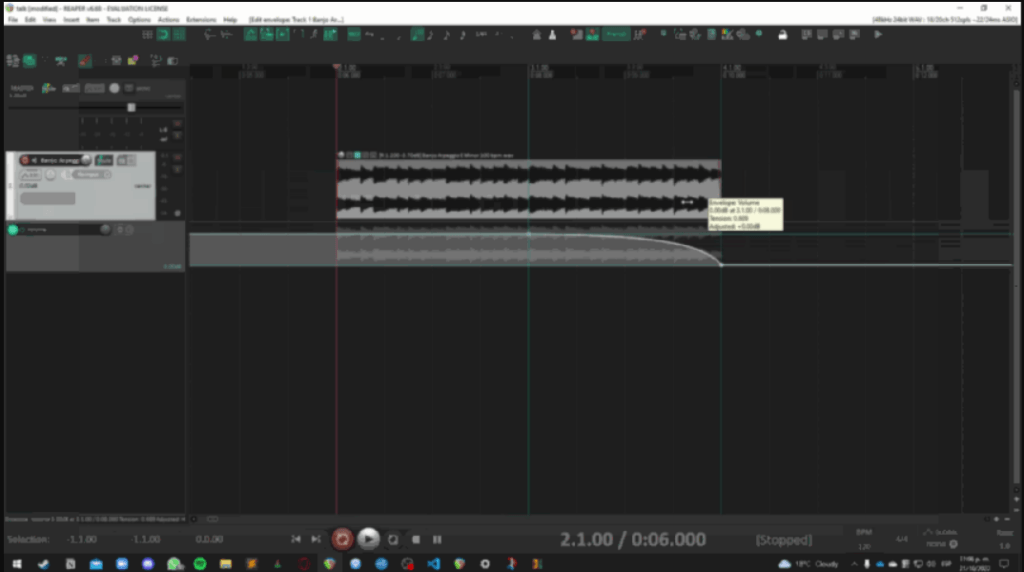
You can alter the curvature of the fade after producing it using automation. Set point shape by performing a right-click on the envelope point where the fading begins. Here, you can choose the curve that your fade should have.

The Bezier curve is typically the best option for song fade-outs. Holding Alt (on Windows) or Opt (on Mac) while dragging the lane that causes the fade up or down will also modify the curve.
Note- Tracks in folders can also be automated to fade out of the group.
VCAs
VCA combines automation and track groups, allowing you to fade out multiple tracks at once without depending on the folders. This automation works like in the last section. Here’s how to use it.
Step 1: Select the tracks you wish to fade. Then, press the keyboard shortcut Shift + G; you may construct a track group that adheres to the VCA.
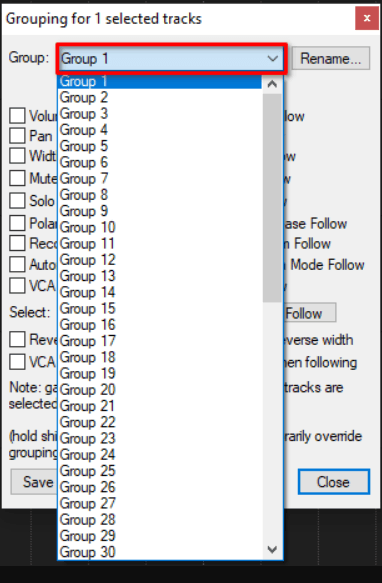
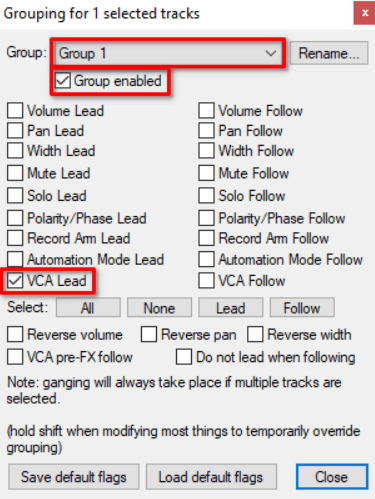
Step 2: Choose the group in the window’s top portion where you wish to allocate your tracks. After that, set up the tracks by checking the VCA follow option and ensuring the group is enabled.
Step 3: Create and select a new track; this will be the VCA track. At this point, do not close the Grouping panel. The flags associated with the VCA track will be updated in the grouping window.
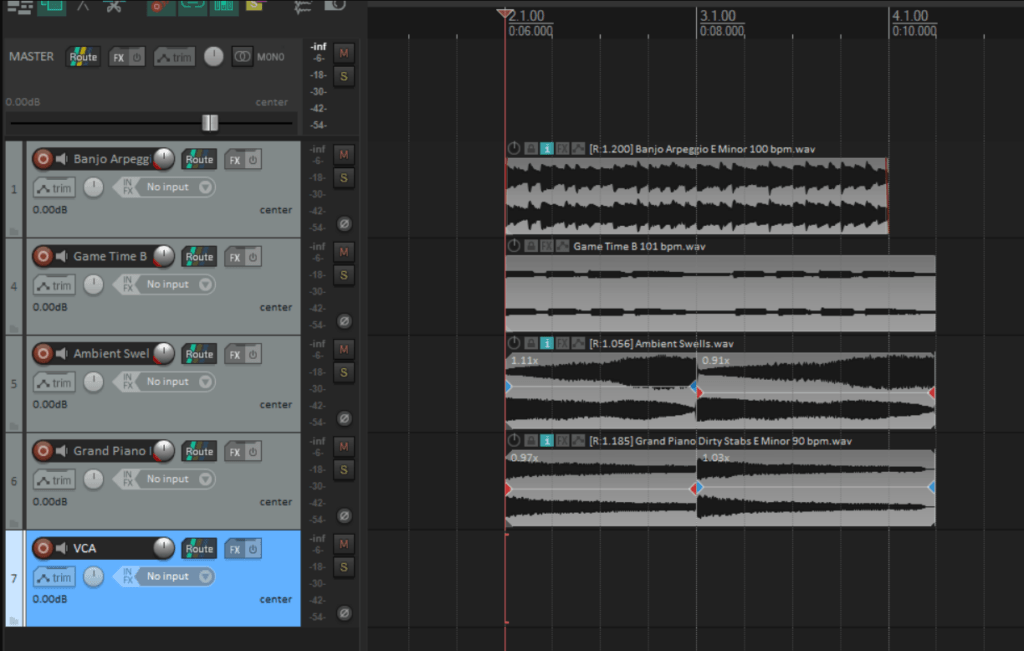
Step 4: Verify the group number is accurate and enabled before selecting the VCA Lead option. By doing this, the VCA track will give the control over the appropriate group.
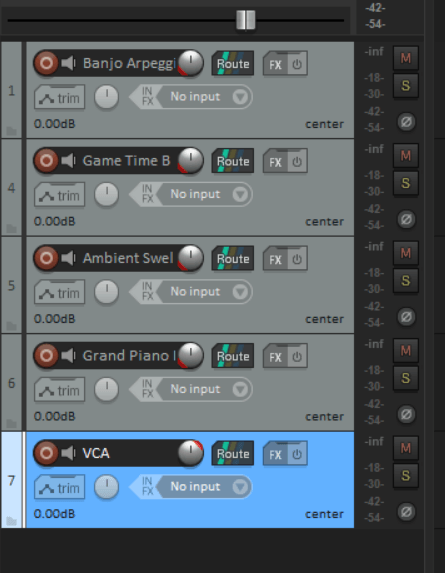
Step 5: The tracks in the group should now have a ribbon indicating their Lead or Follow status above or below the volume knob/fader.
Step 6: You can now observe in the following how the automation entered on the VCA track affects the output of the other tracks.
So, that’s all! This is how you can fade in and out tracks in Reaper with the help of three tool options. However, if you also wonder how to fade in and out on Mac or Android, here we go.
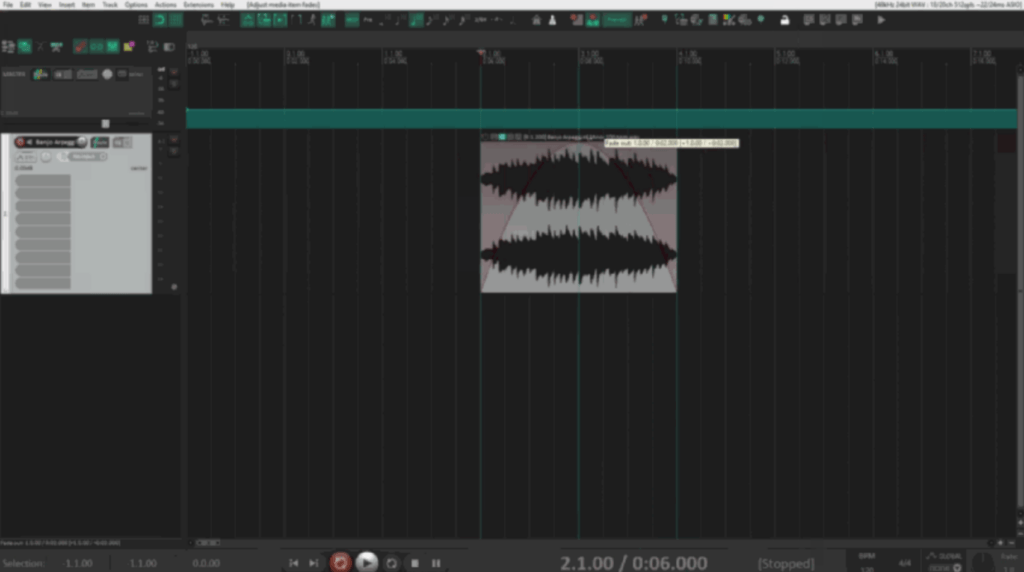
Fade in Tracks in Reaper
If you wish to perform fade-in tracks in Reaper, follow the steps:
Step 1: Choose any above tool, let’s say trim automation.
Step 2: Select the fade-in curve shape and drag the fade-in curve to create fades.
Step 3: To create Fade-out, repeat the same process. Just opt for the shape and create fades. See the below image.
So, that’s all! This is how you can fade in and out tracks in Reaper with the help of three tool options. However, if you also wonder how to fade in and out on Mac or Android, here we go.
How to Crossfading in REAPER?
Before using it, you’ll need the following things:
- The Reaper DAW
- 2 or more media items
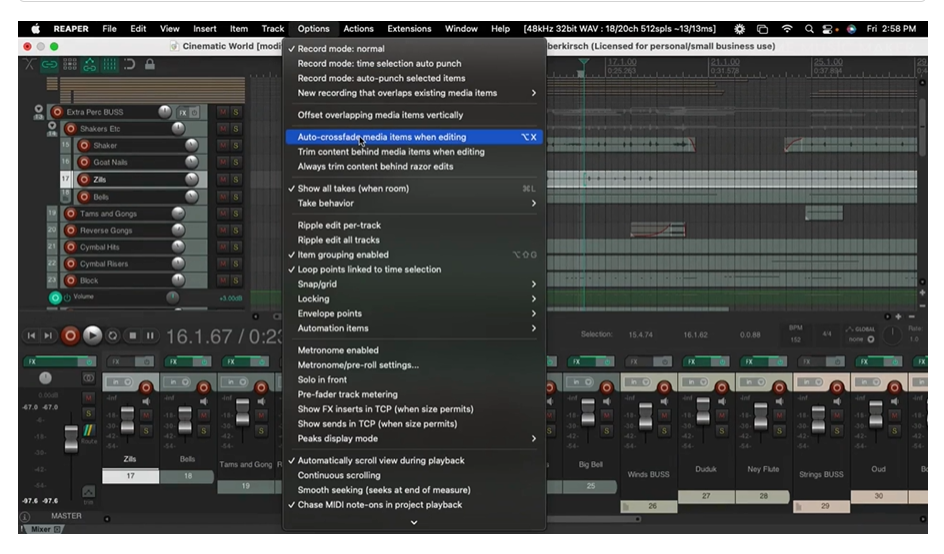
Step 1: Enable auto crossfade
Go to options >> enable the auto crossfade media items when editing the option on the Reaper toolbar.
Step 2: Crossfade Two Tracks
Once auto crossfade is enabled, drag the two tracks together, and Reaper will automatically create a crossfade between the two tracks.
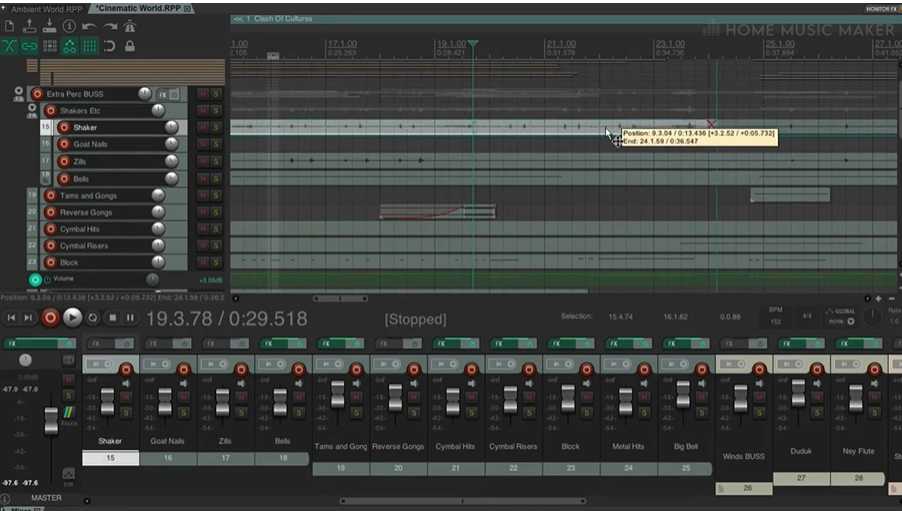
Step 3: Adjust Crossfade Shape and Points
With the help of the mouse, take your cursor over the crossfade until it appears crossfade emblem. Then, right-click on it.
Here, you will get the power to change the crossfade’s shape and access the crossfade editor. This will determine how the transition from one audio track to another audio track sounds.
Alt text: adjust crossfade shape
The crossfade editor allows you to fine-tune the specifics of each crossfade in your project.

Now you have all done. So, sit back and enjoy the music.
Is it possible to fade in audio on a track without splitting it?
Without separating the track in Reaper, it can fade into an audio clip on a track. Here is how you can do it.
Step 1: Launch Reaper, then load an existing project or start a new one.
Step 2: Drag and drop the audio clip into the track or use the “Insert” menu to choose “Media File” or “Record Audio” to import or record the audio clip you wish to use for the fade-in effect.
Step 3: Locate the audio clip in the track and ensure it is chosen once it has been added to your project.
Step 4: Find the “Envelope/Automation” button (it looks like a tiny dot connected to a line) in the track control panel and click on it. The automated lane on the track will be open.
Step 5: Right-click in the automation lane and choose “Volume” from the context menu. For the track, this will produce a volume envelope.
Step 6: To add an automation point at the start of the track, click on the envelope line.
Step 7: Drag the automation point downward to reduce the volume to zero.
Step 8: To change the shape of the fade-in curve, right-click on the automation point and choose “Edit shape”. Depending on the kind of fade you want; you can select different shapes like linear, logarithmic, exponential, etc.
Step 9: Change the automation points’ location and form to perfect the fade-in effect.
Step 10: Play the project or the particular portion where the fade is used to preview the fade-in effect. Continue working if you’re happy with the fade-in outcome.
Easiest Ways to Fade In and Out with Mac, Audacity, and Android
Now let’s see the easiest ways to use fade-in and out on Mac and Android with tools.
Fade in and out with Mac (iMovie)
The iMovie program that comes with Macs makes fading audio extremely simple. Despite what the name might imply, this program can edit audio files just as well as movies. Even better, you can upload the audio track you want to extract from a video here and save it as audio-only. Thus, everyone benefits.
Step 1: Click (+) to create a new project and pick the movie.
Step 2: Press the down error at the top of the screen to upload the audio file from your computer.
Step 3: After selecting the file, click Import Selected.
Step 4: Drop the file into the timeline at the bottom of the screen by dragging it from the library.
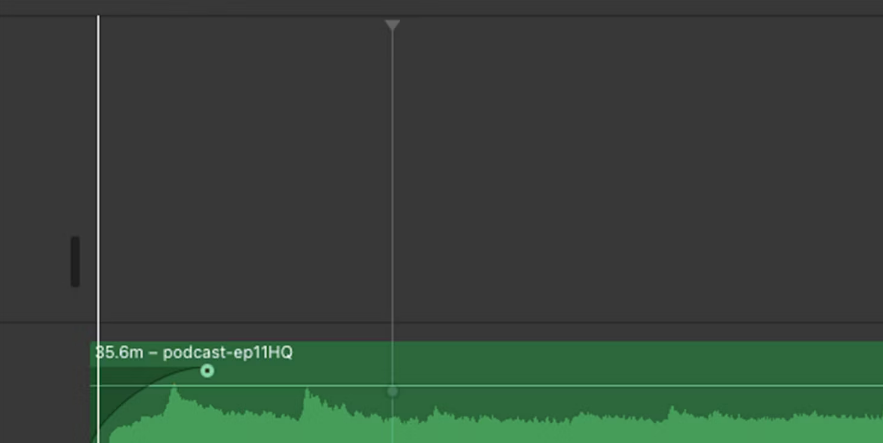
Step 5: To view the beginning of the audio, press Cmd+ to zoom in on it.
Step 6: When your cursor transforms into two arrows pointing horizontally, keep it hovering above the dot at the start of the track.
Step 7: When you get to the part of the audio where you wish the fading to stop, release the dot. The fade-in section will be longer the longer you drag it.
Step 8: Drag the dot at the end of the audio to the left to fade it out.
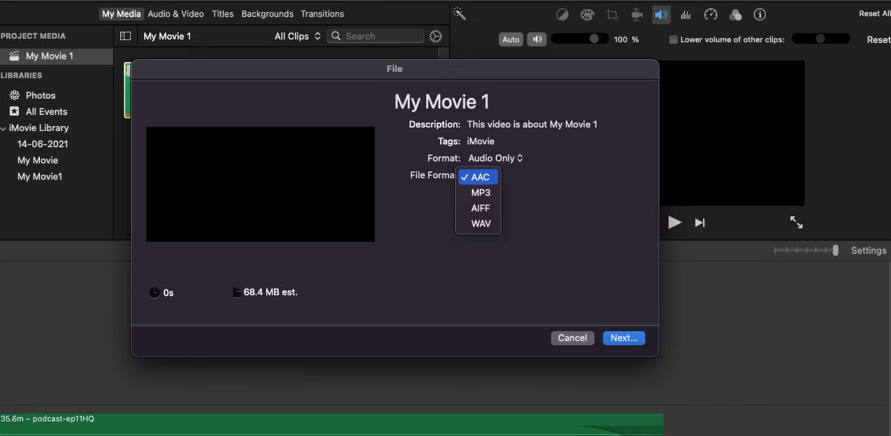
Step 9: File > Share > File should be selected.
Step 10: Choose Audio Only under Format, then choose the desired sort of audio file under File Format. After selecting next, save the finished document to your computer.
Fade in and out with Audacity
Audacity is available as free, open-source freeware for Windows and Mac. It just deals with audio, unlike iMovie, and does it superbly. Moreover, it allows you to add quiet, change the tone, decrease background noise, and even create entire songs. Here’s how you can fade in and out with audacity.
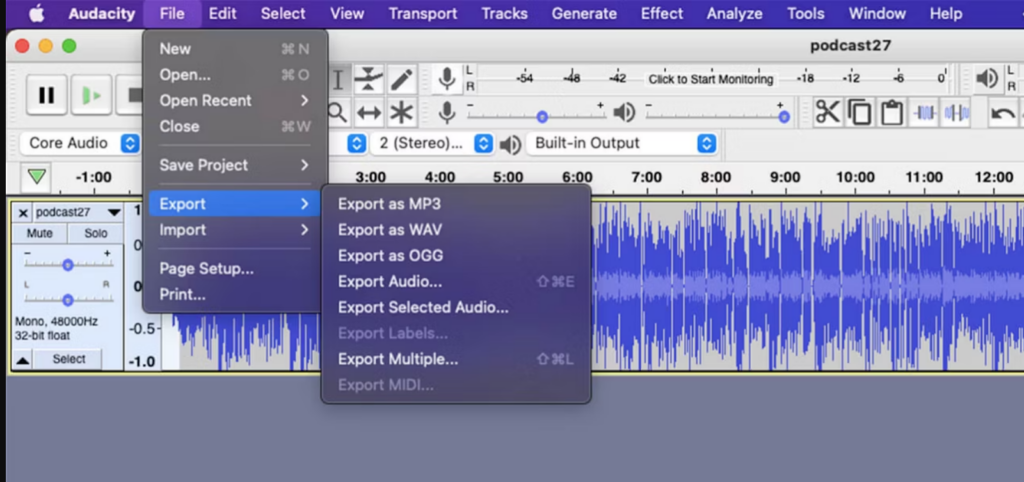
Step 1: Launch the audacity. Go to the file >> open to upload your audio.
Step 2: With the help of a cursor, select the audio you want to fade in.
Step 3: Search Effects >> Fade in.
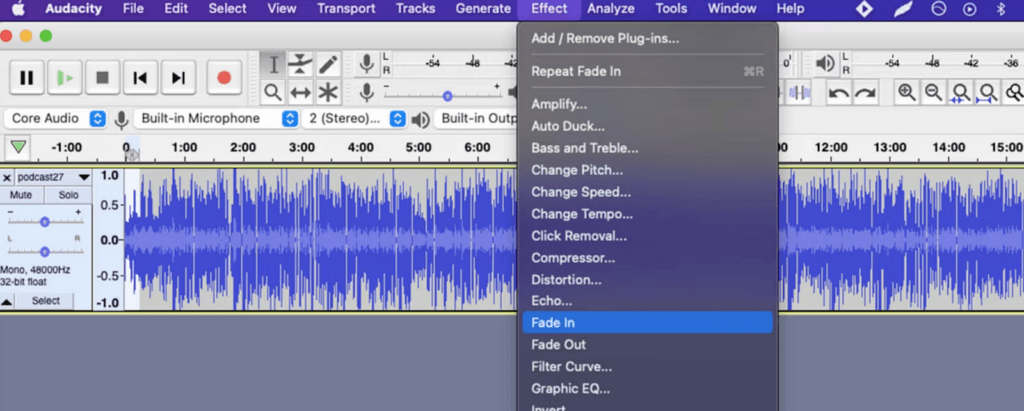
Step 4: To Fade out, select the portion at the end of the track and select effects >> fade out.
Step 5: Select the file type from the File >> export.
You can modify the fade’s length, just like in iMovie. Choose a larger chunk of the audio if you want it to take longer.
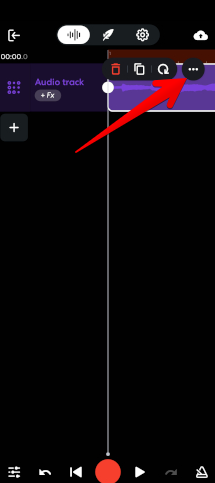
Fade In and Out with Android
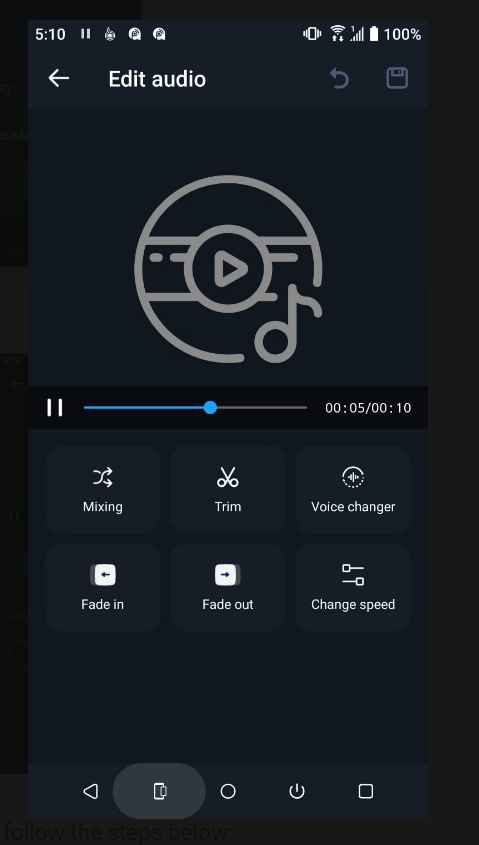
The Fade features in Android are easy to use and implement. Follow the given steps:
Step 1: Go to the edit audio option on the home screen.
Step 2: Select the audio you want to fade in.

Step 3: Choose Fade in.
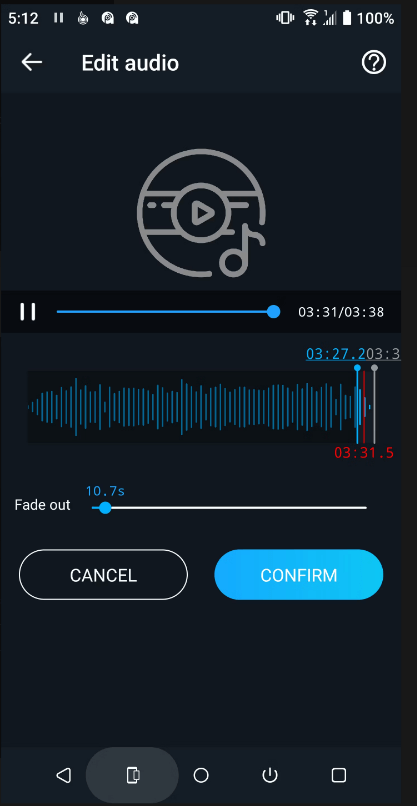
Step 4: Scrolling to the right or left, you may choose how long you want the fade to last. This will show the length in seconds at the bottom bar.
Step 5: Once done, tap on confirm.
Step 6: For fade out, repeat the same steps and tap on the fade out icon.
Step 7: Now tap the disk symbol in the top right corner to save your work.
Are these complicated in use? If so, try Crossfading. It is the most used and demanding editing tool in modern music production. This will also help you to enjoy smooth audio that eliminates nasty glitches, clicks, and pops. Although, it offers a seamless function that you can employ on every Reaper project.
So, why wait? Let’s see how you can use it.
Conclusion
Adding fade-in and fade-out effects in Reaper can considerably improve your audio projects’ quality and professionalism. Using these strategies, you may eliminate abrupt starts or finishes, smoothly transition between audio samples, and provide your audience with a more enjoyable listening experience. Good Luck!