Virtual desktops provide a way to create a 3D environment out of a 2D desktop screen to increase productivity and play games like you are living in it. In most cases, virtual desktops are connected to the personal computer through Wi-Fi, allowing you to have a seamless experience.
However, one of the biggest problems with a Wi-Fi connection is that weak signals or occasional switching off of the Wi-Fi router can disrupt the virtual desktop, making you frustrated.
Therefore, are you looking for alternative methods of using a virtual desktop and wondering, “Can you use a virtual desktop with a cable?”
The short answer is yes, but there are certain ways to do it. So, in this article, we will discuss how to use a virtual desktop with a cable to help you out.
What is a Virtual Desktop?
The desktop of your computer is a graphical UI displayed on your computer’s screen in a physical environment. On the other hand, a virtual desktop permits you to access the desktop environment remotely through various devices, including VR headsets. As a result, it gives you the feeling as if you’re working or playing games in a 3D space.
What is a Link Cable?
A Link cable is a double-ended cable used to connect VR headsets to a personal computer with a wire. It typically features USB-C connectors on both ends, with one end connected to the PC and the other to the VR headset. The Link cable provides a wired alternative to the wireless VR headset connection, ensuring faster and more reliable data transfer, which enhances the gaming experience compared to Wi-Fi connections that might suffer from signal interference and latency.
How Does Virtual Desktop Work with VR Headsets?
In general, virtual desktops are connected to VR headsets through a Wi-Fi connection. However, that is not the only way to use the virtual desktop; you can also connect VR headsets like Oculus/Meta Quest with a Link cable.
How to Use Virtual Desktop with a Link Cable?
Let us learn the simplified steps to use a virtual desktop with a link cable here.
Step 1: Select the Right Hardware
The first essential things you need to use a virtual desktop with a link cable are a personal computer, a link cable, and a VR headset. Virtual desktops work with Meta Quest Link and similar software that connects your PC to the VR headset, so you have to ensure that your hardware is compatible with it.
Below are the hardware requirements for the meta quest link,
- A 3 meters or longer USB-C cable
- A Windows 10 or 11 operating system with 16 GB DDR4 RAM
You can check the comprehensive Meta Quest software requirements by visiting the Meta Quest Link. Furthermore, below are the details of the basic hardware for Meta Quest.
The GPU
Experts recommend choosing the Nvidia card out of the options provided in the supported GPU. This is because Nvidia works better for ASW and has diverse toolkit support. Also, note that Nvidia card specifications for laptops and computers differ because of the performance of their processing units.
For example, the GPU performance of a laptop is 1 tier less than that of the computer. So, you have to choose a better Nvidia card for your laptop.
The VR Headset
VR headsets like Meta Quest 2 or 3 come in two storage sizes. Go for 128 GB if you want something economical and 512 GB if you have a large amount of data to install.
The Link Cable
A compatible link cable for Meta Quest is available on its official website. However, you can also use a third-party cable, such as:
- Anker Cable
- Keuk Cable
Step 2: Install Software and Test Link Cable

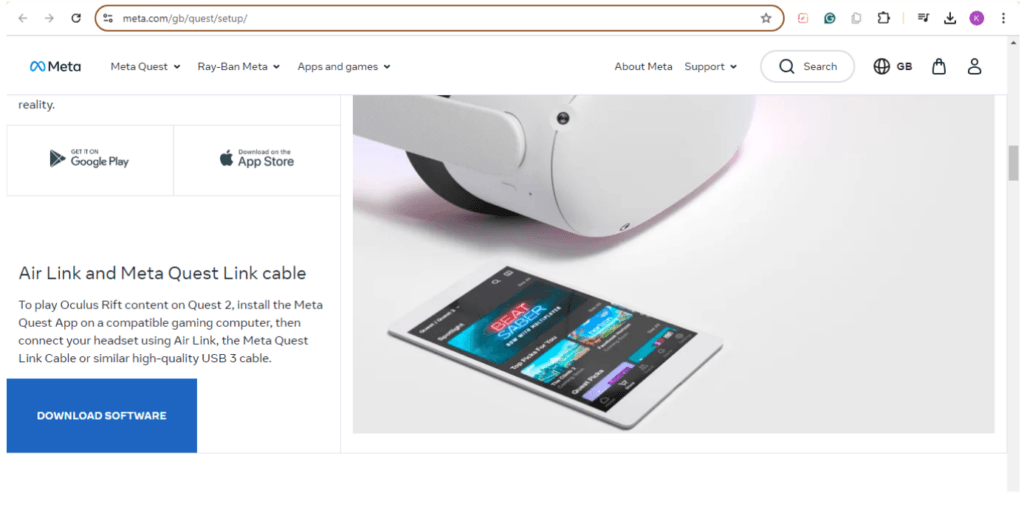
Once you are done with getting the right hardware, the next step is to move towards the software. Meta Quest Link works through Oculus app software. Here is how to download it,
- Go to the Quest official website by clicking on the “Download Software” option provided on the main page.
- After the software is downloaded, go to the download menu on the top right of your computer screen, it is time to install and set it up.

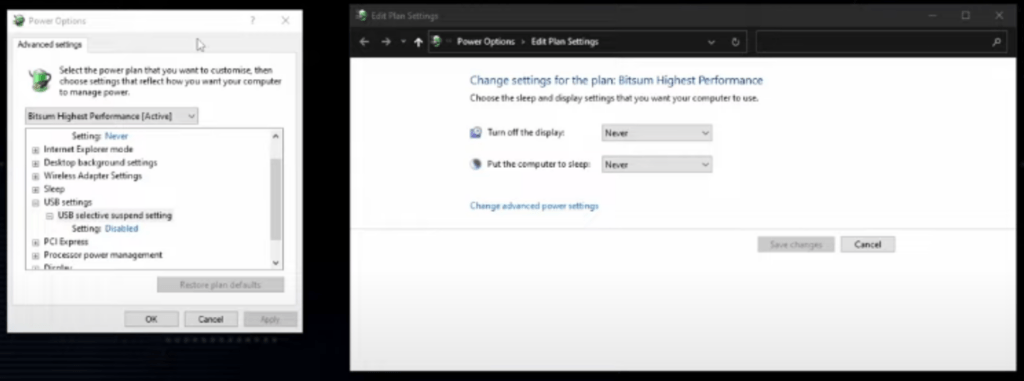
Once you are done installing the software, a window will open up. You have to set the power plan like this:
- Go to the start menu and search for “ edit power plan”
- On the right side of the screen, you will see the “advanced settings” window
- Choose “highest” or “high” performance here depending on your needs
- Now, disable the “USB suspend” settings and click on “OK”
- Launch the Oculus app from the “start menu” and select your headsets
- Choose the “Link Cable” from the options you see after choosing your VR headsets
From the steps mentioned above, you are almost done with your software settings. Then, simply connect one end of your Link Cable to the USB-free port of the PC and the other to the VR headsets.
You can also run a speed test during this to check out if the bandwidth is over 1.5 Gbps. Lastly, continue and move to the resolution and graphics settings.
Step 3: Adjust Resolution and Graphic Settings

To adjust the resolution and graphic settings,
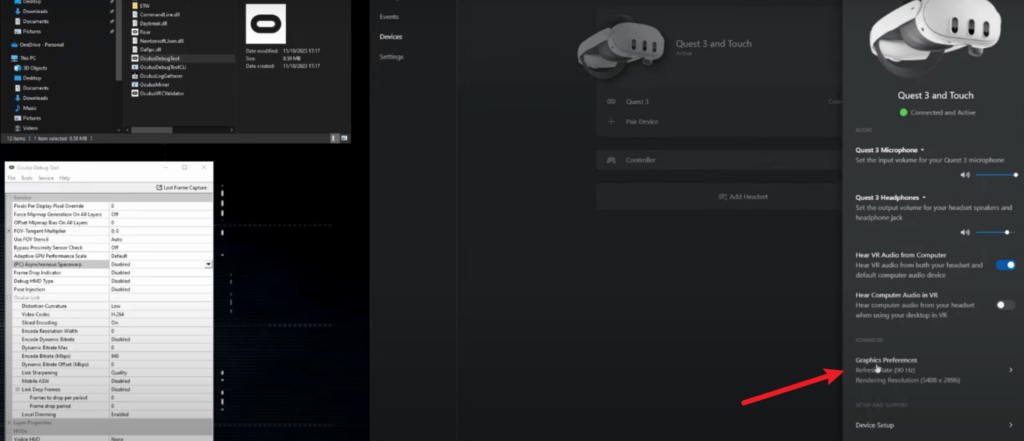
- Click on the Quest headsets, and a window will open up on the right side of the screen
- In the lower section of the window, go to “graphics preferences”
- You can click on the “automatic settings” option to let the software choose recommended settings
- Then, hit “OK” and you are done
However, if you are running a game that works better on high resolution and graphics, turn off the automatic option and select the maximum refresh rate and resolution.
Step 4: Make Changes to the Oculus Debug Tool

Before launching your game, you have to debug the Oculus. Meta link software has a debug tool to help you with it. It is available in the “File” menu, specifically in “see program files”.
When you click on the “OculusDebugTool”, another window will open up on the left side of the screen. You can make changes to the debug tool by following these steps,
- You can change the Encode Bitrate here, which is 500 at the max (for a higher bitrate, you have to copy it in the notes and paste it into this section, and it can go up to 940)
- For slow flight games, go to asynchronous space wrap and enable ASW
- For systems that do not run efficiently on lower settings, change the vertical and horizontal FOV to 0.8 or lower
- For better performance, set the Video Codec to “H.265” and distortion curvature to “High”
- For unwanted artifacts, turn off the sliced encoding
Lastly, scroll down at the end of the window to see performance which is available in the “Visible HUD” menu.
Also, note that the above-mentioned settings are just an example and you have to set up the Oculus Debug Tool according to the game you are playing, the performance of your computer, and the results you want.
Step 5: Launch Game

Now, we are heading towards playing the game. Therefore, launch a game of your choice. Below is how to launch the game:
- Wear your VR headsets connected to the PC through a link cable
- Click on the “Quest Link” option on the window that pops up
- You will see the “Connected” window, click on the “Launch” button here
- You can launch the game either through VR headsets or stream library
- When you click on the game you want to play, choose any mode from the stream VR or Oculus VR mode (note that Oculus VR mode is preferred)
Step 6: Adjust Steam Settings

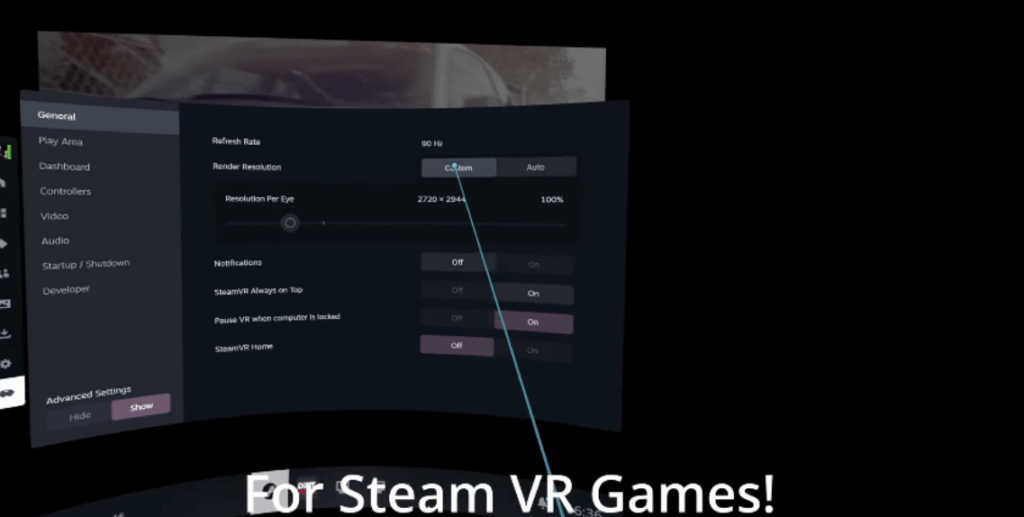
Put your headsets on and go to VR steam settings, which are present in the Oculus mode. Most of the options here are already set. But you can customize it as you want. These options include,
- Refresh rate
- Rendered resolution
- Resolution per eye
- Notifications
Optimal Steam settings depend upon the game you are playing.
Best Link Cable Settings for High-Quality Wired VR
Your gaming experience while using a link cable with a VR headset can be defined by link cable settings. You mainly have to set Occulus and Debug tools. So, let us learn the best link cable settings for high-quality wired VR.
Step 1: Set Graphics Preferences

First of all, open your Quest software and click on the “Devices” menu on the left side of the screen. Let’s use Quest 3 as an example. Follow these steps to set graphic preferences.
- Click on the “Quest 3 and Touch” menu, and you will see a window pop up on the right side of the screen
- Scroll down to the “Graphics Preferences”
- Here, select the refresh rate (72 Hz works well for flight games, while 90 Hz is better for driving simulator games)
- For the optimal visual quality, increase the resolution to 1.3x
- Restart the Quest Meta software after setting up the resolution
Also, note that if you find any issue with the performance, lower the refresh rate and resolution one by one.
Step 2: Set up the Oculus Debug Tool
As mentioned above, the Oculus Debug Tool is present in the files menu. Here are the optimal settings for the debug tool,
- Disable the ASW so that your headset does not shake the view when from asynchronous to synchronous mode
- Set the video codec to H.264
- Disable the Encode Dynamic Bitrate to reduce unwanted noise in the game
- Type “900” in a window, copy it, and paste it into the “Encode Bitrate” option
- Under the Visible HUD menu, select “Performance Summary”
- If you use glasses while wearing VR headsets, FOV to 0.9 or 0.8
Benefits of Using a Virtual Desktop with a Cable to Play VR Games
Here are the 4 reasons why you should use a cable to play VR games.
1. Stronger Connection
While a virtual desktop offers a great experience when connected through Wi-Fi, the instability of the Wi-Fi connection can disappoint you when you play VR games in which you are required to move every instant.
On the other hand, the link cable is directly attached to the PC and VR headsets. Thus, link cables offer a more robust connection that does not lag or buffer during playtime.
2. Less Latency and More Bandwidth
Bandwidth is the amount of data that can be transferred between the PC and headset, while latency is the time taken to transfer that data. The direct connection of the PC with the headset reduces latency and enhances bandwidth.
Thus, it adds to the instant visualization and responsiveness of your interactions in the gaming world.
3. Maintains VR Headset Battery
On average, it takes around 3 hours to charge VR headsets and the battery lasts for approximately 2-3 hours. This short battery timing is one of the major drawbacks of wireless visual desktops.
The Link cable can provide power to the headsets directly and help maintain the battery level during use. This reduces concerns about the battery running out during a session, although it may not fully charge the headset while in use.
4. Improved Graphics
The bitrate with a Wi-Fi connection can go up to 500 Mbps. Although it is suitable for playing video games, a higher bitrate provides a superior experience with better graphics, clear images, and natural visuals. Link cable allows you to increase the bitrate up to 960Mbps.
Furthermore, there is little to no lag and black mask effect on higher bitrate.
Conclusion
A virtual desktop takes your VR gaming experience to the next level by creating a 3D environment. It can be connected to the VR headset through Wi-Fi or Link Cable. Link Cable reduces the need to charge the headset, has low latency, provides better graphics, and does not lag due to weak connection.
Therefore, you can utilize it to connect your PC to the VR headsets. In this article, we have discussed a step-by-step guide to connecting and setting the VR headsets with the Link cable to help you play your favorite games without trouble.
If you’re exploring options to keep your desk setup clean, seamless, and completely cable-free, consider a wireless video transmitter. It simplifies connectivity, providing reliable wireless video transmission without cluttered cables, helping you easily manage your virtual desktop setup.
FAQs
Q1. Do you Need a PC to Have a Virtual Desktop?
A virtual desktop is a virtual setup that allows you to interact with your computer in a 3D environment. To operate a virtual desktop, you only need a compatible device and VR headsets.
It is not necessary for the device to be a PC, as virtual desktops also work on laptops, mobile phones, and tablets as long as they support virtual desktop software.
However, you need a PC to play PCVR games through a virtual desktop.
Q2. Can you Use a Virtual Desktop with USB?
Yes, you can use a virtual desktop with a USB. However, there are fewer things to keep in mind.
- Your VR headsets, PC, and software must be compatible with a USB connection
- You need to set the USB redirection
- It might provide lower performance than that of using a virtual desktop with a link cable
Q3. Can a Virtual Machine Run Without the Internet?
Just like a PC works without an internet connection if you have games installed into it, a virtual machine can run without the internet as well. However, it is essential for the virtual machine to have data such as files, games, software, and other applications fed into it.
Also, note that only offline apps will work on it, and you have to connect to the internet to perform any online function.
Q4. Is Virtual Desktop Better than SteamVR?
Although SteamVR works better for gaming because of its better integration, the virtual desktop is an overall better choice. This is because:
- Virtual desktops have advanced and diverse features
- It is compatible with a wide range of VR headsets
- It can be used for other functions like remote work in addition to gaming
Q5. What Device Can You Run a Virtual Desktop on?
You can run a virtual desktop on any device that supports virtual desktop software. For example, computers, laptops, Android, MacBooks, iPhones, iPads, tablets, VR headsets, smart TVs, and thin clients.


.png)
.png) Français
Français .png) Deutsch
Deutsch .png) Italiano
Italiano .png) 日本語
日本語 .png) Português
Português  Español


