Do you crave better webcam quality without spending on another equipment? If yes, this article will be a great teacher to help you convert a USB webcam to HDMI. Apart from quality, when you turn your webcam signals into HDMI, it opens several doors of compatibility. You can use your camera with monitors, TVs, and various recording gears without a hitch. Since HDMI typically supports enhanced video quality compared to USB, you can enjoy a nice view from your cam.
So, if you are still trying to figure out how to make your webcam into an HDMI device, here you will find 5 ways to do it. Additionally, this article will also tell you the 3 best webcams with HDMI output in case you want to grab one.
So let’s get started.
Can You Plug a USB Webcam into HDMI?
No, you can’t. HDMI and USB are two different interfaces used for distinct purposes. The main function of a USB is to supply power and transfer data. In contrast, the HDMI is designed for transferring video and audio signals. To connect your webcam to an HDMI port, you will need an intermediate device with HDMI input features. This device or medium will be a bridge to convert the USB signals into HDMI.
5 Ways to Convert USB Webcam to HDMI
While it may almost seem impossible to convert your USB webcam into HDMI signals, you can do a few things to make it happen. If you want to display your webcam signals to your TV, ATEM, or director’s monitor, these 5 ways can help you convert your USB webcam into HDMI. Try them all and see what works for you. All you need to do is follow the steps and instructions of each method correctly.
Method 1: Use an HDMI Adapter
HDMI adapters are simple devices that can transfer your USB signals into HDMI. So, to apply the instructions of this tutorial, you will need to have this adapter and a display source, such as a TV. For this method, an OBSBOT HDMI adapter is used, but feel free to have any device that functions in the same way.
- Step 1: Unbox your HDMI adapter. You may find four ports on it. The main HDMII output port is at one end, and a power source port and USB-A and USB-C ports are on the other.

- Step 2: Connect one side of the HDMI cable to the HDMI adapter and the other to the display source.

- Step 3: Connect the power cable and USB webcam to the HDMI adapter. However, before connecting the USB cam, make sure you know whether you have A USB Type-C or USB Type-A webcam port. For example, the screenshot below shows that the USB webcam is connected to the USB Type-C port since the camera has a Type-C port.

- Step 4: Right after making the correct connections, your USB webcam will be displayed to your display source through an HDMI port, ensuring that the signals have been converted to HDMI.
Method 2: Through HDMI Encoder/Decoder
This is the longest and a bit technical method that requires a few manual configurations. Unlike the previous method, you will need an HDMI encoder/decoder, a wired internet, a display source, such as a TV with an HDMI port, and a laptop to make adjustments in the settings. Therefore, if you are following this method, make sure you don’t miss any step.
- Step 1: First, you need an HDMI encoder/decoder. For this tutorial, the TBS2603AU is used. However, you can use any other device with similar functionality.
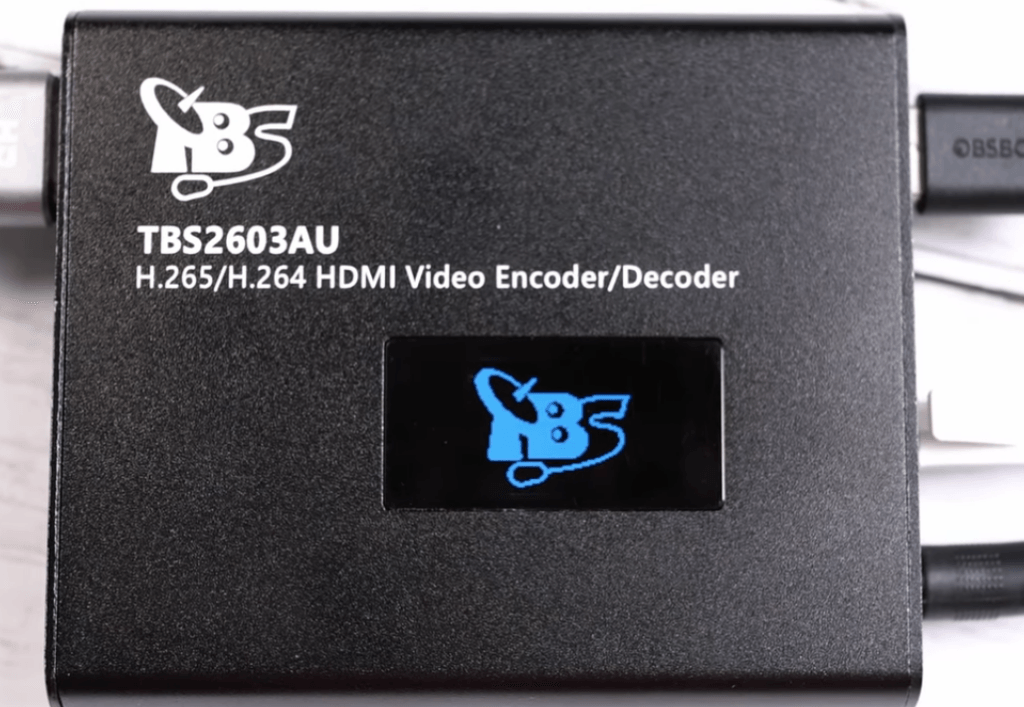
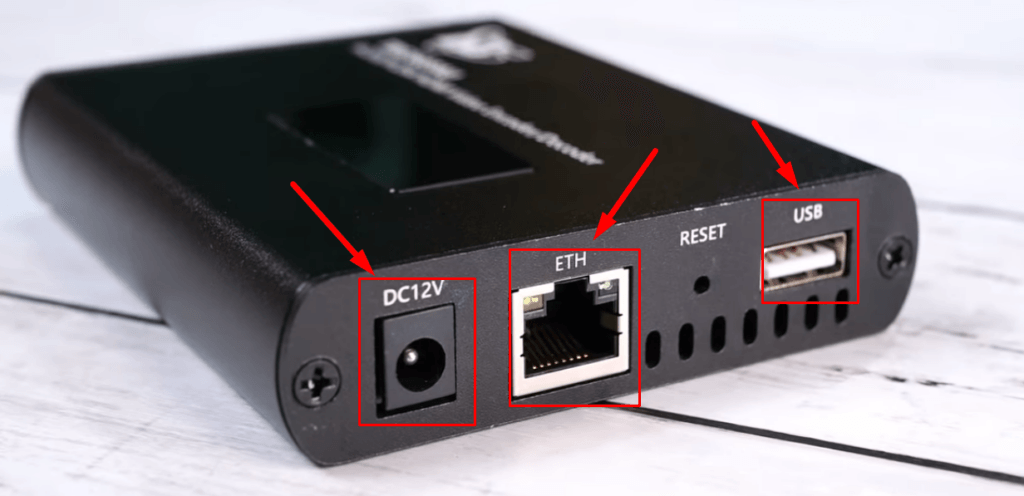
- Step 2: On one side of this encoder/decoder, you will find a power source (DC 12V) port, an Ethernet port, and a USB Type-A port.
On the other side, you will find HDMI I/O ports and audio I/O ports. However, in this slot, the main usage will be the HDMI Out port.
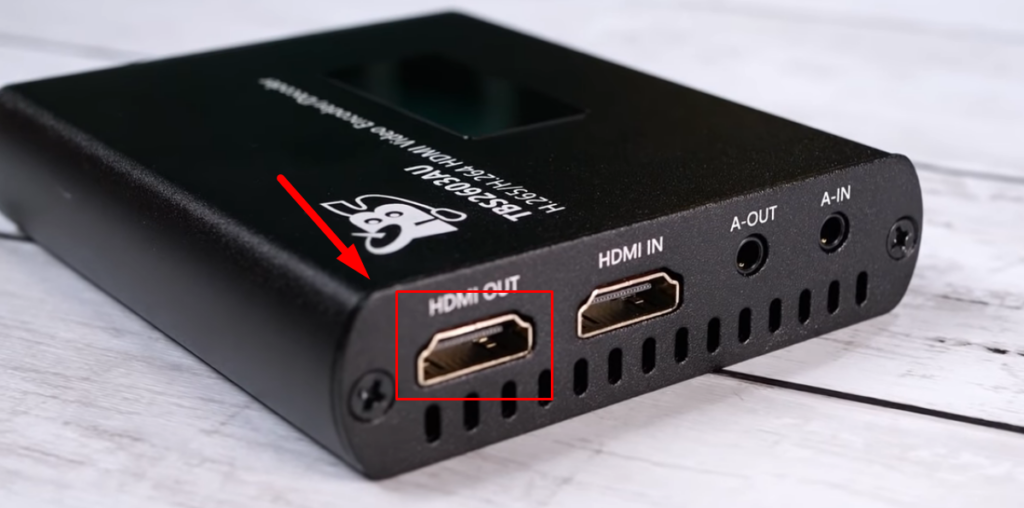
So, connect the device to the power cable, and it will turn on. On the small display screen, you will see important information about the IP address and HDMI with “no input” status at the moment. Also, connect the encoder/decoder with your display source using an HDMI cable. Also, attach your webcam to this device.

- Step 3: So use a docking station with an Ethernet port. Connect it to your PC or laptop. Take the Ethernet cable and attach one end to the docking station and the other to the encoder/decoder. You should keep in mind that, at this moment, you will be using your laptop to gain access to the Ethernet connectivity. In later steps, you will need to attach your main Ethernet cable directly to the encoder/decoder.
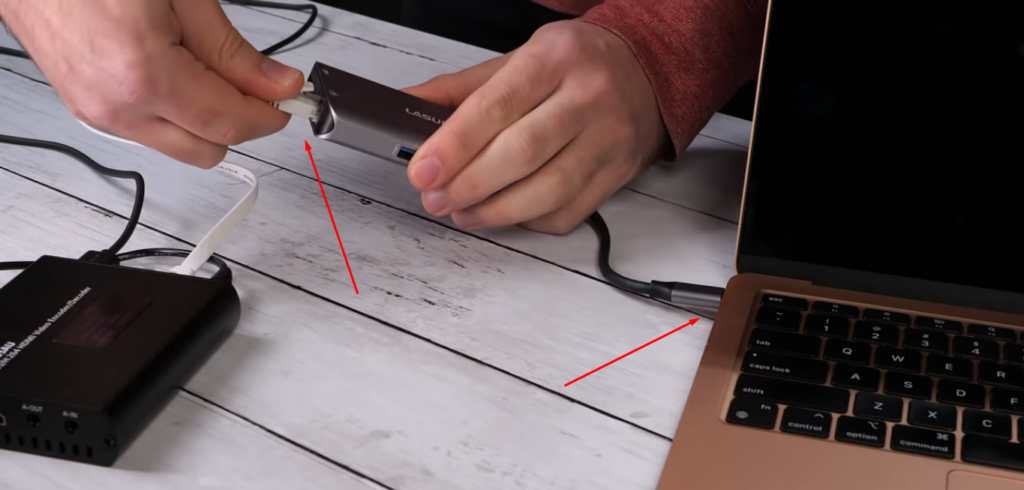
- Step 4: Whether you are using a Mac or Windows, the configuration will remain similar, as seen in the following steps. So open your network settings on your laptop or PC. Click the “dropdown menu” next to “Configure IPv4” option.

Choose “Manually” from the list of options.

This will allow you to change your IP address.
- Step 5: Now, you need to change the IP address. The best way to choose an IP address is to look at the device’s display screen and add “1” to the last digital.
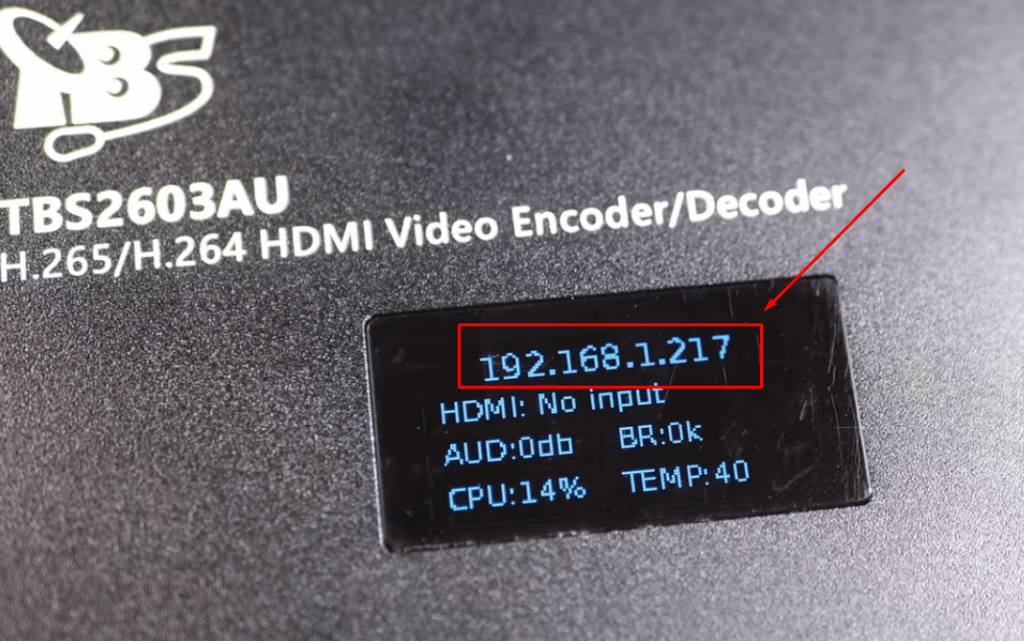
For example, if you look at Step 2, you will find that the IP address on the encoder/decoder device was “192.168.1.217.” So, adding “1” to it will turn it into “192.168.1.128.”

Note: This IP address may appear differently on your system. The IP address you can see in this guide is just to help you understand the concept.
- Step 6: Next, you need to change the “Subnet Mask” from your network settings. So, if your subnet mask is 111.111.0.0, remove the second last zero and replace it with the same digits, such as 111.111.111.0. So, if you look below, you will find out that previously, the Subnet Mask was “255.255.0.0.” But now it is changed to “255.55.0.0.”

Once done, click the “Apply” button to save the changes.

- Step 7: Open your web browser and type in the IP address your device shows on the display screen (in this case, 192.168.1.127).

You should be able to see your device’s login screen. So, enter the default username and password and hit “Enter.”
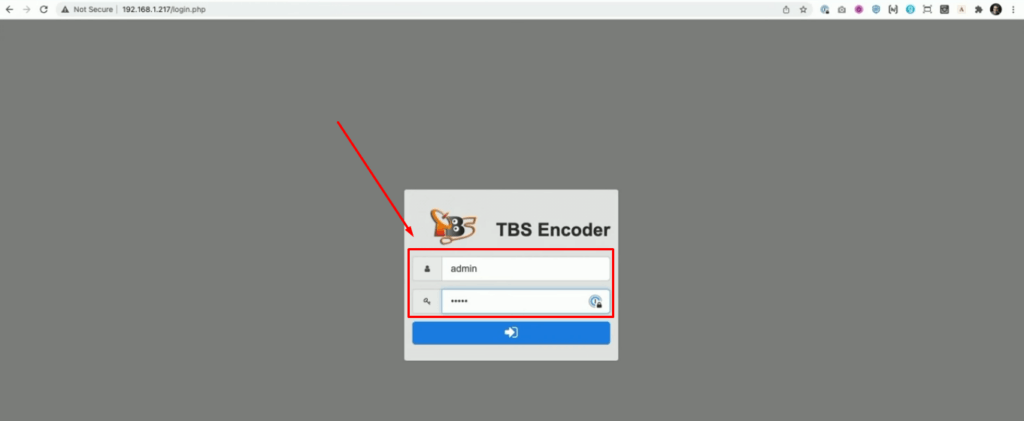
- Step 8: Now click the “Options” icon and choose “Settings.” You will see a “LAN 1” page with different options, such as IP, Mask, Gateway, and more.
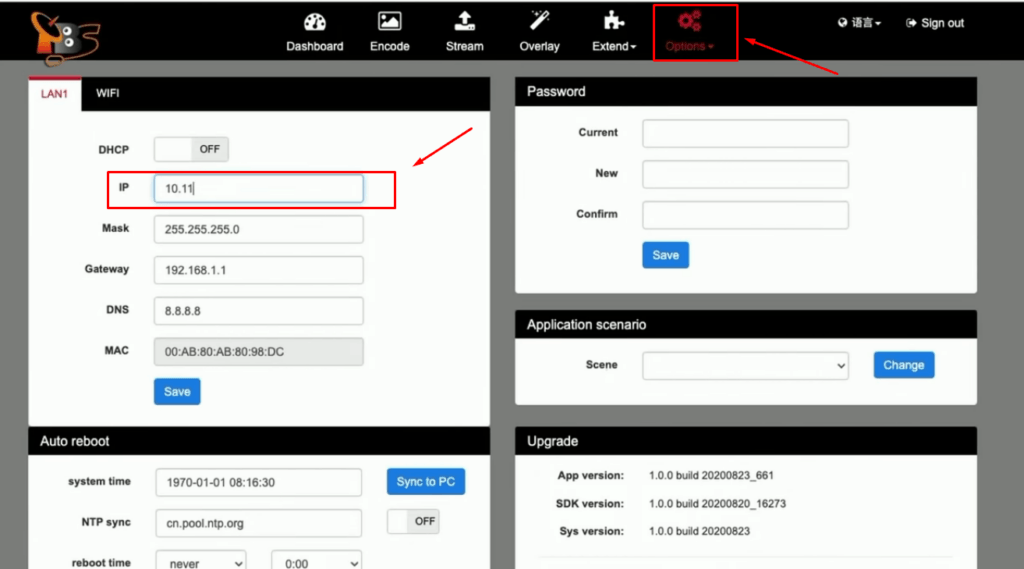
Here, you will need to change three things. The “IP” where you will enter your static IP address that is free. The “Mask” where you will enter the previous version of it, such as 255.255.0.0, and not this one, 255.255.255.0. And your “Gateway” address. Then, click the “Save” button.
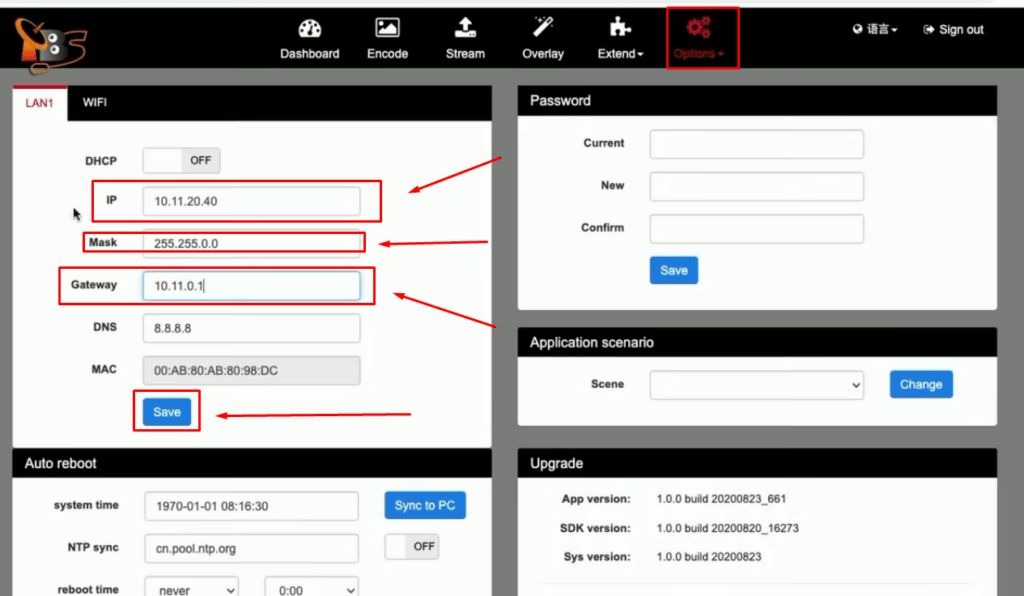
Wait for a few seconds to let your device show the new IP address.

Then, disconnect the Ethernet from your PC and docking station and connect it to the device directly.
Note: If you don’t know your IP, Mask, and Gateway address, you can contact your internet provider to get this information.
- Step 9: Log in again using the new IP address you can now see on your device.
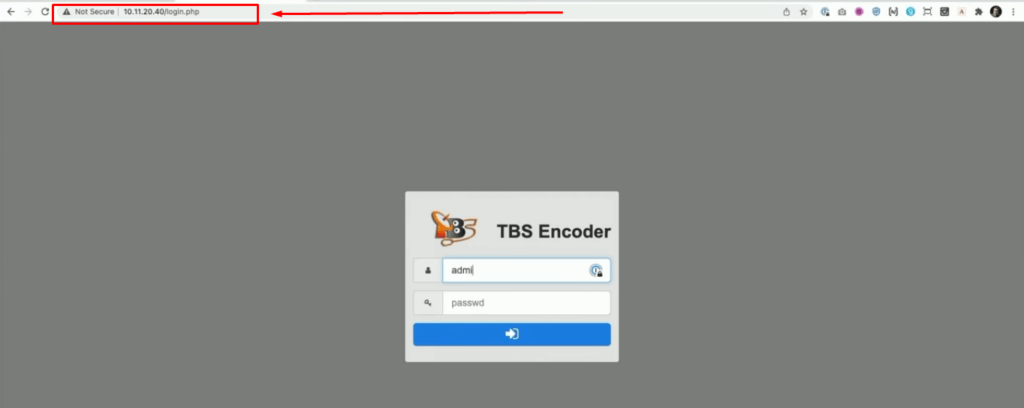
- Step 10: From the top menu, click on the “Encode” option.

- Step 11: Look down in the second window, and you should see that the “HDMI” is toggled “ON” and the “USBCam” is toggled “OFF.”

- Step 12: So you need to toggle off the “HDMI” and toggle on the USBCam options, and click save.

- Step 13: Next, click on the “Extend” option from the top menu and choose “Video mix.”

- Step 14: Look at the “Output Config” and you will see two main options – the “Mix enable,” which should be toggled on and the “Video Source” will be selected as “HDMI.”

Toggle off the “Mix Enable” option. Then, click the dropdown menu next to the “Video Source” option and choose “USBCam,” and click the “Save” button.

- Step 15: Turn on your display source if you haven’t already, and you should be able to see your USB webcam display on your TV via HDMI.
Method 3: With HDMI/iOS Adapter and ATEM Mini Pro
Sometimes, you may need to connect multiple webcams with a screen switcher like ATEM Mini or ATEM Mini Pro. These switchers will not only convert signals to HDMI but also let you have multiple views on the same screen.
So, in this tutorial, you will explore the steps to connect your USB webcam to ATEM Mini Pro using an HDMI/iOS adapter. This device converts USB into HDMI for TV or director’s monitor display and lets you stream on multiple iOS devices. But, assuming you want multiple cameras to be previewed on your display source through HDMI, you can follow the steps below to make it happen.
- Step 1: To start with this method, you should have an HDMI/iOS adapter like this.

However, it can be of any brand or company with the same functionality.
- Step 2: You will find a USB input and an HDMI output port on one side of this device.
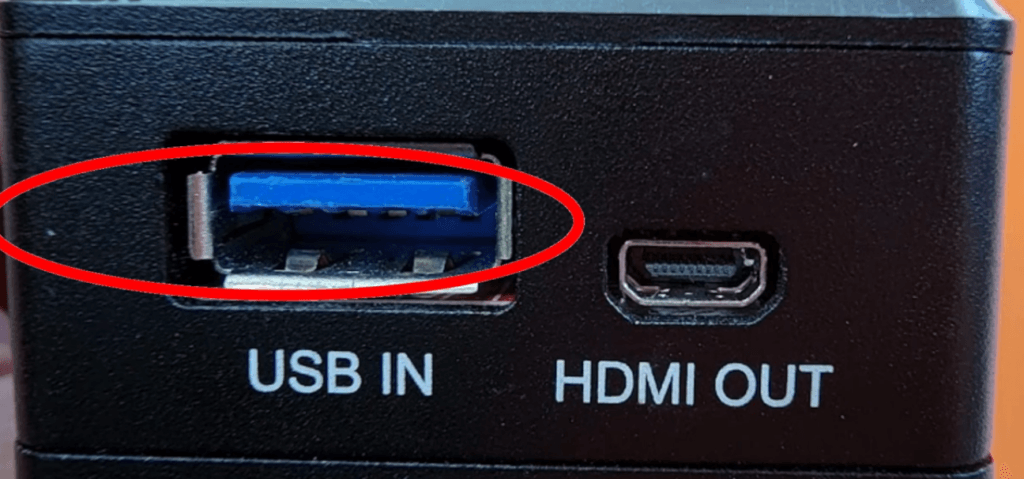
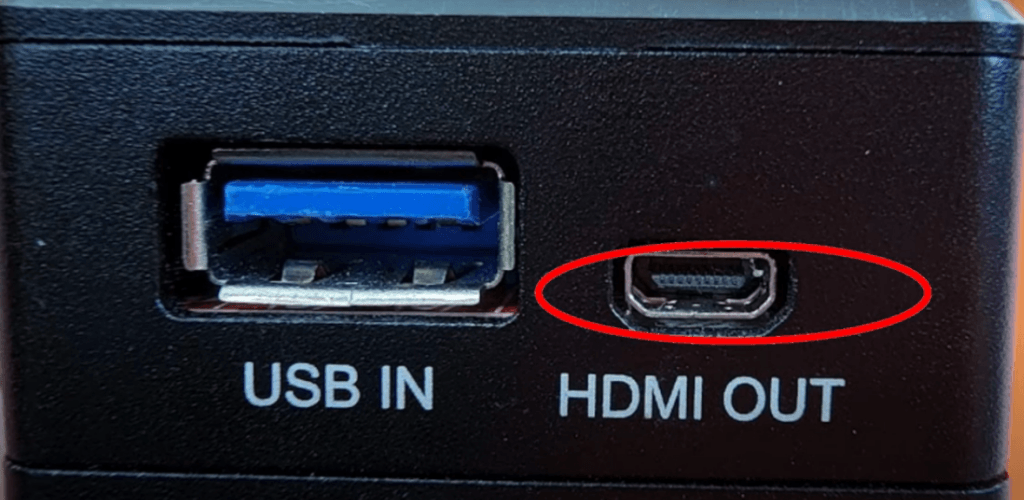
It usually has a Type-A USB port, so you may need a USB-A to USB-C connector if your USB webcam has a Type-C port.
- Step 3: The other side of this adapter has two ports again. A power input (PWR IN) and a USB output (USB OUT) port.
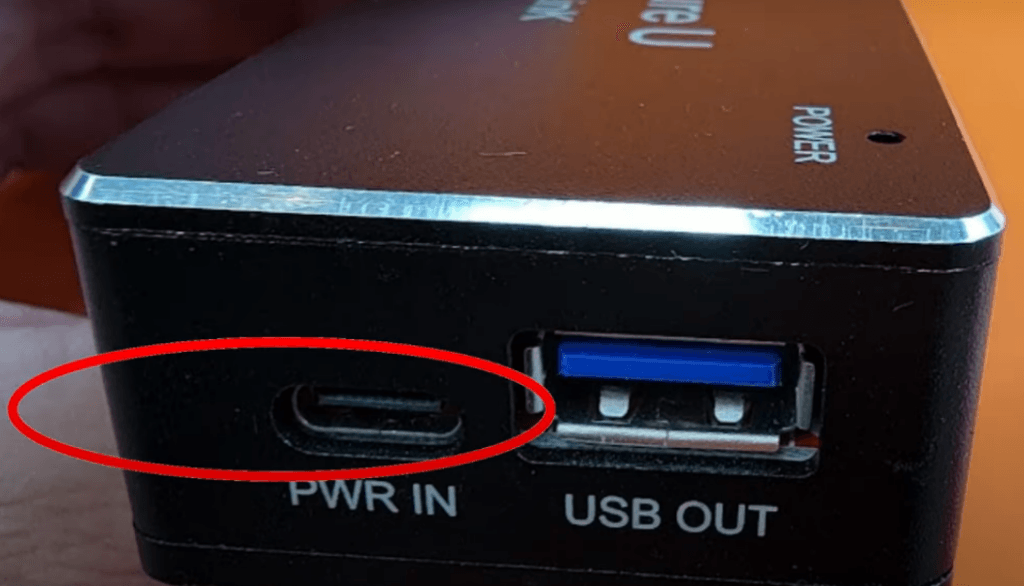
Remember that there will be no connectivity in the USB output port.
- Step 4: Before applying the instructions of this step, you must connect your ATEM Mini Pro to your TV. Once connected, use the USB input port of your device to connect your USB webcam. Likewise, connect the ATEM Mini Pro to the HDMI output using an HDMI cable.
- Step 5: When all the wires are connected and the TV or any supported display source is turned on, click the power button of the ATEM Mini Pro and wait for a few seconds.

You should be able to see the display of your webcam on the TV shortly through ATEM’s HDMI-converted signals.

Method 4: Connection through OBS Studio
In this method, you will learn how to convert a USB webcam into HDMI using the OBS Studio software and your PC/laptop. The main idea of this type of connection is to convert a USB webcam into HDMI signals using OBS Studio and then command the software to display the view on a TV or any other display source.
- Step 1: Open your computer and connect your USB webcam. Next, connect the display source (TV or director’s monitor) to your PC through an HDMI cable (your PC should have an HDMI port).
- Step 2: Download and launch OBS Studio. Once you can see the interface, you will need to make “Scenes” for this method to work. For that, look down under the “Scenes” tab and click on the “+” icon.
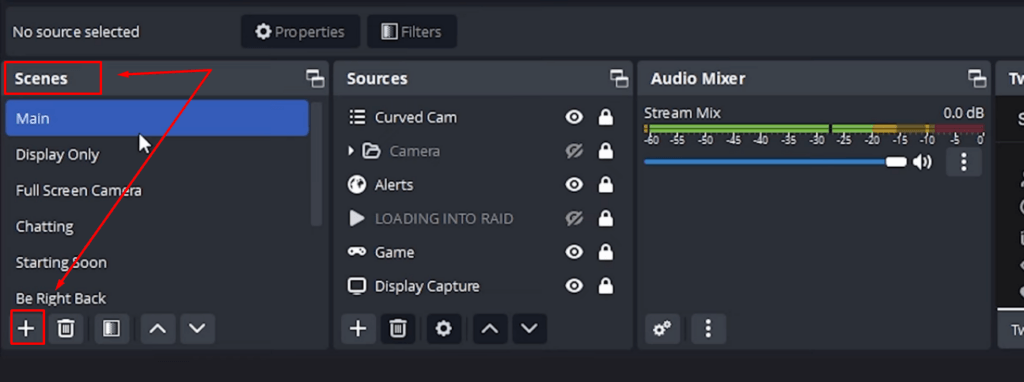
- Step 3: A new window will appear, asking you to name the scene. You can type any name here and click the “OK” button.

- Step 4: Look again under the “Scenes” tab and you will find the newly-created scene with your given name. For example, “Test Scene.” Click on it and you will get a new prompt asking you to “Create/Select Source.”
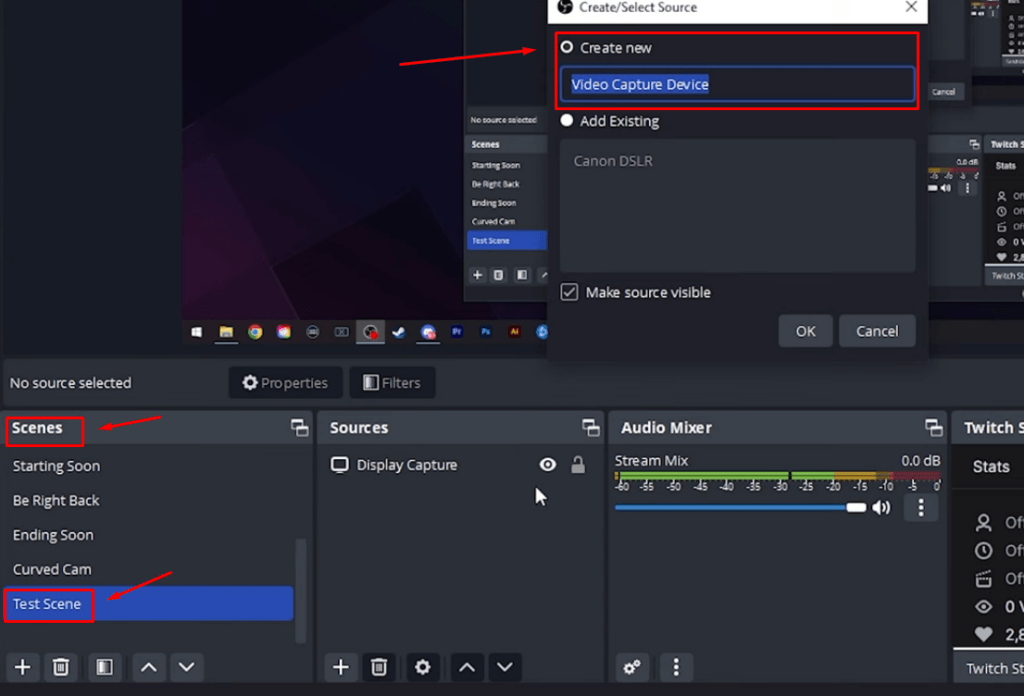
- Step 5: Rename it as per your choice and click on the “OK” button.

- Step 6: As soon as you click the “OK” button, a new window will pop up where you will need to select your webcam. To do that, look for the dropdown menu next to the “Device” option and click it. Then, select your webcam and click the “OK” button.

This will immediately show your webcam display on the OBS Studio screen. However, you will need to adjust the screen size. For that, click on the webcam display screen to see the pointers/handles on the edges of the screen. Click and hold the mouse button on any one pointer/handle and drag it until the webcam display screen matches/takes over the stage/screen of the OBS Studio.
- Step 7: Now, right-click on the display screen to see the menu. Hover on the “Fullscreen Projector (Source)” and select the “Display 2” option.

Method 5: With HDMI Wireless Transmitter and Receiver
To apply this method, you need to have an HDMI wireless transmitter and receiver kit.

It will help convert your USB webcam into HDMI signals for a wide range of purposes, such as live streaming, gaming, and more, on multiple devices. Each kit consists of 1x transmitter (TX) and 1x receiver (RX), and both of them have an HDMI port for connectivity.
- Step 1: Turn on your computer and connect your USB webcam to it.
- Step 2: Take your HDMI wireless RX. Connect it to the power source using the USB port and plug it into the USB port of your display source (TV) like this.


Note: The RX should take the power from the display source only. However, the TX can be powered through any USB connection, such as a charger.
- Step 3: Now, use the HDMI port of your display source to connect the RX.


- Step 4: Next, connect the power cable to the TX and connect the TX to your laptop in the HDMI port.


- Step 5: Go to the HDMI connection in your TV and you should be able to view your USB webcam turned into HDMI.
3 Best USB Webcam with HDMI Output
A standard USB webcam is easy to find since you’ve got many options. But one that has a built-in HDMI connectivity option can be rare. So, to save you time from digging various marketplaces, here are the 3 top USB webcams with USB output.
1. HuddleCamHD Pro

The HuddleCamHD Pro webcam enhances your live streaming and video conferencing experience with its 4K ultra-crisp sensor. With the ability to pan, tilt, and zoom, this webcam offers obstacle-free connectivity to capture amazing 4K video without losing digital zoom. Moreover, it offers great convenience because of an IR remote for digital presets, which are just one click away. Moreover, it has a sleek design with a built-in microphone.
The HuddleCamHD Pro can be used for various purposes, including Facebook and YouTube live streams. It is also an excellent webcam for online teaching, fitness classes, cooking lessons, and presentations. Whether you have a production team or running a business, this webcam is an ideal plug-and-play device for your everyday needs. Additionally, the HuddleCamHD Pro offers USB and HDMI connectivity options. So you can use it as per your requirements.
Features and Specifications of HuddleCamHD Pro
- 30 fps
- Wide angle
- 8x digital zoom
- Ultra-HD video quality
- 108-degree Field of View
- 5-year manufacturer warranty
- Up to 4K video resolution support
- HDMI 1.4 and USB 3.0 connections
Pros of HuddleCamHD Pro
- Decent image quality
- This camera is compatible with a wide range of programs and OS, including Windows, MacOS, Google Hangout, VSee Zoom, MeetFree, Blue Jeans, and more
- You can also control this webcam through an IR remote
Cons of HuddleCamHD Pro
- The webcam lacks basic adjustment options for white balance
- Some users find pixel distortion at the corners during the display
Price of HuddleCamHD Pro
- N/A
2. MOKOSE HDMI/USB Webcam (C100)

The MOKOSE HDMI/USB (C100) streaming webcam offers advanced features, including 4K video resolution at 30fps in HDMI mode. This webcam is also a boon for time-lapse admirers, as it can capture high-quality time-lapse photos. One of the most impressive characteristics of this webcam is the ability to switch lenses, including the 12MP Sony IMX377 Exmor R CMOS image sensor.
The MOKOSE HDMI/USB Webcam has solid aluminum shell material for top-class durability. The webcam also has a USB cable (3-meter) to connect to your USB ports. It has a Screw Thread 1/4-inch design that ensures flexibility whether placed on a mounted LED, desktops, laptops, or flat surfaces.
Talking about the HDMI output, the MOKOSE HDMI/USB Webcam works flawlessly on 3480 x 2160P video resolution at 30fps, 25fps, and 24fps. Moreover, it also supports 1080p and 720p at 60fps. This makes it ideal for a broad range of applications, including live streaming and online teaching.
Additionally, the MOKOSE HDMI/USB Webcam supports playback of videos and photos with audio through the HDMI output. Besides, the connectivity options get doubled with the USB output. The upgrade to the firmware is also like a breeze. You only need a TF card with the latest software to update the device for enhanced image quality.
Features and Specifications of MOKOSE HDMI/USB Webcam
- Auto exposure
- MP4 video format
- Dual output (HDMI/USB)
- USB audio mode enabled
- 180-degree screen rotation
- Support up to 256GB TF card storage
- Windows, MacOS X, and Linux compatibility
- Auto and manual adjustments for white balance
Pros of MOKOSE HDMI/USB Webcam
- This webcam is best for overhead views
- It’s a lightweight webcam that can be mounted easily
- The manual lens focus permits accurate adjustments
Cons of MOKOSE HDMI/USB Webcam
- Dispersion distortion is found in the lens
- You may need to focus it manually from time to time
Price of MOKOSE HDMI/USB Webcam
- $164.50 (As seen on Amazon)
3. OBSBOT Tail Air

Connecting OBSBOT Tail Air is as easy as ABC. Thanks to its flexible port options, including micro HDMI, USB Type-C, and Ethernet cable (PoE-supported). With this webcam, creating a multi-camera video system is no hassle. Applause to its cutting-edge AI capabilities and wider compatibility.
OBSBOT Tail Air integrates with OBSBOT’s latest image system and advanced AI technologies. Plus, the AI auto-tracking and multi-cam setup makes you discover new savory experiences in the world of video streaming. Besides, the camera provides you complete control over the monitoring and configuration through a remote control.
The OBSBOT Tail Air also uses wireless/wired NDI connections to let you establish a quick live streaming activity within a few minutes. This ensures high engagement with your team members or audience regardless of boundaries.
The manufacturers claim this webcam provides crystal-clear image quality and supports up to 4K video resolution at 30ps and 1080p resolution at 60fps. The large pixel size and f1/8 aperture also give you remarkable performance, even in dim-light environments.
Features and Specifications of OBSBOT Tail Air
- AI Atuo framing
- Smart remote control
- 360-degree rotation base
- Dedicated animal tracking
- Object and subject tracking
- Time of Flight (TOF) technology
Pros of OBSBOT Tail Air
- Exceptional automatic settings
- Flexible to different lighting conditions
- The face-focus feature maintains good exposure
Cons of OBSBOT Tail Air
- It has a limited zoom
- The autofocus works slowly during changes in the scene
Price of OBSBOT Tail Air
- $501.00 (As seen on Amazon)
Note: The prices mentioned for each product are taken from Amazon on the day of producing this article. The manufacturers/store owners can change them at any time.
Conclusion
You cannot use a USB webcam directly into your HDMI output. But there are ways to do it, such as using an HDMI adapter. Likewise, you can use an HDMI encoder/decoder device, but it requires manual network configurations. However, it works great. Similarly, it is possible to convert your webcam USB signals into HDMI with the help of an HDMI/iOS adapter and make ATEM Mini Pro your display source. Some users also prefer using their OBSBOT Studio and laptop to convert USB signals into HDMI. Lastly, a wireless HDMI transmitter and receiver kit can also help you with the conversion.
If converting a USB webcam to HDMI gets too complicated, upgrading to a professional streaming camera may save you the hassle and deliver superior video quality. Designed specially for seamless live broadcasting, streaming cameras directly output HDMI, simplifying your workflow while elevating your streams and videos.
FAQs
Q1. Can a USB webcam be converted to HDMI?
You can convert a USB webcam to HDMI through external devices, such as adapters and wireless transmitters/receivers.
Q2. Can you stream video from USB to HDMI?
You will first need to convert your USB webcam into HDMI signals so you can view it on your display source. Once done, you can stream videos on multiple devices.
Q3. Why is my USB to HDMI not working?
Check for damaged adapters or USB ports. The problems may also arise with the USB or HDMI cables hindering USB to HDMI conversion. Also, if you are using ATEM Mini Pro or any director’s monitor, ensure they are not faulty.


.png)
.png) Français
Français .png) Deutsch
Deutsch .png) Italiano
Italiano .png) 日本語
日本語 .png) Português
Português  Español


