.png)
Whether it’s a heartfelt ballad or a hard-hitting rap verse, great vocal recordings don’t just happen because the singer has talent, though that’s a big part of it. The real magic kicks in during the recording process. Bad mic technique or poor gear choices can make even the most amazing voice sound dull, muddy, or unprofessional.
The good news? You don’t need a high-end studio to get studio-quality results. With the right setup, clear direction, and a bit of practice, you can absolutely record clean, powerful vocals right from your home setup. This guide will walk you through the essential gear, proven vocal recording techniques, and the key steps for post-processing to help you get polished, professional-sounding vocals
Step#1 Essential Equipment for Recording Vocals
Before you even hit the record button, your gear needs to be in place. Having the right tools sets the foundation for clear, clean, and emotional vocal takes. Don’t worry—you don’t need to break the bank, but you do need to be intentional with your choices.
1# Microphones
There are three core types used for vocals: Dynamic, Condenser, and Ribbon—each with its own strengths, weaknesses, and ideal vocal styles.

| Type | Vocal Style Best For | Pros | Cons | Popular Models |
| Dynamic | Rock, rap, metal, live vocals | Tough build, great at rejecting noise, no need for phantom power | Less sensitive to detail, narrow frequency range | Shure SM7B, Electro-Voice RE20 |
| Condenser | Pop, R&B, acoustic, studio vocals | Wide frequency range, detailed, crisp highs | Needs phantom power, fragile, can pick up room noise | Audio-Technica AT2020, Neumann TLM 102 |
| Ribbon | Jazz, soul, vintage vocals | Smooth, warm tone, natural high-frequency roll-off | Very delicate, needs a good preamp, expensive | Royer R-121, AEA R84 |
2# Audio Interfaces & Preamps
An audio interface is the bridge between your microphone and your computer. It converts analog sound into digital signals that your DAW can understand, among other applications. Preamps, often built into interfaces, amplify the low-level mic signal to usable levels without adding noise. Make sure your interface has:
- At least 1–2 XLR inputs with phantom power
- High-quality preamps (clean gain = cleaner vocals)
- Low-latency monitoring
- Compatibility with your DAW and operating system
Some most recommended options are Focusrite Scarlett 2i2, PreSonus AudioBox USB 96, Universal Audio Volt 276, and RME Babyface Pro FS
3# Headphones
You’ll need headphones to monitor yourself while tracking and studio monitors to judge your mix accurately afterward. Good headphones isolate your voice during tracking, prevent bleed into the mic, and allow focused listening. They come in closed-back (ideal for tracking) and open-back (ideal for mixing) styles.
Closed-Back vs. Open-Back Headphones
| Type | Best For | Pros | Cons | Top Picks |
| Closed-Back | Recording vocals | Blocks external noise, no mic bleed | Less accurate soundstage, tight on the ears | Audio-Technica ATH-M50x, Beyerdynamic DT770 |
| Open-Back | Mixing/editing | Spacious, natural stereo image | Sound leakage, not suitable for recording | Sennheiser HD600, AKG K702 |
4# Studio Monitors
Studio monitors are flat-response speakers designed to give you an honest picture of your recording. Invest in monitors like Yamaha HS5 or Kali LP-6. They give a true representation of your sound, unlike consumer speakers that add artificial bass or highs. This helps you make decisions that translate well across all playback systems.

5# Pop Filters, Windshields, & Shock Mounts
These small accessories might look minor, but they dramatically improve your audio quality.
- A pop filter blocks plosive sounds (like P and B). Position it 2–3 inches from the mic.
- Foam windshield is useful for mobile or live settings, helps tame the breath and wind.
- Shock mount isolates the mic from vibrations or desk bumps—keeps your takes clean.

6# Acoustic Treatment
80% of “home studio” vocal issues come from recording in a raw, untreated room. You can get this sorted with a few DIY or low-cost solutions.
- Use rockwool or Owens Corning insulation inside wooden frames, wrapped in fabric.
- Wrap around your mic to reduce early reflections.
- Build a vocal booth, even a small closet with treated walls, works wonders.
- Get professional acoustic panels, made from dense materials, that absorb mid-to-high frequencies well.
Mainly focus around the mic, and where sound hits first, you don’t need to wrap the whole room.
Step 2: Setting Up Your Recording Space
If you have access to a studio—great! Use it. You’ll benefit from precise acoustic treatment, professional isolation, and optimized gear placement. But if you don’t, don’t sweat it. You can convert any room into a recording space with some strategic tweaks.
1# Choosing the Right Environment
Start by choosing the quietest space possible. Pick a room that’s small, carpeted, and has soft furnishings (curtains, bedding, cushions). Avoid kitchens, bathrooms, and rooms with bare walls or hard floors—they create echoes and comb filtering.
- Use a bedroom with a bed, rug, and curtains.
- Record in closets or between mattresses if needed—small, soft spaces help reduce reverb.
- Hang thick blankets or duvets on walls where your voice hits first.
- Seal doors/windows with weather stripping or rolled towels to block outside noise.
- Cover the floor with rugs or even yoga mats to dampen floor reflections.
- Avoid large open rooms unless you can treat them with panels, bookshelves, or furniture.
- Time your recordings—late nights or early mornings are usually quieter.
Once you’ve chosen the room, walk in and clap. If you hear a sharp echo or ringing, it needs more treatment. No echo? You’re on the right track.
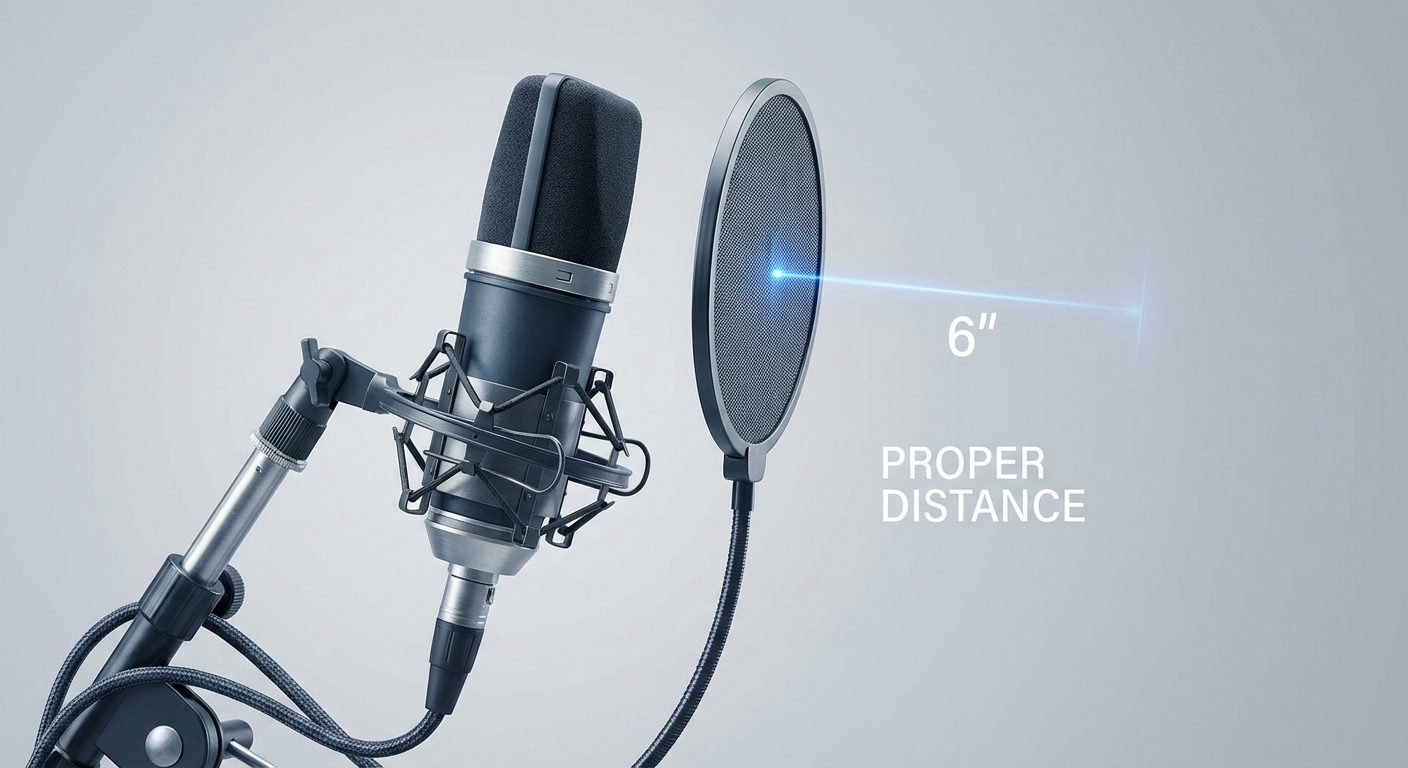
2# How and Where to Place Your Microphone
Bad mic placement = unusable takes. Here’s how to do it right:
- Place the mic 6–10 inches from your mouth. Use a pop filter about 2–3 inches from the mic, and your mouth 3–5 inches behind that.
- Slightly angle the mic off-axis (10–15° away from the mouth). This helps tame harsh “S” sounds and mouth clicks without dulling your tone.
- Keep the mic just below or at mouth level. Don’t point it down from above.

Try a “pencil test”: Place a pencil between your lips and aim the mic where it points—this usually lines up with your voice projection.
Step 3: The Vocal Recording: 7 Techniques
Vocals can be recorded in many creative ways to achieve specific textures, emotions, or spatial effects. Below are some of the most widely used techniques and how to do them step by step.
1# Single Take Recording
It’s when you capture the full performance or song in one uninterrupted pass. It preserves the natural energy, phrasing, and emotion of the artist. Plus, you need to do minimal editing. If you’re recording for an audition, a demo, or a live-style session, they’ll often prefer single-take recordings—it shows raw talent and vocal consistency.
How to do it:
- Set mic gain to peak between -12 dB and -6 dB to avoid clipping.
- Use a pop filter and test your mic position.
- Give the vocalist a comfortable headphone mix—add a light reverb if needed.
- Do a test pass to check tone, levels, and comfort.
- Hit record and let the vocalist perform start to finish.
- Record 2–3 full takes and pick the strongest one
2# Double Tracking (Including Automatic Double Tracking – ADT)
Double tracking is when the vocalist records the same part twice, layered together for a fuller, wider sound. It adds depth and stereo width, especially in choruses or powerful vocal moments. If you want a more modern, punchy sound like pop, rock, or hip-hop vocals, this is a go-to. ADT (Automatic Double Tracking) mimics the effect digitally without a second take.
How to do it:
- First, record your main vocal take as usual.
- Then, record a second take as close in timing and pitch as possible.
- Pan both takes slightly left and right to widen the stereo image.
- If needed, align manually or with vocal alignment software (e.g., VocAlign).
- For ADT: Use plugins like Waves Reel ADT, Logic’s ADT, or chorus/delay tools to simulate the double layer.
- Blend both tracks and adjust the balance to taste.
3# Binaural Recording
Binaural recording uses two microphones positioned like human ears—ideal for creating a 3D, headphone-immersive experience. It’s great for ASMR, audiobooks, intimate acoustic sessions, or experimental music where you want the listener to feel “inside” the space.

How to do it:
- Use a binaural dummy head mic (like Neumann KU100) or DIY with two matched mics placed at ear-width on a mannequin head or foam spacer.
- Make sure the recording is done in a quiet space—binaural mics are ultra-sensitive.
- Place your vocalist directly in front, but have them move naturally if desired (walk around mic, whisper in one side, etc.).
- Record with minimal processing—binaural sound works best raw.
- Export in stereo for headphone-only distribution.
5# Multi-Mic Recording (Blending Different Mics) – Advanced
Multi-mic recording involves using two or more microphones to capture different tonal characteristics of the same vocal performance. For example, you can combine the clarity and brightness of a condenser mic with the warmth and punch of a dynamic mic. This setup gives you rich blending options in post-production and is ideal for producers working with expressive, layered, or genre-blending vocals.

How to do it:
- Choose two contrasting microphones (e.g., a condenser for detail + a dynamic for body).
- Position the main mic 6–12 inches from the vocalist at mouth height.
- Place the secondary mic slightly to the side or farther away to avoid overlap.
- Record both mics onto separate tracks in your DAW.
- Use a pop filter with the main mic to reduce plosives.
- In the mix, blend both tracks using EQ and level adjustment to bring out desired tones.
- Use phase alignment tools (like InPhase or manual time-shifting) to prevent cancellation.
6# Mid-Side (M/S) Recording for Vocals – Advanced
Mid-Side recording captures both direct sound (Mid) and stereo ambiance (Side), using one cardioid mic and one figure-8 mic. It gives you fine control over how much room tone or width you want in the final mix. This method is great for live-style recordings, acoustic settings, or vocals meant for immersive stereo fields like cinematic or choral work.

How to do it:
- Place a cardioid mic (Mid) directly in front of the vocalist.
- Mount a figure-8 mic directly above or below the Mid mic, rotated 90° sideways to capture left and right reflections.
- Record each mic onto separate mono tracks.
- Duplicate the Side track, invert the phase of the copy, and pan both Side tracks hard left and right.
- Keep the Mid mic panned center.
- Adjust the Side track volume to widen or narrow the stereo image.
7# Re-Amping Vocals (Running Vocals Through Speakers) – Advanced
Re-amping sends a recorded vocal back through a speaker and records the sound with microphones, adding natural room tone or creative effects. This technique is excellent for producers who want to add space, distortion, or character beyond standard plugins.
How to do it:
- Send the dry vocal track from your DAW to a re-amp box or audio interface output.
- Connect the output to a speaker or amplifier in a treated room or creative space.
- Place one or more microphones in front of the speaker to capture the sound.
- Record the re-amped signal on a new track in your DAW.
- Experiment with mic placement and speaker volume to shape the tone.
- Blend the re-amped track with the original vocal during mixing.
Step 4# Best Software & DAW Techniques for Recording Vocals
A DAW (Digital Audio Workstation) is the software you use to record, edit, and mix your vocals. It’s your main control center—where all the tracks, effects, plugins, and editing come together. Here are some top-recommended DAWs for vocals.
- Logic Pro X – Great built-in tools for vocals (Mac only)
- Pro Tools – Industry standard for professional studios
- Ableton Live – Ideal for modern, electronic, or creative vocal setups
- Reaper – Lightweight, budget-friendly, and highly customizable
- Studio One – Smooth workflow and powerful comping features

Create a new session with a sample rate of 44.1 or 48 kHz. Add a mono audio track, select your mic input, and arm it for recording. Keep levels peaking around -12 dB to -6 dB. Use a pop filter and insert light monitoring effects (like reverb) on an aux send so the vocalist hears them without recording the effects. Label tracks clearly and save your session often.
Recording Dry vs. Wet: What It Means
Dry recording means capturing vocals without effects. Wet monitoring means the singer hears effects like reverb or delay during recording, but these aren’t actually recorded. Both serve different purposes in the workflow.
| Dry Recording | Wet Monitoring |
| Clean, no-effects signal recorded | Effects heard during the performance only |
| Full control in mix; no baked-in effects | Helps the vocalist feel emotion and space |
| Can feel lifeless while singing | Might introduce latency or affect timing |
| Studio mixing, professional polishing | Live-feel performances, expressive vocals |
Do Punch-In Recording & Comping Takes
Punch-in recording lets you fix small vocal mistakes without redoing the whole track. Just mark the problem area in your DAW, set the punch-in and punch-out points a second before and after, and re-record that section. For multiple takes, use comping: record several full passes, then select the best parts from each and stitch them together on a new track. Most DAWs let you do this visually with playlists or take lanes—just smooth transitions with fades and edits.
5# Basic Vocal Processing & Editing
Post-processing is where you sculpt the raw sound into a polished performance. Here’s a brief guide on how to approach these tasks.
1# Basic Vocal Chain (EQ, Compression, Reverb, Delay):
This is the standard order most vocals go through.
- EQ helps remove unwanted low-end rumble or boxiness and brings clarity to the voice (cut mud at 200–400 Hz, boost presence around 3–5 kHz).
- Compression balances out the volume so louder and softer parts–start with a ratio of 3:1 and adjust to keep dynamics natural.
- Reverb adds a sense of space, like singing in a room instead of a closet.
- Delay adds an echo effect that can help fill space or create emotion.
2# Tuning Vocals (Auto-Tune, Melodyne, Manual):
Even good singers drift off pitch sometimes. Pitch correction tools tools like Auto-Tune (more automatic) or Melodyne (more manual) let you subtly fix off-notes while keeping the natural feel. Use it to polish the performance, not make it robotic—unless that’s your creative choice.
3# Noise Reduction & Clean-Up:
Home recordings can pick up background sounds—fans, clicks, hums. A high-pass filter around 80 Hz can remove these without hurting the vocal quality. Also, use noise reduction plugins (like iZotope RX) lightly to avoid dulling your voice. Use “De-click” or manual clip gain can clean up mouth clicks and lip smacks.
4# De-essing & Breath Control:
Harsh “S” sounds (sibilance) and loud breaths can be distracting. Insert a de-esser plugin and sweep between 4–8 kHz to tame sibilance. For breaths, reduce volume using clip gain or automate fade-ins. Don’t remove every breath—just the overpowering ones. Natural breathing keeps the task feeling real.
Final Tips for Different Types of Professional-Quality Vocal Recordings
Not every recording method suits every vocalist or project, so here’s a quick guide on who should prioritize what:
- Beginners and solo artists: Start simple with single-take recording, a good condenser mic, and basic vocal chains (EQ + compression). Focus on mic technique and warm-ups.
- Singers aiming for thicker, richer vocals: Use double tracking or Automatic Double Tracking to add depth and fullness.
- Podcasters and ASMR artists: Experiment with binaural microphones for immersive sound.
- Producers working on immersive audio or complex mixes: Explore ambisonic and surround sound techniques or multi-mic blending for detailed spatial recordings.
- Advanced engineers and studios: Implement mid-side recording and re-amping to add creative control and texture.
Conclusion
No matter your skill level, always warm up your voice before recording with simple exercises like humming or lip trills to protect your vocal cords and improve tone. Keep mic levels set between -12 dB and -6 dB to avoid clipping and retain headroom for dynamic peaks.
Use a pop filter and position the mic slightly off-axis to minimize plosives and sibilance naturally. Record multiple takes and listen critically to pick the best parts. Finally, take breaks during sessions—fresh ears and a rested voice deliver the best performances.
FAQ’s
Q: What do singers use to record their voice?
Singers typically use a microphone connected to an audio interface, which sends the sound to a computer running a DAW. Common mic choices include large-diaphragm condenser microphones for their clarity and detail. Headphones and pop filters are also essential to capture clean, high-quality recordings.
Q: How to reduce mouth noises when recording?
Mouth noises (like clicks or lip smacks) are common but distracting. To reduce them, drink water frequently to keep your mouth moist. Use a pop filter to reduce saliva impact and position the mic slightly off-axis (not directly in front of your mouth). During editing, manually remove or reduce these noises with audio editing tools.
Q: How to fix the loud spikes in my vocal recording?
Loud spikes happen when certain words or sounds suddenly jump in volume, causing unevenness or clipping. To fix this, use compression during mixing to smooth out volume differences. Manually lower the volume of spikes using automation or clip gain in your DAW. For next time, record at a lower input level to avoid distortion.
Q: Should I hear my own voice while recording?
Yes, hearing yourself while recording is called monitoring, and it’s important. It helps you stay in tune and maintain a consistent mic distance. Use closed-back headphones to avoid sound bleeding into the mic. Be careful with latency (delay in hearing your voice); if it’s distracting, use direct monitoring through your audio interface for near-zero delay.
Q: How to voice over like a pro?
Warm up your voice with simple exercises before recording to sound clear and confident. Practice your script to nail the tone and pacing—don’t just read, perform it. Use a pop filter and proper mic technique to avoid plosives and unwanted noise. Record multiple takes and use basic processing like EQ, compression, and gentle reverb to make your voice sound polished and natural.