.png)
.png) Français
Français .png) Deutsch
Deutsch .png) Italiano
Italiano .png) 日本語
日本語 .png) Português
Português  Español
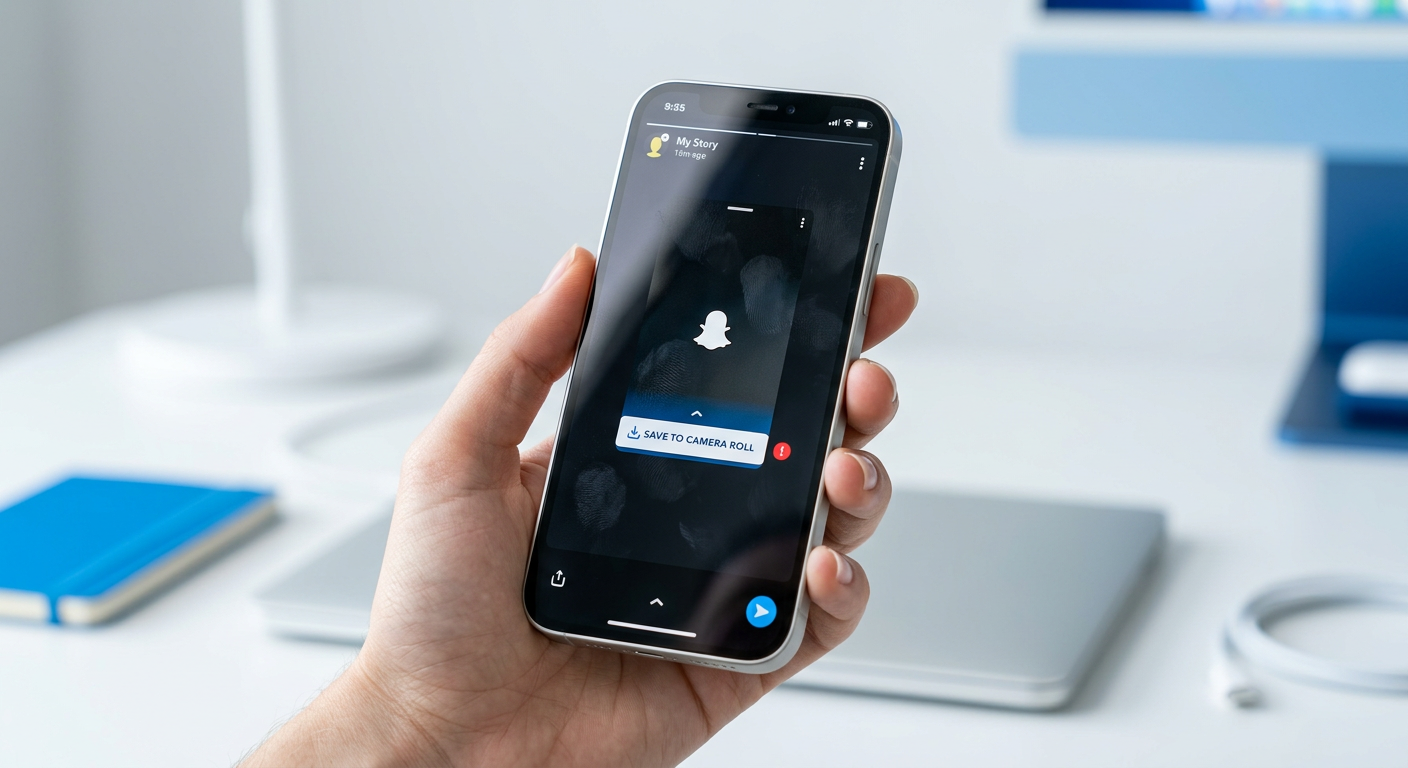
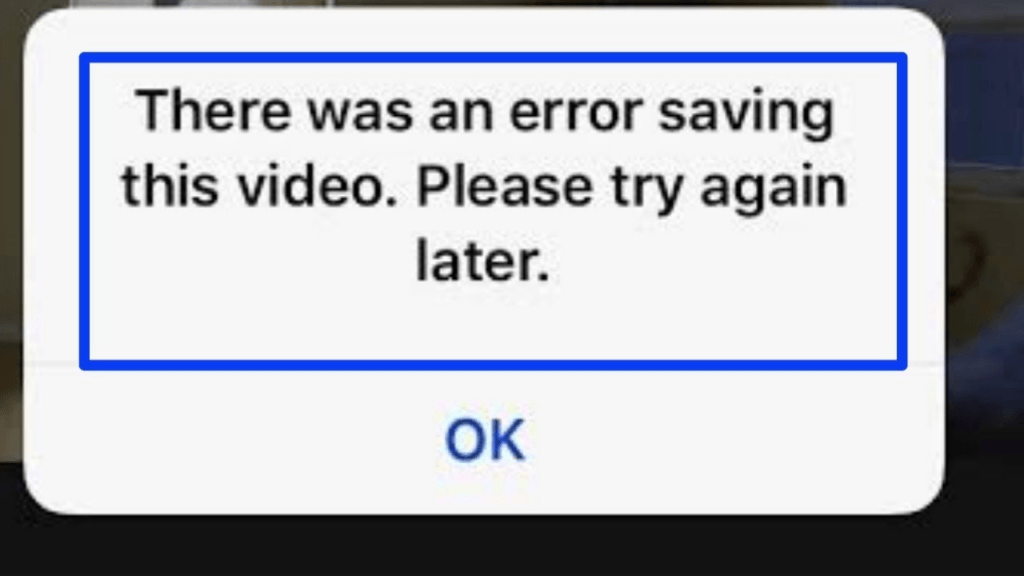
 Many users complain about seeing a message saying, “There was an error saving this video. Please try again later.” when they try to save a video on their iPhone. Even though the reason behind this issue may vary depending on your iPhone model, the iOS it currently has, and the available storage, the troubleshooting steps are pretty straightforward.
With that said, the following sections discuss some root causes of the problem and their possible solutions in detail.
Note: iPhone 13 Pro Max is used here for all illustrations.
Reason 1: Minor Glitches in the iOS
Sometimes, iOS encounters inconsistencies due to frequent installation and removal of the apps. Because of this, your iPhone may start behaving obnoxiously. As a result, it might prevent you from saving videos and display the above message on the screen instead.
Proposed Solution(s): Normal and Forced Restarts
Although this may not look like a solution, surprisingly, restarting your iPhone resolves many issues. In this context, if/when the normal restart fails to work, force restarting helps. For your convenience, both processes are explained below:
Restarting iPhone Normally
You can perform a normal restart at the iOS level. The instructions given below explain how to get the job done:
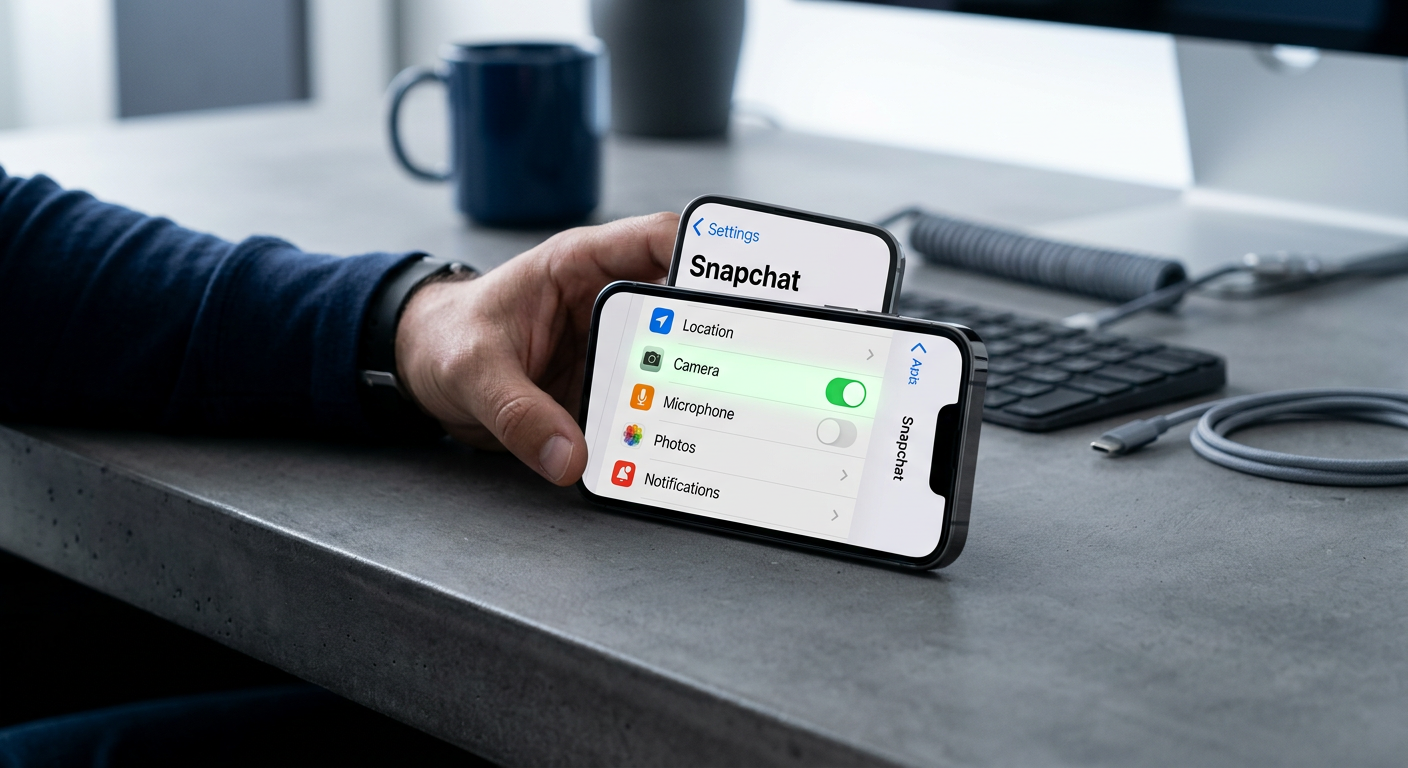
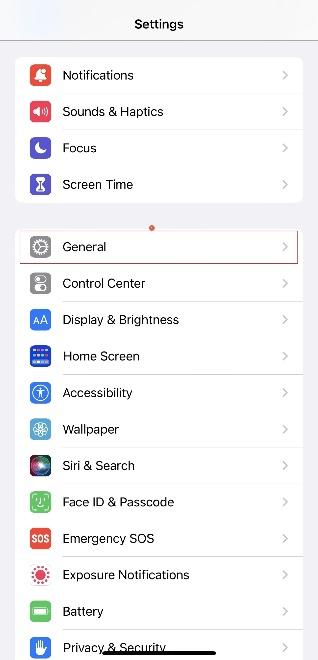
- On your iPhone, go to Settings
- Tap General
- Scroll down the General screen to the bottom
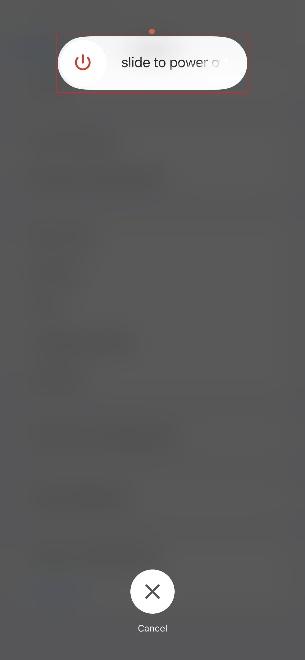
- Tap Shut Down
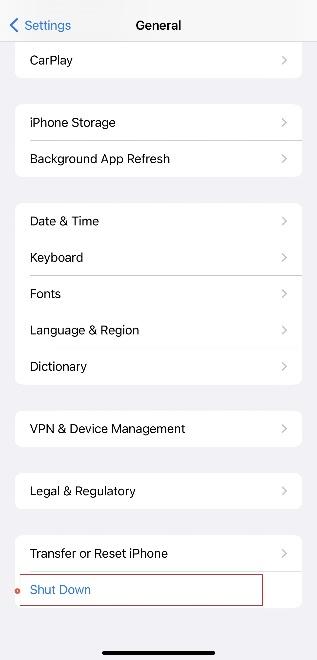
- Swipe the slide to power off bar to the right to shut down your iPhone
- Wait for 25 to 30 seconds
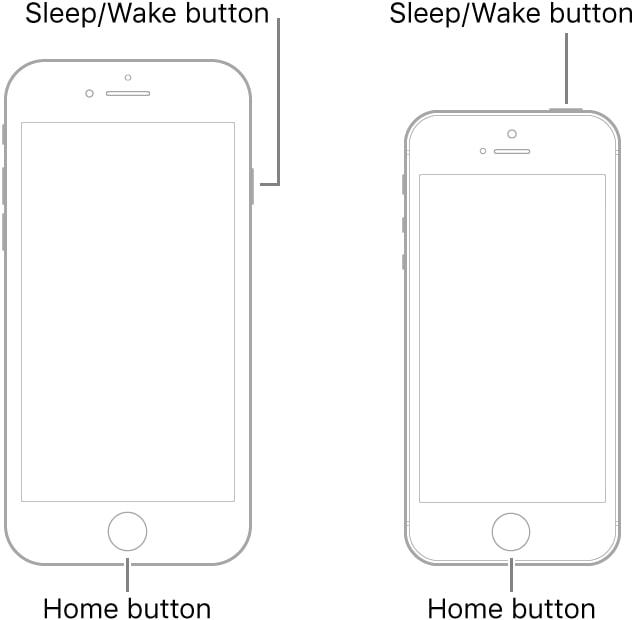
- Long press the Sleep/Wake button to power the phone back on
- Check if the issue is fixed
Force Restarting iPhone
When you force restart, your iPhone pulls the current from the motherboard momentarily and resumes the supply after a brief pause. As a result, all junk data in the phone’s memory is flushed, thus allowing your smartphone to boot afresh.
Force restarting an iPhone requires you to press a combination of buttons. Because Apple has made significant changes to the form factor and hardware of its smartphones in the past few years, depending on the iPhone model you have, the process may vary.
Therefore, to make things easy, methods for all iPhone variants are explained below:
For iPhone 8 and Above, and iPhone SE (2nd Generation and 3rd Generation)
- Press and quickly release the Volume Up button
- Immediately press and quickly release the Volume Down button
- Press and hold down the Sleep/Wake (Power) button
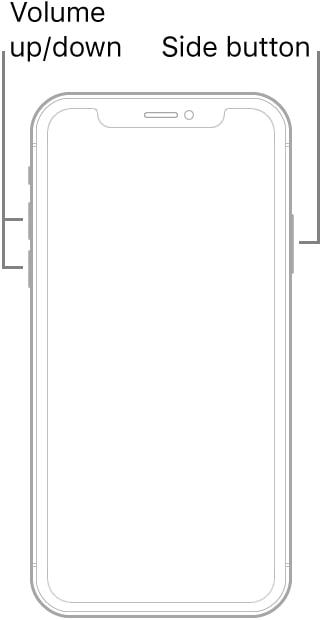
(Image Credits: https://support.apple.com/en-in/guide/iphone/iph8903c3ee6/15.0)
- Wait while your iPhone turns off and automatically turns back on (this is when the motherboard loses the power supply for a short period)
- Release the Sleep/Wake button as you see the Apple logo on the screen
For iPhone 7 and 7 Plus
- Press and hold down the Volume Down and Sleep/Wake buttons together
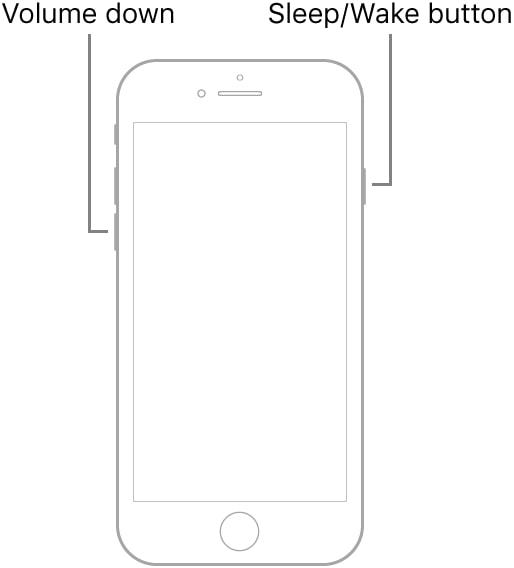
(Image Credits: https://support.apple.com/en-in/guide/iphone/iph8903c3ee6/15.0)
- Wait while your iPhone shuts down, restarts, and displays the Apple logo
- Release both buttons and allow your iPhone to boot properly
For iPhone 6s and Earlier, and iPhone SE (1st Generation)
- Press and hold down the Home and Sleep/Wake buttons together
(Image Credits: https://support.apple.com/en-in/guide/iphone/iph8903c3ee6/15.0)
- Wait while the phone powers off and back on
- As you see the Apple logo on the screen, release both buttons
- Allow your iPhone to boot properly
Once your iPhone restarts and is ready to accept your commands, try saving the video again and see if the issue is resolved.
Reason 2: Obsolete Operating System
In some cases, your iPhone may not save the video properly if it has an older version of iOS. Because Apple regularly updates its servers and the associated apps and expects you to do the same, your current (obsolete) iOS version might not be compatible with the service required to get the video on your device or synchronize with the iCloud storage.
Proposed Solution(s): Check for and Update iOS
All the latest iPhones are configured to download and install iOS updates automatically as soon as they roll out for the masses. However, if you have customized your device to behave otherwise, you must do this manually.
The following instructions explain how to update the iOS on your iPhone:
Prerequisites
Before proceeding, ensure that your phone is connected to a stable, high-speed Wi-Fi network and is at least 50 percent charged.
Once everything is in place, you are good to go:
Note: In this section, iPhone 7 is used for illustrations.
- Go to Settings > General as explained earlier
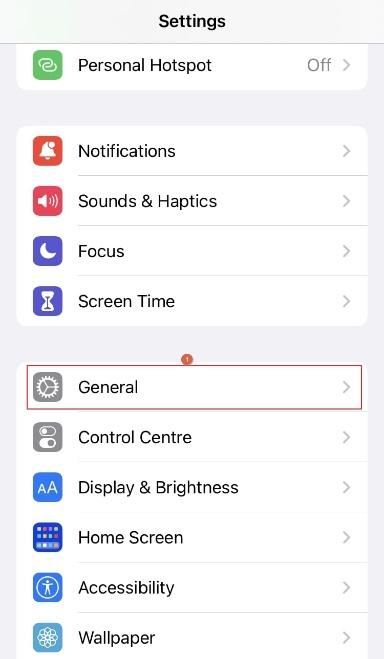
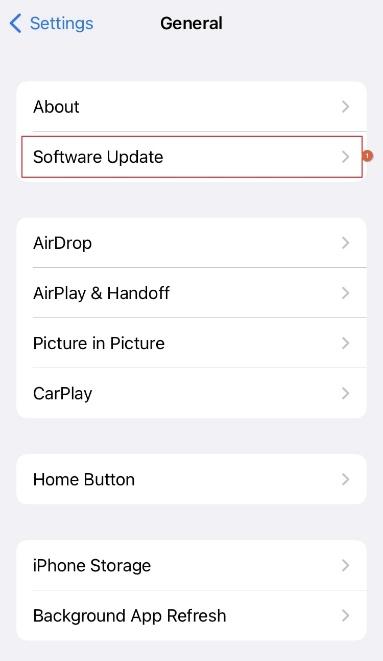
- Tap Software Update
- Wait while the iPhone checks for the newer version of iOS (if any)
- Once/if found, tap Download and Install from the lower area of the screen
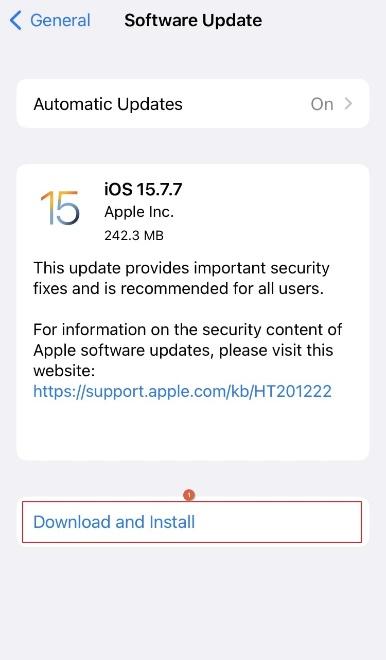
- Wait while your phone downloads and installs the latest iOS
Note: Your iPhone may reboot several times during the update process.
- Once everything is done, check if the problem is resolved
Reason 3: Insufficient Storage
This is obvious.
If your iPhone doesn’t have enough space, it won’t allow you to save the video. Because the proposed fix may require you to get rid of some files and apps, a route that you may want to avoid as much as you possibly can, this point is at number three in this guide.
Nevertheless, if you are here, it means the above two remedies didn’t work, and you’re ready to dig deeper.
Proposed Solution(s): Check Available Space and Make Room for New Files (If Necessary)
This solution has three parts. While in the first two, you manage local storage, in the third part, you deal with the iCloud space. Because each of the suggested remedies is important, you must follow all to get the best results.
Part 1: Storage Optimization
By default, your iPhone is configured to save the original (high-resolution) copies of your photos and videos on its local and iCloud storage. While the original media files give you the best visual experience, they occupy a remarkable amount of space.
After storage optimization, your iPhone keeps the high-res media on the iCloud but compresses those on your local device for better memory management. Although this method compromises the quality, you get extra room for new elements, including.
The steps given below explain how you can optimize your iPhone storage:
- Go to Settings
- Scroll down and tap Photos

- Tap to select the Optimize iPhone Storage option from the ICLOUD section
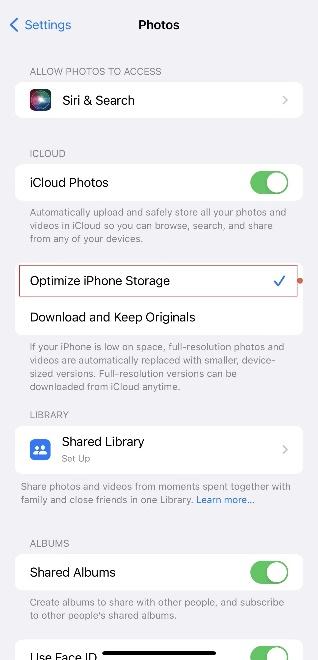
- Restart your iPhone (or wait for a couple of minutes to allow the changes to take effect)
- Trying saving the video again and see if the issue is resolved
Part 2: Manage Local Storage
In this part, you will check the storage available on your local device. Here you will also learn how to free up space for new apps if you’re running out of it. The process is given below:
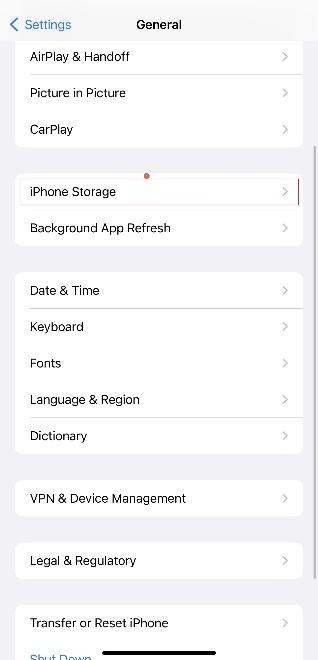
- Go to Settings > General as before
- Tap iPhone Storage
- Wait while the phone calculates the free and occupied space
- Check the storage status from the top of the iPhone Storage screen
- Tap Enable next to Offload Unused Apps from the RECOMMENDATIONS section (optional)
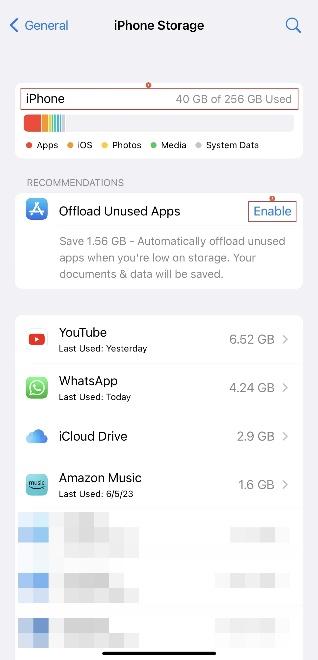
Note: This allows iPhone to automatically remove unused apps if it is running out of space. This is a safe approach because the phone saves your files before cleanup.
- From the available list, check the names of the apps and the amount of space they’re consuming
- Tap the program you don’t need

- Tap Delete App from the next screen
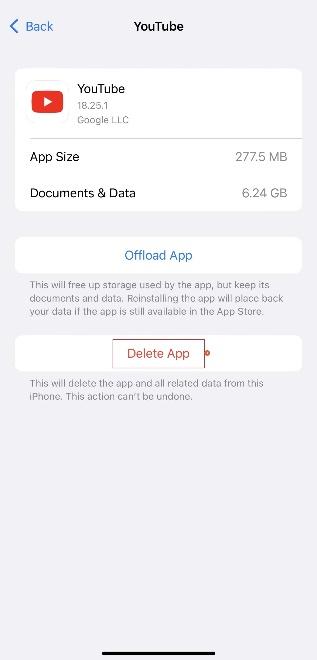
- Tap Delete App again in the confirmation box that pops up from the bottom to remove the app and its associated files to free up some space
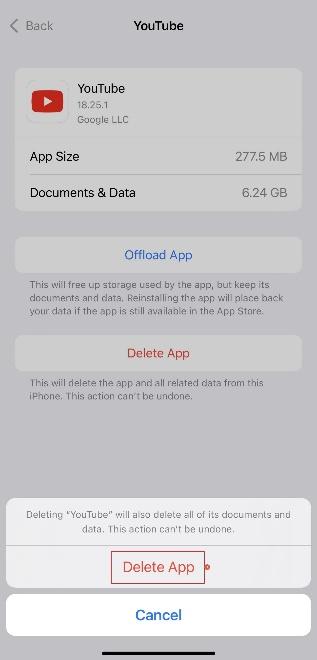
- Repeat this deletion process for all the unwanted apps
- Once you’re done, try saving the video and see if the problem is gone
Part 3: Manage iCloud Storage
This part is equally important as your iPhone may not be able to save the video due to insufficient iCloud space (in the case of synchronization). You can manage iCloud storage by following the steps given below:
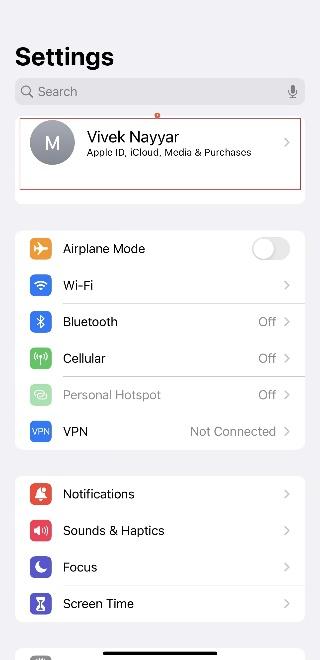
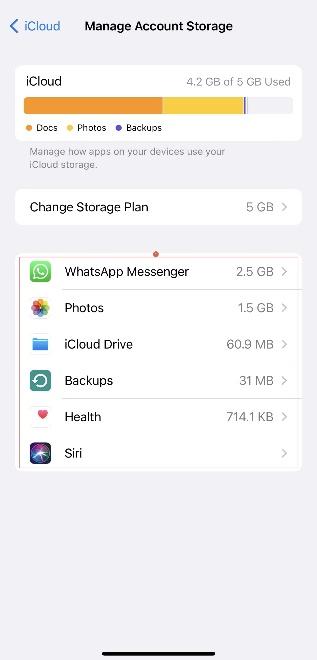
- Go to Settings
- Tap your name from the top of the screen
- Tap iCloud
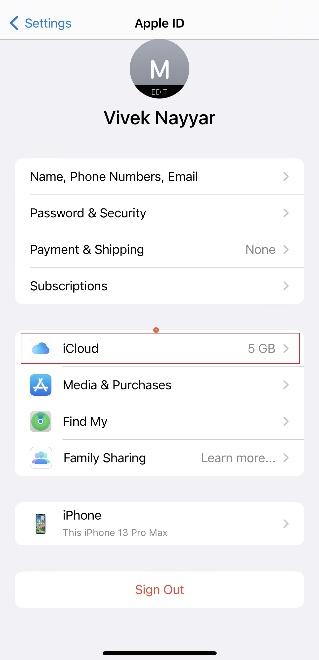
- Notice the storage status from the top of the iCloud screen

- Tap Manage Account Storage
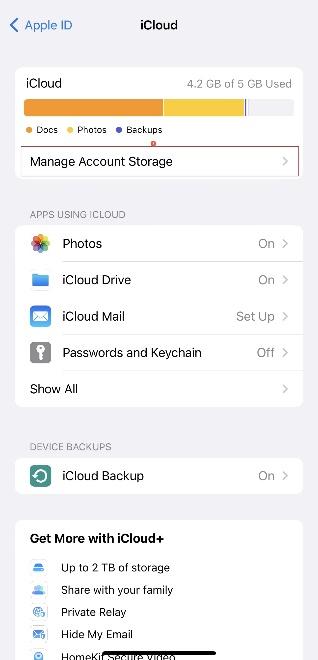
- On the next screen, tap the app occupying the largest part of the storage
- Tap Delete Data from the app-specific screen that opens next

- Tap Delete in the confirmation box at the bottom to free up iCloud space
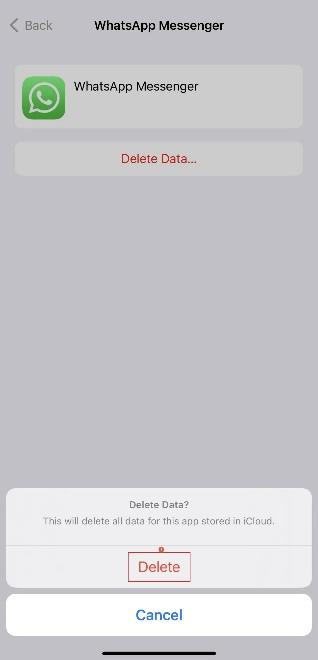
- Try saving the video again and see if the issue is fixed
Reason 4: Erroneous iOS
If the instance of iOS on your iPhone got corrupted due to some unknown reason, you may not be able to save the video on your device. Although you can install a fresh copy of the operating system, doing so would remove everything from your phone, which is something you might not want to do. Therefore, this section suggests an equally effective workaround.
Proposed Solution(s): Reset All Settings
The best way to fix iOS-related issues without losing data is to reset all settings to default. When you choose this option, it:
- Resets all network settings
- Resets keyboard dictionary
- Resets the Home screen layout
- Resets the location service
- Resets privacy settings
The instructions given below explain how you can reset all settings on your iPhone:
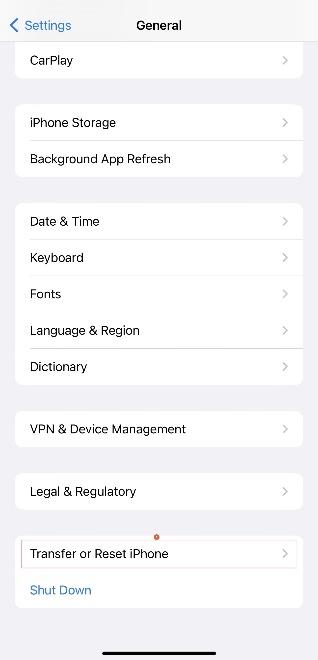
- Go to Settings > General
- Scroll down to the bottom
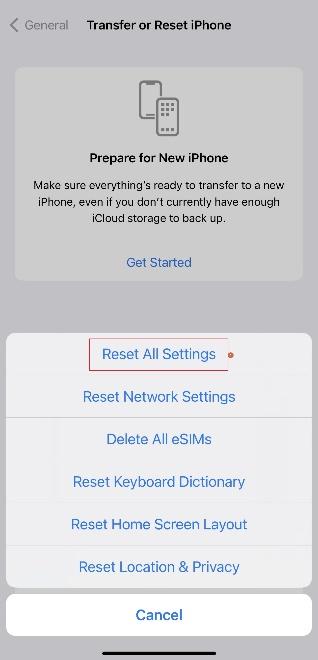
- Tap Transfer or Reset iPhone
- Tap Reset
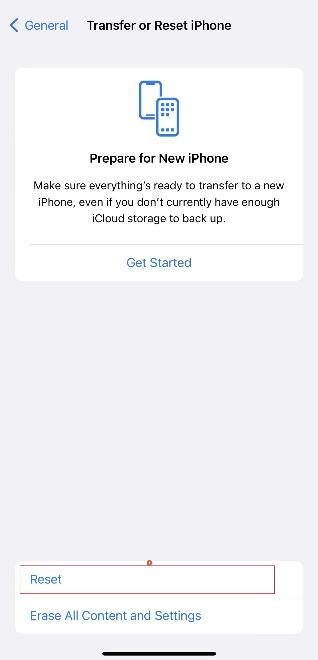
- Tap Reset All Settings from the menu that appears
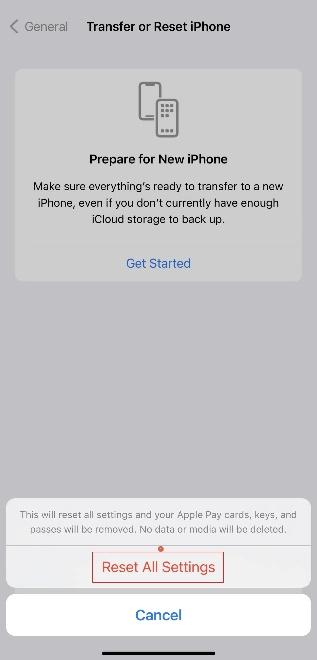
- Enter the passcode when iPhone prompts

- Tap Reset All Settings in the information box that pops up at the bottom
- Tap Reset All Settings again in the confirmation box
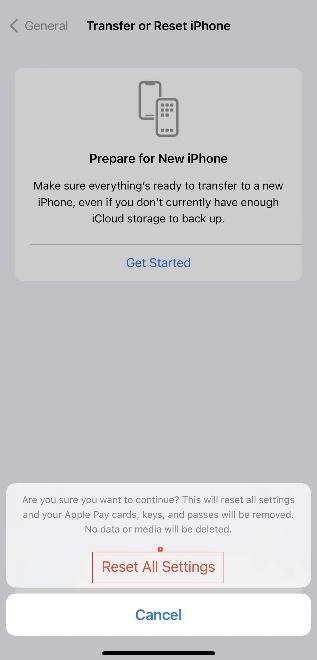
- Once your iPhone reboots, check if the problem is resolved
Conclusion
iPhones showing the “There was an error saving this video. Please try again later.” message is not an uncommon problem, and many users experience it at some point. If you are one of them, the solutions given above will help you fix the issue in a few minutes, even if you don’t have prior technical knowledge.
If you frequently handle video recording or streaming from your iPhone, ensuring stable and real-time transmission is essential. Using a wireless video transmitter can help you seamlessly send your captured footage to a monitor or recording device without losing quality or encountering saving errors.
FAQs
- If I see this error message, could it be a hardware issue?
Absolutely not. The only part where your iPhone’s hardware is involved is the limited storage, and honestly, you can’t do anything about it unless you buy a new phone. Apart from that, this error message doesn’t reflect any hardware problem, and you can fix it by trying the above methods.
- What if none of the above solutions works?
In that case, you can try erasing all content and settings. You can find this option at the bottom of the Settings > General > Transfer or Reset iPhone screen.
- Does configuring iPhone to optimize photos and videos improve its performance?
If your iPhone memory is totally exhausted, giving it some room to breathe by freeing up space surely helps. However, you are suggested not to have high hopes about the phone’s performance.
- What if my iCloud storage is full as well?
If that’s the situation, you can subscribe to a paid storage plan by going to Settings > <YourPofile> > iCloud > Manage Account Storage > Change Storage Plan.
Alternatively, you can go to https://www.icloud.com/ from your PC and download all photos and videos to your computer’s local hard drive. After that, you can safely erase your iCloud data to make room for new files.