Adobe Premiere Pro is the epitome of providing relaxation to professionals and frustration when you cannot navigate your project. It might make you panic, knowing all your work might be lost or cannot be retrieved. And corrupted projects can halt the overall performance of your work.
The file crashes during the saving process when one or more data may be lost, and the file appears damaged. However, you can fully recover your damaged projects by understanding the Premier secrets. And it will equip you with essential knowledge on analyzing the issues and recovering corrupted project files.
How to fix “the project appears to be damaged, it cannot be opened?”
The prevalent issues happen after updating Adobe Premier with the latest technologies, which brings corrupted file issues. However, if there are incomplete data during saving or without a proper file link, the error popup that “the project appears to be damaged, it cannot be opened.”
There are prominent solutions to recover the damaged data, so follow the step-by-step guides to solve this error.
Method 1- AutoSave
Adobe Premiere Pro AutoSave feature is excellent in solving project issues because it saves recent non-corrupted files. When you directly open the project, the error appears that “the project appears to be damaged, and it cannot be opened.” So, follow the hereunder step-by-step process:
Step 1- Navigating the AutoSave Folder
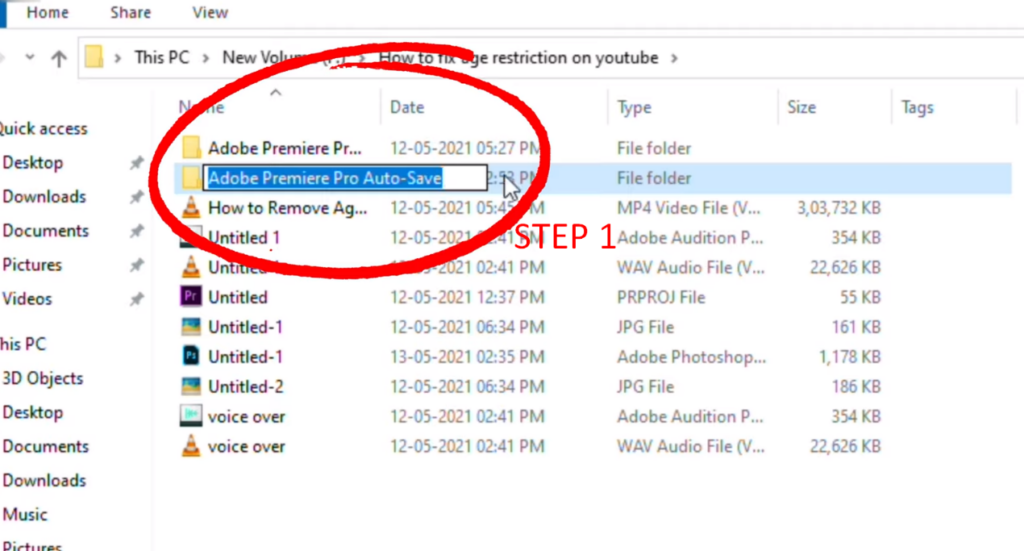
• From your hardware storage, navigate and select the AutoSave folder of the project gallery.
Step 2- Selecting File
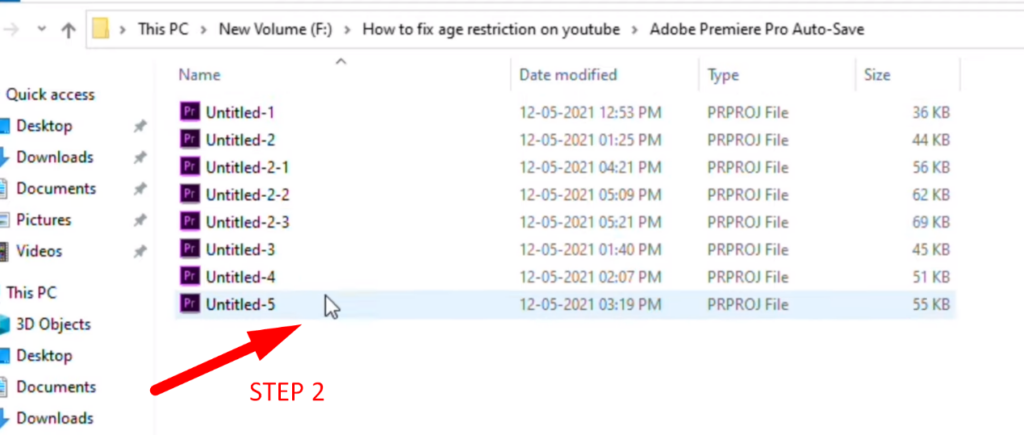
• Click on the latest AutoSaved file to open it in Premiere without error.
• You will see more than one file here, so you can modify the time or project name for clarity.
The AutoSave feature can seamlessly solve project issues; however, the hard drive can corrupt the file. Follow the enlisted step-by-step guide to solve the hard drive issue and seamlessly save your project:
Step 1-
• Click and open the project from AutoSave to Premiere Pro
• After you are done with all the editing, save your work into another hard drive
Step 2-
• Click on the “File” from the top left corner of the menu bar
• Select “Save As” to save the project into another folder
Note: Make sure to give the file a unique name and location away from the corrupted files.
Besides this, you can also import the existing project into the new project file because importing the corrupted files into the new project solves the issues.
Method 2- Resetting Preferences
Resetting the preferences is essential to troubleshoot the issues that will most likely remove the project error. However, backing up your customized preferences is recommended to avoid data loss. It’s recommended to be cautious while restoring preferences because it might reinstall the error.
Step 1- Navigating the Preferences
The resetting will reset the preferences to their default settings, so navigating and moving the account preferences to other locations is essential.
Step 2- Launching Premiere Pro

• Launch the Premiere Pro from the application to open as a new project
• Resetting will remove all customizations, but allocation memory is permanently stored.
Step 3- Importing the Project
• After setting a new project, click “File” from the menu bar and select “Open Project” to open your corrupted project.
• From the “File” popup window, select “Import Project” to import your project.
• The project will open without any errors.
And removing the preferences and cache will bring additional clarity to your projects, which is essential for efficient work.
Method 3- Installing the Latest Version
• Uninstall the previous version and focus on installing the latest version
• Then open the file on the newest version
Note: Make sure to open the corrupted file on the new project, which will open without getting any error.
Also, ensure the file extension is compatible with Premiere, like the mpg extension, because Adobe Premiere does not support TS Files. Hence, changing it to MPG or another compatible file extension is better.
Bonus Tip: Common Issues of the Project of Premiere Pro
Adobe Premiere Pro is the leading Video Editor due to its maneuverable design that brings life to creative ideas. Besides technological advancements, specific problems can arise that need to be addressed.
Adobe Premiere Pro Keeps Crashing
Premiere Pro is advanced editing software; the primary reason for crashing is using the old graphic version. Besides this, the graphics card is mandatory to access the full and smooth functionality of Premiere. And for better optimization, ensure the programs run smoothly by applying the underlying solutions:
- Turn off GPU Acceleration
GPU Acceleration may accelerate the video rendering process, but it’s the leading cause of crashing. So it’s essential to disable GPU by following the underlying guide to fix this problem:
1. Click on the “File” from the top-left menu bar
2. Select “Project Settings” and tap on “General” from the popup window
3. Set the “Renderer” to Mercury Playback Only and click “OK” to save the changes.
- Reset Premiere Preferences
Resetting the preferences will remove the damaged files by restoring the default settings. For this, Press Alt Key (for Windows) and Option Key (for Mac) after clicking on launching the Premiere.
The popup window will appear to restore the preferences.
- Deleting Cache Files

The cache is a temporary storage house for corrupt files and causes frequent disruptions and crashes in project files.
• Click “Edit” from the top left of the menu bar and select “Preferences.”
• Then select “Media Cache” and click “Delete” to remove all cache files from your system.
• Tap on “Okay” and wait for it to end.
- Updating Adobe Premiere Pro
First, ensure you are using the newest version of Premiere because every update removes glitches or bugs and enhances user-friendly experiences.
Also, try closing and reopening the program because it can remove temporary issues effectively.
Warp Stabilizer Issues
The primary function of the warp stabilizer is to stabilize shaky videos and bring smoothness to your videos. And excess use of the warp stabilizer can cause the program to slow down the rendering process. However, two types of errors pop up, and follow the hereunder step-by-step guideline to solve these issues:
Method 1- When “Warp Stabilizer and Speed can’t be used on the same clip.”
If two different clips have varying speed effects, the error “Warp Stabilizer and Speed can’t be used on the same clip.” So, nesting the clips will make one separate clip and primarily merge the timeline clips for smooth speed.
Step- 1
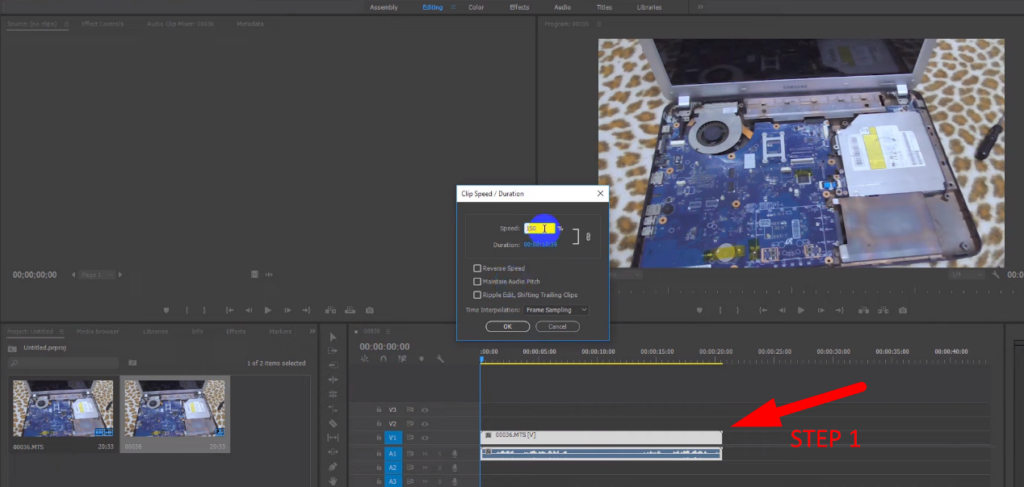
• First, drag your video to the timeline and choose the segments to cut the video to get the portion you like.
• For this, the shortcut key of “Q” to cut in front of the clip and “W” to cut behind the clip
Step- 2
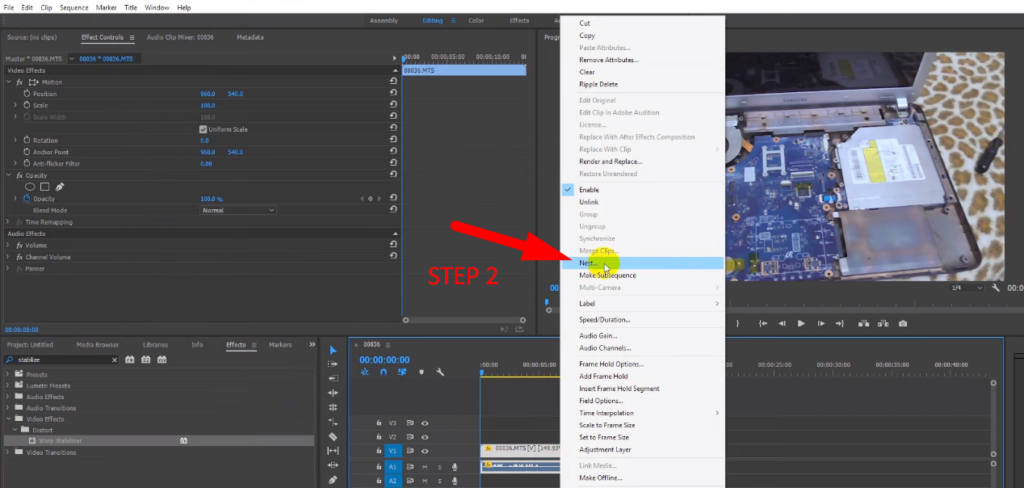
• Right-click on the clips and select “Nest.”
• After nesting, you can seamlessly add a warp stabilizer to your timeline clips.
Step- 3
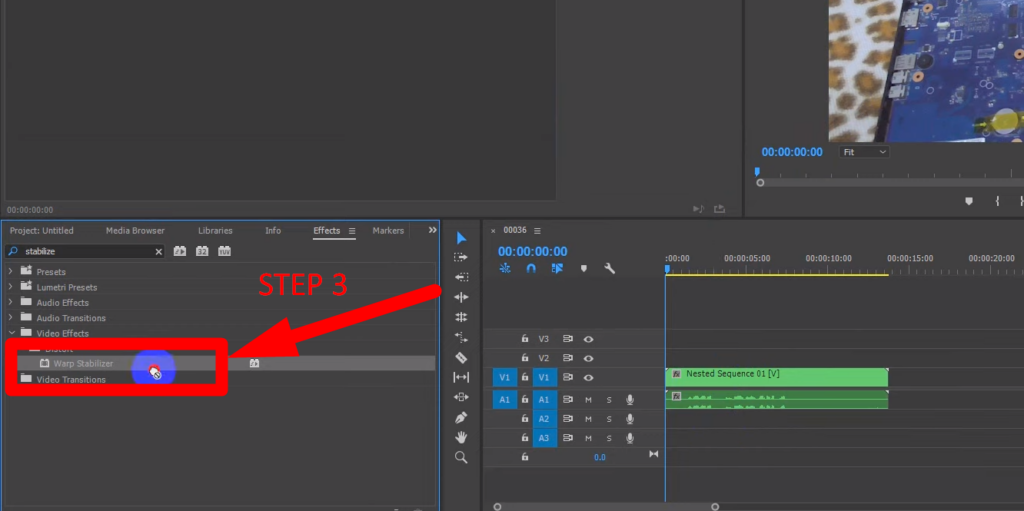
• Click on “Effects” from the left menu bar and tap on the search bar
• Write “Warp” and drag the “Warp Stabilizer” effect to the shaky timeline clip
Step- 4
• After that, you have to wait for it to analyze and stabilize
• You can manage your smoothness or motion results from the effects control settings.
Method 2- When “Warp Stabilizer requires clip to match sequence (fix by nesting).”
When clips in the timeline are of different dimensions, the error “Warp Stabilizer requires clip to match sequence (fix by nesting)” will appear. It means that your clip dimensions sequence does not match like one clip in 4k in the 1080 dimension. However, follow the enlisted steps for nesting clips to solve this issue.
• Right-click on the timeline and select “Nest” from the popup window menu
• After nesting, apply the “Warp Stabilizer” effects and await the results.
When nesting the clips, clips with different dimensions will merge into a separate and unique file. So, clip nesting will automatically adjust the sequence resolution and solve the speed issues proficiently.
Conclusion
Although Adobe Premiere is premium in building creativity, damaged project files can halt the overall performance. And it becomes difficult to navigate and understand the issue of “the project appears to be damaged, it cannot be opened.” However, the abovementioned solutions can alter your frustration and enable you to recover your lost data. So, after setting preferences and carefully applying the guide, you can import or work on your projects without errors.
Prevent project corruption caused by interrupted connections or faulty cables during production shoots by adopting a robust wireless video transmitter. Its stable wireless transmission ensures your video projects remain safe from data disruptions and unnecessary recovery headaches.
Frequently Asked Questions
How to fix Adobe Premiere Pro Video not playing?
First, it’s essential to understand the root causes of the problem because the issue varies with the system. However, the primary reason is media cache files which store large cache files with file size. Besides this, technical glitches, corrupted files, overheating, and update problems are the prominent reasons.
So, after analyzing the problem, you can adopt any of the hereunder methods to solve the problem:
Method 1- Clearing Cache
• Close the premiere pro, navigate its location from the computer storage, and delete the “cache” files.
• Open “Trash” (for MAC) or “Recycle Bin” (for Windows) to permanently delete caches.
Method 2- Restart your computer because it will remove the temporary glitches and freshen the software. Also, it solves the overheating problems.
Method 3- With time, Premiere drivers become corrupted or outdated, so they need to be updated regularly.
How to fix the error “Media Offline” in Adobe Premiere Pro?
The primary reason this error pops up is that Premiere cannot locate its location when working on the files. Their immediate location changes when multiple editors work on the same project.
And ‘Relinking’ the media is possible with two methods. First, hit “Shift + 1” to locate your missing clips with the question mark icon and right-click on them to select “Link Media.”
Second, click on the media file you want to add file and select “Locate.” Then link your file to the original folder, and the error will be removed. You can choose the lost media files and right-click “Link Media” to the new location.
Why can’t I drag and drop anything anywhere in Adobe Premiere Pro?
After updating or installing the latest Premiere Pro version, the issue is that “you cannot drag and drop” any files. Here are the solutions to this problem,
Method 1-
• Hold the “Shift + Alt” key and click to open the Premiere Pro
• Select to clear your preferences and plugins
Method 2- After opening the Premiere account, reset your “workspace” settings to the default and try dragging the file to see if it works.
Method 3- Do not run your Premiere Pro as “Administrator,” and all the features will start working again.


.png)


