.png)
Lights, camera, Blender! If you’re an aspiring filmmaker or a video editing enthusiast, you know the power of a well-placed camera angle in creating captivating visuals. Whether you’re working on a short film, animation project, or even a product showcase, mastering the art of camera placement can take your creations to new heights.
In this comprehensive guide, we will delve into the exciting world of Blender, an acclaimed open-source 3D creation suite, and explore the ins and outs of adding one or multiple cameras to your scenes. Buckle up as we embark on a journey to unlock the secrets of cinematic storytelling and bring your ideas to life with stunning visuals.
So, grab your director’s chair, fire up Blender, and let’s dive into the magical realm of cameras!
What is Camera in Blender
In Blender, a camera is a crucial tool that allows you to view and capture your 3D scenes from specific angles and perspectives. It serves as the virtual eye through which you observe your creations and bring them to life. Think of the camera as the director’s lens, guiding the viewer’s attention and adding depth and realism to your projects.
Just like a real-world camera, Blender’s camera has various properties and settings that you can adjust to achieve your desired visual effect. You can control the camera’s position, rotation, focal length, depth of field, and much more. These settings empower you to create stunning compositions, simulate real-world camera effects, and tell your story with precision.
How to Add a Camera in Blender
Adding a camera in Blender is a straightforward process that sets the foundation for creating compelling visuals and telling your story through the lens of your virtual camera.
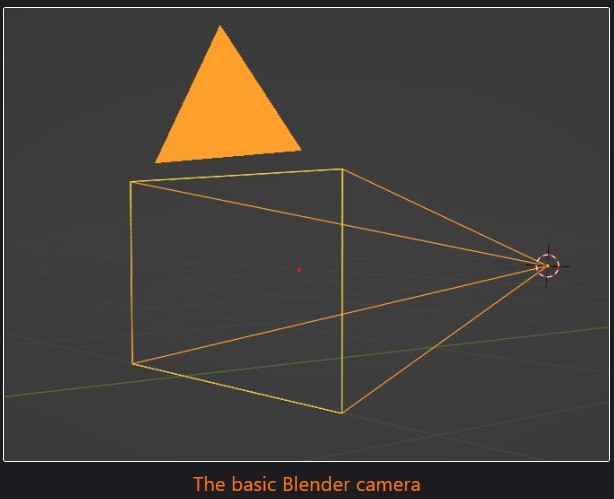
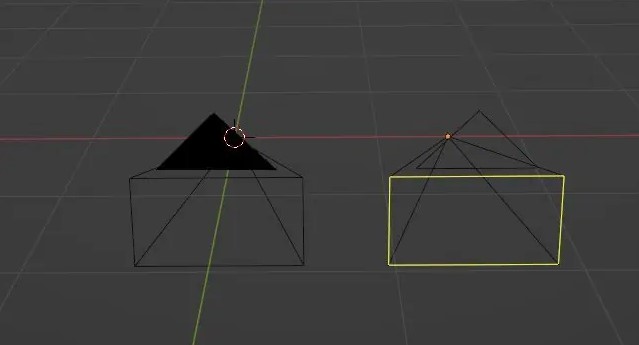
Cameras in Blender are represented as pyramid-like objects, featuring an arrow pointing away from the base like a hat. The rear of the camera is located at the point of the pyramid, while the base represents the lens. The arrow indicates the top edge of the lens.
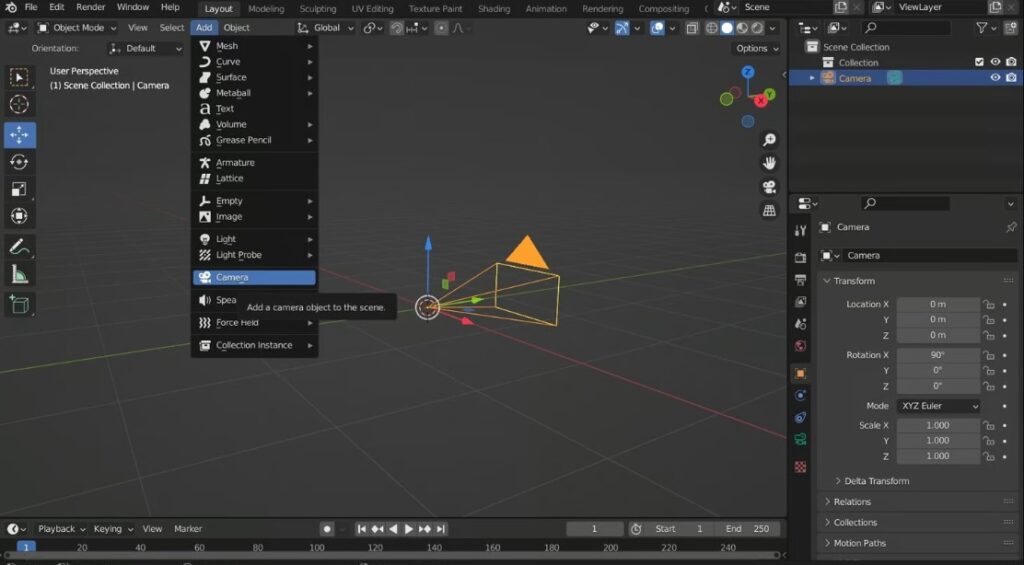
To add a camera object in Blender, you can follow these simple steps:
- Press “Shift+A” to bring up the Add menu, or click the Add dropdown located at the top of the Viewport.
- Left-click on “Camera” in the menu to create a camera at the position of the 3D cursor.
- Alternatively, you can use the up and down arrow keys to navigate through the Add menu and hit Enter when “Camera” is highlighted.
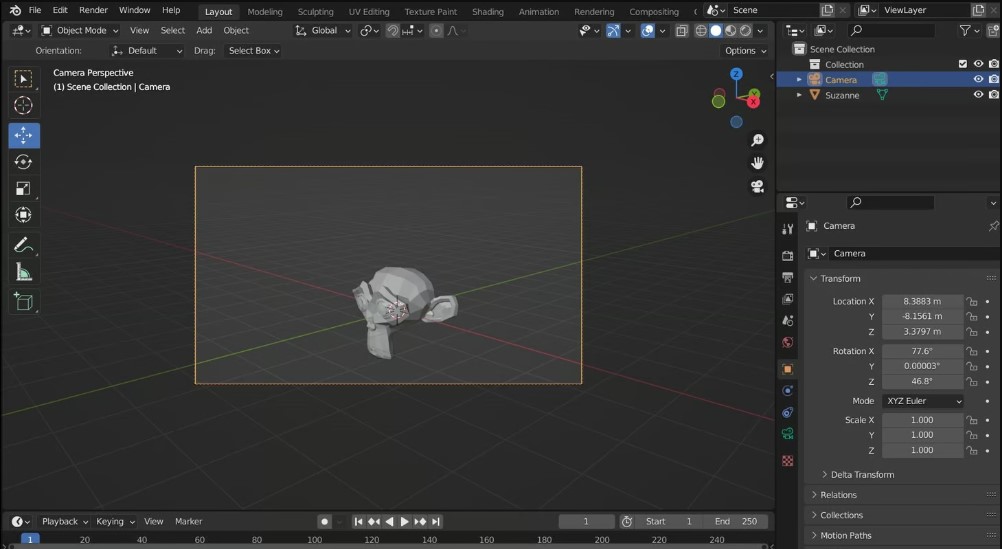
Once your camera is placed, you can easily toggle in and out of the camera view by pressing the “0” key on the numpad. This view allows you to see the scene from the camera’s perspective, giving you a preview of what your final render will look like.
If you need to recenter your 3D cursor, which appears as a target and determines the placement of new objects, you can simply press “Shift+C” to reset its position.
How to Add Multiple Cameras in Blender
Adding multiple cameras in Blender follows a similar process to adding a single camera. Here’s a step-by-step guide:
- Launch Blender and open your desired project or create a new one.
- Ensure you are in the 3D Viewport workspace, the default workspace for 3D modeling and animation in Blender.
When adding multiple cameras, you can follow these general steps:
- Press “Shift+A” to bring up the Add menu or click the Add dropdown at the top of the Viewport.
- Left-click on “Camera” to create a new camera at the location of the 3D cursor.
- Repeat this step as many times as needed to add additional cameras.
Each newly added camera will appear as a separate object in your scene. You can position and adjust each camera individually to capture different angles or perspectives within your scene.
By setting up multiple cameras, you gain the flexibility to switch between different viewpoints and create dynamic shots in your animations or renders. Experiment with different camera positions and settings to craft engaging visual narratives.
NOTE: Remember to save your project regularly to preserve your work, and enjoy the creative possibilities that multiple cameras bring to your Blender projects.
How to Move the Camera in Blender?
Scenario 1: Viewport Controls (Viewport Only)
- Move the view: Hold down “Shift” + middle mouse button and move the mouse across the Viewport.
- Rotate the view: Hold down the middle mouse button and move the cursor around the Viewport.
- Zoom in/out: Scroll the mouse wheel up or down over the Viewport.
Scenario 2: Direct Controls (Camera Only)
- Move the camera: Select the camera and press ‘G’, then use the cursor to move it. Press ‘X’, ‘Y’, or ‘Z’ to lock the movement to a specific axis.
- Rotate the camera: Select the camera and press ‘R’, then move the mouse to rotate. Press ‘X’, ‘Y’, or ‘Z’ to choose the rotation axis.
- Zoom: Click and drag the rectangular end of the camera to zoom in or out.
Scenario 3: First-Person (Viewport or Camera)
- Enter first-person view: Press “Shift+`” (grave key) or customize the shortcut in Preferences.
- Move around: Use ‘W’ and ‘S’ to move forward and backward, ‘A’ and ‘D’ to move left and right, and ‘E’ and ‘Q’ to move up and down.
- Adjust speed: Scroll the mouse wheel up to speed up or down to slow down the movement.

Remember to press Enter or left-click to exit the first-person view and save your current Viewport or camera position. Now you have the tools to navigate your scene in Blender, whether it’s through a camera for rendering or in the Viewport for modeling from different angles!
How to Know What Camera is Active in Blender?
Method 1: Scene Properties
- Open Blender and access the Properties window.
- Navigate to the Scene Properties tab.
- Look for the “Camera” field under the scene settings. The active camera will be displayed here.
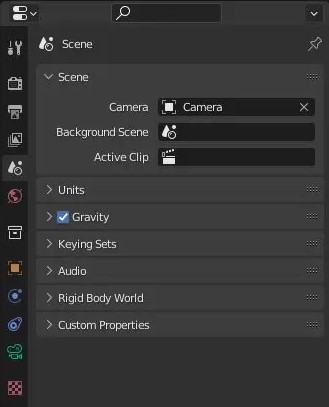
NOTE: This method works even if the cameras are hidden in the scene.
Method 2: Camera Object
- Examine the camera objects in the scene.
- Active cameras are indicated by a solid triangle above them.
- A solid triangle indicates the camera is active, while a wireframe triangle indicates it is not.
NOTE: This method provides a quick visual indication of the active camera, but it may not be effective if the cameras are hidden.
Method 3: Snapping the View
- Press the “0” key on the numpad to snap the view to the active camera.
- To maintain the view focused on the camera, select the camera while in camera view and press the “Delete” key on the numpad.
NOTE: The view will snap to a camera even if it is hidden in the scene hierarchy. However, selecting a hidden camera in the scene view is not possible, although camera borders may still be visible.
By using these methods, you can easily determine which camera is active in Blender. Understanding the active camera is essential for managing camera settings, setting up shots, and rendering specific viewpoints in your Blender projects.
How to Set a Camera to Active?
Step 1: Adding a Camera
- Start by adding a camera to the scene if there are no cameras present.
- Even if the camera is not explicitly set as active, Blender will automatically designate it as the active camera during rendering.
Step 2: Scene Properties
- Access the Scene Properties tab.
- Under the “Scene” section, locate the camera field.
- Click on the camera field and select the desired camera from the dropdown menu.
- Alternatively, you can type the camera’s name to search for it in the dropdown list.
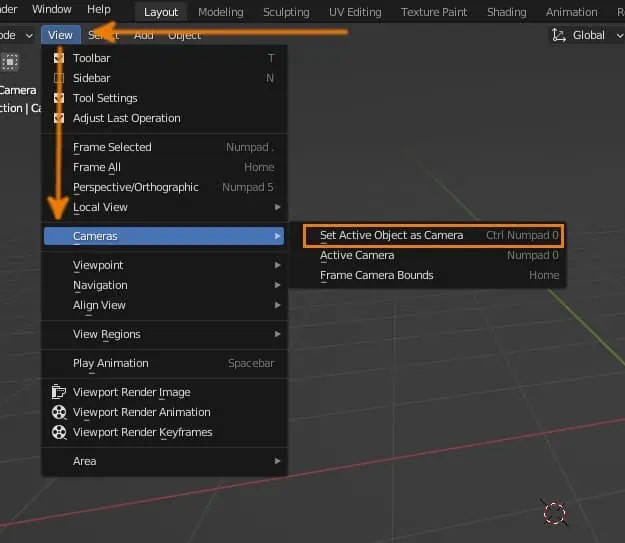
Step 3: Set Active Object as Camera
- Select the camera you want to set as the active camera.
- Go to the View menu and click on Cameras, then select “Set Active Object as Camera.”
- This method directly sets the selected camera as the active camera.
NOTE: Disabling the rendering or visibility of a camera in the scene hierarchy does not affect its ability to render. When a camera is set as active, it will render regardless of its rendering or visibility settings. Additionally, pressing the “0” key on the numpad to snap the view will center on the active camera, even if the camera is hidden.
By utilizing these methods, you can easily set a camera as active in Blender. Having an active camera is crucial for controlling the viewpoint during rendering and achieving the desired results in your Blender projects.
How to Lock Camera to Current View
To set the active camera to the current view in the 3D Viewport, follow these steps:
- Press Ctrl + Alt + NumPad 0.
- Note: It is important to use the “zero” key on the number pad, as the zero key on top of the keyboard will not work for this function.
By doing this, the active camera will align with the current view in the 3D Viewport.
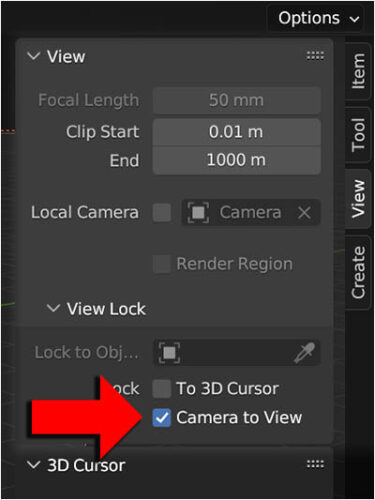
Additionally, you can lock the camera to the viewport view, which allows the camera’s view to follow your perspective in the 3D Viewport. Here’s how to do it:
- Press “N” to open the sidebar in the 3D Viewport.
- In the sidebar, under the “View” tab, find the checkbox labeled “Camera to View” and enable it.
Now, when you press “0” on the number pad to enter the camera view, the camera’s view will be synchronized with your navigation in the 3D Viewport. Locking the camera to the current view or enabling the camera-to-view mode can be useful for positioning the camera accurately and adjusting its composition before finalizing the shot.
NOTE: Remember, you can turn off the “Camera to View” option once the camera is set to a desired position.
How to change camera during animation?
When creating an animation, there may be a need to switch between different camera angles. While you can animate a single camera to change its position, another approach is to use multiple cameras for more flexibility and ease of use. Here’s how you can change the active camera during an animation using markers:
- Open the Layout workspace or any workspace with the timeline visible.
- Drag the playhead to the beginning of the animation where you want to switch cameras.
- In the Timeline, select Marker > Add Marker to add a marker at the current frame.
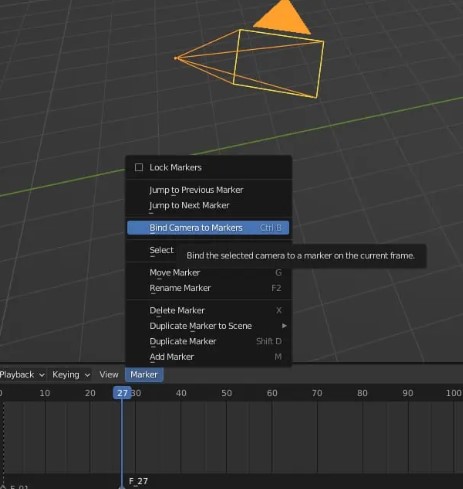
- In the Scene View, select the camera you want to be active at that point.
- Go back to the Timeline and select Marker > Bind Camera to Marker. This links the selected camera to the marker.
- Move the playhead to the frame where you want to switch to a different camera.
- Add another marker at that frame using Marker > Add Marker.
- Select the new camera you want to be active at that point in the Scene View.
- Bind the new camera to the marker by selecting Marker > Bind Camera to Marker.
Repeat these steps for any additional camera switches you want to make during the animation.
Using markers to change cameras provides a convenient way to control the active camera throughout the animation. It allows for smoother transitions between different camera angles without the need to manually animate a single camera’s movements.
Enhancing your cinematic storytelling starts with capturing exceptional footage, and using a high-quality streaming camera can greatly elevate your visual creativity. Whether you’re integrating live-action shots or refining virtual camera movements in Blender, a reliable streaming camera ensures professional-grade results and smoother workflows.
Frequently Asked Questions
How do I add a camera in Blender?
To add a camera in Blender, press “Shift+A” to bring up the Add menu, click on “Camera,” and it will create a camera at the location of the 3D cursor.
Can I have multiple cameras in one Blender scene?
Yes, Blender allows you to have multiple cameras in a single scene. You can switch between these cameras to capture different angles or shots.
How do I switch between cameras in Blender?
To switch between cameras in Blender, you can use markers. Place markers in the timeline at the frames where you want to switch cameras, and bind each camera to its respective marker.
How do I move the camera in Blender?
To move the camera in Blender, select the camera object and press “G” on your keyboard. You can then use your mouse or arrow keys to move the camera in the desired direction.
Can I lock the camera to a specific view in Blender?
Yes, you can lock the camera to the current view in Blender. Press “Ctrl + Alt + NumPad 0” to set the active camera to the current viewport view.
How do I make a camera the active camera in Blender?
To make a camera the active camera in Blender, select the camera object and go to the Scene Properties. Under the scene tab, select the desired camera from the camera field.
How can I know which camera is currently active in Blender?
You can check the active camera in Blender by going to the Scene Properties and looking at the camera field. The active camera will be displayed there.
Can I animate cameras in Blender?
Yes, you can animate cameras in Blender. You can keyframe their movements, change their focal length, or apply other transformations to create dynamic camera animations.
How do I render from multiple cameras in Blender?
To render from multiple cameras in Blender, you can set up different render layers or create separate scenes for each camera. This allows you to render from each camera independently.
Are there any shortcuts for switching to the camera view in Blender?
Yes, you can switch to the camera view in Blender by pressing “0” on the numpad. Alternatively, you can go to the View menu and select “Cameras > Active Camera” to switch to the active camera view.