.png)
In the realm of audio editing, Audacity stands as a mighty tool for creators and editors alike. Yet, amidst its prowess, the occasional hiccup may arise, leaving users baffled by the elusive vanishing of equalization options. Fear not, for within this blog, we delve into the depths of Audacity’s equalization mysteries, unraveling the causes behind its disappearance and guiding you through a symphony of solutions. Whether you’re a podcaster, musician, or audiophile, join us as we harmonize your way back to flawless equalization.

What is Audacity?
Audacity is an open-source, cross-platform audio editing software that allows users to record, edit, and manipulate audio tracks. It offers a wide range of features for both basic and advanced audio editing tasks, making it a popular choice among podcasters, musicians, sound designers, and anyone working with audio content. Audacity supports various audio formats, offers tools for cutting, copying, and pasting audio segments, and provides effects and filters for enhancing audio quality and creativity.
One of Audacity’s notable features is its equalization tool, which enables users to adjust the frequency balance of an audio track by boosting or reducing specific frequencies. This can be useful for various purposes, such as correcting imbalances in recorded audio, improving the overall sound quality, or applying creative audio effects. Now, let’s delve into the specifics of addressing the issue of missing equalization options in Audacity.
7 Steps to Audacity Equalization Missing
It’s crucial to navigate Audacity’s evolving features to make the most of its powerful equalization tools in the latest versions. Here’s a step-by-step guide to using the Filter Curve and Graphic EQ features for precise and effective equalization which are replaced by previous Equalization Feature:
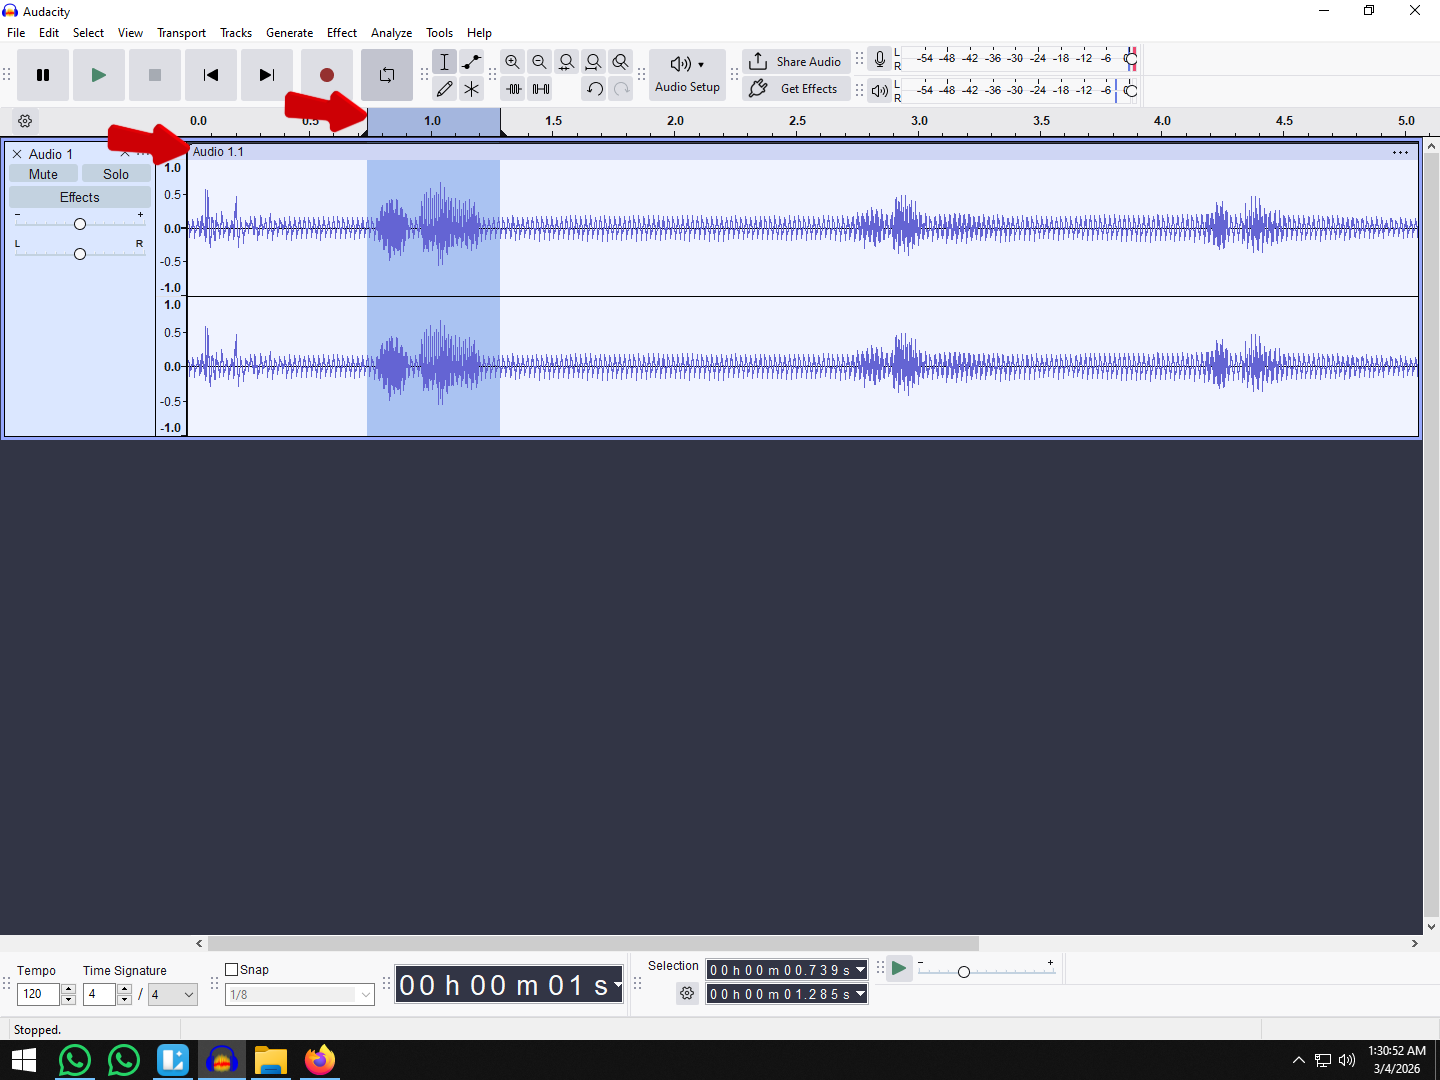
- Begin by recording the audio you’d like to enhance using equalization. This could be a podcast episode, a musical track, or any other audio content.
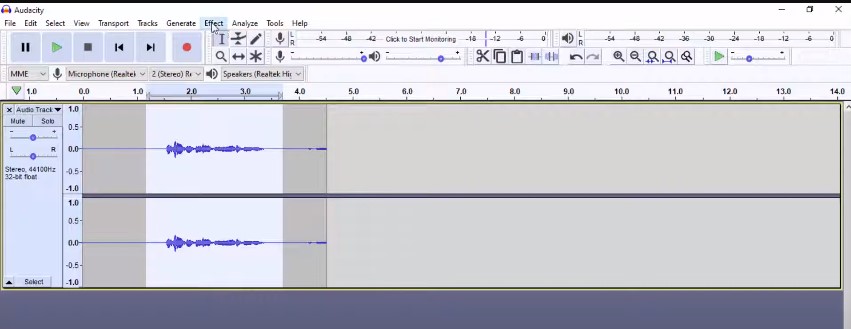
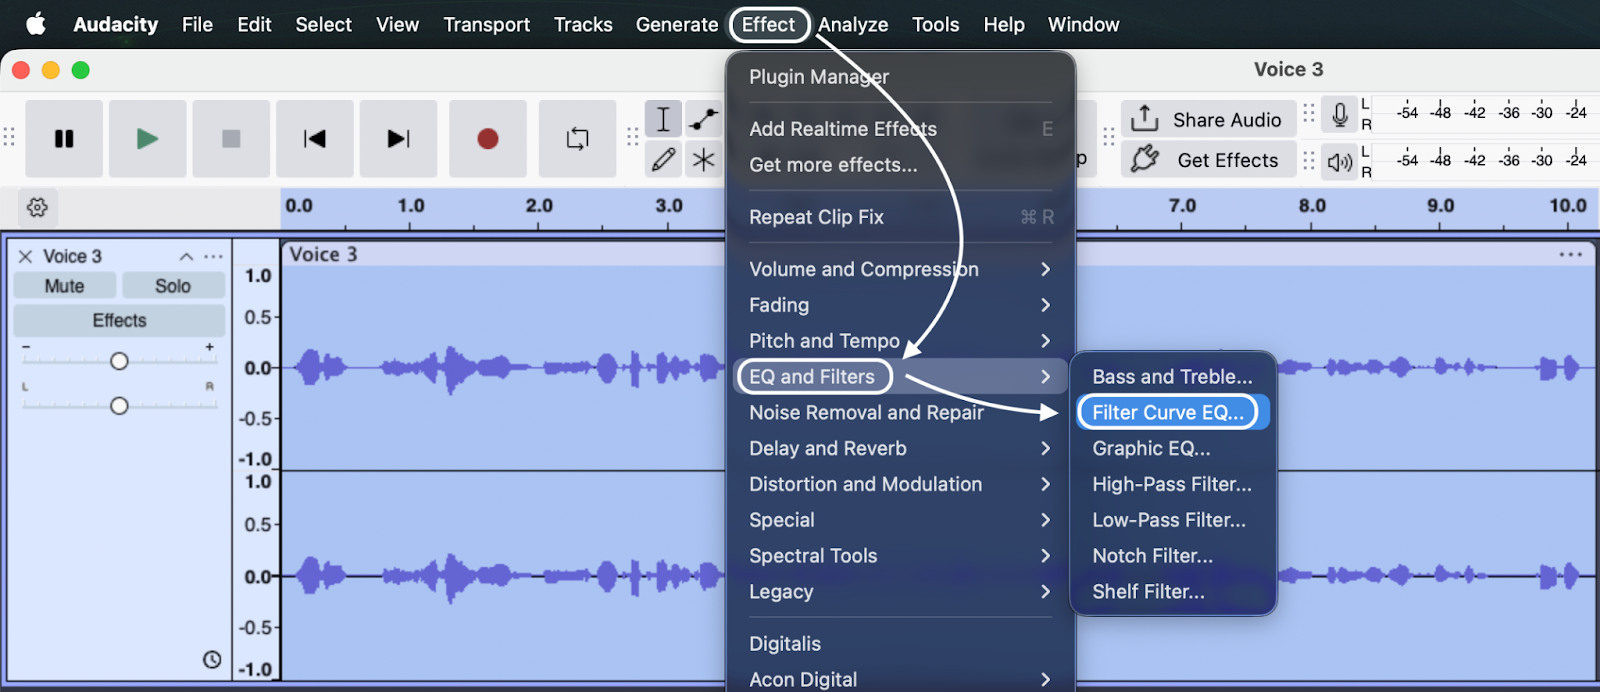
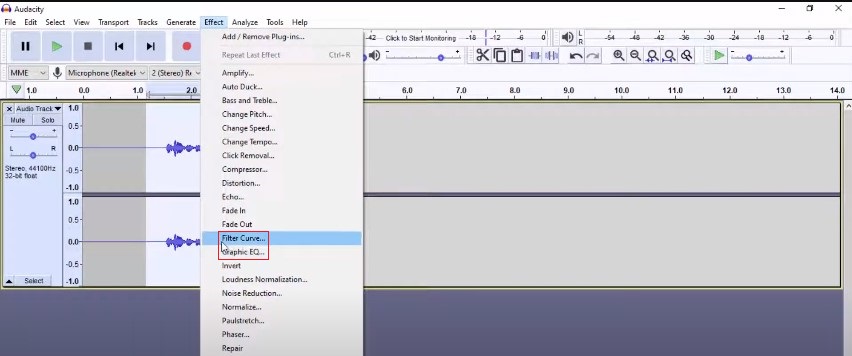
- After recording, proceed to the “Effect” menu at the top of the Audacity interface. Here, you’ll find the two essential equalization tools: Filter Curve and Graphic EQ.

- If you prefer the previous interface, select “Filter Curve EQ” from the Effect menu. This tool allows you to manually adjust the frequency response of your audio by modifying a curve that represents the EQ changes.
- Click on “Manage” to access the Factory Presets options, which provide predefined EQ settings tailored to various scenarios.

To explore the Graphic EQ feature, choose “Graphic EQ” from the Effect menu. The Graphic EQ offers a visual representation of frequency bands and their respective gains or reductions. This tool simplifies equalization adjustments, particularly for users who find the graphical interface more intuitive.
- With either tool, you can adjust the EQ settings by manipulating the frequency bands and their gains. Boost or reduce specific frequency ranges to tailor the audio’s tonal balance to your preference.
- If you’re using the Filter Curve EQ, the Factory Presets provide a range of pre-configured EQ settings suitable for various audio scenarios. Select a preset that matches your intended outcome and adjust it further if needed.

- With the Graphic EQ, adjust the gains by dragging the control points on the graph up or down. You can boost or cut frequencies with precision, observing changes in real-time.
Audition and Refine
As you adjust the equalization settings, make sure to listen to the audio changes in real-time. Play the audio segment and make adjustments until you achieve the desired sound quality.
What if You can’t find the Filter Curve and Graphic EQ Option in Effect Menu
If you’re unable to locate the Filter Curve and Graphic EQ options in the Effect menu of Audacity’s latest version, you might need to manually add or enable these plug-ins. Here’s a guide on how to do that:
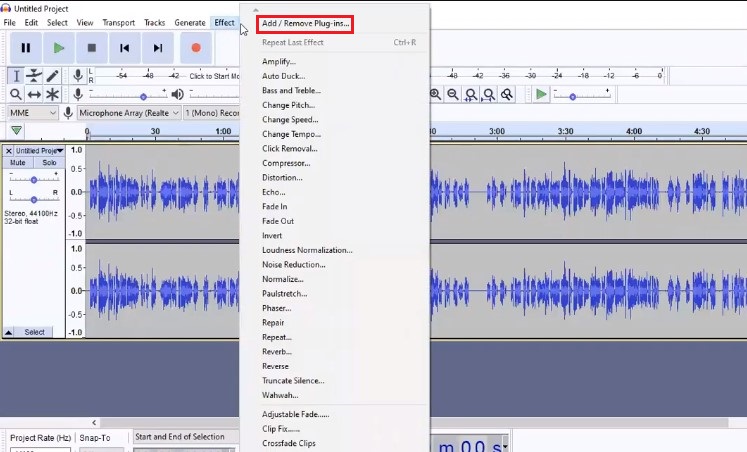
- Access the Effect Menu
Start by opening Audacity and navigating to the “Effect” menu at the top of the interface.
- Open Plug-in Management
Within the Effect menu, look for an option called “Add/Remove Plug-ins” and click on it. This option allows you to manage the plug-ins available in Audacity.
- Enable Equalization Plug-ins
In the Plug-in Management window, you’ll see a list of available plug-ins categorized by type. Look for the equalization-related plug-ins, which should include “Filter Curve EQ” and “Graphic EQ.”
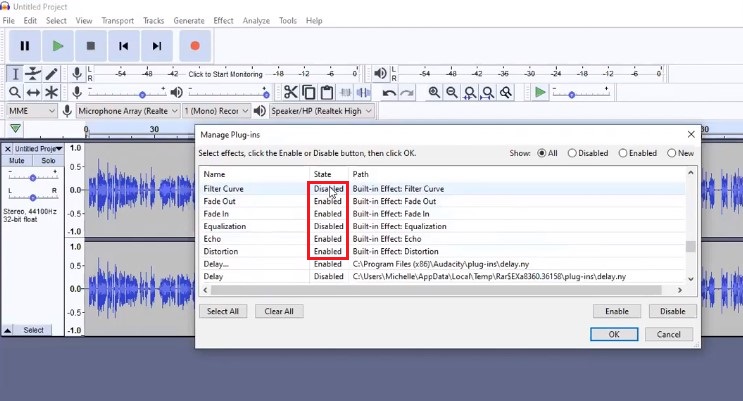
- Check the Boxes
Locate the entries for “Filter Curve EQ” and “Graphic EQ” in the list. They might be unchecked, indicating that they’re currently disabled. Check the boxes next to these plug-ins to enable them.

- Apply Changes
Once you’ve checked the boxes for the desired equalization plug-ins, click the “OK” or “Apply” button in the Plug-in Management window to save your changes.
- Access Equalization Tools
Return to the Effect menu, and you should now see the options for “Filter Curve EQ” and “Graphic EQ” listed among the available effects.

- Proceed with Equalization
Follow the steps mentioned earlier to use either the Filter Curve EQ or Graphic EQ tool to adjust the tonal balance of your audio as needed.
How to Use the Audio Equalizer in Audacity?
The Audio Equalizer tool within Audacity empowers you to enhance the quality of your audio by manipulating its frequency components. By strategically boosting or reducing certain frequencies, you can achieve a balanced and more appealing sound.
To utilize Audacity’s Audio Equalizer, follow these steps:
- Load Your Audio File
Open Audacity and load the audio file you want to improve. This sets the stage for your equalization adjustments.
- Access Filter Curve EQ
Navigate to the “Effect” menu and select “Filter Curve EQ.” This tool allows you to fine-tune the frequency response of your audio.

- Starting with a Flat Line
Once inside the “Filter Curve EQ” tool, you’ll notice a flat line as the default representation of the equalizer. If the line isn’t flat, simply click the “Flatten” button located at the bottom of the interface.

- Roll Off Bass
Begin by addressing the lower frequencies that are typically inaudible in human speech. Create a dot just above 100Hz on the curve. Then, add another dot slightly to the left of it.

Drag down the second dot until it reaches the lowest point on the curve. This action attenuates frequencies below 100Hz, improving clarity.

- Enhance Treble Frequencies
To add brilliance to your audio, focus on enhancing the treble frequencies above approximately 6,100Hz. Place a dot above 6,100Hz on the curve and another dot just to the right of it.
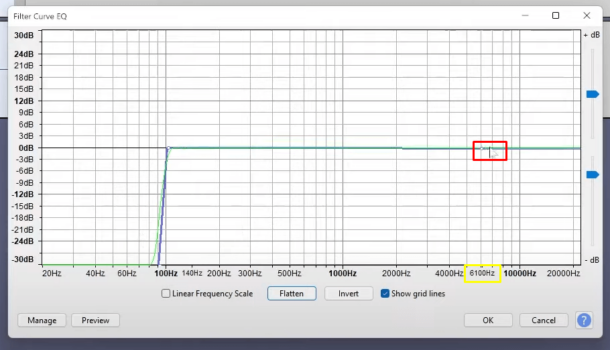
Drag the second dot upward by up to 6dB. This action accentuates the crisp treble frequencies, adding clarity and sparkle.

- Polish the Audio
The beauty of using the Filter Curve EQ lies in its flexibility. You can manipulate multiple frequencies to achieve your desired sound. Add and drag more points on the flat line to further refine your adjustments. Customize your equalization by adding and adjusting dots at various frequencies. Each dot represents an adjustment to the audio’s frequency response.
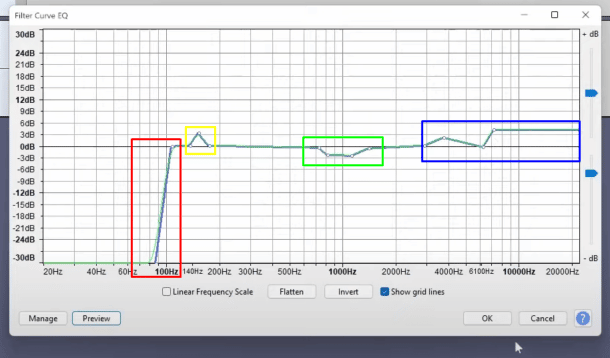
- Custom Adjustments
The various dots we added and adjusted in the above step can represent different enhancements. Here’s its breakdown for you:
- Red: Rolling off the base frequencies with a high pass filter.
- Yellow: Notching up the low-end frequencies.
- Green: Attenuating boxy mid-range frequencies.
- Blue: Enhancing the highs for brilliance.
- Preview and Apply
Before finalizing your equalization, preview the audio to ensure the adjustments meet your expectations. If you’re satisfied, click the “OK” button to apply the effects.
Conclusion
From unraveling the mystery of missing equalization options to harnessing the power of Filter Curve EQ and Graphic EQ, you’ve journeyed through a landscape of solutions. Remember that Audacity’s frequent updates ensure you stay on the cutting edge of audio editing, and by navigating the latest versions, you’ve unlocked a wealth of features designed to enrich your sonic canvases.
Equalization is not just about correction; it’s about enhancing, customizing, and amplifying the emotional impact of your audio content. Whether you’re crafting podcasts that captivate, music that resonates, or any other auditory experience, the equalizer is your trusted companion on this creative voyage.
So, step boldly into Audacity’s world of equalization, armed with knowledge and the determination to elevate your sound. Unleash your creativity, refine your skills, and embark on a journey where every adjustment becomes a brushstroke in the masterpiece of your audio vision. Hit the comment section below to give your feedback and share your thoughts with us. Happy equalizing!
As you enhance your Audacity skills and fine-tune audio equalization, capturing clean audio right from the start is equally important. Consider using a wireless lavalier microphone – it’s a simple and effective way to significantly improve your voice quality, making audio edits in Audacity much smoother.
Frequently Asked Questions
What changes have occurred in Audacity’s Equalization over time?
In earlier Audacity versions, the Equalization effect was known as “Equalization,” featuring modes like “Graphic” (replaced by “Graphic EQ”) and “Draw” (transformed into “Filter Curve EQ”).
How can I access equalization options in Audacity’s 2023 version?
Audacity’s equalization options are reachable through a “Draw curves” mode under Effect > Filter Curve EQ. They can also be found via Effect > EQ and Filters > Graphic EQ.
What happens when I adjust sliders in Audacity’s EQ?
By adjusting an EQ slider, you modify the loudness of specific audio frequencies. However, exercise caution, as even slight dB adjustments can significantly impact the overall sound quality.
How should I approach using Audacity’s EQ for the best results?
To make the most of Audacity’s EQ tools, begin with conservative 1 dB to 2 dB adjustments. This ensures you have a foundation to fine-tune for your desired audio outcome.
What’s the step-by-step process for improving audio quality in Audacity?
Enhancing audio quality involves selecting a sound-free section, accessing Effect > Noise Removal, clicking “Get Noise Profile,” highlighting the entire recording, revisiting Effect > Noise Removal, and finally clicking OK.
How do I locate Audacity’s settings and preferences?
Audacity settings are accessible via the Edit Menu or using the shortcut Ctrl + P. On a Mac, you can find them under the Audacity Menu or with the shortcut ⌘ + ,.
Is it possible to remove a high-pitched whine from my audio in Audacity?
Yes, you can. Select the audio, navigate to Effects > Notch Filter, input the frequency for reduction and the Q-value for affected frequencies, then press OK to apply the effect.
What if I can’t find the Factory Presets in Filter Curve EQ?
Ensure you’ve selected “Filter Curve EQ” from the Effect menu, then click on “Manage” to access the Factory Presets options for predefined EQ settings.
Can I use the Graphic EQ tool similarly to Filter Curve EQ for equalization?
Yes, you can achieve equalization adjustments using the Graphic EQ tool by following similar steps in the Effect menu.
How do I fine-tune equalization settings after enabling the options?
Adjust frequency bands and gains while listening in real-time to achieve the desired tonal balance. Use your ears as your guide.
What should I do if the Equalization options are still missing after enabling the plugins?
If the problem persists, consider reinstalling Audacity or seeking assistance from the Audacity community for more specific troubleshooting.
Is it possible to save my custom equalization settings for future use?
Yes, you can often save your custom settings as presets for quick application on similar audio in the future.
Why are the Equalization options missing only on certain tracks or projects?
Make sure that tracks are selected and active, as the Equalization options might not appear if no track is chosen.
Can third-party plugins affect the availability of Equalization options?
Yes, third-party plugins can sometimes conflict with Audacity’s features. Launch Audacity in safe mode to test if a plugin is causing the issue.
Where can I find more help and support for Audacity-related issues?
You can visit Audacity’s official forums, online communities, or consult user guides and documentation for additional assistance and troubleshooting tips.