.png)
When handling audio files, encountering occasional challenges is inevitable, particularly with voice recordings or digitized content originating from analog sources like cassette tapes or vinyl records. Cleaning up audio recordings is essential for achieving professional-quality results in any project, whether it’s a podcast, music production, or video editing. Audacity, a free and open-source audio editing software, offers a plethora of tools and techniques to help users enhance the clarity and quality of their audio files.
This article seeks to emphasize the significance of audio quality in establishing credibility and persuasiveness in audio or audio-visual content for audiences. Additionally, it will explore the utilization of Audacity, a freely available tool renowned for enhancing sound quality, in producing top-notch audio for educational materials such as e-learning courses and academic audio-visual resources.
Understanding the Interface
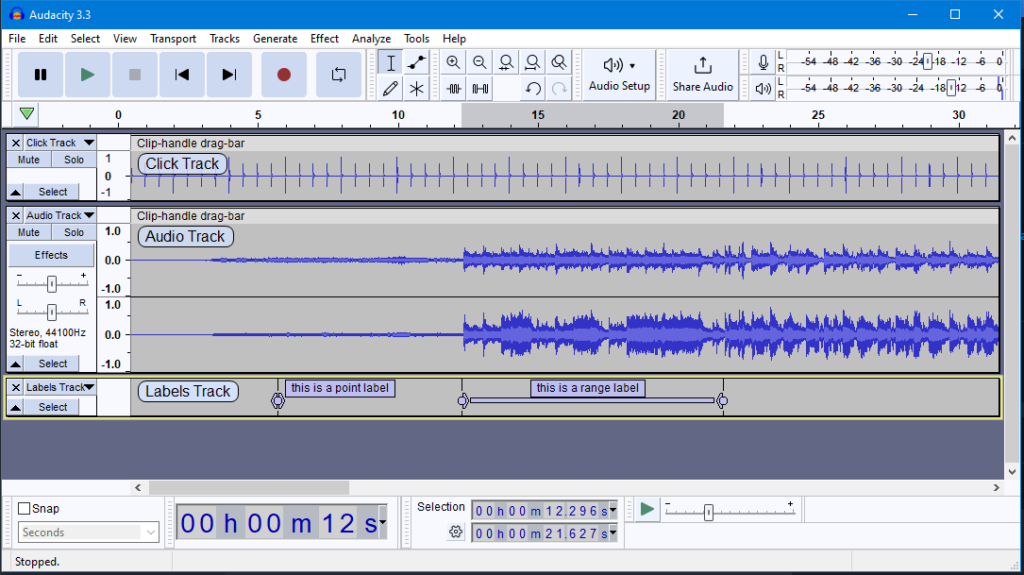
Audacity’s user-friendly interface provides easy access to its powerful editing tools. Upon opening Audacity, users are greeted with a familiar layout consisting of tracks, menus, and various controls. The timeline allows for precise editing, while the toolbar offers essential functions such as selection, cutting, and zooming. Familiarizing yourself with Audacity’s interface is the first step towards mastering audio cleanup.
Audacity’s Notable Effects
Audacity facilitates audio recording from various sources, including standard microphones, mixers, and digital files extracted from videos or recordings. Additionally, it can capture live audio streams if your computer is equipped with the appropriate sound card.
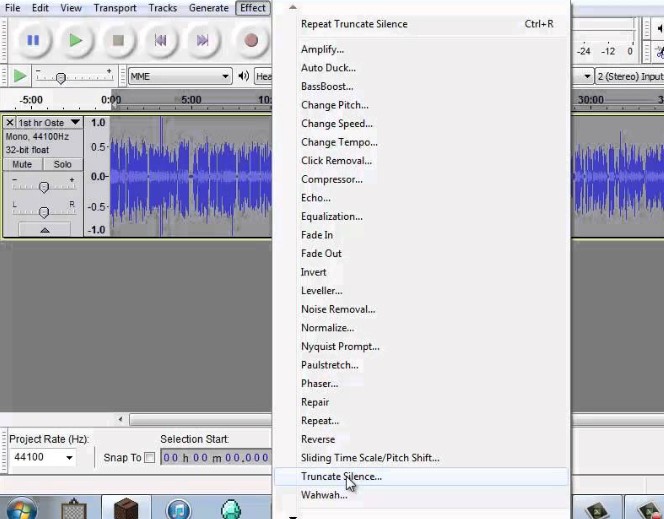
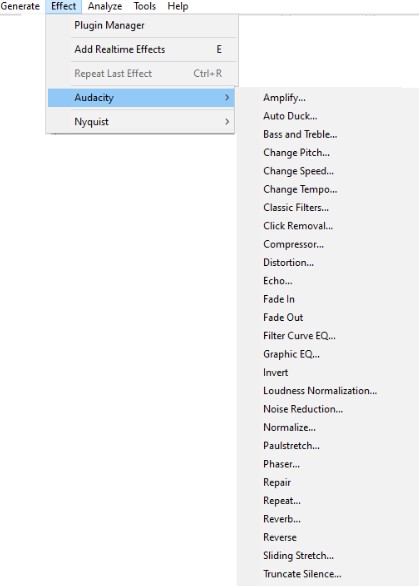
The software encompasses a wide array of built-in effects to customize audio files according to your preferences. Additionally, Audacity offers a range of specialized effects, including:
- Distortion: Alter the audio file to create a ‘crunchy’ or ‘abrasive’ sound.
- Truncate Silence: Minimize passages with audio below a defined threshold to avoid excessive silent parts.
- Wahwah: Create sound using a movable band-pass filter regulated by a low-frequency oscillator.
- Phaser: Combine phase-shifted signals with the original signal, controlled by a low-frequency oscillator.
- Reverb: Add reverberation to enhance ambiance and authenticity.
- Reverse: Invert the audio, playing the end first and the beginning last, useful for censoring or encoding hidden messages.
- Echo: Repeat selected audio at intervals to simulate an echo effect.
- Limiter: Control signals below a specified input level to prevent signal surges from exceeding the threshold.
- Paulstretch (extreme stretch): Significantly slow down audio with minimal pitch alteration.
These effects provide users with a versatile toolkit to enhance and manipulate audio content according to their creative vision and technical requirements.
Essential Criteria for Quality Audio Production
Thankfully, achieving excellent audio quality doesn’t always require groundbreaking techniques. Instead, focus on meeting the following essential criteria:
- Balance: Ensure a consistent balance of audio elements throughout your presentation, maintaining harmony between different sounds and voices.
- Clarity of Dialogue: Prioritize clear and intelligible dialogue, ensuring that speakers in videos, recordings, or podcasts are easily understood. Avoid overshadowing voices with background music or sound effects.
- Minimal Noise: Strive to minimize or eliminate background noise such as wind, clicks, or electronic hums, preserving the clarity and purity of the audio.
- Headphone Compatibility: Recognize that many audience members consume content through headphones. To safeguard against discomfort or ear strain, ensure that audio levels do not exceed 6dB, providing a comfortable listening experience.
By adhering to these principles during the production of audio or audio-visual content, you can create compelling and high-quality material that resonates with your audience, even without extravagant equipment.
Cleaning Up Audio in Audacity
Discover the following crucial actions you can undertake in Audacity today to swiftly enhance the quality of your audio recordings.
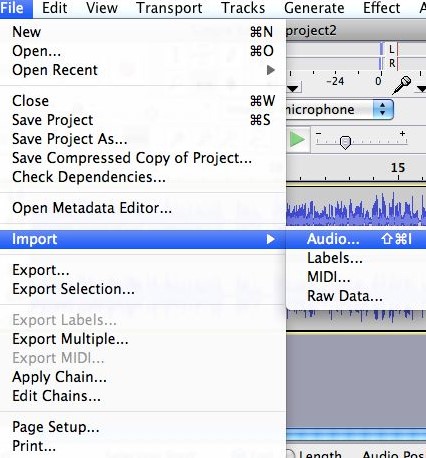
Step 1: Import Your Audio File
Launch Audacity, your trusted audio editing companion, and smoothly navigate to the File menu. From there, elegantly glide over to the Import submenu and graciously select Audio. With a flourish, choose the audio file you wish to polish, laying the foundation for your audio enhancement masterpiece.
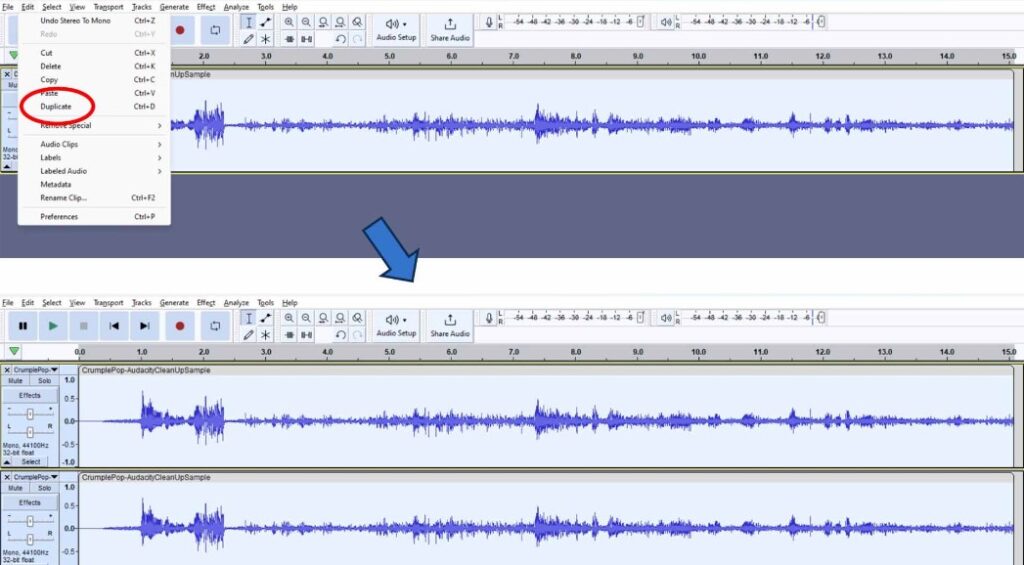
Step 2: Create a Backup of the Original Track
Once your chosen audio file graces the Audacity workspace, take a moment to duplicate the track. With a deft click on the track name and a swift selection of Duplicate from the dropdown menu, ensure the preservation of the pristine original. Identify the audio file you wish to replicate, then proceed by selecting Edit > Duplicate (shortcut: CTRL + D).
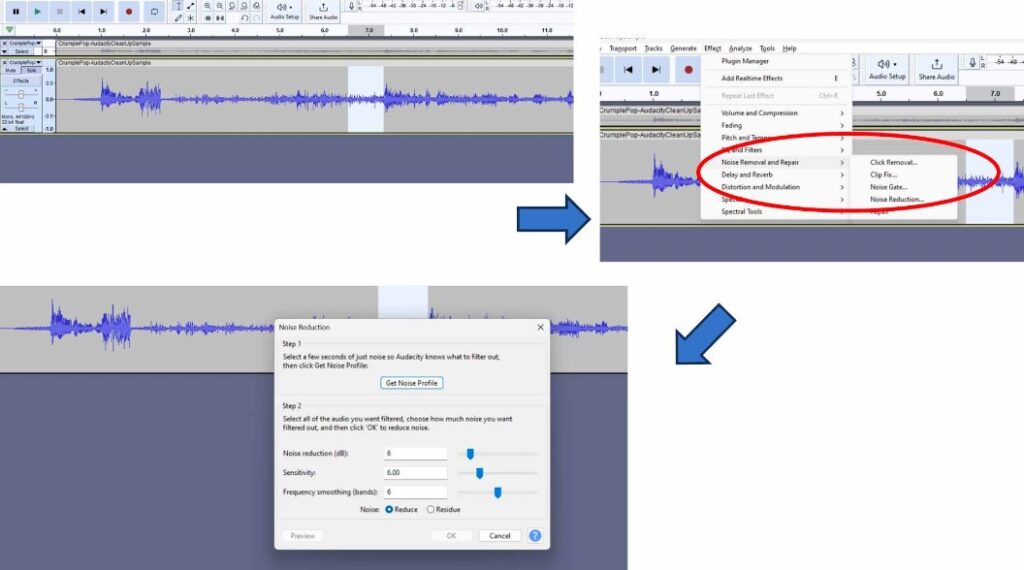
Step 3: Eliminate Background Noise
Tweak the settings with a discerning eye, applying the effect with grace and finesse, purging the audio of its noisy afflictions.
- Identify a segment in the audio containing only the unwanted noise, like hisses or hums.
- Head to Effect > Noise Reduction and click on Get Noise Profile.
- Then, choose the entire track, return to Effect > Noise Reduction, tweak the settings as necessary, and apply the effect.
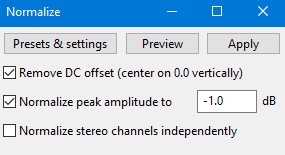
Step 4: Normalize the Audio
As we strive for sonic perfection, we must ensure that our audio reaches its full potential in terms of volume consistency.
- Highlight the entire track.
- Navigate to Effect > Normalize.
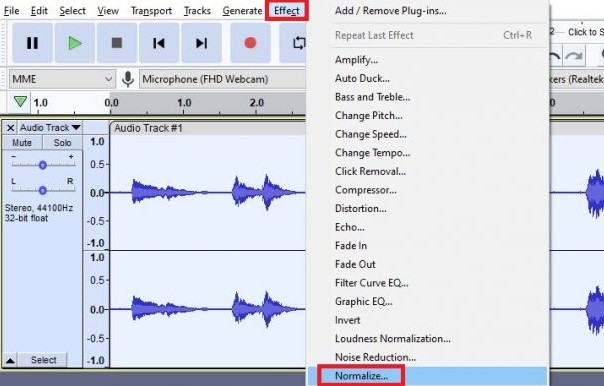
- Tick the boxes for Normalize maximum amplitude, Remove DC offset, and Normalize stereo channels independently. Confirm by clicking OK.
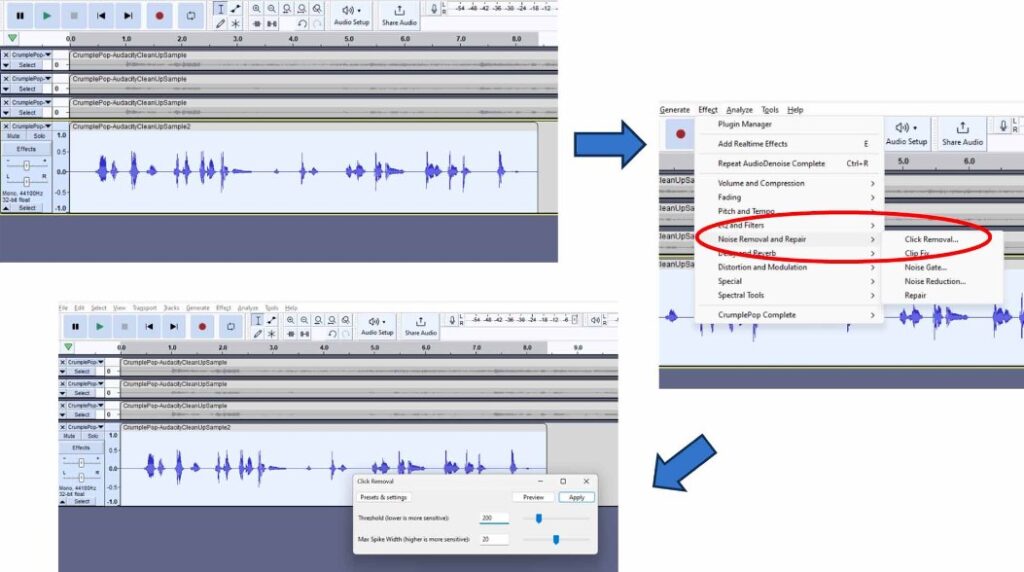
Step 5: Removing Clicks and Pops
The scourge of clicks and pops is the bane of every audio enthusiast’s existence. Fear not, for Audacity offers a solution to this vexing dilemma.
- For manual removal, zoom in on the waveform to identify clicks, select them, and press Delete, or use Edit > Silence.
- Alternatively, utilize the Click Removal effect under the Effect menu for automated processing.
Step 6: Equalizing the Audio
With a steady hand, select the entirety of the audio track and unveil the powerful tools of equalization hidden within the hallowed halls.
- Begin by selecting the entire track by pressing CTRL + A.
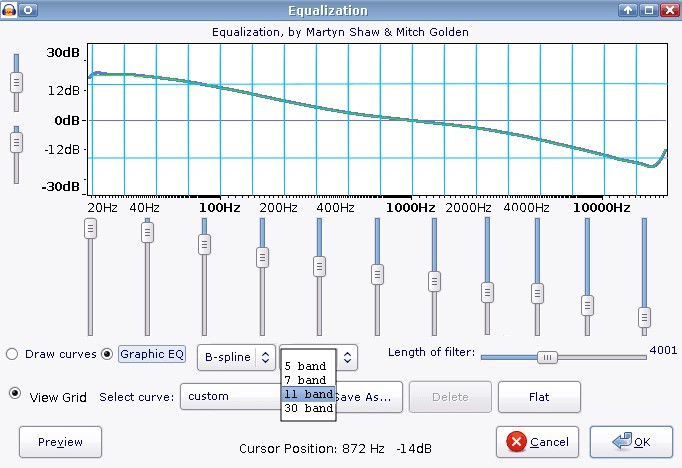
- Then, navigate to Effect > Equalization to open the Equalization dialog box.
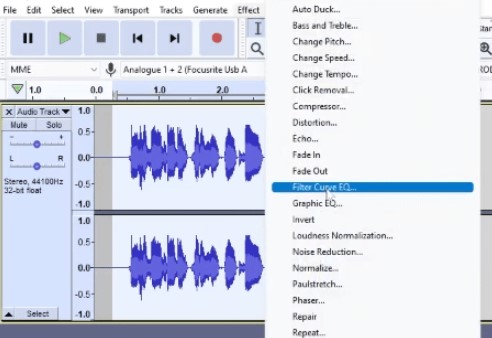
- Enable the “Draw Curves” option and select “EMI 78” from the “Select Curve” dropdown menu. Feel free to customize settings to your preference.
- Utilize the “Preview” button to listen to the adjustments and fine-tune them as needed. Once content with the result, confirm by clicking “OK” to implement the changes.
Step 7: Applying Compression
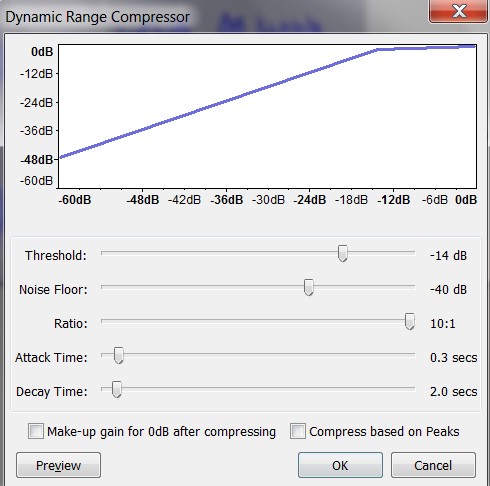
With precision and care, we adjust the threshold, noise floor, ratio, attack time, and release time to our liking, sculpting the dynamic range to achieve a more balanced and polished sound. With each adjustment, we draw closer to sonic perfection, unleashing the full potential of our audio creation.
- Select the track.
- Proceed to Effect > Compressor.
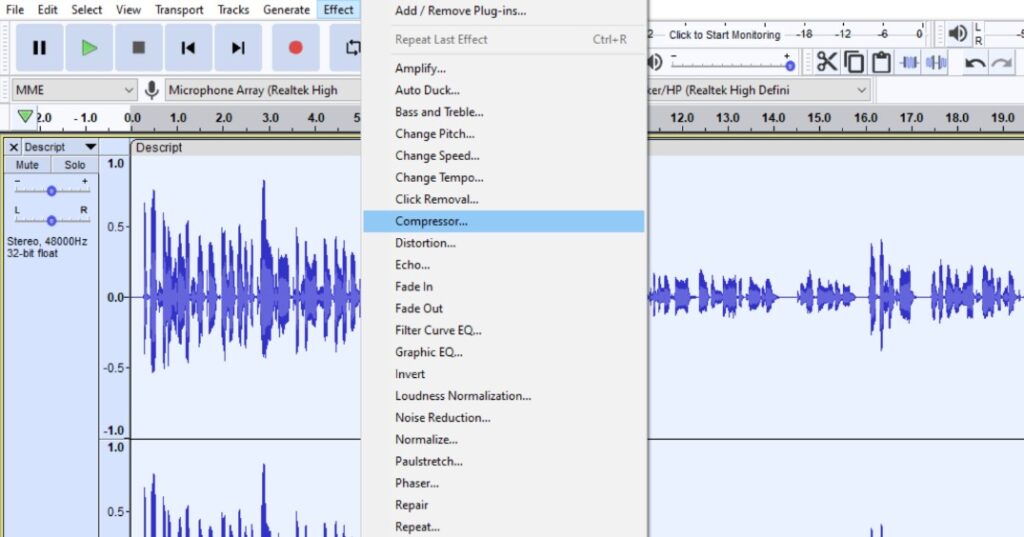
- Adjust the threshold, noise floor, ratio, attack time, and release time settings according to preference. This action reduces the dynamic range, evening out sound levels.
Step 8: Truncating Silence
For audio refinement, we encounter moments of silence that linger for too long, disrupting the flow of our creation. Fear not, for Audacity offers a solution to this vexing dilemma.
- Select the entire track by pressing CTRL + A.
- Navigate to Effect > Truncate Silence.
- Audacity employs specific thresholds to identify silence, including Min Duration, Max Duration, and Silence Threshold, which users can adjust according to their preferences.
- Silence compression dictates the extent to which silence is condensed. For example, in a 3:1 compression ratio, a 3-second silence will be reduced to 1 second.
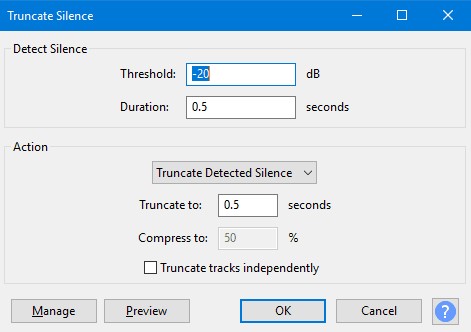
- After configuring all parameters to your satisfaction, click “OK” to proceed with the truncation process.
Step 9: Rectifying Clipped Audio
We may encounter moments where our audio waveform reaches its limits, succumbing to the harsh reality of clipping. Fear not, for Audacity offers a remedy to this unfortunate circumstance.
- Zoom in on the waveform to locate clipped sections.
- Highlight the clipped portion.
- Go to Effect > Repair.
Step 10: Final Listening and Adjustments
With Audacity as your faithful companion, you’ll listen to the entirety of your creation, paying heed to every nuance and subtlety. With a discerning ear, you can make any final adjustments necessary to achieve audio perfection.
- Review the entire track.
- Make any last-minute adjustments, such as volume tweaks, additional noise reduction, or applying Fade In/Fade Out effects for smoother transitions.
Step 11: Exporting the Cleaned Audio
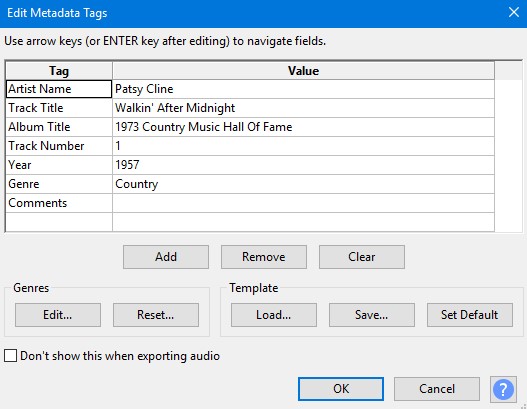
Choose your desired format, ensuring compatibility and quality for your audience. With each metadata field filled with care and attention, send your creation out into the world
- Access File > Export and opt for your preferred format.
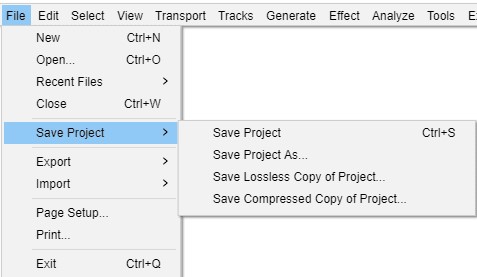
- In the meantime, exporting the refined track enables users to preserve the ultimate result in various formats such as MP3, WAV, or Ogg Vorbis, facilitating seamless sharing and dissemination.
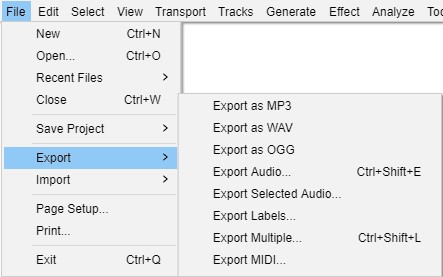
- Fill in any necessary metadata in the export dialog and click Save.
Achieving Optimal Audio Quality in Audacity
Crafting exceptional audio recordings in Audacity requires a blend of technical expertise and personal preferences. While the process is both an art and a science, adhering to certain guidelines can significantly enhance your results:
- Utilize Quality Equipment: Invest in reliable equipment such as high-quality microphones, pop filters, interfaces, and cables to capture clear and crisp audio signals.
- Mind Acoustics: Pay careful attention to the acoustic environment, mitigating external disturbances and optimizing the placement of individuals (for voice tracks), musicians, and equipment. Consider the acoustic properties of your recording space to minimize unwanted reverberations or echoes.
- Optimize Volume Levels and Dynamics: Achieve optimal volume levels and dynamics during the recording process to minimize the need for extensive post-production adjustments. Conduct test recordings to fine-tune settings before committing to a final take, ensuring consistent and balanced audio throughout.
Conclusion
Cleaning up audio in Audacity requires a combination of technical skill and creative intuition. By understanding Audacity’s powerful editing tools and implementing effective techniques such as noise reduction, equalization, and dynamic processing, users can achieve professional-quality results in their audio projects. With practice and experimentation, the possibilities for audio enhancement are limitless in Audacity. So, roll up your sleeves, dive into your audio recordings, and unleash the full potential of Audacity’s editing capabilities!
We value your opinion! Have you found this guide helpful in improving your audio production skills in Audacity? We’d love to hear about your experience and any suggestions you may have for future content. Please share your thoughts and feedback with us in the comments section below. Your input helps us tailor our content to better serve your needs and interests. Thank you for being a part of our community!
Of course, achieving great audio quality starts right from the recording stage. Using a reliable wireless lavalier microphone ensures clearer, crisper voice capture, significantly simplifying your cleanup process in Audacity later on.
Frequently Asked Questions
What is the best way to remove background noise in Audacity?
The most effective method to remove background noise in Audacity is by utilizing the Noise Reduction effect. First, select a portion of the audio containing only the background noise. Then, navigate to Effect > Noise Reduction and click on Get Noise Profile. Afterward, select the entire audio track, revisit Effect > Noise Reduction, and adjust the settings as needed before applying the effect to reduce or eliminate background noise.
How can I improve vocal quality in Audacity?
To enhance vocal quality in Audacity, utilize tools such as Equalization, Compression, and Reverb. Begin by adjusting the EQ to emphasize vocal frequencies and reduce any unwanted resonances. Then, apply Compression to even out volume levels and enhance vocal presence. Finally, add a touch of Reverb to create depth and richness in the vocals, contributing to a professional-sounding result.
Can Audacity remove echo from audio recordings?
Yes, Audacity offers tools to reduce or eliminate echo from audio recordings. One effective method is to use the Echo Reduction effect, which can help diminish reverberations and echoes in the audio. Additionally, adjusting the Equalization settings and applying Noise Reduction techniques can further mitigate echo, depending on the specific characteristics of the recording.
What are the optimal noise reduction settings in Audacity?
Start with moderate settings for Noise Reduction, Sensitivity, and Frequency Smoothing in Audacity. Adjust based on noise characteristics and desired outcome through experimentation.
How can I make my audio sound professional in Audacity?
To achieve professional-sounding audio in Audacity, focus on factors such as clarity, balance, and consistency. Use tools like Equalization to fine-tune the frequency balance, Compression to control dynamics, and Reverb to add depth and dimension. Pay attention to details such as noise reduction, volume levels, and overall mix quality. With careful attention to these elements and practice, you can achieve professional results in Audacity.
Is it possible to remove vocals from a song using Audacity?
Yes, it is possible to remove vocals from a song using Audacity, although the results may vary depending on the complexity of the audio and the recording quality. One method is to use the Vocal Remover effect, which attempts to isolate and remove vocal frequencies from the audio. However, it’s important to note that this technique may not always produce perfect results and may also affect other elements of the audio.
How do I fix distorted audio in Audacity?
To fix distorted audio in Audacity, start by identifying the source of the distortion, which could be caused by clipping, excessive volume levels, or other factors. If the distortion is due to clipping, use the Amplify effect to reduce the volume and prevent further clipping. Additionally, adjusting the Equalization and Compression settings can help mitigate distortion and improve overall audio quality.
Can I enhance the bass in my audio with Audacity?
Yes, Audacity offers tools to enhance bass frequencies in audio recordings. One method is to use the Equalization effect to boost lower frequencies, thereby increasing bass presence. Alternatively, the Bass and Treble effect allows for specific adjustments to bass frequencies. Experiment with different settings to achieve the desired level of bass enhancement while maintaining overall balance and clarity in the audio.
What file formats can I export my cleaned audio into from Audacity?
Audacity provides various options for exporting cleaned audio, including popular formats such as MP3, WAV, and Ogg Vorbis. Additionally, users can export audio in formats compatible with specific devices or software applications. Simply navigate to File > Export and select the desired file format from the available options to export cleaned audio efficiently.
How can I remove breath sounds from audio in Audacity?
Use Audacity’s Breath Control effect to reduce or eliminate breath sounds in recordings. Select the portion with breath sounds, apply the effect, and adjust settings for desired reduction level.