.png)
As an iPhone user, you get different privileges from associating with the brand. iPhone has been known to offer some of the best camera settings, and when you purchase your iPhone 14 Pro, knowing how best you can maximize these perks to your advantage is vital.
Unfortunately, not all iPhone 14 Pro users understand how they can unleash the power of their iPhone to capture the best shots. Luckily, we’ve researched and prepared a detailed guide on unlocking different features to get the best camera qualities. Read on to understand what iPhone 14 Pro camera settings you should use.
How Best to Maximize iPhone 14 Pro Camera Settings
Every iPhone has hidden camera features; unless you are keen and curious, you may never use them. The lucky ones who understand the hidden gem in their camera settings menu have met their photography needs without needing an external camera. Your iPhone 14 Pro is all you need to capture quality pictures that astonish and meet your goal.
So, what are the different tricks and tips you should know and unlock to maximize the iPhone 14 Pro camera settings? Take a look!
Utilize the ProRAW Format
If you are keen on the default format used when taking pictures, you might have noticed that the iPhone 14 Pro uses the HIEC format. However, this is not the best available option. Apple owns and uses this format for different reasons, including to save on space by compressing the images. While the motive is good, the quality of the images suffers the most, especially when you try editing the captured photos.
However, you can utilize the ProRAW format, which captures and saves images without compressing them. That way, even though you will get larger pictures, the quality won’t deteriorate, and you can quickly maximize other options, such as using higher pixels.
Here’s how to enable the ProRAW format when taking pictures.
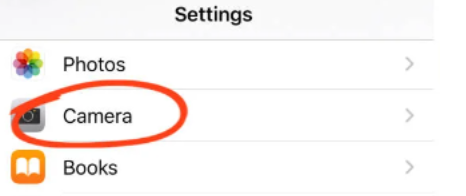
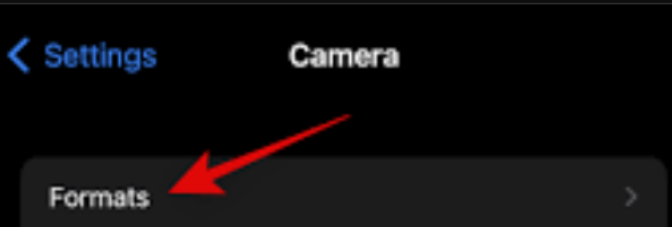
- Start by accessing the Settings option on your iPhone 14 Pro.
- Locate the Camera section and click on it.
- Find the option for Formats and click it.
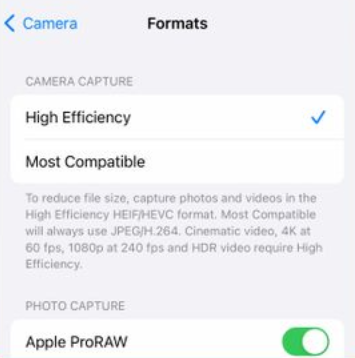
- Lastly, enable the Apple ProRAW format.
With that, the next time you take a picture on your iPhone, it will get captured and saved using the ProRAW format, and you will move one step closer to being a better iPhone photographer.
Enable 48MP Resolution
Once you’ve enabled the Apple ProRAW feature, the next trick to achieving high-quality pictures is to use the 48MP resolution. iPhone 14 Pro increased the main lens to 48MP, but the default resolution for the camera is 12MP. Thus, you must know what steps to follow to activate the 48MP resolution.
Everyone enjoys quality pictures, and with the 48MP option, you have no excuse for not taking part in enjoying this fun. Below are the quick steps you should follow, but ensure you’ve followed the steps in the first tip covered above. Once you have the ProRAW format activated, proceed as follows.
- Open your iPhone’s Settings App.
- Click on Camera.
- Tap on the Formats option.
- Click the ProRAW resolution.

- Lastly, click on the 48MP option.

You will now notice that your next images will have a sharper focus, and even after you crop them, they will retain their quality and detail.
Switch to Portrait Mode
Depth is key to the quality of your images, and when taking pictures, you should ensure you get the maximum depth to ensure the target stands out. With good depth, you will easily capture the target scene as you have room to capture a large size with minimal effort. To achieve maximum depth when taking pictures, go for the portrait mode.
Sometimes, you may get confused about which photo modes to use when you have a crowded background. The ideal solution is to switch to portrait mode and focus your view on the target.
It is like choosing landscape or portrait views on the Hollyland VenusLiv streaming and recording camera. But in a more technical way on iPhone 14 because VenusLiv has more simple options due to its user-friendly interface. You can capture visuals by effortlessly switching between vertical mode (portrait) using up to 46-degree FOV and horizontal mode (landscape) up to 80-degree FOV. However, on iPhone 14, you have to play with the blur adjustment to maximum depth in your image.
You will eliminate blurriness using a thin depth, as demonstrated in the steps below.
- Open your iPhone camera.
- Locate the f icon at the top and click on it.
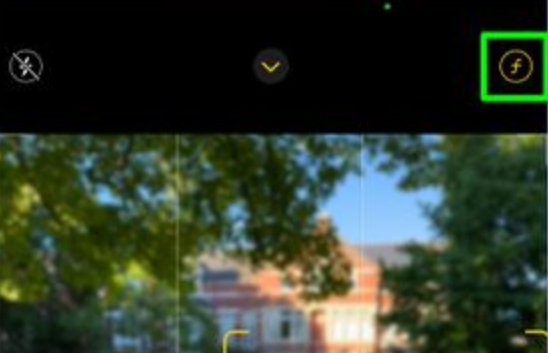
- Drag the slider at the bottom to adjust the blur.

Enable Portrait Lighting
Once you choose to use the portrait mode when taking pictures, you can spice this feature by activating the portrait lighting to enhance the image quality. With the iPhone 14 Pro, you get different lighting modes that you can switch between to control the mood of your pictures.
For this case, we will select the portrait lighting as it blends with our selected portrait mode. You can try the three portrait lighting options to see which suits you best. They include Stage Light Mono, Stage Light, and High Key Light Mono.
Proceed as follows.
- First, enable Portrait Mode.
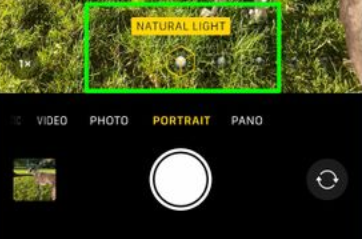
- Click the Natural Lighting on your camera window.
- Once the lighting styles open, click on any of the portrait lighting options you want to use.
Consider switching between the different lighting styles to see which works best for your case.
Unlock a Wider Frame View
When you check the back of your iPhone, you notice it comes with multiple cameras, right? Well, the multiple cameras not only add to its beauty but also aid in capturing a broader frame view. Instead of focusing solely on the main camera, you can utilize the “view outside the frame” feature with the iPhone 14 Pro to unlock a wider view.
The goal is to ensure you access a wider image view than what is displayed on your screen. With this feature, you will control the composure of your pictures and can accommodate a broader view of the captured picture.
Follow the steps below to unlock this feature.
- Access the Settings app.
- Open the Camera section.
- Find the “View Outside the Frame” option and enable it.
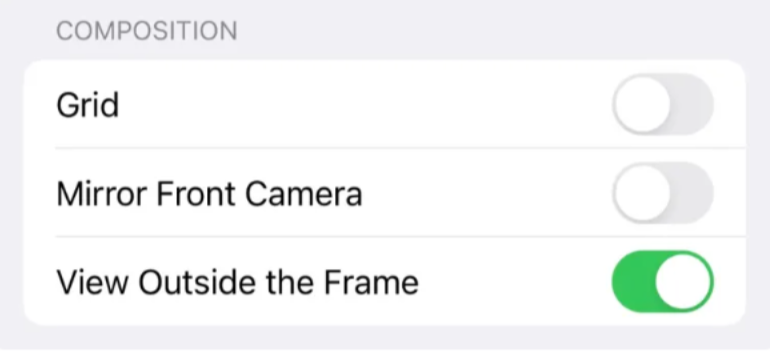
It’s that simple! You now have a wider camera preview frame for accommodating a wider angle when taking pictures.
Disable Macro
For iPhone 14 Pro, the macro mode is added to help capture objects using an ultra-wide angle. Moreover, it’s ideal for capturing small objects, and your camera is designed to enable macro mode when it automatically detects you are close to a small object.
Moreover, the macro mode helps with capturing slow-motion and live photos. Despite all its benefits, sometimes you may want to turn off this feature when you don’t want it to get enabled automatically.
To stop the automatic macro mode feature, use the following steps.
- Open the Settings app and access the Camera option.
- Locate the Macro Control and tap on it.
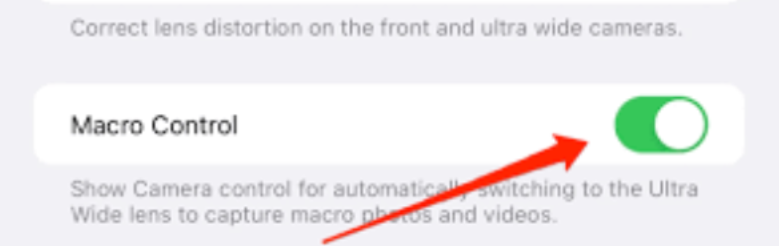
- In the Camera window, locate the macro icon at the bottom left and toggle it off.
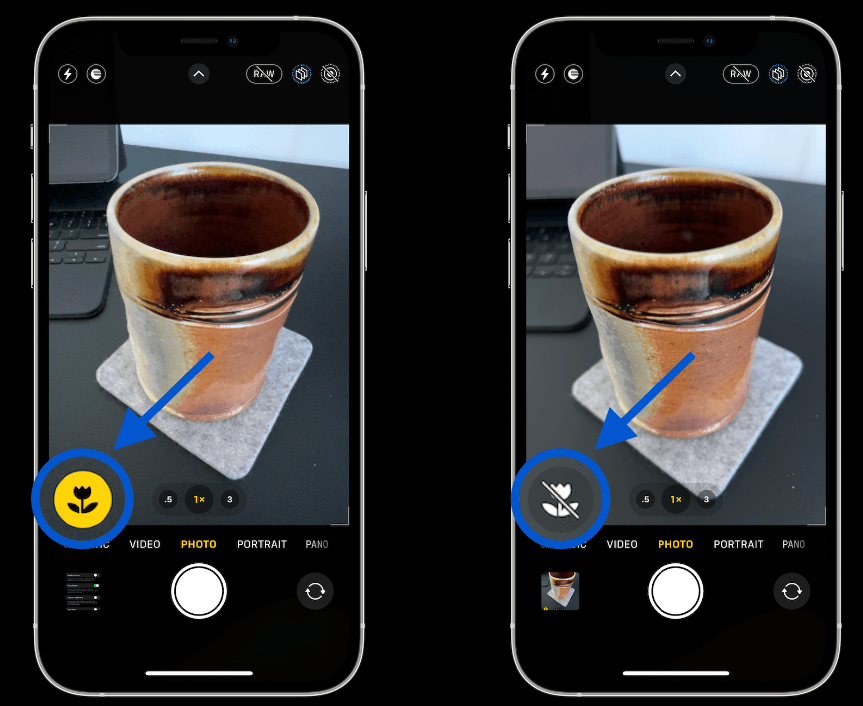
You can turn it on and off at will to get better shots.
Mirror the Selfie
When you take selfies, you may notice that the final capture doesn’t look like you saw it in the preview. iPhone has the mirror feature that makes the captured selfie appear different, and unless you enable the mirror front camera feature, you will have different-looking pictures.
It’s best to enable the mirror feature for clearer images if taking selfies. Follow the below steps.
- Open the Settings app and access the Camera settings.
- Find the Mirror Front Camera and enable it.
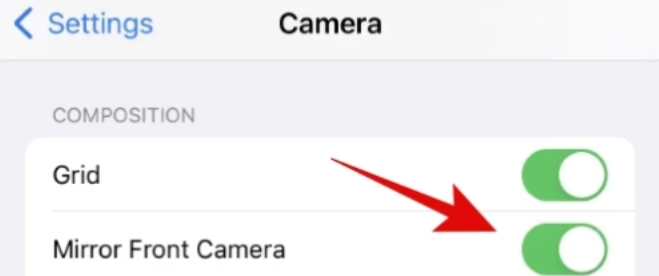
With the simple steps, you will now get better-looking selfie images.
Disable HDR Auto
It’s a thing with iPhones to have the HDR feature enabled by default. The feature aims to give you better shots by combining various exposures. However, some blends end up creating unnatural-looking pictures. Different photographers affirm that turning off this feature helped capture better-looking pictures.
Consider trying it and see what impact it has on your pictures. If it works for your case and creates better images, stick to taking pictures while it is disabled. The steps below guide on how to turn it off.
- Open your Settings app.
- Click on the Camera option.
- Locate the Smart/HDR option and toggle it off.
Hopefully, turning it off will give you more natural-looking pictures.
Preserve the Settings
Having worked this hard to revamp your iPhone 14 Pro camera settings, you wouldn’t want to keep customizing them whenever you want to capture images or videos. For someone who keeps taking pictures, having to repeat the customization is hectic. The good thing is you can preserve the settings to reuse them later. Under the camera settings, you can preserve the shooting settings. That way, you minimize the hassle of creating beautiful moments with your camera.
To enable this feature, do the following.
- Open the Settings app.
- Open the Camera option.
- Find the Preserve Settings option and tap on it.
- For each displayed option, toggle on those you wish to preserve.

Any option with a green icon next to it has been preserved, and you will reuse it whenever you take pictures.
Conclusion
It’s unfortunate that you own an iPhone 14 Pro and don’t know how to maximize the camera settings to capture astonishing pictures and videos. One beauty of owning an iPhone is its spectacular camera options, but not all these features are enabled by default. However, you can twerk around with the camera settings to enable more capabilities and maximize the camera quality when taking pictures or capturing videos. Today’s post has focused on various ways to work around the iPhone 14 Pro camera settings to get the best out of it. Hopefully, the steps presented are clear, and you’ve managed to follow along and revamp your iPhone photography skills. Have fun!
FAQs
Which is the Best Photographic Style for the iPhone 14 Pro?
There is no specific photographic style that is best for all scenarios. The trick is to switch between the available styles and try them to see which works best for your needs. Besides, you can combine the photographic styles with other camera settings to see what output you get.
What Does ProRAW Mean in iPhone?
By default, Apple uses the HIEC format for capturing and processing images. However, you can change and use the ProRAW format. This format doesn’t compress the images and instead saves the image in its RAW format, allowing you more flexibility when you want to edit the captured image using an editing app. You should use ProRAW when you want to customize the captured picture or don’t want your images to get compressed, affecting their quality.
Is iPhone 14 Pro Good for Pictures?
Yes, it is. Any iPhone is designed to give users an amazing picture and video experience. As for the iPhone 14 Pro, you will appreciate the quality of its pictures. Besides, you can change the camera settings in numerous ways to get better pictures. This post has presented some of the best camera settings you can use to get professional pictures. Refer to them and see which ones to apply for your case.
Why Does My iPhone Camera Appear Blurry?
We understand the disappointment that comes with taking blurry pictures. If you are close to your target, the iPhone will appear blurry. However, you can fix this by using the ultra-wide camera mode. If you use the macro mode, your iPhone will blur the close objects. Therefore, ensure you enable the ultra-wide mode for clear pictures.