


.png)
The DaVinci Resolve’s cutting-edge technology enhances the quality of the work with its seamless ability to add new clips between existing clips. And inserting the video clip brings smoothness and improves content potential. So, this feature is handy for beginners and professional video editors, providing endless nourishment opportunities.
With versatile editing and trimming features, Resolve also allows for duration adjustment and is essential for a smooth workflow. Besides adding the clips, it also enables replacing the video clips or applying transitions for consistency and precision. And with multiple inserting methods, it’s essential to understand which way can bring efficiency and clarity to your project.
How to Insert Clips between two existing clips in DaVinci Resolve
DaVinci Resolve has been instrumental in providing filmmakers and content creators with the potential to unlock their creativity. And inserting the clips between two existing ones will expand your timeline and provide additional possibilities for efficient workflow.
The quick way to add the clips is to drag them to the timeline from the bin. However, due to its ineffectiveness, follow the step-by-step guideline for smooth and precise projects.
Step 1- Import the videos
• Open the DaVinci Resolve “Edit” page and add the clips to the timeline you want to insert the video.
• Ensure to add the video and audio in their respective tracks when adding the video clips.
Step 2- Setting the Timeline
• At first, split the resolve screen into source viewer and timeline viewer from the top right split icon.
• Make sure the playhead should be between two clips.
• And if it’s in between any of the clips, press the up key, and it will go automatically between them.
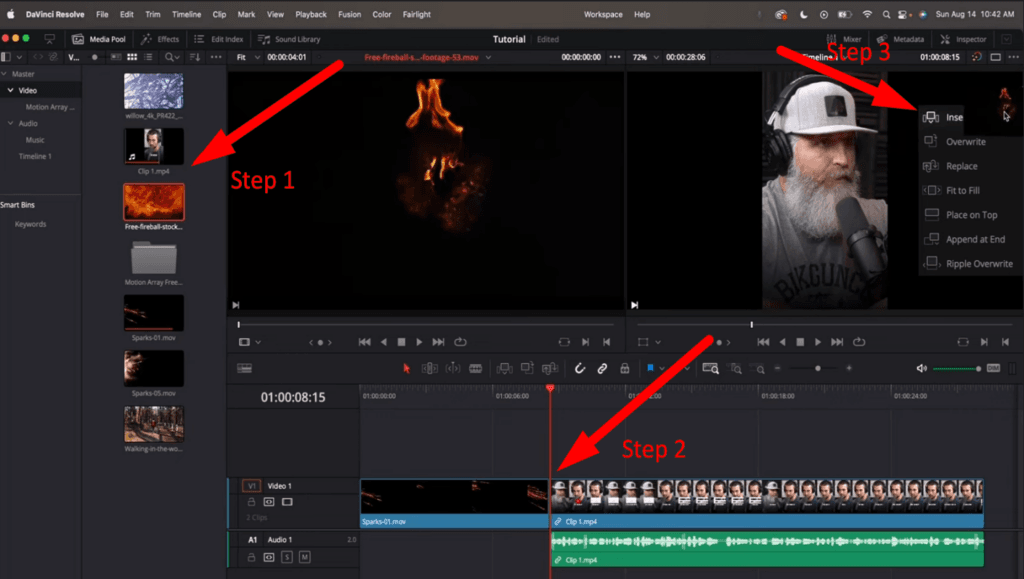
• From the source clip, mark the “in” and “out” of adding the clip and place the playhead where you want to insert the video clip.
Step 3- Drag and Insert
• Double-click the video you want to add and drag it to the timeline viewer.
• Make sure to deselect the audio tracks and the “Command + Shift” key, probably used for dragging the just video between clips.
• The popup menu will appear from the top-right corner, and choose the “Insert” button.
• For inserting clips, you can also use the “F9” shortcut key.
Step 4- Previewing the results
• Ensure that the added clip retains its quality and works smoothly.
• When satisfied, you can export or save your work.
However, Resolve also lets you move the clips inside the timeline to the desired location. It’s essential to keep the project flow by moving the video clips. For this, simple shortcut keys enhance efficiency for copying and pasting the clips.
• The shortcut key “Ctrl + X” in Windows and “Command + X” to cut the clips.
• Then place the playhead in the preferred location and use “Ctrl + Shift + V” to paste it.
Also, if the clips cut within the timeline frame, it will create a space that should be removed using the “ripple delete” by right-clicking on the empty track.
Bonus Tips:
Shortcuts to Add Clips to the Timeline
The shortcut keys are essential for efficient workflow, and you can also use the shortcuts according to your preferences. And understanding the keys will get the work done in the shortest time.
Here’s a complete table of adding clips in the timeline with shortcuts:
| For the Insert clip | F9 |
| For the Overwrite clip | F10 |
| Replace Clip | F11 |
| Place On Top | Shift + F11 |
| Append At End | Shift + F12 |
How to Add Clips to the Timeline?
The simplest method to add clips in DaVinci Resolve is to double-click the video from the media pool.
• Then “Drag” the video from the “Source Viewer” and “Insert” it into the “Timeline Viewer.”
• You can also add video and audio separately in the timeline.
• But make sure to add the video and audio in separate tracks in the timeline.
When inserting the clips, resolves describes it as a “smart insert” because it will retain the quality of the video clips even if you have to move the video clips.
Adding Only Video to the Timeline (Without Audio)
The Resolve lets you focus on your videos and adjust the audio separately. To add only videos to the timeline, follow the enlisted step-by-step guide:
Step 1- Open the Media Pool
• Open the DaVinci Resolve “Edit” page and click on the “media pool” from the top-left of the screen.
• Import and double-click the clip to add it to the source viewer
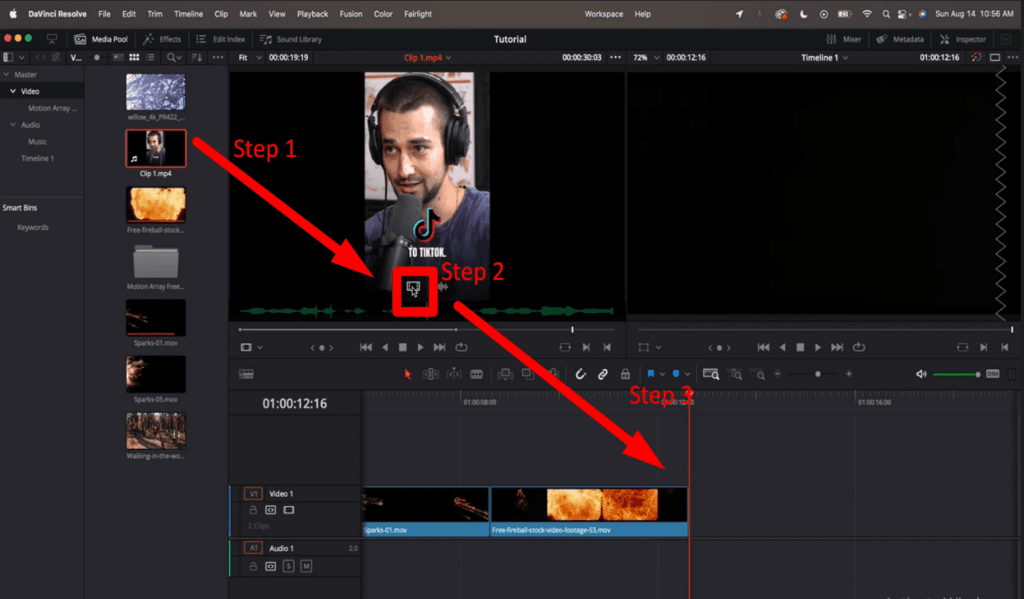
Step 2- Drag the Video
• After that, hover the mouse over the video in the source viewer, and two icons will pop up at the bottom center of the video screen.
• Click on the “video icon,” hold and drag the video to the timeline.
Step 3- Drop it into the timeline
• Make sure to drop it to “video track” in the timeline
Besides this, the “Alt Key” is the shortcut, and by holding the key, you can drag the video from the source viewer to the timeline video track.
And for further editing, audio can also mute or remove from the timeline.
Adding Only the Audio Part of a Clip to the Timeline
Adding the audio part of a clip is just as simple as adding the exclusive clips in DaVinci Resolve.
Step 1- Open the video in Source Viewer
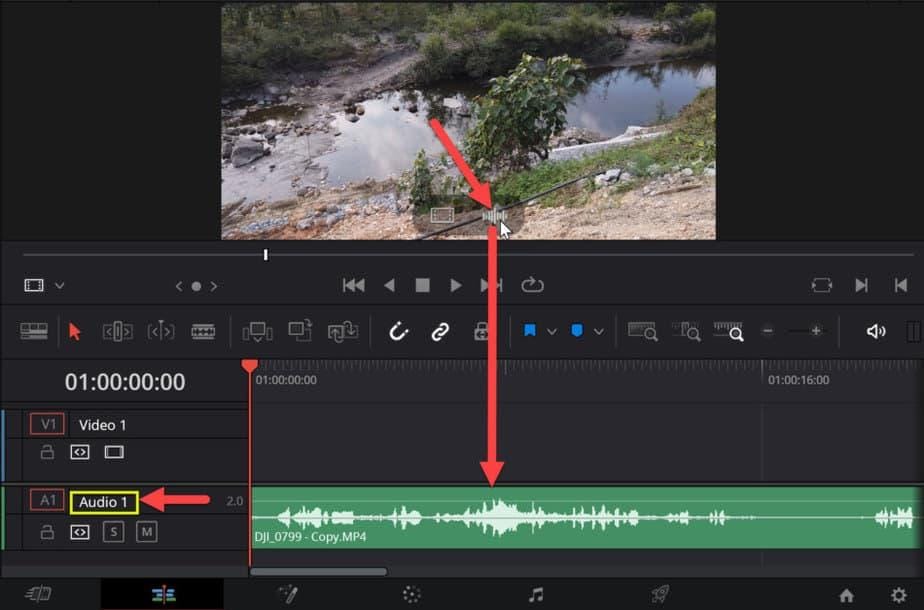
• Open the “Media Pool” and double-click on the video to appear in the Source Viewer.
• And hover the mouse in the source viewer, and two icons will appear.
• Click and drag the audio wave icon to the timeline.
Step 2- Drag and Drop to the timeline.
Then drop the only audio into the timeline “audio track,” you can also drag and drop by holding the “Shift Key” to the timeline. From there, you can zoom in to expand or remove the clips.
How to use “Overwrite Clip” in DaVinci Resolve?
The overwrite clip allows modifying the existing clip by overwriting the parts without disturbing the other video track clips. To overwrite the clips, specifically, three methods are in prominent use:
Method 1- Using the Toolbar
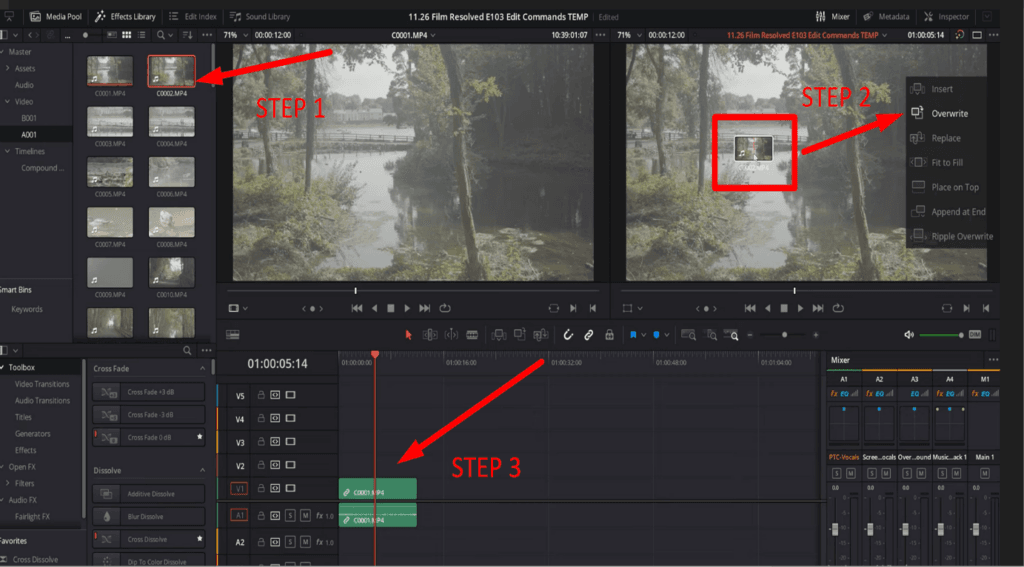
1. Place the timeline playhead at the start or between the clips.
2. Double-click the video you want to add to appear in the source viewer.
3. And select the “overwrite clip” icon from the toolbar.
Method 2- Using Shortcut
• Besides this, overwrite the clips using the “F10” shortcut key.
Method 3- Timeline Viewer
• In addition, drag the video to the top-right of the timeline viewer and select “Overwrite” from the popup menu.
How to use “Replace Clip” in DaVinci Resolve?
With “Replace Clip,” the right side of the video from the playhead will be replaced for the leftover duration. And by selecting the “ins and out,” you can mark the replacement area or place the playhead before starting the edit.
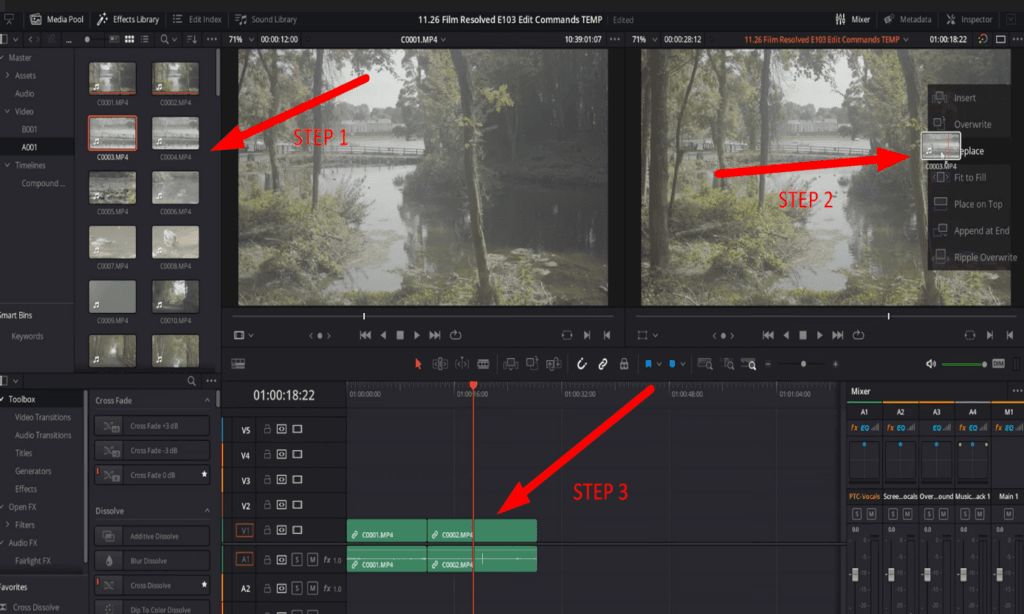
1. Open the resolve “Edit” page and double-click the clips you want to add as a replacement.
2. Adjust the timeline playhead from where you want to replace the video clip.
3. Drag the desired video from the source viewer to the timeline video track.
4. Then select the “Replace Click” from the toolbar, and it will replace the clips.
After positioning the playhead, hold and drag the video with the “F11” shortcut key. You can also trim and adjust the durations of the replaced clip.
How to use the “Fit to Fill” clip in DaVinci Resolve?
The DaVinci Resolve “Fit to Fill” can fit any media precisely into any timeline frame and work as a time remap to fill the gap between different videos timeline. Follow the simple steps to bring smoothness to your projects:

1. Ensure the timeline playhead is at the end side of the replacement clip.
2. Double-click on the video, and it will appear in the previewing window.
3. Drag the video clip to the top-right timeline viewer and select “Fit to Fill” from the menu.
4. The clip will replace the video from the track.
And a small “clock icon” will appear on the added video. Right-click on the clip or use the command “Ctrl + R” to check or edit the speed of the replaced clip. It also adjusts according to the original clip length.
How to use the “Place on Top” clip in DaVinci Resolve?
Follow the simple steps to add the clip on top of existing clips of timeline tracks.
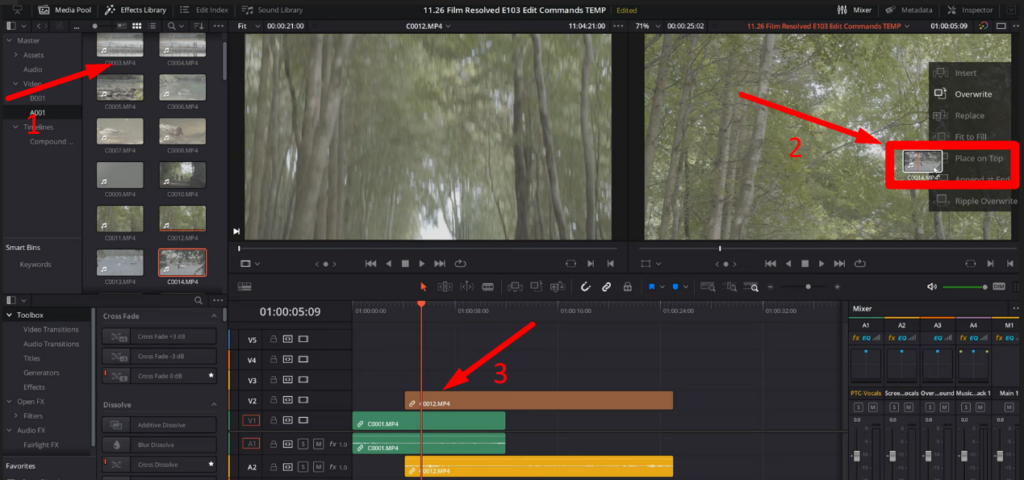
1. After importing the video into the track, place the timeline playhead to the point where you want to add the clip.
2. From the media pool, double-click the video to add it to the “previewing window.”
3. Then drag the video to the top of “timeline viewer.”
4. And drop the clip on “Place on Top” from the popup menu.
In addition, drag and drop the clip to the timeline using the “Shift + F11” shortcut key.
Note: When playhead is on the added clip, inserting video clips will add to the top new tracks. You must place the playhead on the original timeline track for further editing.
By this, you can also change the tune of the tracks.
How to use the “Append at End” clip in DaVinci Resolve?
It’s “track-sensitive,” so track selection is mandatory when working with different timeline tracks for the precise end. It’s beneficial because it describes the end of the timeline track and follows the simple steps for its application:
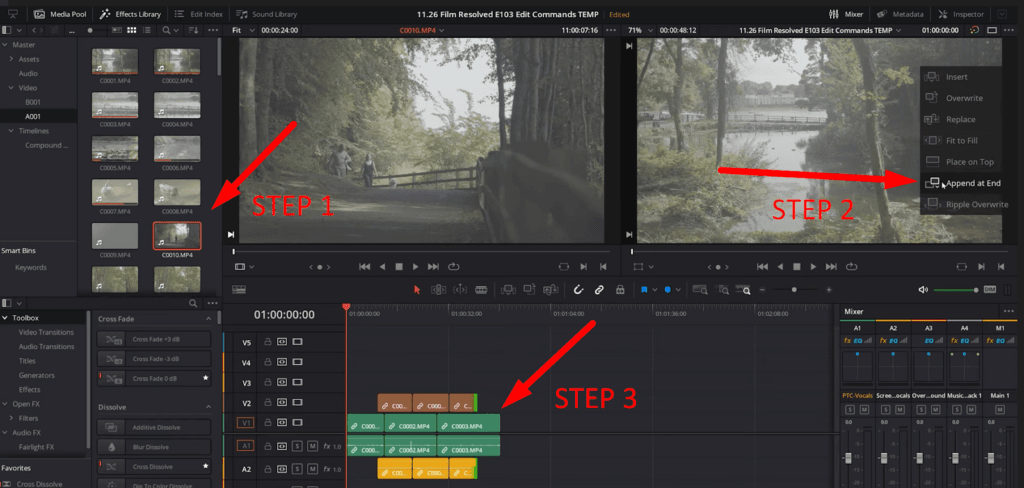
1. With this, you don’t have to adjust the timeline playhead but ensure the video and audio tracks are active.
2. Double-click the video, and it will appear in the “source viewer.”
3. Drag the video from the preview window to the timeline viewer and drop on “Append at End.”
The shortcut key “Shift + F12” is also used to drag and drop clips in the timeline.
How to use the “Ripple Overwrite” in DaVinci Resolve?
Before using “Ripple Overwrite,” it’s best to be careful when applying the ripple to prevent damage to the edit. The “ripple overwrite” will pull the track to the left when a shorter video is added to the timeline and push the clips to the right when longer videos are added.
Follow the enlisted steps for seamless editing.
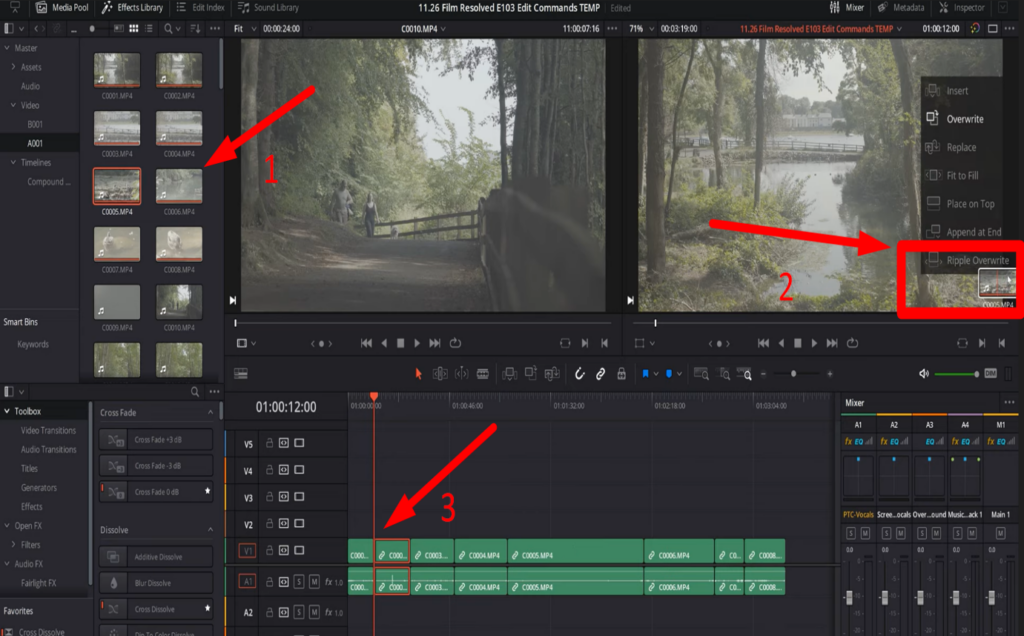
1. Drag the timeline playhead where you want to add the clip.
2. Then drag the video from the “source window” to the top-right “timeline viewer.”
3. And drop the video into the “Ripple Overwrite.”
In addition, hold the “Shift + F10” shortcut key and drag the video to the timeline viewer. With this, you can easily overwrite the clips for the smoothness of your projects.
When editing clips precisely in DaVinci Resolve, accurate monitoring is key to achieving seamless transitions. A professional-grade camera monitor enhances visual clarity and ensures you insert clips with utmost precision, creating a smoother editing workflow.
