.png)
Logic’s captivating technology brings the magic of digital music production and helps unravel creativity. After you’ve finished recording or composing the music, exporting the file to test the final tracks is essential. Before transferring the files, you must convert them into mp3 audio files to allow seamless export.
Also, when bouncing the audio tracks, it converts them to stereo tracks that will seamlessly help restore them to mp3 files. However, Bouncing and Exporting differ in generating the results according to their compatibility.
Additionally, it allows you to send entire tracks or MIDI regions, making you export any part of the audio files. Also, exporting is easy and follows simple steps to enjoy your music production with endless possibilities.
How to Export One or a Few Tracks as MP3 Files in Logic Pro?
Exporting a single or few audio tracks is essential to share and enrich the music with professional experiences. With its enriching features, it’s necessary for mixing and developing creativity so that it will bring new meanings to the project.
Additionally, single tracks will export into separate audio files and not convert to stereo recording. So, knowing how to export will enhance your experience, and this step-by-step guide will help you in this regard.
Step 1- Open and create Groups
- The first step is to open the project and select the desired track or tracks you want to export.
- Ensure to mute other audio tracks to avoid interference.
- Then choose the audio tracks and press the “Shift” key to make them one group.
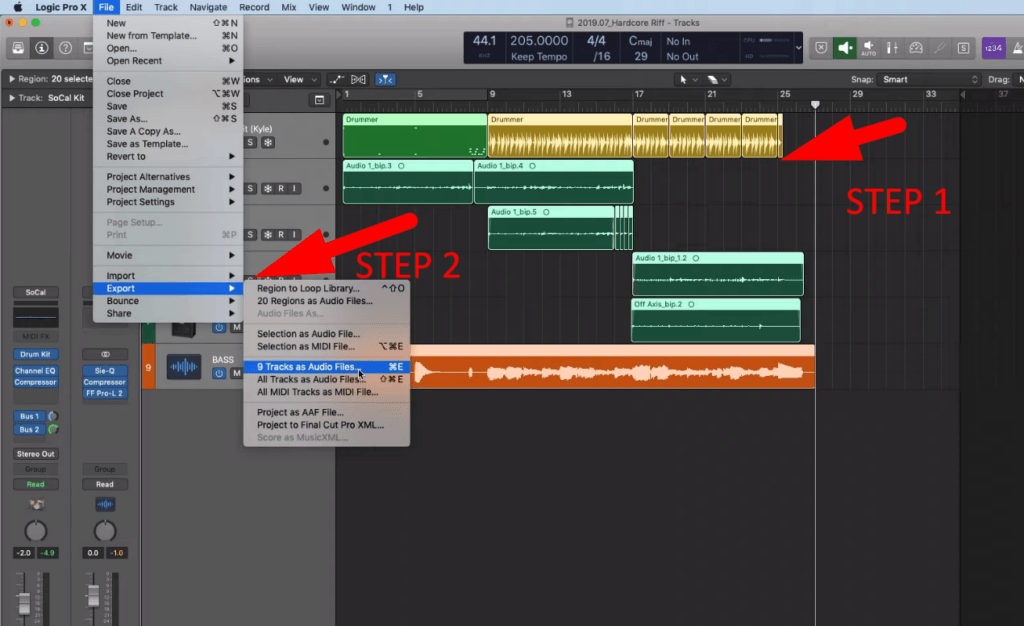
Step 2- Select the Export
- First, navigate to the menu bar and click the “File” button, then choose “Export” from the popup window.
- After that, you can either stem the tracks as one audio file by merging the contents of the audio track by tapping “1 track as Audio File.”
- Furthermore, to generate “Export,” you can use the “Command + E” shortcut key.
Step 3- Export Audio Files
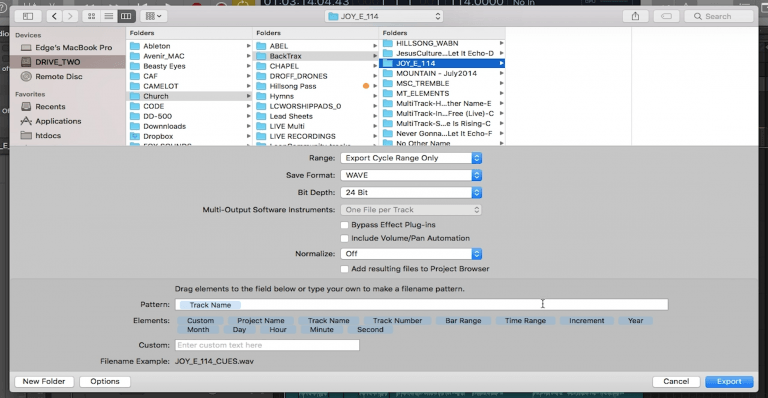
- Besides that, you can also choose “All tracks as Audio Files,” and it will pop up the settings to export.
- From there, selecting the file format or Bit Depth is easy, which depends entirely on your work.
- You can also set the “New Folder” button from the bottom left corner to create separate folders in one place.
Note: Logic Pro doesn’t allow exporting the single-track projects directly to mp3 file formats, and you need a converter. Because it will allow generating mp3 files for further recording or mixing to raw projects, converters can easily format the file.
When exporting the tracks, it will be by default in the AIFF or when in MIDI file allows to send raw information for better experiment. So, before sending the downloaded files, you must convert them to mp3 for a seamless experience. And it’s essential to get a better idea from experienced people.
How to Export All Tracks as One mp3 file in Logic Pro?
Bouncing is essential to create one unit when exporting all tracks as one stereo or mp3 audio track. Bouncing shares all the information as one audio file, but it never converts tracks as one file but into separate files. And for seamless music production, it’s easy to work and analyze the performances of your audio tracks.
After completing mixing or editing your projects, bouncing is used to listen to the audio effects on other platforms by changing the formats. So, follow the hereunder step-by-step guide to export all tracks without any error:
Step 1- Selecting Intro and Outro
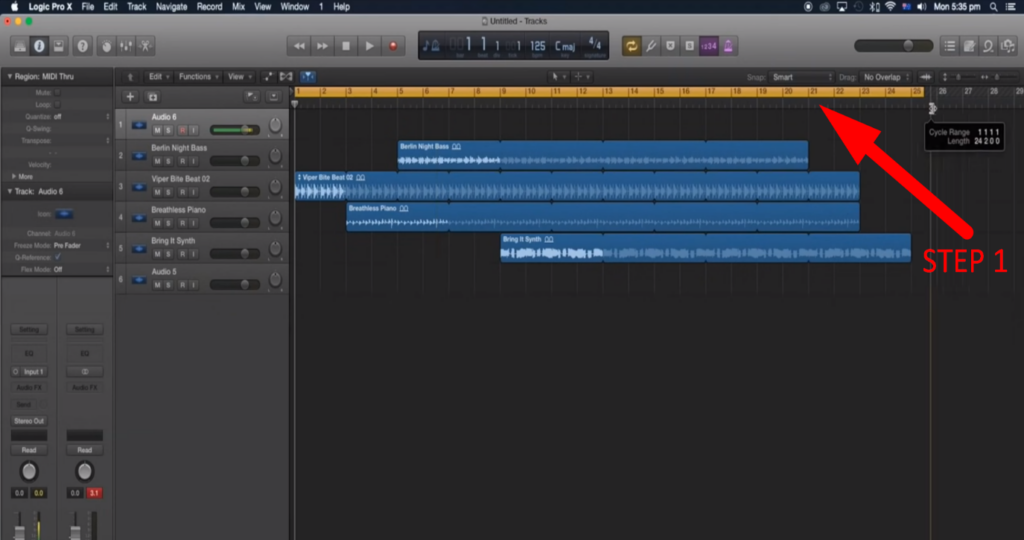
- Then set, the project ends with the yellow bar “Cycle Range” that will mark the intro and outro points of the tracks.
- Besides this, these ends are essential to preserve the quality when compressing the tracks.
Step 2- Selecting the Tracks
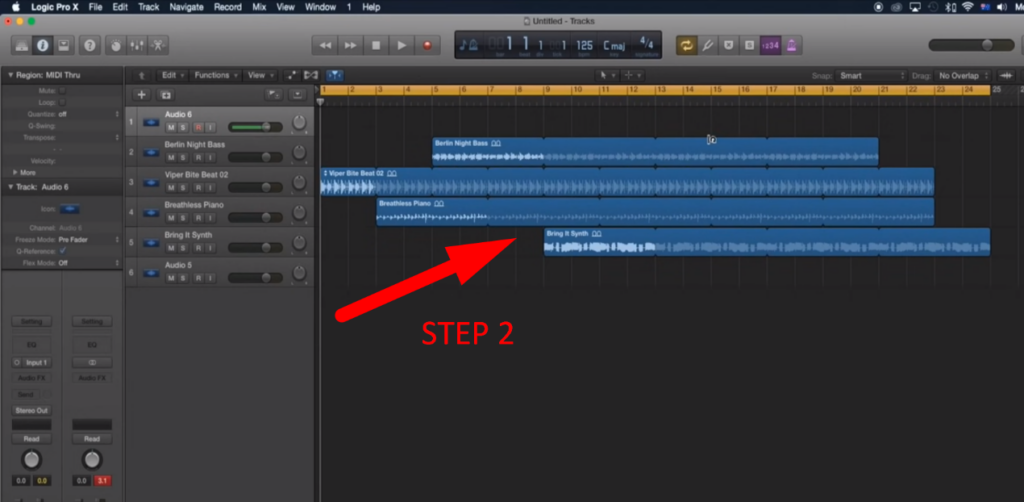
- Open the project with desired tracks that you want to export.
- After that, select all the audio tracks, like the first, and press hold the “Shift key,” then click on the last audio track.
Step 3- Bounce the Tracks
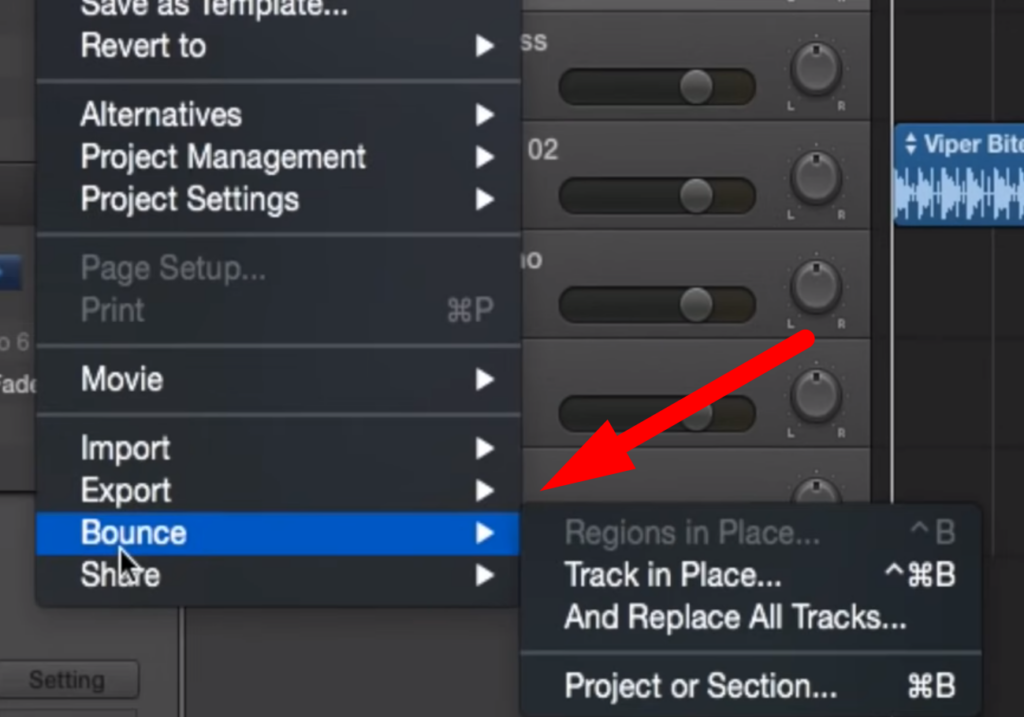
- After carefully checking where your song starts and ends, click on “File” from the menu bar and select “Bounce” from the popup window
- Then click on the “Project or Section,” and “Command B” is the shortcut key to “Bounce” the tracks.
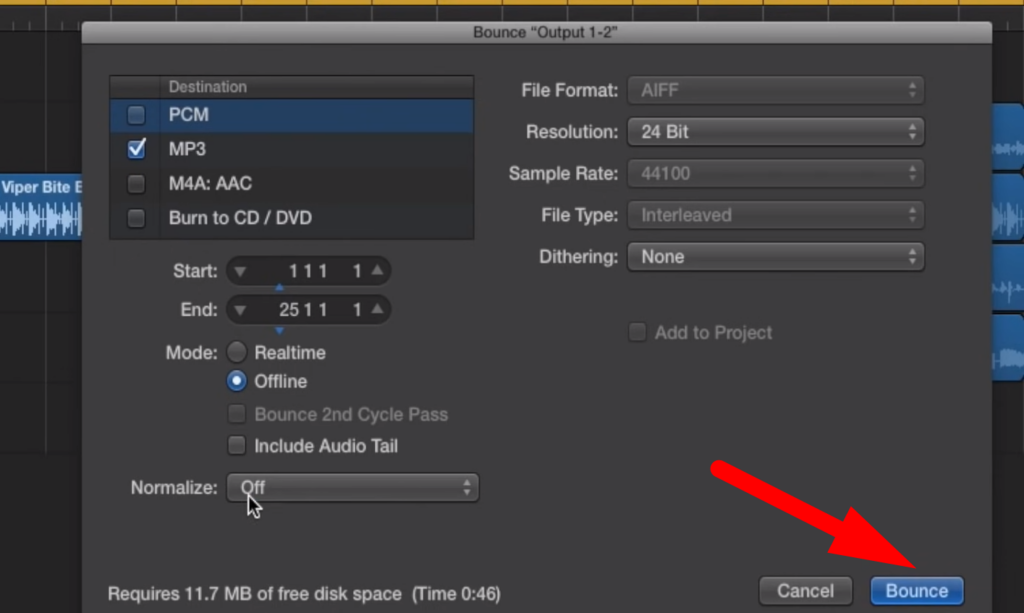
- Choose mp3 from the following settings window and select between quality and bit depth according to your work.
- It’s recommended to use 320 kbps audio quality to preserve the clarity.
Step 4- Saving the Tracks
- Then from the “Finder” window, click to open the folder you want to save and name the song.
- After checking the other settings, tap the “Bounce” button to export the tracks.
- You can also select “New Folder” from the bottom left corner, which will save results in a separate folder.
Note: You can either turn on or off the normalization, but it will increase the maximum level of digital signals. Also, it’s recommended to keep the normalization off for better and professional usage. You can set bounce offline mood, and Audio Tail is useful to preserve the end points of songs from being cut off.
Additionally, you can select both PCM and MP3 files and can export the files to your designated places. With this, you can separately set the settings of these files, which will be downloaded to their respective file locations.
From this, Logic Pro allows exporting single or multitrack according to your desired audio formats. You can export tracks to WAVE, M4A: AAC, and PCM by following the same export method, but an additional converter is essential when compressing the audio tracks.
Logic Pro Bouncing and Exporting difference
It’s crucial to analyze the difference between bounce and export. However, it entirely depends on how you want to convert the tracks. Bouncing converts all the audio tracks to one stereo file ready to share with others. Also, it allows converting or exporting the tracks in mp3 files of the highest quality for better optimization.
Exporting usually sends individual tracks but doesn’t convert them into stereo or mp3 files. And it’s done when you’re trying to send the audio tracks to professionals for mixing.
Final Thoughts
Knowing the essence of seamlessly exporting audio tracks enhanced the potential and creativity of music productions. Also, with an ideal bit rate or bit depth, exporting the files while muting other tracks brings a captivating experience. You can unveil the secrets of exporting to enjoy musical excellence by successfully evaluating the formats and audio tracks.
So, seamless exporting knowledge and carefully knowing the destination empowers to bring new changes to enhance the potential.
Now that you’ve mastered exporting your MP3 tracks in Logic Pro, consider capturing crystal-clear audio directly at the source. A wireless lavalier microphone ensures professional audio quality, making your recordings sound polished and ready to export.
Frequently Asked Questions
Why I’m not able to export all the tracks from Logic Pro?
It happens when you’re trying to export multiple tracks, but Logic allows a few audio tracks simultaneously. And when using third-party or software glitches, the error will pop up that you cannot export all the tracks, and it selects them randomly.
Furthermore, to solve this issue, it is mandatory that you are using the latest version of Logic Pro and that all the tracks are in 1-2 stereo output. Also, it would be best to consolidate the audio tracks, which will work seamlessly without any limitation errors.
How can I export all tracks of the same length?
If your project is of varying length, then you can still export the tracks with the same size by following the simple methods.
- One way is to bounce individual tracks before exporting, which will take much longer than expected.
- Another method is setting two small silent pieces, one stereo, and one mono, at the end of the tracks to ensure same-length channels.
- The simplest way is to “extend the file length” to ensure they are the same length and can be exported seamlessly.
What is the best way to export Logic Pro tracks for better mixing?
It’s easier to export the song, but a few things must be considered before exporting when mixing the tracks. Ensure to merge the tracks with similar experiences and mute all unused tracks. Also, bypass “plugins and effects” that will shape and bring clarity for better audio quality.
After that, click on “File” from the menu bar and select “Export” from the drop-down window bar. Then choose “All Tracks as Audio Files” and create a separate folder from the “Finder” window. Also, name the song and click “Export” to save the folder ready for mixing the audio tracks.