.png)
The RODE NT1 has been a studio favorite since 1991. Singers, musicians, and creators admire its warm and clear sound. Over the years, RODE released new versions to match growing needs. The latest update is the RODE NT1 Signature Series. Still, the 5th Generation is widely used for good reason. It supports both USB and XLR connections, making it flexible and simple to use.
This article shows how to set up RODE NT1 using the 5th Gen model. Once you learn the steps, setting up other versions becomes just as straightforward.
Steps to Set Up RODE NT1 Microphone (5th Gen)
RODE NT1 5th Generation has dual connectivity options – XLR and USB-C.

Let’s explore the process of using both by setting up this mic on an RODE AI-1 or any other audio interface, and then connecting it to your Mac or Windows computer.
With an XLR Cable to Your Audio Interface Connected to Your Computer
- Step 1: Make sure your audio interface is connected to your computer and is turned on. Then, lower the input gain level/volume before proceeding

- Step 2: Upon unboxing the RODE NT1 5th Gen, you should have the RODE XLR and USB-C cables inside the package. So, grab the XLR wire and insert the female plug into the male XLR port of the mic


- Step 3: Then, insert the other end of the cable (the male XLR plug) into the XLR port (male) of the audio interface

- Step 4: Once connected, you should see the gain button on your AI-1 audio interface. Push it to activate the Phantom Power

NOTE: If you’re setting up NT1 to any other audio interface, look for the “P48” button to turn on the phantom power.
- Step 5: On your audio interface, insert your headphone jack into the audio monitoring port in order to analyze the audio when you speak into the mic

- Step 6: Gradually, turn up the input gain knob until you’re able to hear yourself clear

- Step 7: Go to your audio input settings of your Windows or Mac, and in your audio input and output devices, select “RODE AI-1”
That’s all you need to set up the RODE NT1 5th Gen through an audio interface.
On Mac/Windows System with USB-C Connectivity
- Step 1: To set up the NT1 mic to your computer via USB connection, you will need a USB-C to USB-C cable

NOTE: If your computer doesn’t have a USB-C port, you can use a USB-A to USB-C cable.

- Step 2: Insert one end of the USB-C plug into your PC

- Step 3: Plug the other end of the cable into the USB-C input of your NT1 microphone


- Step 4: Now, you must ensure that NT1 is selected as your audio input device.
So, if you have a Windows computer:
- Open the “Settings” menu
- Locate the “System” option and select “Sound”
- Now, under the “Input” section, choose “RODE NT1 5th Gen” as your audio input device

If you are setting up RODE NT1 5th Gen on Mac:
- Open “System Settings”
- Select the “Sound” option
- Click on the “Input” option and choose “RODE NT1 5th Gen” (or any NT1 version) as your input device

And that’s all!
On Mobile
Although NT1 5th Generation has USB-C connectivity, it still doesn’t connect to all smartphones with a USB-C port. Therefore, you will need an external phantom power and an adapter cable.
For this demonstration, the Comica AD2 phantom power is used to set up the RODE NT1 with a phone. However, you will also need a 3.5 mm TRRS to USB-C adapter cable for the connection.

After having all these required items:
- Step 1: Connect the phantom power device to the power source
- Step 2: Insert one end of the XLR cable into the microphone and the other into the external phantom power
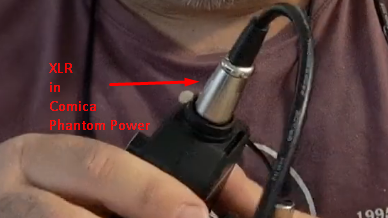
- Step 3: Insert the 3.5 mm TRRS jack of the phantom power into the TRRS to USB-C adapter
- Step 4: Next, insert the USB-C plug of the adapter into your Android or iPhone (USB-C) device
- Step 5: Open any audio recording app to test the mic
In most cases, this setup should work.
Pro Tip: Compatibility is a highly sought-after feature that creators look for in a mic. A microphone that easily connects to computers, cameras, and smartphones breaks all the connectivity barriers. Why so? Because you can record high-quality audio for your podcasts, vlogs, streams, and everyday video recordings. That’s why a wireless microphone like Hollyland Lark M2S is highly recommended by content creators all over the world!

Hollyland LARK M2S - Wireless Hidden Microphone
An ultra-discreet wireless microphone featuring a clip-on transmitter for an “invisible” fit.
Key Features: No-Logo Fit | Ti+ Design | 48 kHz/24-bit
Lark M2S is a titanium clip-on wireless microphone system with a logo-free design. It is equipped with the latest technology and features, including dual-level Environmental Noise Cancellation (ENC), 48 kHz/24-bit audio capture, up to 9 hours of battery life, and a 1000 feet wireless range.
Conclusion
Setting up the RODE NT1 does not have to feel confusing. In this article, the 5th Generation model was used because it works with both USB and XLR. That means you can connect it directly to a computer or use it with an audio interface. Whether your microphone is an older model or one of the newer versions, the steps shown still apply. This guide makes it simple to understand how to set up RODE NT1 the right way.
Frequently Asked Questions about Setting Up RODE NT1 Microphone
Q1. How is the RODE NT1 different from the 5th Gen version?
The 5th Generation version gives you two ways to connect: USB and XLR. That’s handy if you’re recording straight into your laptop without extra gear. It also lets you record 32-bit float audio, so loud spikes won’t ruin your track. There’s a built-in preamp, and it even has effects you can use. The Signature Series sticks with just XLR. It’s great for studio work but doesn’t have those extra digital features.
Q2. Is there a difference in setting up the 5th Gen and Signature NT1?
The main thing you’ll notice is how you plug them in. The 5th Gen connects using USB-C or XLR, so it can go straight into your computer. That saves you from needing other gear. The Signature Series only uses XLR, which means you’ll have to connect it through an interface. If you’re going simple, the 5th Gen wins. But for traditional setups, the Signature Series still works well.
Q3. How many RODE NT1 versions have come out?
There are quite a few. The original NT1 had a simple, flat tone. Then came the NT1-A, known for its brighter voice. Then came the NT1-A, known for being brighter. Later, the 4th Gen NT1 was released in black with a warmer tone. The 5th Gen added USB and float recording. Finally, the Signature Series came out in fun colors but uses only XLR. Each version brings its own style.
Q4. Why isn’t the RODE NT1 working with my phone?
Some phones don’t give enough power for mics like this one. The NT1 5th Gen was not made for direct phone use. You can try using a USB hub that powers both the mic and your phone. This might help it work better. It’s not always a sure fix, but some people have seen results by trying this simple step first.
Q5. Does the RODE NT1 need an audio interface to record?
The RODE NT1 5th Gen does not always need one. Thanks to its USB-C port, it can plug straight into your computer. You can start recording without using an external audio interface. But if you want to use XLR, then yes, an interface is required. The dual output makes it flexible for both simple and more advanced setups.
Q6. Can the RODE NT1 work with any audio interface?
Yes, it can. Just make sure your interface has an XLR input and supports phantom power. The NT1 is a condenser mic, so it needs that extra power to work. Many people suggest using something like the Focusrite Scarlett 2i2. But any good-quality interface with 48V phantom power will work just fine.