.png)
 简体中文

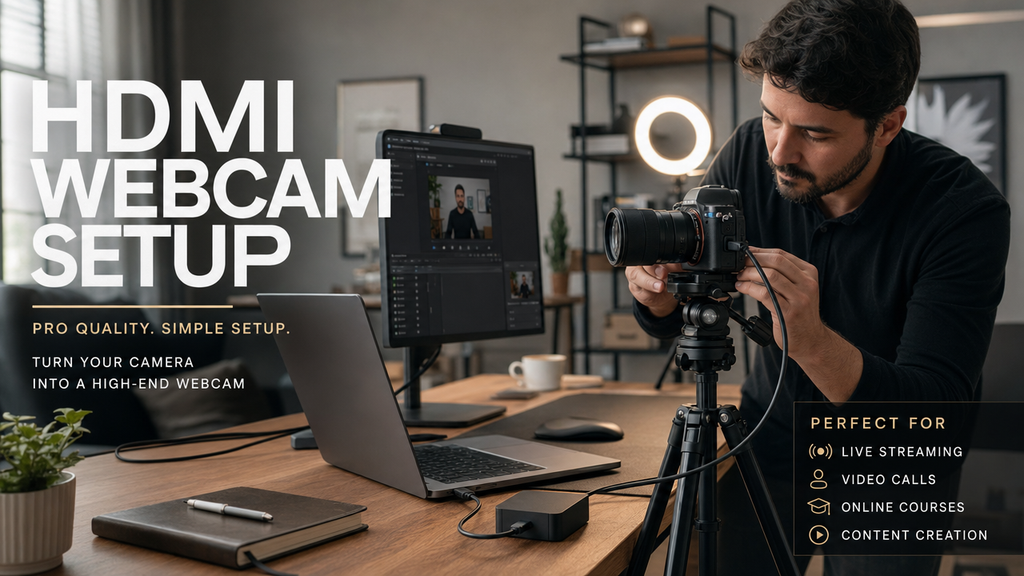
Your DSLR or mirrorless camera almost certainly produces better video than your laptop’s built-in webcam. Connecting it via HDMI is one of the most effective ways to upgrade your video call or stream quality, but the setup involves more than plugging in a single cable. This guide explains the required equipment, connection steps, camera settings, driver installation, and app selection. It helps you set up your hardware and start streaming live video without confusion.
How the HDMI Webcam Method Works
Before starting, remember that a computer’s HDMI port only sends video out. It connects to monitors but cannot accept video from cameras. A capture card allows your computer to receive the camera’s video signal.
The hardware chain is:
Camera → HDMI cable → Capture card (HDMI in) → USB cable → Computer
The capture card converts the camera’s HDMI signal into a USB video stream that your operating system recognizes as a standard webcam (UVC device). Once recognized, any app that accepts webcam input can use it as its camera source. This method produces high-quality video, but it involves more components and configuration steps than a plug-and-play webcam.
What You Need: Hardware Checklist
Required Hardware
- Camera with HDMI output — Verify that your specific model supports clean HDMI output. Many entry-level bodies do not. This is covered in Step 1.
- HDMI cable — correct connector type for your camera body:
- Full-size Type A: larger DSLRs and camcorders
- Mini HDMI (Type C): mid-range mirrorless and DSLR bodies
- Micro HDMI (Type D): compact mirrorless bodies
- USB capture card — Converts the HDMI signal to a USB video stream. This is non-negotiable; the setup cannot work without one.
- Stable power source — Camera batteries drain quickly under continuous HDMI output. Use an AC adapter, a dummy battery (DC coupler), or USB power delivery where your camera supports it.
- Computer with a USB 3.0 port — Required for reliable 1080p60 or 4K input. USB 2.0 may work at lower resolutions but is prone to dropped frames.
Optional but Recommended
- Camera tripod or mount — Eliminates camera movement and keeps framing consistent throughout a call or stream.
- External lighting — Camera sensors perform significantly better with adequate light, reducing noise and preventing auto-exposure fluctuations.
| Item | What to Look For | Why It Matters |
|---|---|---|
| Camera | HDMI output, clean HDMI support | Delivers a usable, overlay-free signal |
| HDMI cable | Correct connector type (A/C/D) | Wrong type will not physically connect |
| Capture card | UVC compliant, USB 3.0, resolution support | Converts HDMI to webcam signal |
| Power solution | AC adapter or dummy battery for your model | Prevents shutdown during sessions |
| USB port | USB 3.0 on the computer | Handles 1080p60 without dropped frames |
Step 1: Verify and Enable Clean HDMI Output on Your Camera
This is the most commonly skipped step and the leading cause of on-screen overlays appearing in the webcam feed.
What Clean HDMI Output Means
By default, a camera’s HDMI output mirrors its display, including battery level, autofocus boxes, exposure values, and histograms. Clean HDMI output removes all of those overlays and sends only the raw video image. If clean HDMI is not enabled, every participant in your call will see your camera’s UI elements in the frame.
Enabling Clean HDMI Output by Camera Brand
| Brand | Series | Menu Path | Setting Name | Notes |
|---|---|---|---|---|
| Canon | EOS R, 90D and above | Shooting Settings → HDMI Display | Set info overlay to “Disable” | Many EOS M bodies lack this option |
| Sony | Alpha a6xxx, a7 series | Setup → HDMI Settings | “HDMI Info Display: Off” | Also disable Live View Display if present |
| Nikon | Z series, D780 | Setup → HDMI | Disable info overlay in output settings | D3xxx/D5xxx series generally do not support clean HDMI |
| Panasonic | GH5/GH6, S5 series | Setup → TV Connection → HDMI Mode | Enable “Clean HDMI Output” | Camera must be in Creative Video mode |
| Fujifilm | X-T4, X-S10, X-T5 | Set Up → Screen Setting | Set LCD+EVF Display to “Off” for HDMI | Older X-T2/X-T3 may require a firmware update |
Entry-level bodies and older models frequently do not support clean HDMI output. Check the manufacturer’s product specification page before proceeding if your camera is not listed above.
Identifying Your Camera’s HDMI Port Type
Check the side of your camera body for a small HDMI port. The three types are:
- Full-size Type A: Approximately 13.9 × 4.45 mm; found on larger DSLRs and video-focused bodies
- Mini HDMI Type C: Approximately 10.42 × 2.42 mm; common on mid-range DSLR and mirrorless cameras
- Micro HDMI Type D: Approximately 6.4 × 2.8 mm; standard on compact mirrorless bodies
If you are unsure, your camera’s manual or the manufacturer’s spec page will clearly identify the port type.
Step 2: Connect the Camera to the Capture Card and Computer
Physical Connection Sequence
Follow these steps in order to avoid signal initialization errors:
- Connect the HDMI cable from your camera’s HDMI output to the HDMI input on the capture card. Confirm you are using the input port, as some cards have both an input and a passthrough output.
- Plug the capture card into your computer’s USB 3.0 port. Avoid USB hubs when possible; a direct port connection provides more consistent bandwidth.
- Power on the camera and set it to Video or Movie mode. The camera must be in a video output state for the HDMI signal to be active. Photo mode does not generate a continuous HDMI stream.
- Confirm the HDMI output is active. Some cameras require navigating to a display or connection settings menu and explicitly enabling external output. Consult your camera manual if the signal does not appear.
Camera Power During Use
Continuous HDMI output depletes batteries quickly. Many cameras also apply a default auto-off timer ranging from five to thirty minutes, which will cut off a call or stream mid-session.
- Use an AC adapter or dummy battery rated for your specific camera model for long or recurring sessions.
- Disable the auto-off timer in the camera’s power management menu. The setting is typically labeled “Auto Power Off,” “Sleep Mode,” or “Power Save.”
- Sony and Fujifilm bodies support USB power delivery through the camera’s USB port while also outputting HDMI, which is a useful alternative when an AC adapter isn’t available.
Note: Use a dummy battery confirmed to be compatible with your camera model. Third-party options that are not rated for your body can cause intermittent power drops or trigger error warnings during use.
Step 3: Install Capture Card Drivers and Verify Recognition
Windows Setup
Most current capture cards, including the Elgato Cam Link 4K and AVerMedia models, are UVC-compliant and plug-and-play on Windows 10 and 11.
- Plug the capture card into a USB 3.0 port and wait 10 to 30 seconds for device detection.
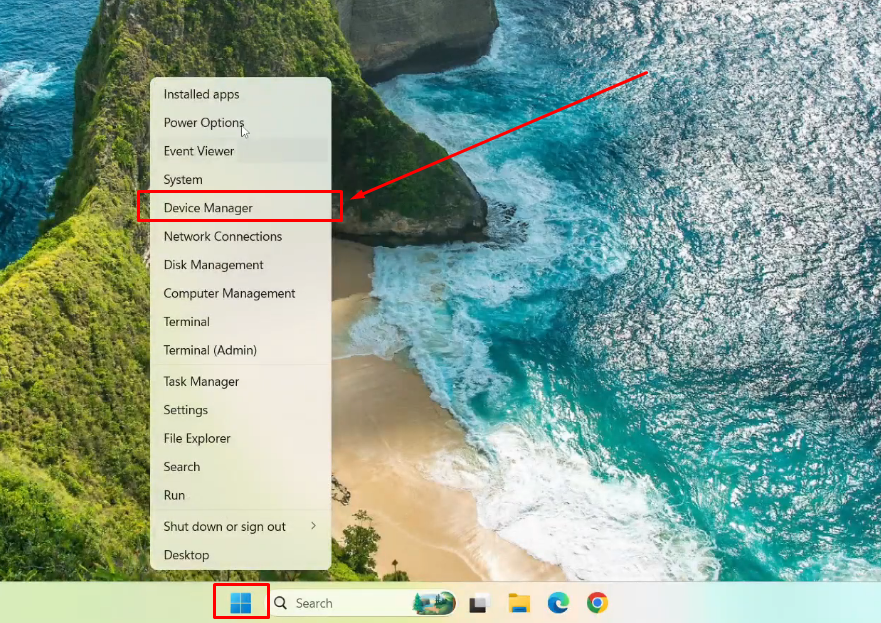
- Open Device Manager (right-click Start → Device Manager).
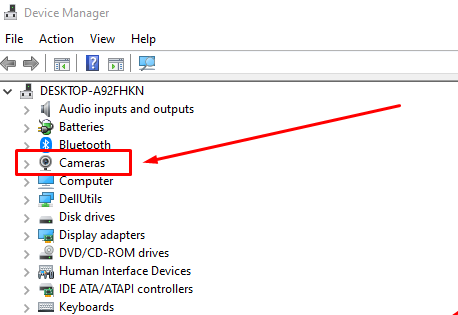
- Expand Imaging Devices or Cameras. The capture card should appear as a named video device.
- If it is not detected, download the driver from the manufacturer’s website, install it, and restart the computer.
macOS Setup
UVC-compliant capture cards are natively supported on macOS 10.14 and later.
- Plug the capture card into a USB 3.0 port (use a USB-C adapter if needed).
- Go to Apple Menu > System Settings > General > About > System Report > Select USB or Camera.
- The capture card should appear as a connected device.
- Some cards require the manufacturer’s companion software (such as Elgato 4K Capture Utility) for full resolution and frame rate control.
Confirming the Signal Is Live
Before opening any conferencing app, verify the hardware chain is working end to end.
Open the capture card’s companion application and check for a live preview of the camera feed. If the preview shows your camera image, the HDMI-to-USB chain is confirmed and working. If it shows a black screen or “No Signal,” return to Step 2 and check each connection before proceeding to app configuration.
Step 4: Select the Capture Card as Your Webcam Source in Your App
Zoom
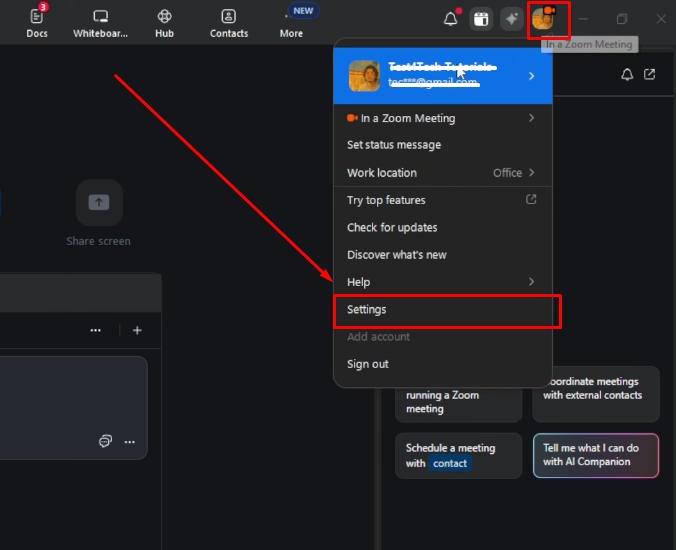
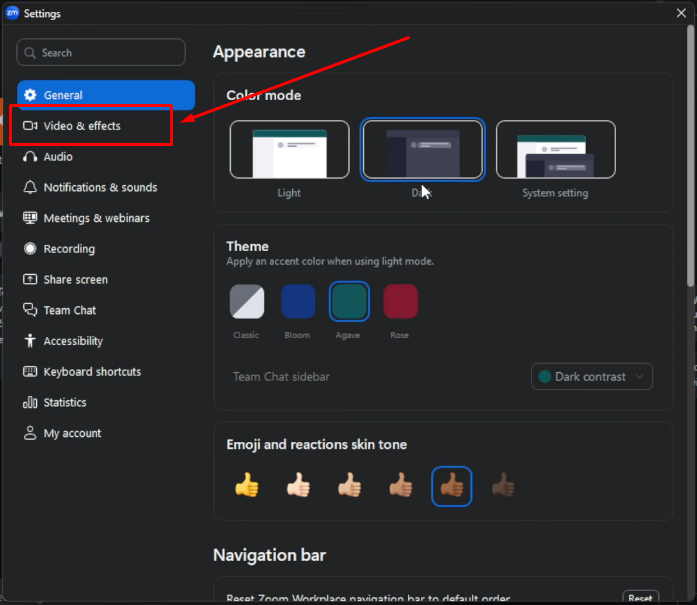
- Open Zoom, click your profile image, and click on the Settings option from the menu. Then click on the Video and effects tab.
- In the Camera dropdown, select the capture card device name.
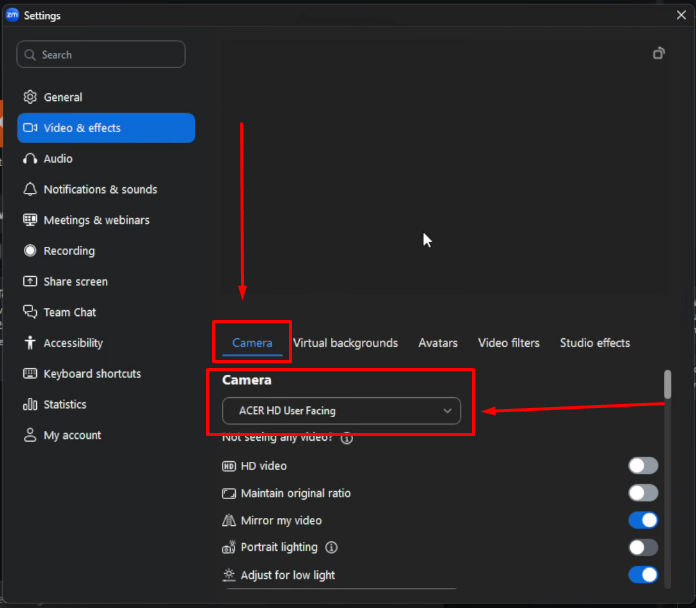
- Confirm the preview window shows your camera feed, then test in a meeting.
Microsoft Teams
- Open Teams, click “Settings and more,” select Settings > Devices.
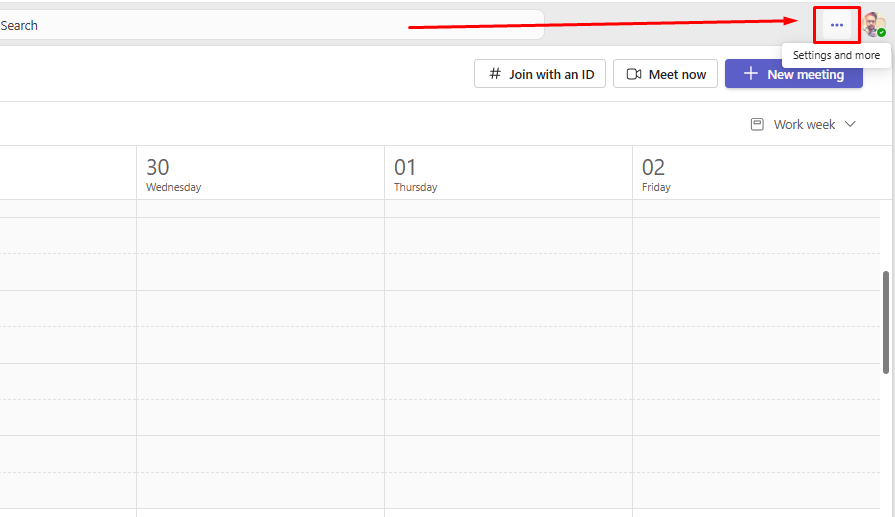
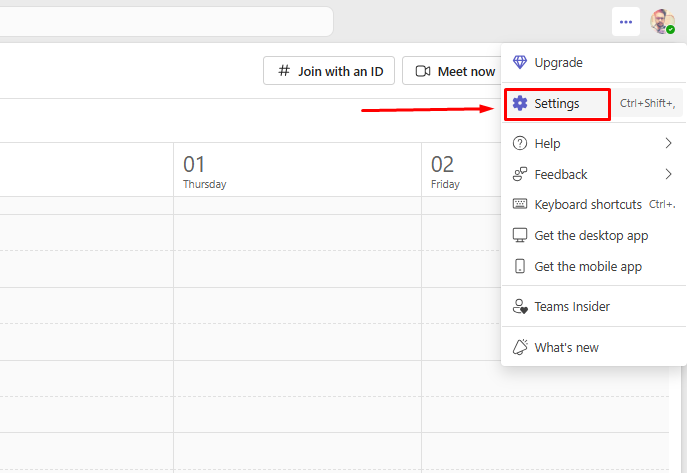
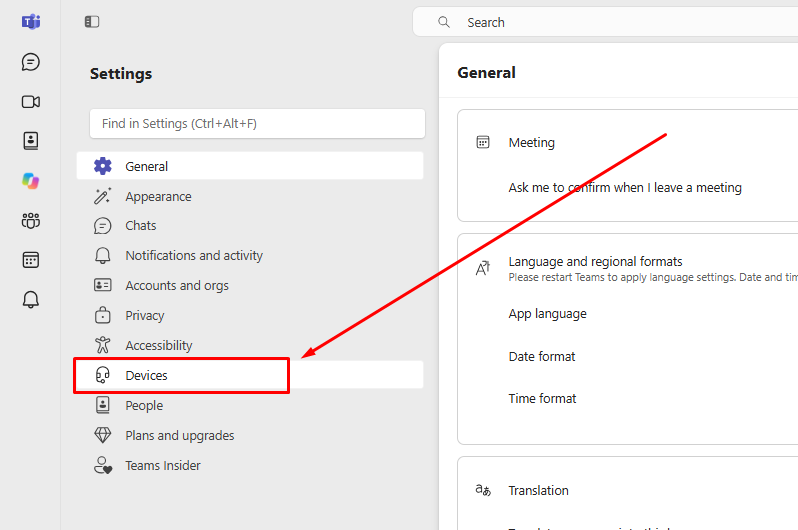
- Under the Video and Video settings section, go to the Camera option, select the capture card from the dropdown.
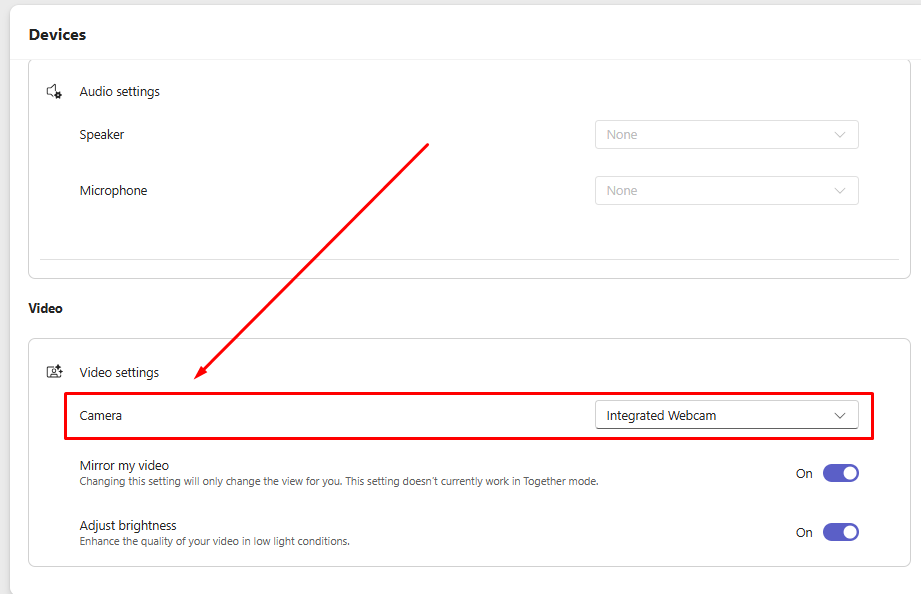
- Use Make a test call to verify the image quality and framing.
Google Meet
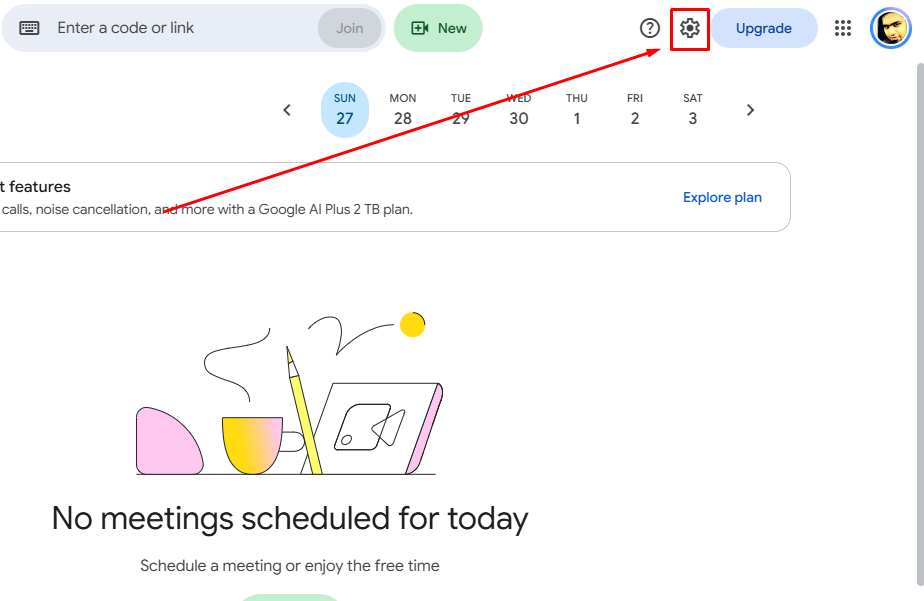
- Before you join a call, click on the gear icon in the top-right corner to open Settings.
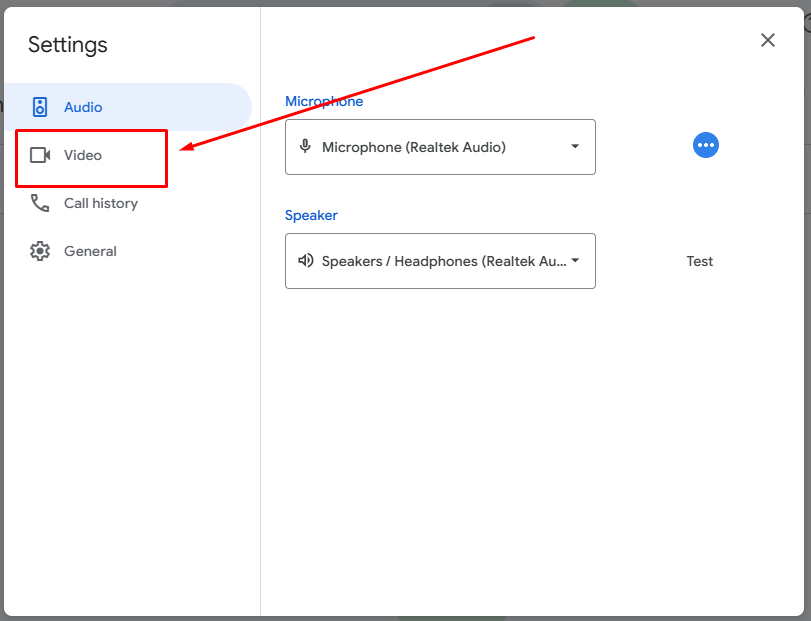
- Next, go to the Video tab.
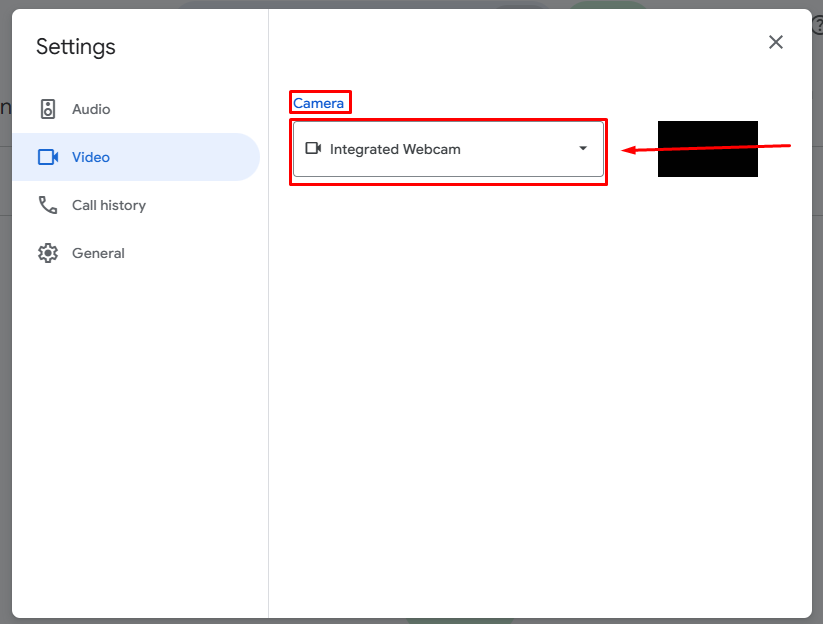
- Under Camera, select the capture card from the dropdown list.
OBS Studio (for Streaming or Recording)
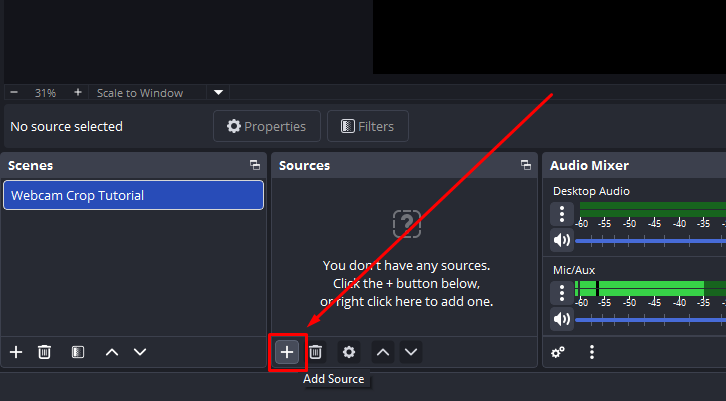
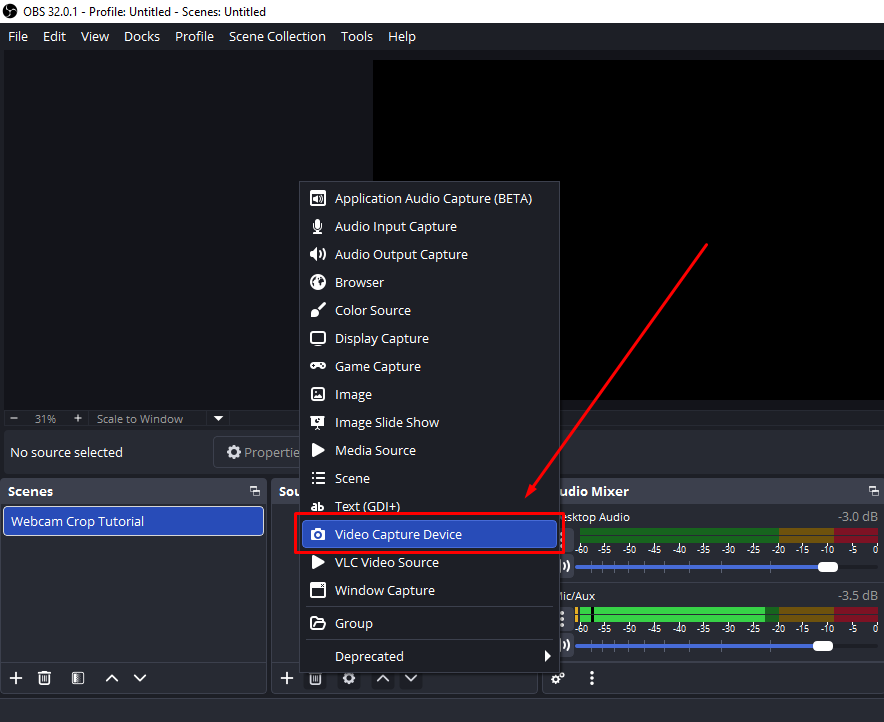
- In the Sources panel, click + and select Video Capture Device.
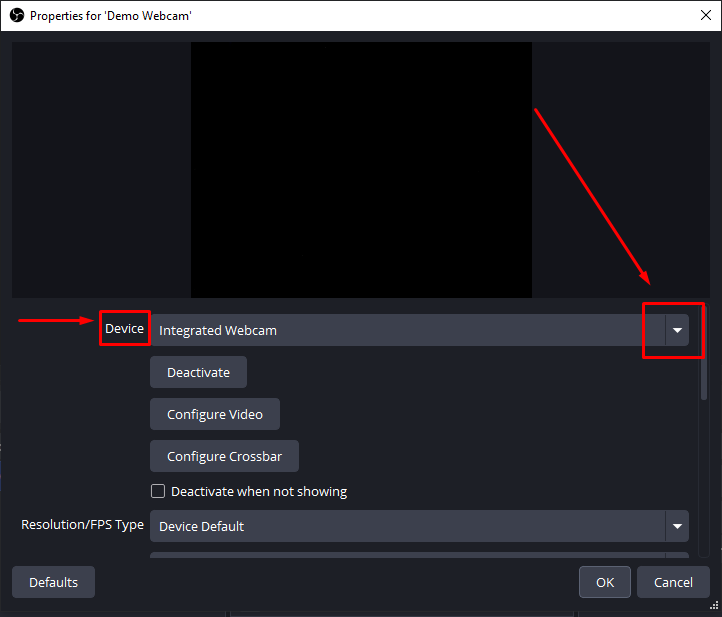
- In the device properties, select the capture card from the Device dropdown.
- Set resolution and frame rate to match your camera’s HDMI output (for example, 1920×1080, 60fps).
- To use the OBS feed as a webcam in other apps, click on the Start Virtual Camera button on the main interface. Other applications will see “OBS Virtual Camera” as a selectable source.
Camera Settings for the Best Video Quality via HDMI
Once the connection is confirmed and working, adjust these camera settings to stabilize and improve the image your viewers see.
- Resolution and frame rate: Set to 1920×1080 at 60fps for most use cases. If your capture card supports 4K input, 3840×2160 at 30fps is available. Match the capture card settings to the camera output.
- Exposure: Use Manual (M) or Aperture Priority mode to prevent auto-exposure hunting, which causes distracting brightness fluctuations as you move or as lighting changes.
- White balance: Set a fixed preset such as Daylight, Cloudy, or Tungsten. Auto White Balance can shift color tone mid-call in a way that is visually distracting.
- Focus: Continuous AF works well for single-person framing. Switch to Manual Focus if the camera hunts on low-contrast backgrounds or if your position is fixed.
- Picture profile: Use a standard picture profile. Log profiles (S-Log, C-Log, L-Log) produce flat, desaturated footage that appears washed out in a webcam feed without a LUT applied in OBS or a similar processing step.
- Image stabilization: Disable in-body or in-lens stabilization if the camera is on a tripod. Active stabilization on a stationary camera can introduce a subtle micro-jitter into the output.
Troubleshooting: HDMI Camera Webcam Not Working
Use the table below to match your symptom to the most likely cause and fix.
| Symptom | Likely Cause | Fix |
|---|---|---|
| Black screen or no video in app | Camera not in Video mode; HDMI output inactive; capture card not recognized | Switch camera to Movie/Video mode; verify HDMI output is enabled; check Device Manager (Windows) or System Information (macOS) |
| Overlays and icons visible in feed | Clean HDMI output not enabled | Enable clean HDMI output in camera menu (see Step 1 table) |
| Capture card not appearing as camera option | Driver conflict or undetected device | Re-seat USB cable in a USB 3.0 port; reinstall drivers from manufacturer website; restart computer |
| Camera shuts off during call | Auto-off timer active; battery depleted | Disable auto-off in camera power settings; switch to AC adapter or dummy battery |
| Stuttering or dropped frames | USB 2.0 port in use; resolution or FPS mismatch | Move capture card to USB 3.0 port; reduce to 1080p30 if on USB 2.0; match OBS source settings to camera HDMI output |
| Incorrect aspect ratio or stretched image | App overriding capture resolution | Set capture output to 16:9 in the manufacturer’s companion app; match video source resolution in OBS settings |
If the table does not resolve the issue, test with a different HDMI cable and a different USB port. A faulty cable or an underpowered port is a common but easily overlooked cause of intermittent signal failures.
Capture Card Options: What to Look for
Three tiers cover most use cases. The table below is a decision-support reference, not a full review.
| Tier | Representative Products | Max Input Resolution/FPS | USB Standard | Best For |
|---|---|---|---|---|
| Budget | Generic USB capture dongles, Razer Ripsaw HD | 1080p30 | USB 2.0 | Basic video calls; limited streaming use |
| Mid-range | Elgato Cam Link 4K, AVerMedia Live Streamer CAP 4K | 4K30 / 1080p60 | USB 3.0 | Most streamers and remote professionals |
| Pro | Magewell USB Capture HDMI Gen 2, AVerMedia BU113 | 4K60 | USB 3.0 / USB-C | Broadcast, production, high-frame-rate workflows |
Prioritize three factors when comparing cards: UVC compliance (plug-and-play, no driver required), USB 3.0 support for 1080p60 and above, and the distinction between 4K capture and 4K passthrough. Passthrough lets you monitor output on an external display but does not deliver 4K as a webcam input to your computer. Only 4K capture does.
Want a Simpler Setup? Consider a Dedicated Webcam
For users who want high image quality with a single-cable connection, a purpose-built webcam eliminates most of that complexity.
The Hollyland Lyra offers a simpler option for anyone tired of extra cables and setup steps. Its 50MP 1/1.5-inch CMOS sensor and F/1.8 aperture support 4K video at 30fps. It also includes 48kHz/24-bit audio, AI tracking, and Smart Auto Framing. Best of all, one USB-C cable connects it to your computer. The Lyra appears as a standard UVC camera, so no capture card or extra drivers are needed. Just connect it, select it in Zoom, Teams, or another video app, and start streaming. Choosing between an HDMI setup and the Lyra depends on your existing gear and how much setup work you want to manage.
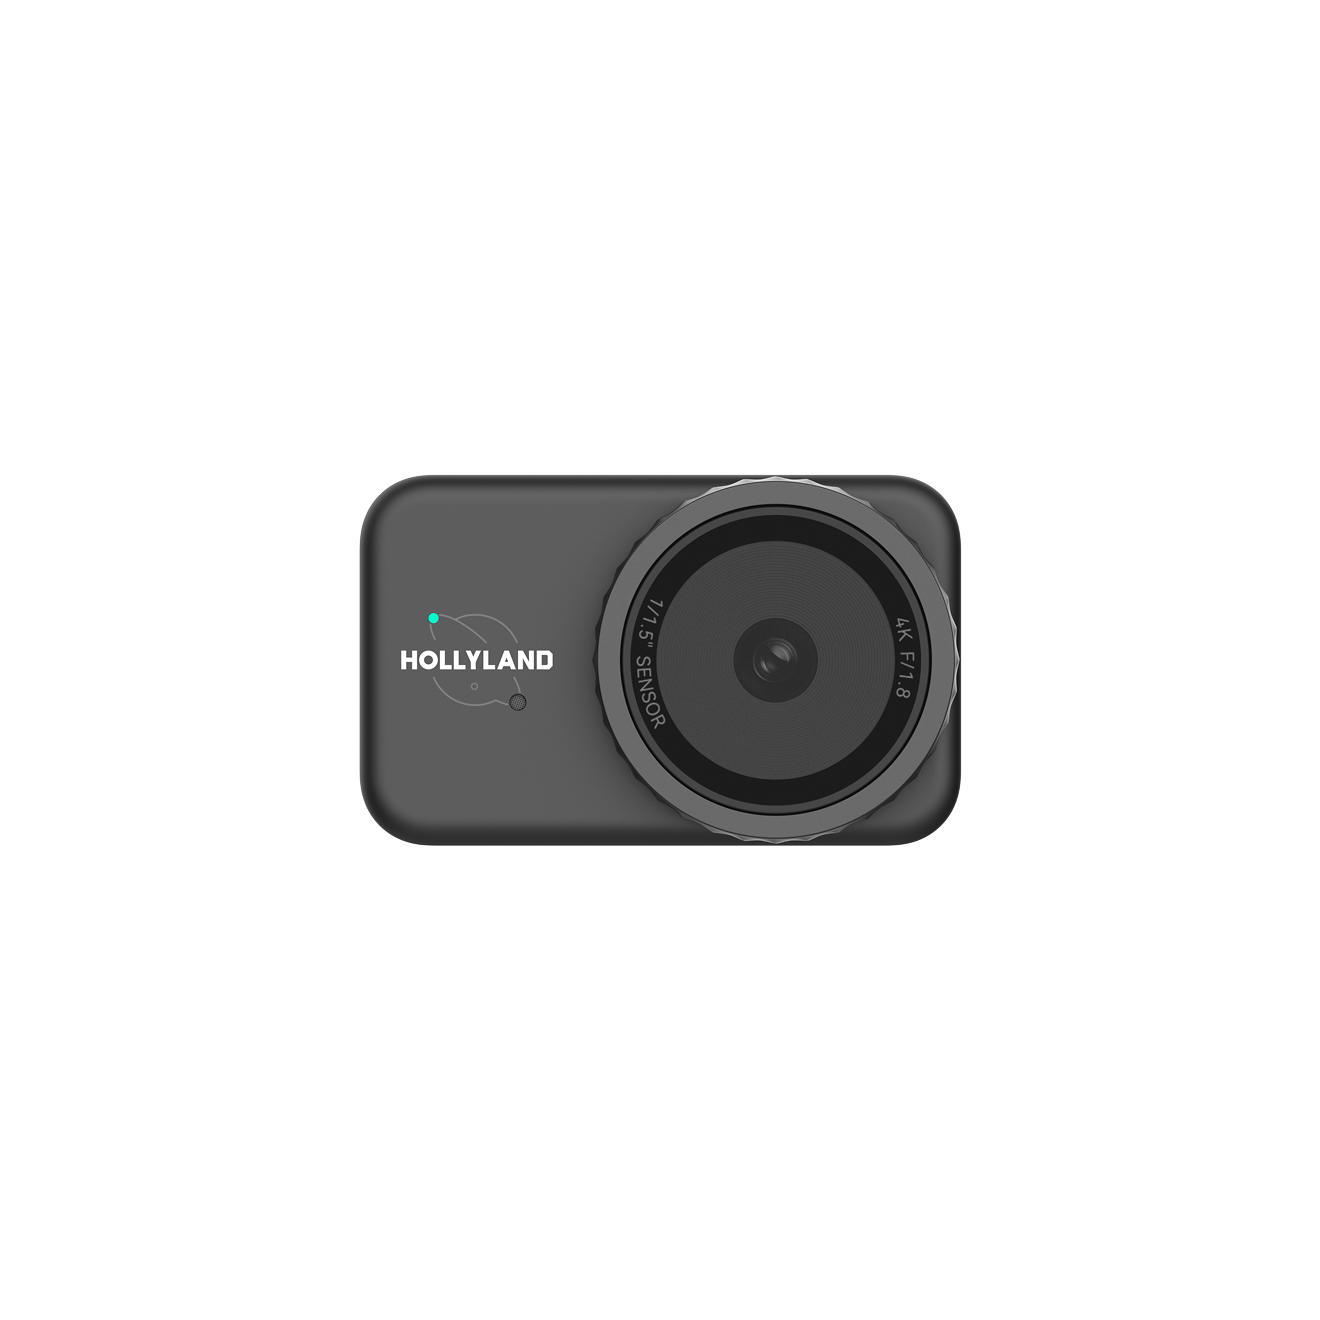
Hollyland Lyra - 4K AI Webcam
A flagship 4K AI webcam featuring a large 1/1.5″ CMOS sensor, smart auto-framing, and studio-grade 48 kHz/24-bit audio for effortless streaming and conferencing.
Key Features: 1/1.5″ CMOS & 4K30 | AI Tracking & Auto Framing | 48 kHz/24-bit Audio
Frequently Asked Questions
Q: Do I need a capture card to use a camera as a webcam via HDMI?
Not always. A computer’s HDMI port only sends video, not receives it. You need a capture card to bring camera footage into your computer. Many modern mirrorless and DSLR cameras connect directly through USB. The camera maker’s software or USB webcam mode enables this connection. These modes often limit video to 720p or 1080p30. For full HD or 4K quality through HDMI, a capture card is still necessary.
Q: Which cameras support clean HDMI output?
Most mid-range and higher bodies support it: Canon EOS R series and EOS 90D and above, Sony Alpha A6XXX and A7 series, Nikon Z series and D780, Panasonic GH5/GH6 and S5, and Fujifilm X-T4, X-S10, and newer models. Entry-level bodies and older models often do not. Confirm on the manufacturer’s specification page before purchasing a capture card.
Q: Why do camera overlays and icons appear in my webcam feed?
Clean HDMI output is not enabled on the camera. Go to your camera’s display or HDMI output settings menu and look for an option labeled “Clean HDMI Output,” “Info Display Off,” or “HDMI Output: Video Only.” The exact label varies by brand. The table in Step 1 of this guide lists the menu path for major camera brands.
Q: Can I stream 4K via HDMI to my webcam setup?
Yes, provided your capture card supports 4K input (not just 4K passthrough) and your camera outputs a 4K HDMI signal. Keep in mind that most video conferencing apps cap webcam display resolution at 1080p regardless of the input. 4K capture is most useful in OBS for local recording or streaming platforms that support 4K output.
Q: Why does my camera keep turning off during video calls?
The camera’s auto-off or sleep timer is active. Disable it in the camera menu’s power management section, and use an AC adapter or dummy battery to ensure the camera has continuous power for the full session.
Q: Does this method work with Zoom, Microsoft Teams, and Google Meet?
Yes. Once the capture card is recognized by the operating system as a video device, any app that supports webcam input, including Zoom, Teams, Google Meet, Skype, and OBS, can select it as the active camera source. No configuration beyond choosing the device in each app’s settings is required.
Conclusion
Using your camera as a webcam requires just a few setup steps. First, check that your camera supports clean HDMI output and enable it. Connect the camera to a capture card using the correct HDMI cable. Plug the capture card into your computer’s USB 3.0 port. Check that your operating system recognizes the connected device. Then, select the capture card as your camera source. Set manual exposure, fixed white balance, and a standard picture profile. These settings help maintain a steady, professional-looking image throughout your recording.