.png)
.png) Français
Français .png) Deutsch
Deutsch .png) Italiano
Italiano .png) 日本語
日本語 .png) Português
Português  Español
 Pyro 5 Support
Non-Broadcast mode: Pyro 5 can pair with up to 2 receivers & 2 APPs.
Broadcast mode: Pyro 5 can pair with up to 4 receivers.
Non-broadcast: Pyro 5 can pair with up to 2 mobile devices to monitor.
Broadcast: Pyro 5 doesn’t support pairing with the mobile devices to monitor.
The device’s battery life can be calculated based on the battery capacity and rated voltage. For example, the power consumption of the transmitting mode of the Jiying 5 is <16.5W, and the power consumption of the receiving mode is <14W. The battery capacity of our NP-F970 is 6000mAh and the rated voltage is 7.4V. Then 6000×7.4÷1000=44.4Wh. The fully charged NPF970 battery can last for about 2~3 hours. Take this as a reference.
Please enter the menu of the Pyro 5 system settings.
Select the “Wireless” and click the “Scan” button in the “Channel Switch” area.
The height of the columns indicates the signal strength of the channel(RSSI).
The meaning of the scanning results:
➢ Yellow: Using frequency channel.
➢ Red: There is other wireless interference for this channel
➢ Green: There is no other wireless interference for this channel
Note:
➢ The “Scan” function only works in Receiver mode.
➢ Click the “channel column” to switch the channel quickly.
1. Enter the APP store , search and download the APP named “Hollyview” (If you can’t find it in the store, you can also download it from the Hollyland official website.)
2. Open the WiFi list. The WiFi name of the Pyro 5 is “HLD_xxxxxxx”. The default password of WiFi is 12345678.
3. Open the Hollyview APP, click “Connect”. Then you can see the video from Pyro 5.
Note:
➢ Pyro 5 supports the HollyView app when operating in Transmitter and Non-Broadcast mode.
➢ Turn off the mobile network. (4G/5G)
➢ Enable the location permission for the APP.
➢ Choose channel 1 and channel 2 when you use the Android phone.
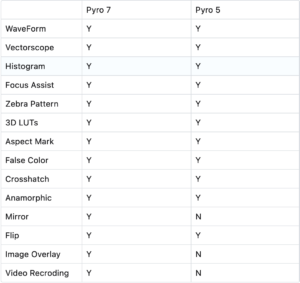
Import the 3D LUT(SD card or USB flash disk):
1. Please prepare a USB flash disk whose capacity is less than 32GB. Then format the flash disk as FAT 32 or NTFS. (Please ignore this step when you use an SD card.)
2. Import the 3D LUT file into the flash disk or SD card.
3. Plug the flash disk into the USB-C port at the rear of Pyro 5, or insert the SD card into the SD car port at the side of Pyro 5.
4. Please choose 3D LUTs from the toolbar. Choose a LUT from L1 to L5. Then select Import LUT. The imported LUT will replace the one you selected..
Note:
➢ Pyro 5 only supports .cube LUT files.
➢ Pyro 5 supports 16/17/32/33/64/65 bit LUT files.
3D LUT Application:
1. Click the monitor screen to wake up the bottom menu bar. Then click the rightmost secondary menu icon to open the full toolbar.
2. Find the 3D LUTs menu in the toolbar, click L1-L5 under the menu bar to apply the corresponding LUT file.
1. Insert the SD card into the SD card port beside the Pyro 5. There is some information that can be defined: name of the video, turn on and off the Trigger control function.
2. Start recording by pressing the red button at the bottom of the screen.
Note:
➢ The video is stored on the SD card
➢ A single video supports up to 40 minutes of recording when the SD card is formatted as FAT32. With other formats, there is no time limit.
➢ The recorded video file can be used as a proxy file when you use the PR, Davinci.
➢ The Timecode function is supported and enabled default.
The format of the recording video depends on the format of the video source. For example, if the video source is 1080P60, the recorded video will also be 1080P60.
No, the Pyro 5 doesn’t support UVC function.
The upload bandwidth should be at least 6 Mbps. For RTMP streaming, connect to the monitor screen via the Hollyview app to enter the stream URL and key. When streaming to a single app or without connecting to the app, the streaming bitrate is 6 Mbps. When streaming to two apps simultaneously, the bitrate is reduced to 3 Mbps per stream. The maximum supported resolution is 1080P60, and the video format is H.264.
Steps:
1. Connect the network card to the Pyro 5 via an OTG dongle. The network card needs to be able to access the network.
2. Check whether the Pyro 5 recognizes the network card by observing the icon. When the USB flash disk icon turn to a network icon, the Pyro 5 has recognized the USB flash disk.
3. Connect Pyro 5 to the Hollyview APP via WiFi, then enter the stream URL and key in the APP.
4. When the network icon changes to the streaming icon, the stream has started successfully.
Note: there are 2 kinds of USB network card.
1. USB wireless network card: Once plugged in, it enables wireless Wi-Fi connection but is not suitable for video transmission or monitoring devices..
2. USB network card: It contains a mobile data card and provides cellular data for internet access after plugging in.
Pyro 5 only supports the second type.
Non-Broadcast: It is recommended to use up to four Pyro 5 units simultaneously.
Broadcast Mode: It is recommended to use up to two Pyro 5 units simultaneously.
When installing the Pyro 5 easy-install antenna, you need to insert it firmly into the bottom until you hear a click. At the same time, you can shake the antenna to determine whether it is installed firmly.
Static electricity during use may have caused the WiFi chip to malfunction. It is recommended to apply for official after-sales service for repair.