.png)
OBS is a trusted choice for streaming and video recording. For beginners, setting up a mic may seem difficult at first. Many believe everything must be fixed only inside OBS. But that’s not how it actually works. The process starts with your computer’s sound settings. Whether using Windows or Mac, this step is important.
Once the mic is set up there, OBS responds better later. Then, the audio configuration inside OBS becomes much easier to handle. Options such as Audio Input Source help manage the mic input. Global Audio Devices can also improve how the sound is received. This guide explains how to add a microphone to OBS by starting with system settings and using those in-app options to finish the setup.
How Does OBS Handle the Microphone?
OBS gives users two ways to use a microphone. One option is through Global Audio Device settings. This makes the mic active in every scene by default. It’s useful when audio needs to stay consistent throughout. Another option is adding the mic as an Audio Input Source. This method works for scenes that need audio only sometimes. It gives more control when switching between different layouts.
When set as a Global Audio Device, the mic stays on always. But when added as an Input Source, it works only in chosen scenes. This setup is helpful when different scenes need unique audio settings. It avoids unnecessary background sound in certain parts.
However, using both methods with the same mic isn’t ideal. It often causes echo or sound doubling. To avoid issues, disable the Global Audio Device when using scene-based input. Therefore, knowing how to add a microphone to OBS the right way prevents audio problems.
NOTE: We have demonstrated both methods to add your mic to OBS in Parts 1 and 2. You can choose any method to add your microphone, whether you are a Mac or Windows user. However, most streamers and content creators prefer using the Global Audio Device Method to add the microphone.
Part 1: How to Add a Microphone to OBS on a Windows System?
In this section, you will learn the process of adding a mic to OBS if you use it on your Windows desktop or laptop. For your ease, we have made two subsections of this part: configuration and method. However, the steps are in continuation, so let’s get started!
Configuration
- Step 1: Turn on your PC and right-click on the “Speaker” icon at the bottom-right corner of the taskbar

- Step 2: Click on the “Open Sound settings” option when the small menu slides up

Once done, the Settings page will open, and you will automatically be taken to the “Sound” settings page, like this

- Step 3: Scroll down the page until you see the “Sound Control Panel” option and click on it

NOTE: In some Windows versions, the sound control panel option might be on the right corner of the interface.
The sound control panel window will appear with several tabs at the top

- Step 4: So, click on the “Recording” tab

If you have multiple microphones connected to your system, you will see their names alongside levels in this window, so:
- Step 5: Click on the microphone of your choice (the one you want to use as the default on your Windows system) and check if its levels bounce up and down when you speak.

- Step 6: Then, right-click on the microphone’s name and choose “Properties” from the menu

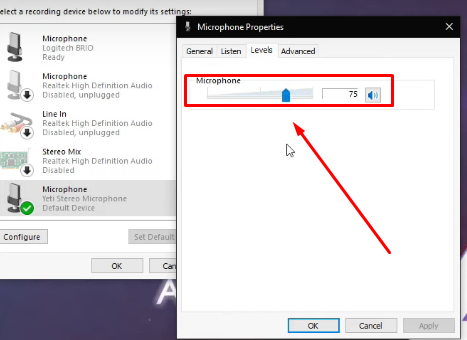
- Step 7: Once the properties window pops up, you will notice several tabs at the top of the window. From there, click on the “Levels” option to view relative settings

In the levels tab, you will notice a slider to set levels for the mic. While it depends on your preference, usually most OBS users keep these levels to 75. Therefore:
- Step 8: Click and hold the slider and drag it to the left or right to set the microphone levels as per your requirement
- Step 9: Next, click on the “Advanced” tab
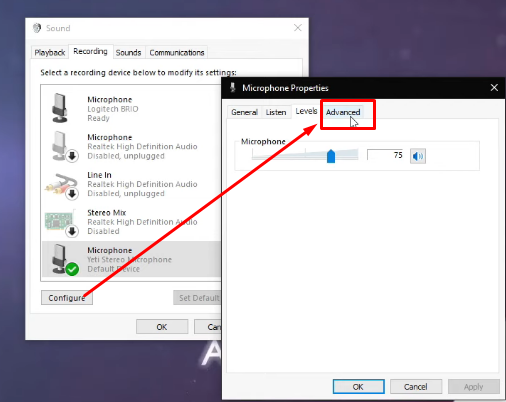
- Step 10: Click on the dropdown menu to choose the audio format

We recommend choosing “2 channel, 16 bit, 48000 Hz (DVD Quality)” format since it supports high-quality audio on OBS.
Method Used: Audio Input Source
- Step 11: Open OBS on your PC and click on the “+” (Plus) icon under the “Sources” section at the bottom of the interface

- Step 12: Doing so will show a list of options. So, select “Audio Input Capture”

- Step 13: Once done, a “Creat/Select Source” dialog box will appear on your screen. So, type the name of your microphone under the “Create new” text field and click the “OK” button

- Step 14: Next, you will need to choose the default device (which is your microphone). To do that, click on the dropdown menu next to “Device.” Choose the default microphone (the one you made during the configuration setup), and click “OK.”


- Step 15: Now, under the “Audio Mixer” section on OBS, you will notice that your chosen microphone will appear with an audio bar, showing you levels as you speak

If you can see that, it means you have successfully added your microphone to OBS using the Audio Input Source option.
Part 2: How to Add a Microphone to OBS on a Mac?
This part is dedicated to adding your mic to OBS if you run it on a Mac. Again, you will need to first ensure that your system has detected the mic, and then continue adding it to OBS through the Global Audio Devices method.
Configuration
After connecting an external microphone to your Mac:
- Step 1: Look for the “System Settings” icon on the dock and click on it

You can also enter the system settings from the Apple menu by clicking the “Apple” logo in the top-left corner of the screen.
- Step 2: Once the “Settings” page appears on your screen, you will notice that you are inside the “General” tab

However, you will need to enter the “Sound” settings to configure the mic. To do that:
- Step 3: Look for the “Sound” option in the left sidebar of the screen, and click on it

- Step 4: Then, navigate to the right side of the screen (the bigger area), and click on the “Input” tab, since you need to select the external mic as your default audio input device

You will notice that currently the “Built-in” mic of your Mac (MacBook, etc) will be selected (see the yellow box in the screenshot). This means that your voice will be captured through this microphone only on apps.

Therefore:
- Step 5: Find the name of the external mic you have connected to your Mac in the “Input” section. Click on it to select the mic, and speak to verify the input levels. If the levels increase and decrease as you speak, it ensures that your default mic is now changed from the built-in microphone to the external mic

Method Used: Global Audio Devices
Now, it’s time to add the mic to OBS by choosing it from the Global Audio Devices settings.
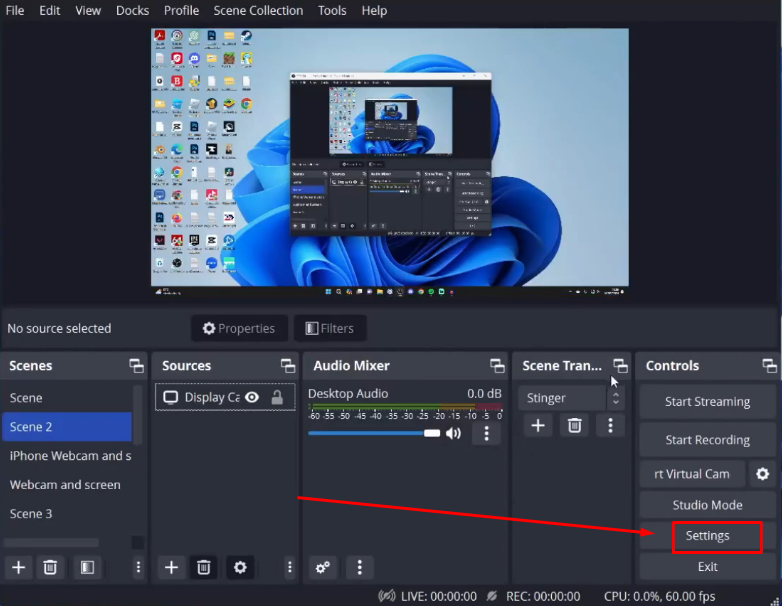
- Step 6: Open the OBS app and click on the “Settings” option on the bottom right of the interface
- Step 7: On the left sidebar menu, you will find various options, so look for the “Audio” icon and click on it
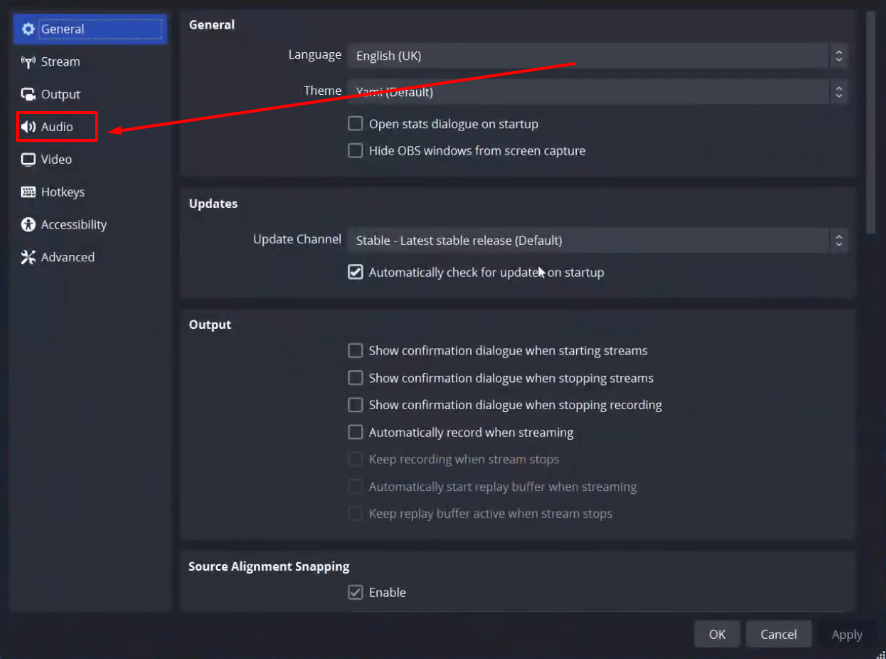
Once you do that, sound and audio-related options will appear on the right side of the screen.
- Step 8: Go to the “Global Audio Devices” section and click on the dropdown menu next to the “Mic/Auxiliary Audio” option
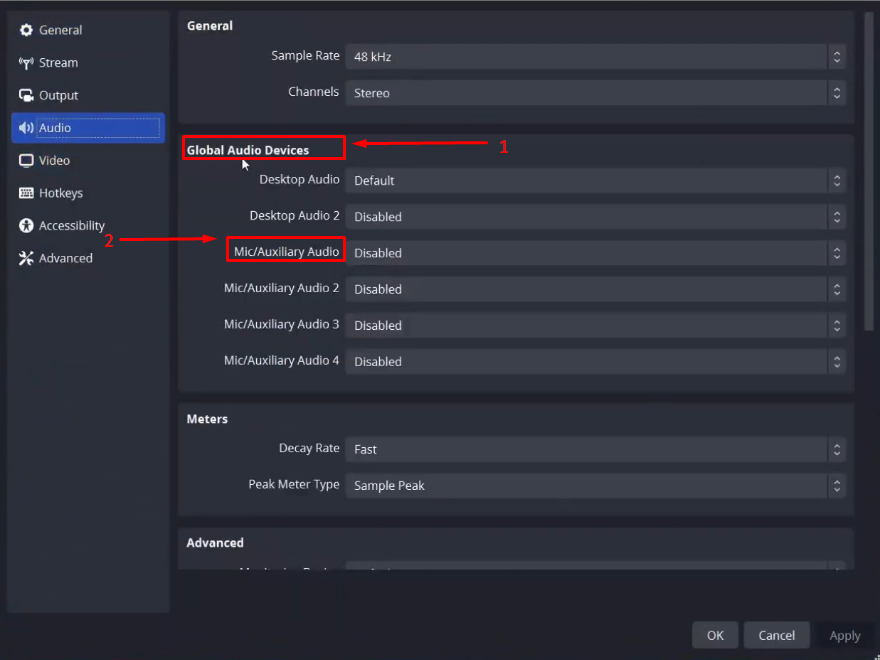

- Step 9: Select the microphone from the list and click on the “Apply” and “OK” buttons


- Step 10: Now, to ensure you have successfully added the mic, go to the “Audio Mixer” section and check if the “Mic/Aux” levels are bouncing back and forth as you speak into the selected mic

And that’s it!
Pro Tip: Want to make your OBS sound extraordinarily clean without using heavyweight and expensive microphone setups? Consider external wireless microphone kits, such as the Hollyland Lark M2S.

Hollyland LARK M2S - Wireless Hidden Microphone
An ultra-discreet wireless microphone featuring a clip-on transmitter for an “invisible” fit.
Key Features: No-Logo Fit | Ti+ Design | 48 kHz/24-bit
Lark M2S isn’t just a mic, but it’s a gateway to modern features and design that anyone can imagine in a tiny microphone. Imagine a 7-gram, logo-free wireless microphone attached to your clothing through a high-quality titanium clip-on mechanism. Well! That’s what Lark M2S is. But wait, there’s more!
Lark M2S offers marvelous features, including up to 9 hours of battery life by just charging it once. An Environmental Noise Cancellation (ENC) to make you sound clear even if you’re streaming or recording in noisy places. And, of course, complete freedom of movement with a wireless range of up to 1000ft.
Conclusion
At first, adding a microphone to OBS may feel overwhelming. But once the basic steps are clear, the process gets easier. It all begins with proper system settings to support clean audio. This step helps OBS detect and handle the mic more smoothly. From there, users can choose between two solid setup options.
Audio Input Source is direct and easy to manage. Global Audio Devices gives more control over audio input. Both methods are effective when used correctly. With the help of clear steps and images, the setup becomes simple. Anyone can follow along and get great results. Knowing how to add a microphone to OBS ensures stronger audio and better content.
Frequently Asked Questions about Adding a Microphone to OBS
Q1. How do I push my microphone to speak on OBS?
Start by going to Settings and selecting Audio. Next, scroll down to your microphone source and check the box that says Enable Push to Talk. Next, go to Settings again and click on Hotkeys. Find your mic source and choose a key to activate Push to Talk. When you hold down this key, your voice will be heard. Without pressing the key, your mic remains inactive, even though sound activity shows. No need for Push to Mute with Push to Talk.
Q2. What is the reason my OBS is not picking up the microphone?
If OBS isn’t detecting your mic, first check your settings. Go to Settings and then Audio. Ensure your mic is selected as the Mic/Auxiliary Audio device. If it’s already selected, try disabling it and re-enabling it. Next, check the audio tracks in Settings under Output. Make sure at least one track is selected for your mic. In the Audio Mixer dock, open Advanced Audio Properties and confirm your mic is enabled on the correct track. If nothing works, reinstalling OBS or Windows might help.
Q3. My OBS detects my microphone, but I am unable to hear the audio. Why?
If OBS detects audio but you can’t hear it, the issue may lie in your audio output settings. Check the audio output on your PC to ensure it’s set to the correct device. For example, the speakers you have connected. Sometimes, it might be set to a different device, like a monitor. Additionally, if using multi-track recording in OBS, VLC may not play all tracks by default. Manually switching the track in VLC may resolve the issue. Make sure you choose the correct track to hear the audio.
Q4. Why is desktop audio disabled in OBS on Mac?
According to OBS users, there are restrictions from Apple that stop OBS from capturing desktop audio. To solve this, you’ll need a third-party program like BlackHole or iShowU. These tools allow OBS to capture desktop audio on macOS. Online guides can help you set up these programs with OBS. Once set up, OBS will be able to record desktop audio as expected. Both programs are commonly recommended for improving audio capture on Mac computers, making your streaming experience more complete.