


.png)
Unlocking the full potential of Adobe After Effects requires more than just creativity and technical skills. Efficiently managing your projects is crucial for seamless workflow and optimum performance. One essential aspect of project management in After Effects is learning how to clear the render queue.
In this comprehensive guide, we will delve into the intricacies of clearing the render queue, empowering you with the knowledge to keep your projects organized and your creative flow uninterrupted. Get ready to take your After Effects expertise to the next level as we unveil the secrets of mastering the render queue clearance process.
What is Render Queue?
The render queue in Adobe After Effects is a panel that allows you to manage and prioritize the rendering of your compositions. When you work on complex projects in After Effects, you often need to render your compositions into a final video format for playback or distribution.
The render queue acts as a staging area where you can add multiple compositions and specify their output settings, such as the file format, resolution, and compression settings. Once the compositions are added to the render queue, they are processed and rendered one by one based on the order you set.
Each composition in the render queue is referred to as a “render item.” You can customize settings for individual render items, such as applying different output modules or adjusting render settings specific to each composition. This flexibility allows you to tailor the rendering process to the unique requirements of each composition in your project.
How to Clear/Delete Render Queue in After Effects
To clear the render queue in Adobe After Effects, you can follow these steps:
- Launch Adobe After Effects and open your project.
- Go to the top menu and select “Window” -> “Render Queue” to open the Render Queue panel.
- In the Render Queue panel, you will see a list of render items that are ready to be rendered.
- To clear the render queue, you can select all the items in the queue by pressing “Ctrl+A” (Windows) or “Cmd+A” (Mac) on your keyboard. This will select all the items in the queue.
- Once the items are selected, you can right-click anywhere within the Render Queue panel and choose “Remove” from the context menu. This will delete the selected render items from the queue.
How to Clear Render Cache in After Effects?
To clear the render cache in Adobe After Effects, you can follow these steps:
- Launch Adobe After Effects and open your project.
- In the top menu, go to “Edit” and select “Purge” from the dropdown menu.
- A submenu will appear with several options. To clear the render cache specifically, choose one of the following options:
- To clear both the disk cache and the RAM cache, select “All Memory & Disk Cache.”
- To clear only the disk cache, select “All Disk Cache.”
- To clear only the RAM cache, select “All Memory.”
- After selecting the appropriate option, After Effects will start clearing the render cache. This process may take some time, depending on the size of your cache and the speed of your system.
- Once the cache is cleared, you will receive a confirmation message.
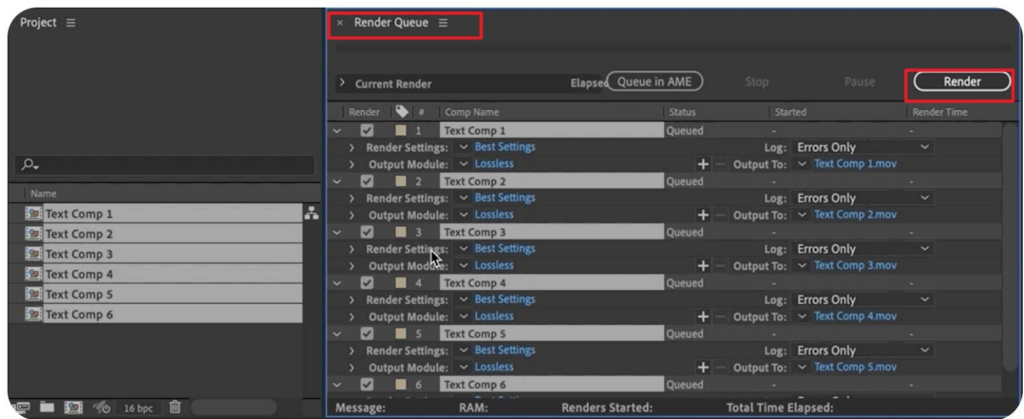
How to Add Render Queue?
Adding compositions to the render queue in Adobe After Effects is a crucial step in preparing them for rendering. Here’s how you can do it:
- Launch Adobe After Effects and open your project.
- Make sure the composition you want to add to the render queue is selected in the Project panel.
- In the top menu, go to “Composition” and select “Add to Render Queue” or simply use the keyboard shortcut “Ctrl+M” (Windows) or “Cmd+M” (Mac).
- The selected composition will now appear in the Render Queue panel, along with its associated settings.
- If needed, you can modify the output settings of the composition by clicking on the “Output Module” link in the Render Queue panel. This allows you to specify the desired format, codec, resolution, and other settings for the rendered output.
- Once you have set the desired output settings, you can adjust additional parameters like the output file name, destination folder, and any other specific rendering requirements.
- Finally, click on the “Render” button in the Render Queue panel to start the rendering process. After Effects will begin rendering the composition based on the settings you have configured.
By following these steps, you can easily add compositions to the render queue in After Effects, ensuring they are properly set up for rendering and export.
Render Export in After Effects Easily
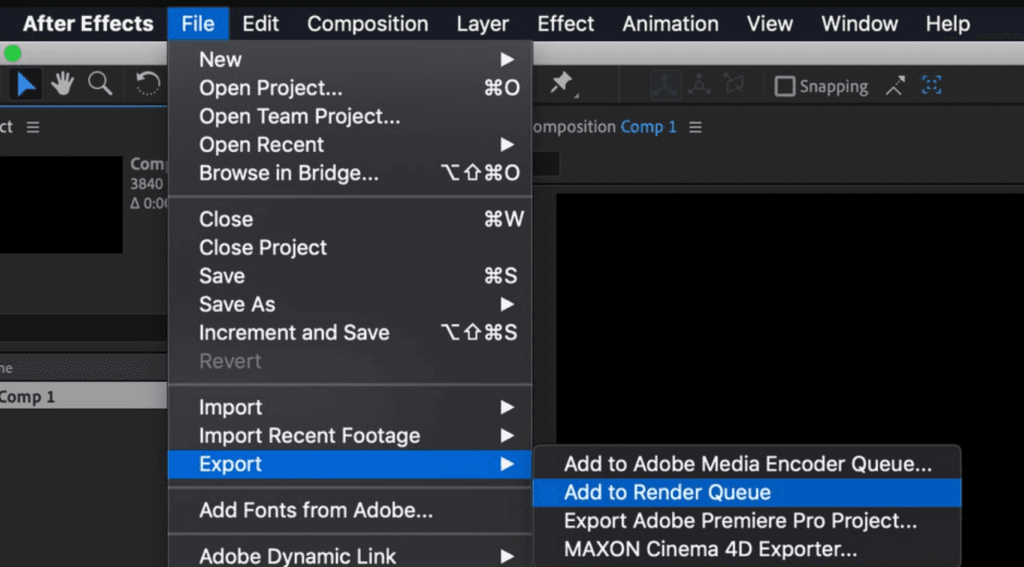
- Composition > Add to Render Queue: Click “Composition” in the top menu and select “Add to Render Queue” to open the Render Queue window.
- Drag and Drop from Project Window: Simply drag and drop compositions from the Project panel directly into the open Render Queue window.
- Keyboard Shortcut (Cmd+Ctrl+M): Use the keyboard shortcut Cmd+Ctrl+M to quickly add selected compositions to the Render Queue.
- Adjust Render Settings: Modify the render settings such as quality and resolution by clicking on the Render Settings option below your composition in the Render Queue.
- Choose Output Format: Under Output Module, select the desired file format (e.g., Quicktime, AIFF) for your rendered file.
- Specify Output Location: Click on the Output To option to choose the location where you want to save your downloaded file.
When working on After Effects projects, accurately previewing your edits can save precious render time. Consider using a high-quality camera monitor to see your visuals clearly and streamline your workflow.


