.png)
So you got a cup of coffee ready to edit your next video project. You had already planned to add great FX to your clips, but unfortunately, you couldn’t find the main tab. Relax! It happens to most AE users all the time. And gladly, there are fixes for After Effects Effect Controls not showing.
This article will help you show some easy hacks to get back your effect control panel. In fact, this is more than just a fix guide with tips to add and organize effects in your Adobe Effects. And by the end of your read, you will be able to overcome this problem without any hesitation easily.
What is the Purpose of After Effects?
After Effects is a powerful and popular software known for its impeccable motion graphics effects. It is used by animators and designers to create 2D, as well as 3D animations with the help of rasterized and vector art.
The software also lets you import different sorts of media files, including photographs and third-party-generated effects, so you can add them to your projects. Although some people find it similar to Adobe Premiere, in reality, it has a different purpose. However, if you have prior experience using Premiere, that’s a plus point.
Moreover, After Effects has different new and old versions, but the fix for effect controls disappearing is almost the same.
Understanding the Effect Controls in Adobe After Effects
Some users, especially new learners, think the Effect Controls panel is a part of the After Effects’ default workspace. But it is not. The panel should automatically reveal every time you add a new effect to your project’s layer in the composition. And since the penal is a viewer, you can also have different Effect Controls panels for multiple layers.
These multiple panels can be opened together, allowing you to use the main viewer menu in the standard tab of the panel in order to select layers. Typically, you can close or open the Effect Controls panel for any selected layer by pressing F3 on your keyboard.
But what if the Effect Controls menu is not showing? Let’s check the fixes in the next section.
Fix 1: How to Bring the Effect Control Panel when It is Not Showing
In this example, you will learn how to make the Effect Controls panel visible in After Effects when it is disappeared from the interface. This usually happens when you install the software and open it for the first time. Or, you accidentally hide the panel. In any case, you can follow these steps to fix this problem.
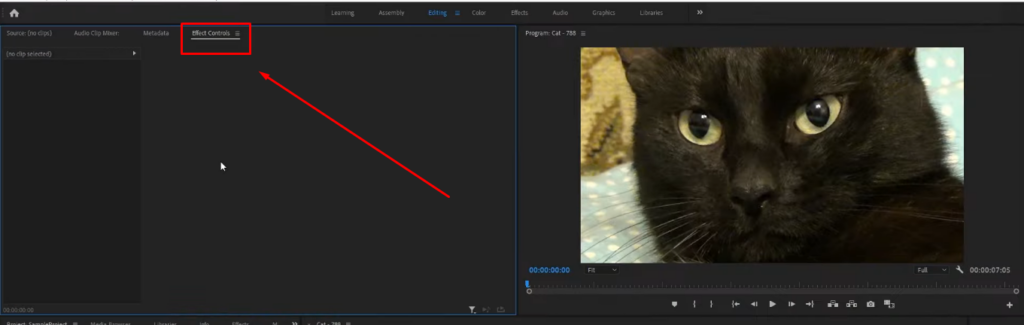
- Step 1: Open your After Effects on your Windows or Mac computer. Wait for the software to load all the options. It may take a few seconds, depending on the speed of your system.
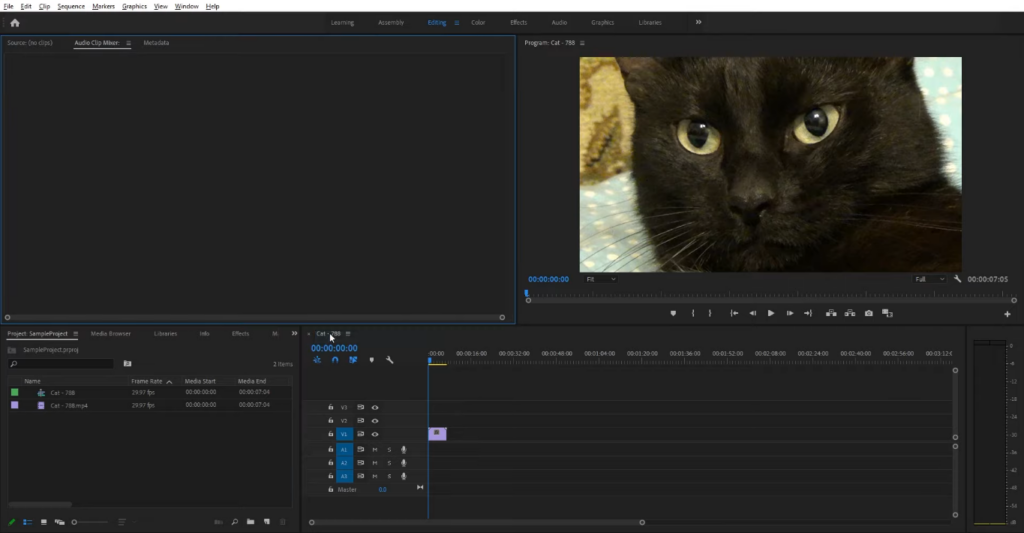
In the above screenshot, you can see that there is no Effect Controls tab, and the viewer is blank/empty (the screen next to the cat image).
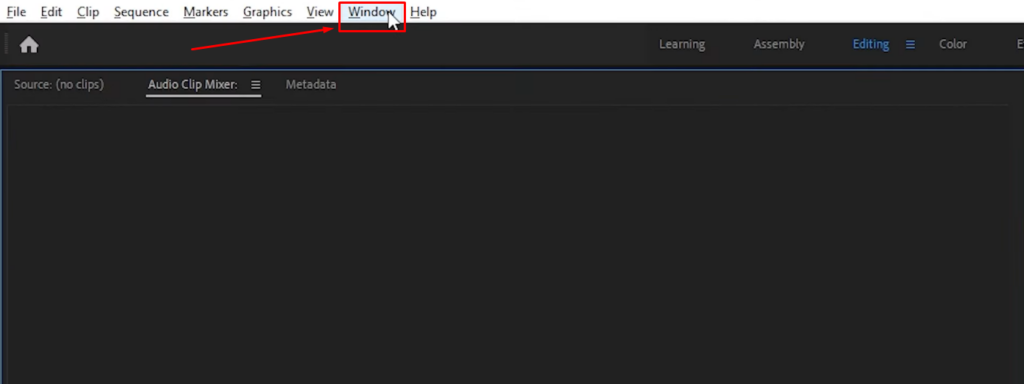
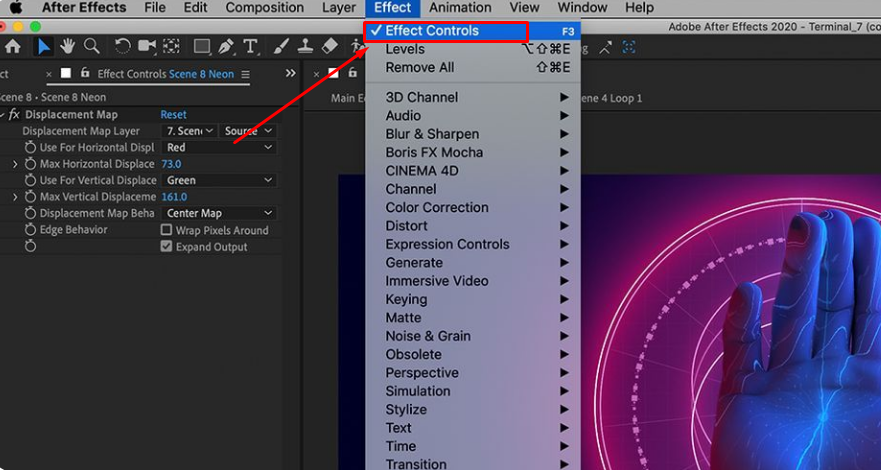
- Step 2: Take your mouse cursor to the ‘Window’ tab at the top and click it. This will open a menu list with different options.
- Step 3: Go down to the ‘Effect Controls’ and click this option.
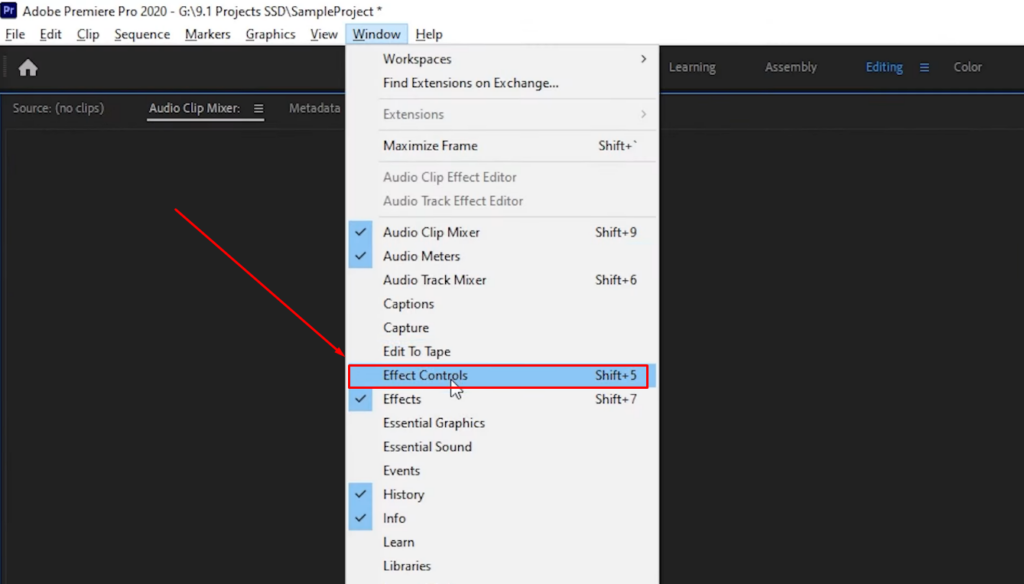
- Step 4: As soon as you click it, you will notice that the ‘Effect Controls’ tab will appear on the left side of the preview screen.
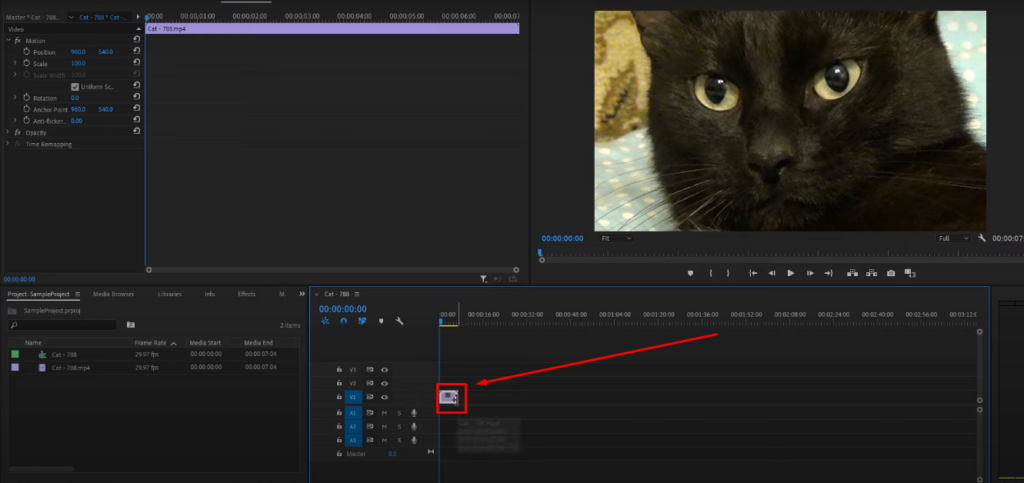
- Step 5: Now, go to the timeline where you have the video clip, and click on it to see the effects on the extreme left of the screen.
- Step 6: If the above steps are still not showing the Effect Controls panel, go to the ‘Window’ tab, and hover your mouse on the ‘Workspaces’ menu. From there, select the ‘Reset to Saved Layout’ option.
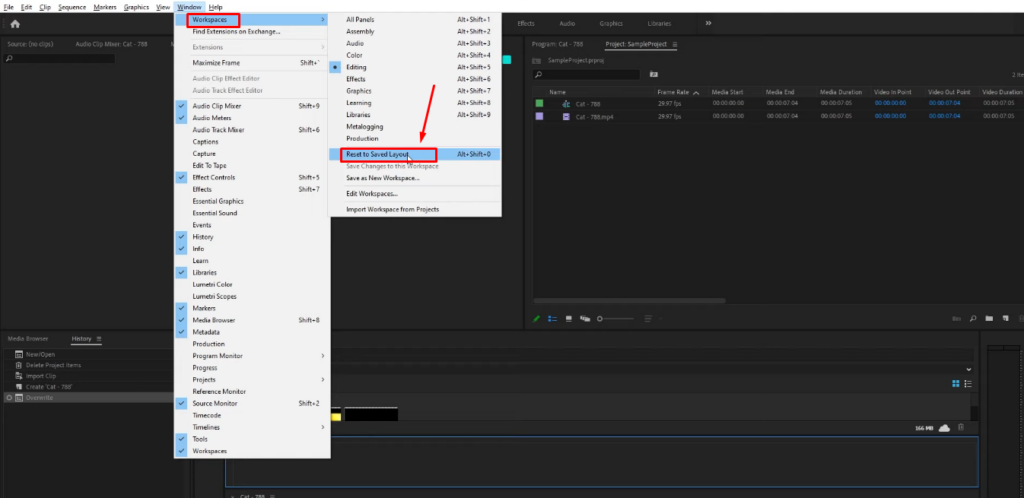
This will reset the entire layout and bring the Effect Controls to the screen.
Fix 2: Effect Controls Not Showing on Project Panel After Applying the Effect
Here’s another fix for After Effects Effect Controls not showing on your project panel. This can happen after applying the effect on your adjustment layer. For instance, you made one adjustment later and applied the distort effect. But when trying to tweak the results, there are no controls available.

Normally, the controls appear above the project panel right after apply the chosen effect. But, unfortunately, you couldn’t find it. Well, this isn’t something to really worry about because in most cases, the users accidentally close the Effect Controls panel.
So here’s a quick solution.
- Step 1: On your main screen, go to the ‘Window’ tab and make sure the ‘Effect Controls’ option is checked.
This should make the Effect Controls on your project panel. But if it’s still not showing and the ‘Effect Controls’ is also check marked, you can always try the ‘Workspace’ option (See Step 6 of Fix 1).
Fix 3: The Effects in Effect Controls are Greyed Out
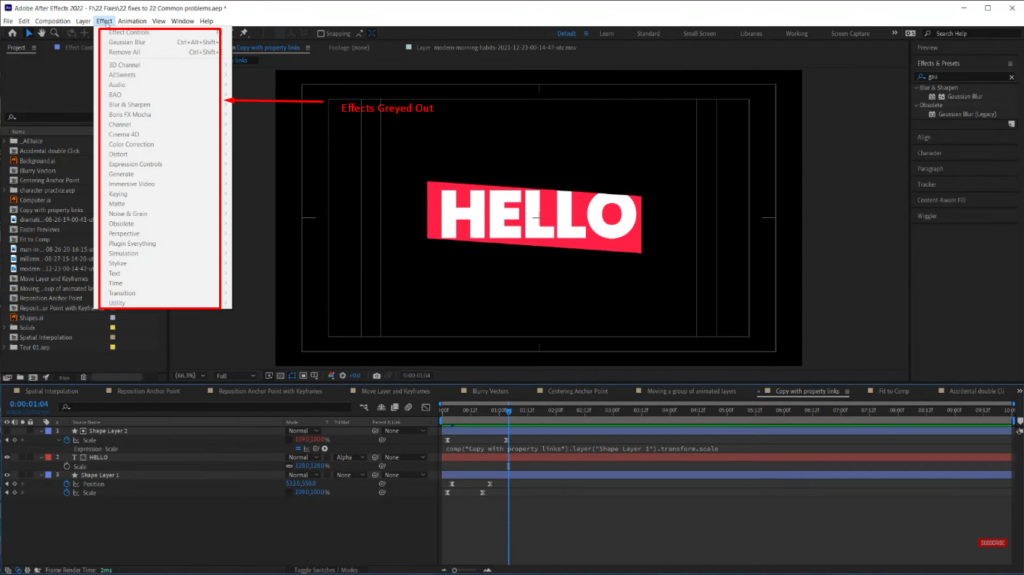
Of course, it is frustrating to see that after all the hard work and adjustments of your project, when you finally go to apply effects, you just can’t do it. Why? Because all the effects are greyed out. That means you are unable to click them.
If this is your case, you will see the Effect tab. However, upon clicking and viewing the list of effects, they will all be faded in grey.
So here’s how you can fix this problem.
- Step 1: Assuming you have already opened the project, recheck whether or not the effects are greyed out by clicking the ‘Effect’ tab. If it looks like the screenshot below, follow the next step.
Important: In order to make the effects visible, you must confirm After Effects that there is a layer selected on which you want to apply the effect. Otherwise, you will face the greyed out issue.
- Step 2: Go to the layer panel on the left-bottom of the screen, right next to the timeline. And select any layer by clicking on it once.
- Step 3: Click the ‘Effect’ tab to confirm the problem is fixed. For example, in this screenshot, you can see that the effects are not greyed out anymore.
Fix 4: Effect Controls Panel Has No Buttons to Change Opacity, Position, Etc.
Here is another common issue After Effects users face regarding the Effect Controls panel. So, assuming that you are working on a project. You imported some images to add to your animation after applying some nice effects.
But guess what? You are unable to do it because suddenly, there is no content in the effect panel. You can’t find buttons to adjust the position, size, and opacity of your images.
And even after uninstalling and reinstalling the software to reset your preferences, you still face the same issue. Well, here’s an instant solution.
- Step 1: First, go to the image layer, and you will find an arrow pointing downward. Toggle it, and you will see the option. If there it’s empty or greyed out, follow the next step.
- Step 2: Check whether or not you have applied effects to the file. For instance, have a look at this screen.
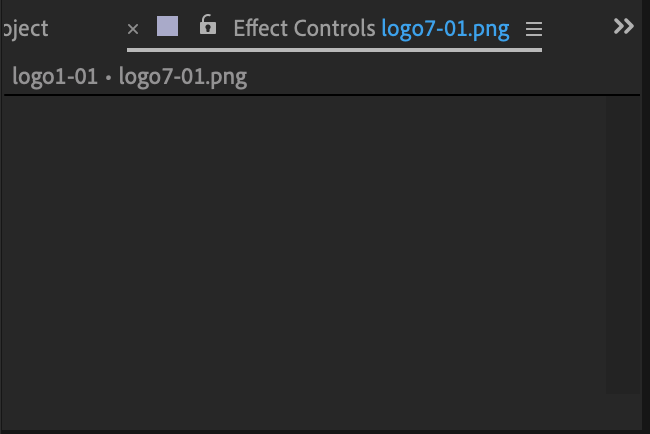
As you can see, the Effect Controls panel is empty for the file ‘logo 7.’ This could be possible because of the previous effects, such as curves or blur from the Effect menu. So, click on the layer and go to the ‘Effects’ tab to see if you have applied any effects earlier. If yes, then undo them or use the ‘Workspace’ option to reset your preferences. This should fix the issue.
Important: Keep in mind that, unlike Adobe Premiere (all versions), After Effects doesn’t include options like scale and position as effects. So don’t look for them under the ‘Effect Controls’ since they are available in the ‘Layer’ tab.
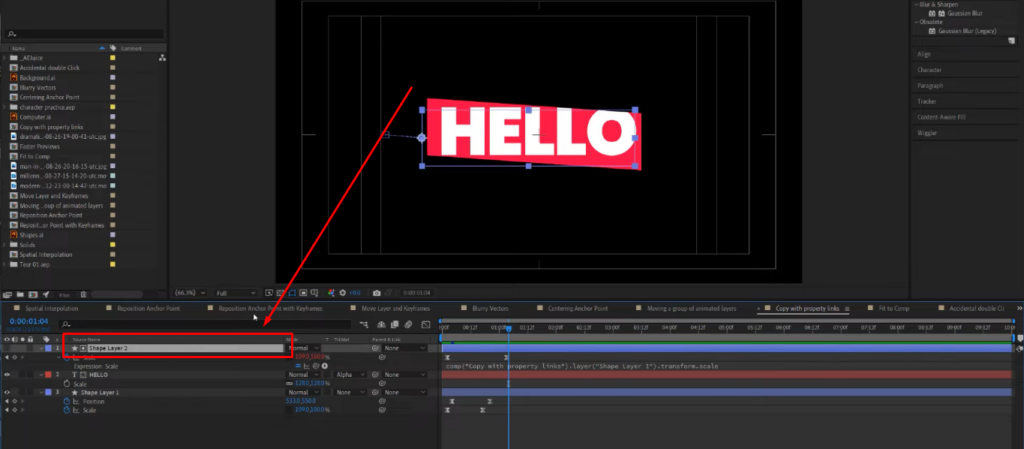
Fix 5: Red Values in After Effects Effect Controls Panel
Red values are a great problem for thousands of Adobe After Effects users. They occur when you try to edit numbers in your effects controller section. Moreover, they are linked to Expressions. Or in other words, the red numbers you see basically indicate each value is set by expressions.
So, if you see red values like this, here’s an easy fix below.
These red numbers or values are controlled by expressions. Therefore, you need to edit them. To do that, select the layers with red values in the timeline, and press the E-key twice on your keyboard. This will let you see the Expressions.
If editing Expressions will be a hard job as per your experience with After Effects, skip the above solution and continue with the steps below.
- Step 1: Make sure your project is open on After Effects with visible red values.
- Step 2: Select properties and choose ‘Animation.’
- Step 3: Then, select the ‘Keyframe Assistants’ option and choose ‘Convert Expression to Keyframes.’
If you follow the above steps correctly, your problem will be solved.
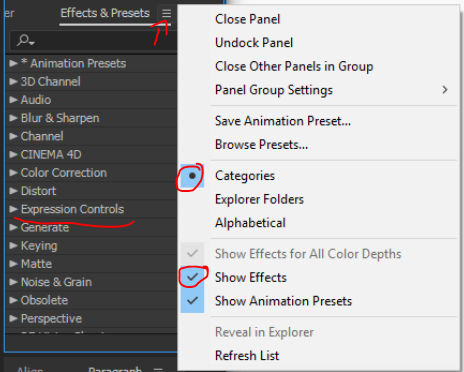
Fix 6: Slider Control Effect/Preset Missing
Here’s another problem most users find difficult to solve. In this case, you are unable to find the slider control preset missing from the effects window. Besides, sometimes, the entire Expression Control’s preset folder also disappears.
Some users would say that you should download the missing preset, which could be an option, but there’s no surety of its functionality. So before you try that, it is suggested to follow this short tutorial because it works most of the time.
- Step 1: Open your project in After Effects.
- Step 2: Click on the Effects & Presets panel menu (three vertical lines).
- Step 3: Put a checkmark on the ‘Categories’ and ‘Show Effects’ options.
Once done, you will be able to see the Slider Control Effect under your Expression Controls menu.
Fix 7: Unable to See All the Effects in One Window
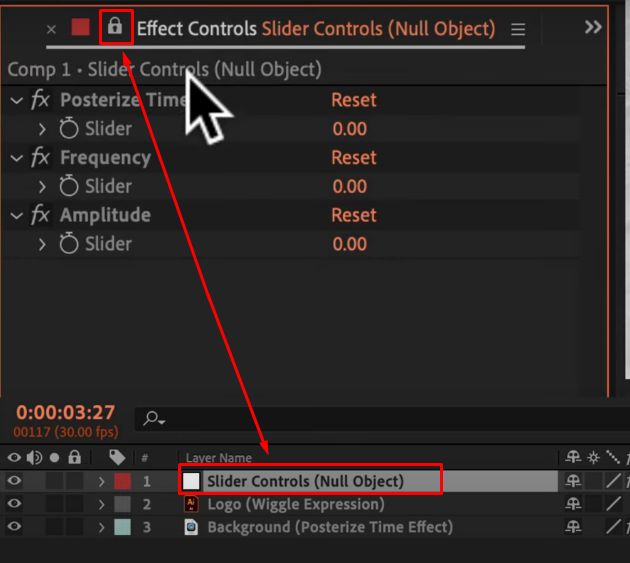
In this fix, you will learn how to lock the Effect Controls panel to help you view different applied properties and effects in one window. Even when you are working on a specific layer.
For example, you are working on three different layers.
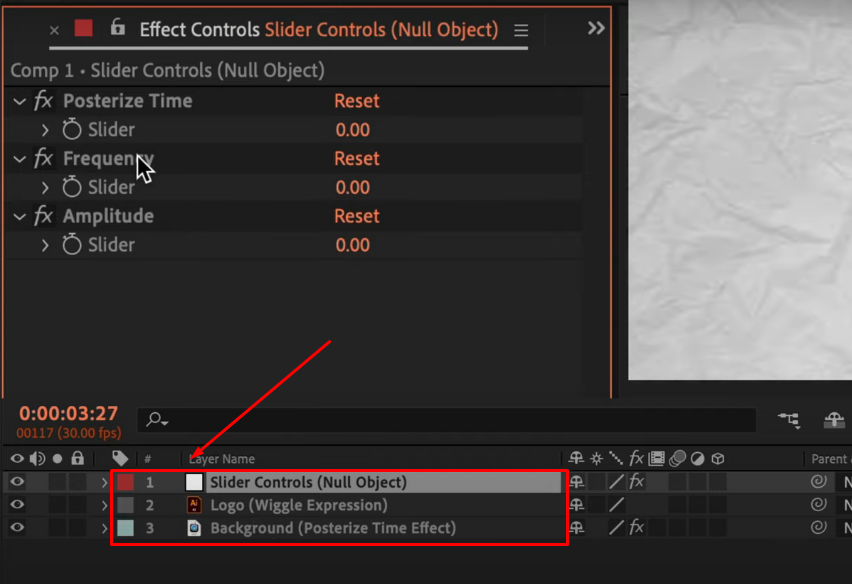
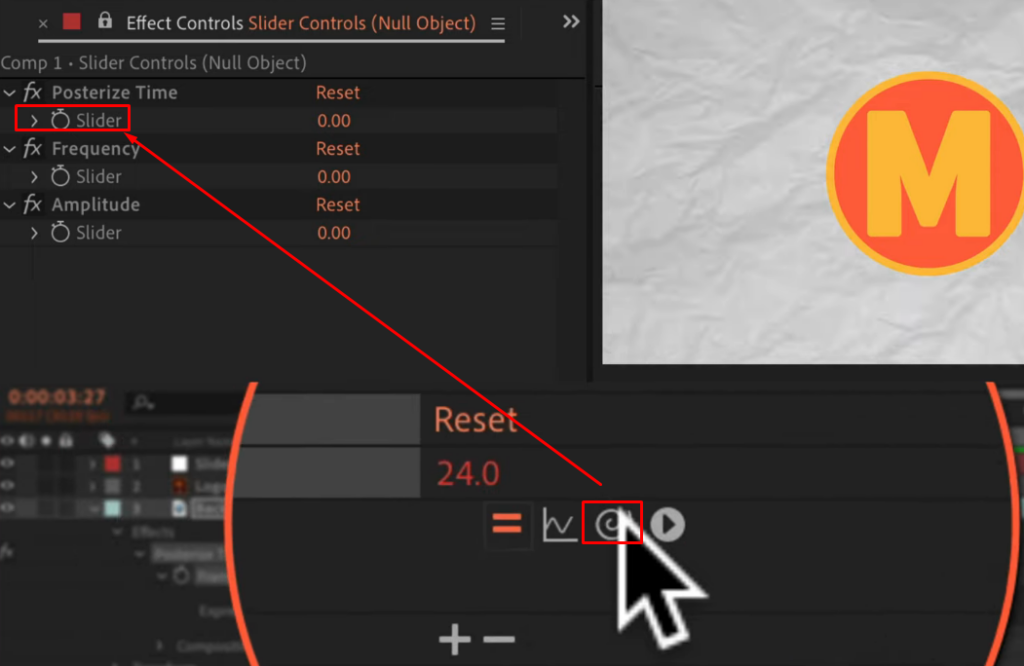
So, if you click the ‘Slider Controls’ layer, you will only see the ‘Posterize Time,’ ‘Frequency,’ and ‘Amplitude’ effects.
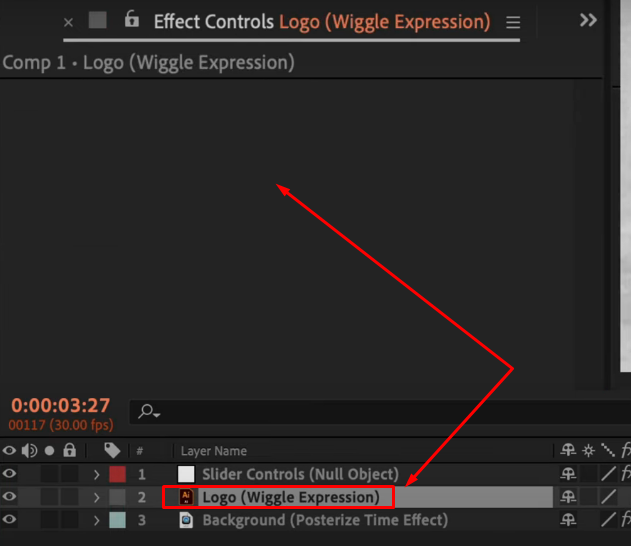
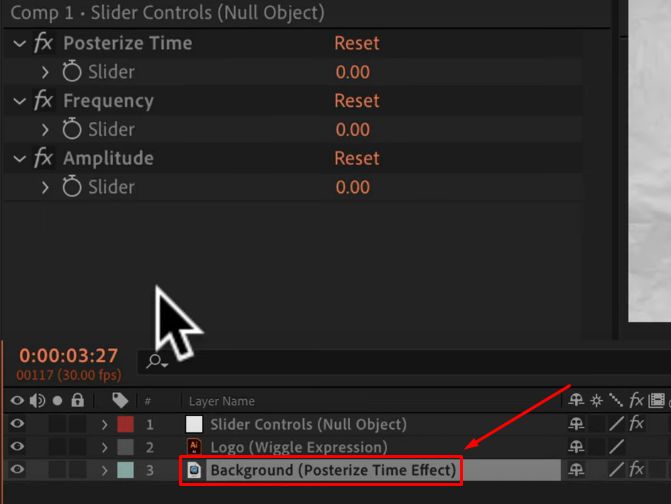
But as soon as you click the ‘Logo’ layer, you won’t be able to view the effects applied to the ‘Slider Controls.’
Likewise, selecting the ‘Background’ layer only shows the ‘Posterize Time.’ Whereas the previous effects disappear.

So if you want the effects for any layer to remain visible even when you select another layer, here’s what you need to do.
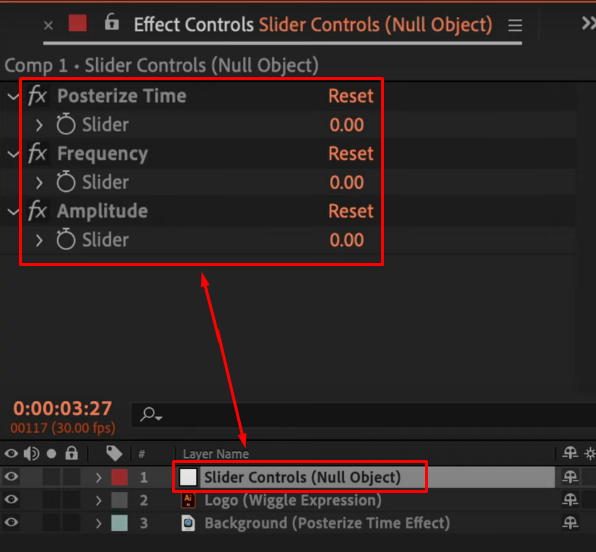
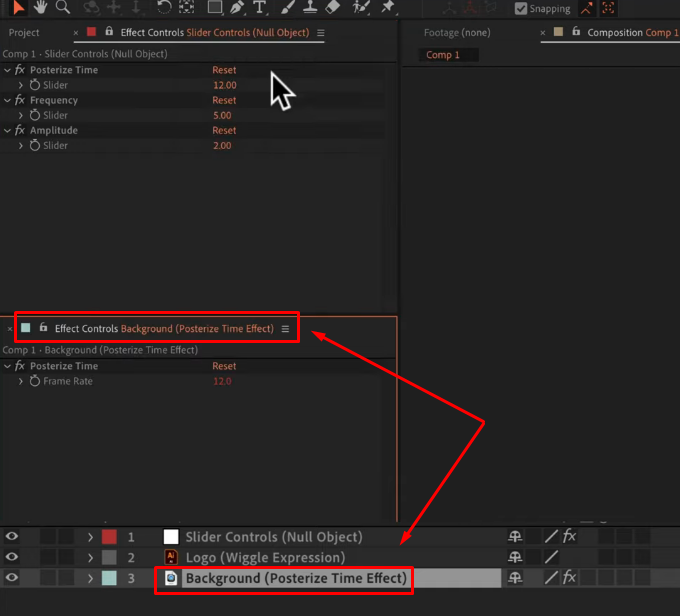
- Step 1: Select the first layer (ideally, the Slider Controls layer) and click on the unlocked paddle lock icon to make it lock.
Now, click on any other layer, and all the ‘Slider Controls’ effects will still be visible. But, you need to enter the effect values for each layer to the main Slider Controls layer. Otherwise, you won’t be able to proceed with the animation project. To do that, continue with the following steps.
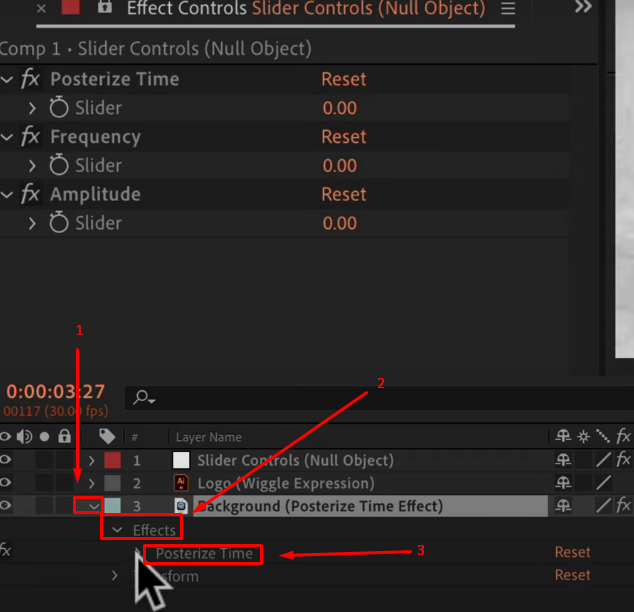
- Step 2: To add the effects properties in the visible layer, click on the layer, such as ‘Background’ with a Posterize Time Effect.
- Step 3: Click the little arrow button (1) on the left side of the ‘Background’ layer. Choose ‘Effects’ (2), and click ‘Posterize Time’ (3).
- Step 4: Click the ‘stopwatch’ icon next to the ‘Frame Rate’ while holding Ctrl/Command + Windows Key (for Windows users).
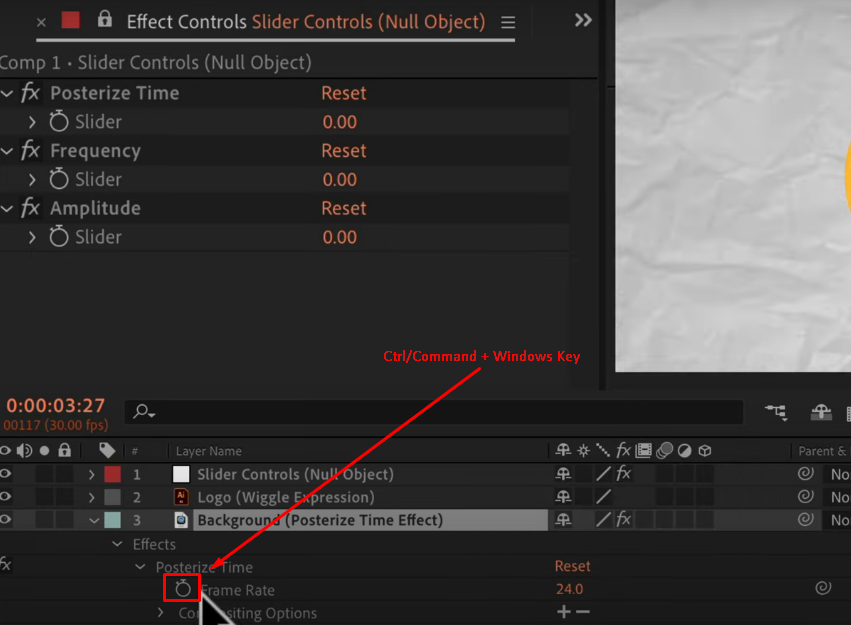
- Step 5: Drag the ‘Expression Pick Whip’ icon and drop it on the ‘Posterize Time > Slider.’
Doing so will reset the values and stop the animation. So feel free to add the value of your choice. And continue the same process with all the other layers.
- Step 6: To see the effects in a separate viewer but in the same window. Select the layer and click on the menu.

- Step 7: Choose the ‘New Effect Controls Viewer’ option.
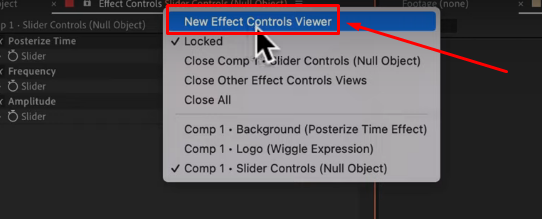
A separate window will appear for the selected layer with all the effects applied to it.
How to Add and Manage Effects on Effects Control Panel using After Effects
Want to enjoy the maximum benefits of the Effects Control Panel in your After Effects? This part of the article will surely help you find and manage the hidden gems. You should keep in mind that the Effects menu acts as an umbrella to keep all types of effects categories together. However, there is more to look at that you might have ignored or didn’t know earlier.
So here are a few important points you might have missed and now causing trouble completing your project.
Can’t Find My Effect Controls Panel?
Those who rely on After Effects will indeed be worried about not finding the Effect Controls panel. So if one day, you open your AE and can’t find the panel. With hope and patience, you create a new project or simply reset the workspace preferences. But, unfortunately, still, there’s no sign of the panel anywhere. Relax! It happens.
- Step 1: Select one of the layers from the timeline.
- Step 2: Go to the ‘Effect’ tab.
- Step 3: Checkmark ‘Effect Controls.’
Contrarily, press the F3 button, as discussed earlier in the article.
Remove All Effects from Your Layer in After Effects
Alright! This one is a great tip for managing your Effect Control panel. While undoing a single effect applied to the layer is easy, removing tens and hundreds of them can be a big challenge.
So if you need to remove all the layer’s effects at once, here’s what you must do.
- Step 1: Go to the ‘Effect’ tab.
- Step 2: Click on the ‘Remove All’ option.
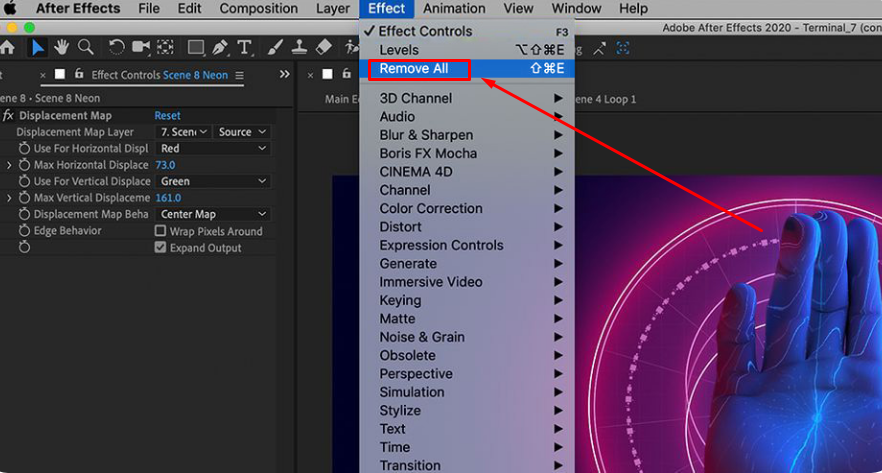
And that’s it. All the effects will be gone from that specific layer. You can also use this same method for multiple layers.
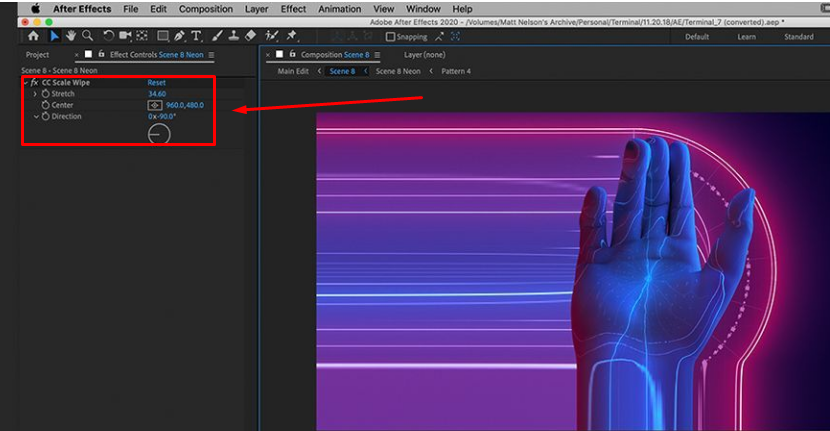
Re-Applying the Recently-Used Effect to Your Project in After Effects
There are times when you need to apply the same effect several times to your project. Now, going all the way back to unearth previous comps or a huge list of effect menus can be time-consuming. So instead of crawling backward, try these steps.
- Step 1: Select single or multiple layers from the timeline.
- Step 2: Go to the ‘Effect’ tab and look below the ‘Effect Controls’ option. The name that will appear after the effect controls option in the menu will be the last effect you have applied. Click it to apply on all the selected layers immediately.
For example, the screenshot below shows that the last effect used is the ‘CC Scale Wipe.’
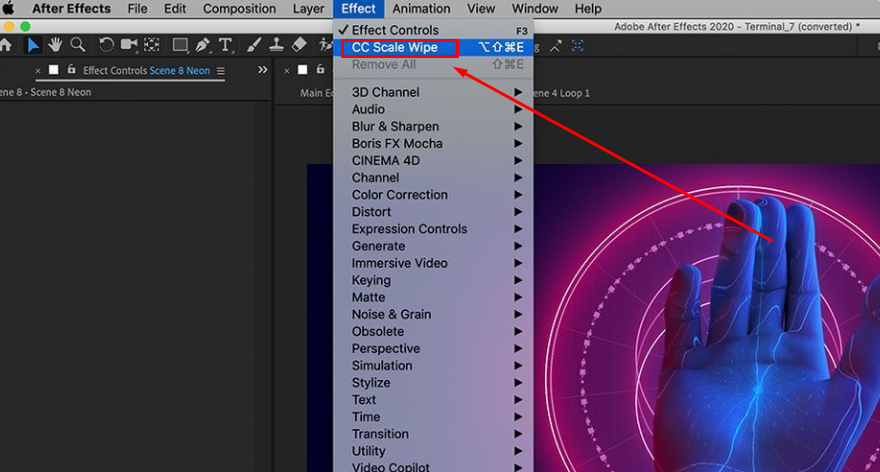
If you like to take things through your keyboard, here’s a shortcut for MacOS and Windows users.
- On Windows: Option + Shift + Control + E
- On Mac: Option + Shift + Command + E
Pressing the above keys in the same manner will help you quickly add your previous effects to the layers.
Add and Make Use of the Extraordinary Effects to Your Layer in After Effects
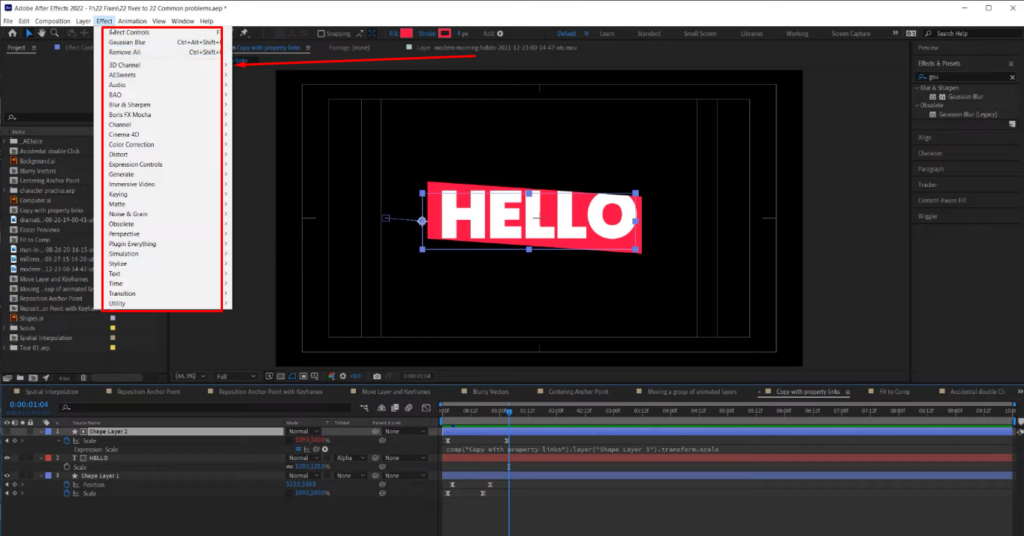
The ‘Effects’ menu is full of mesmerizing effects, but you already know that information. So what’s new you will learn here? Well, the fact that you can apply audio, color correction, and transition effects, which most users don’t feel like using in After Effects.
Editing Customized Parameters of Audio in After Effects
It is true that After Effects is not a perfect platform for tweaking your audio files. However, the tool has some exceptional qualities for editing custom audio parameters. This saves you time that you might waste on opening another software. Here’s how you do it.
- Step 1: Open your project and select your audio layer.
- Step 2: Click the ‘Effect’ tab, move your cursor on the ‘Audio’ option, and choose ‘Modulator.’
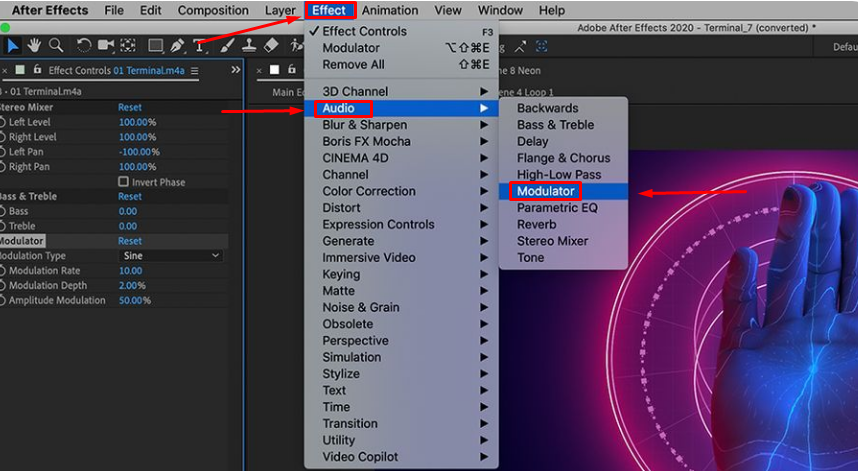
Applying this effect will add tremolo and vibrato to your audio by varying the amplitude and frequency.
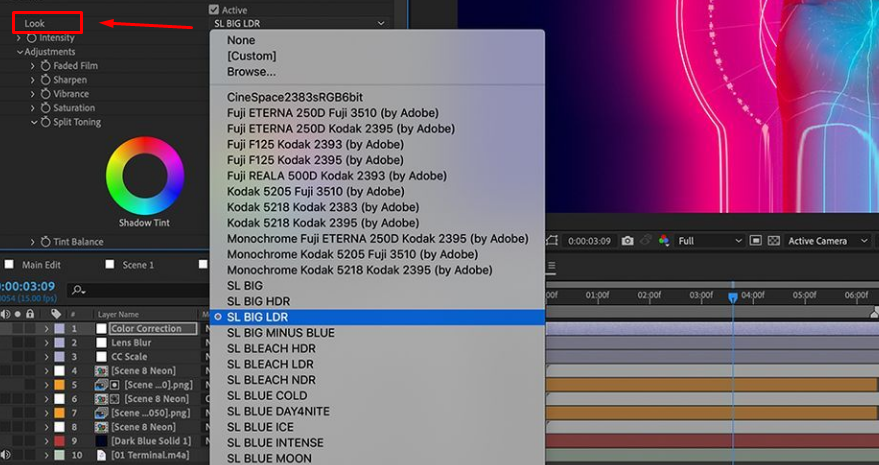
Color Correction through Lumitre Color in After Effects
Did you know you can have a dedicated control panel for color correction? Thanks to the Lumetri Color tool, that allows you to master and fine-tune colors in your project. Once activated, you can enjoy effects like Vibrance, Levels, Saturation, Exposure, and more, in your Effect Controls panel. Moreover, it also has built-in color filters.
Although the filters are widely used on raw footage for editing, they also look brilliant when applied to animation. Plus, they are a great way to polish your final project.
So here’s where you can find this tool.
- Step 1: Click on ‘Control Panel.’
- Step 2: Choose ‘Creative’ and select ‘Look.’
Add Transition to Your Project in After Effects
CC Scale Wipe is one of the best transitions to do little experiments with your project.
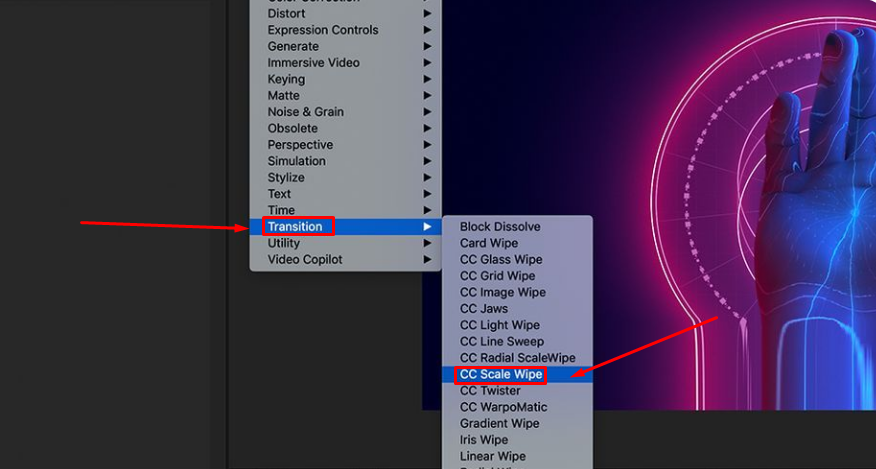
To try it.
- Step 1: Go to the ‘Effect’ tab’
- Step 2: Choose ‘Transition’ from the menu.
- Step 3: Click on ‘CC Scale Wipe.’
This effect helps you stretch the amount, change the direction, and axis center your animation, which looks cool.
Conclusion
There are some easy fixes for after effects Effect Controls not showing in the project window. For example, you can make the Effect Controls panel appear by activating the tool from your Windows tab. Or by resetting the saved layout.
Similarly, there are problems with Effect Controls, such as options being greyed out, no options to position opacity, red values, missing slider, or effects not appearing in the same window. But guess what? These issues can be easily resolved in minutes if you know the right ways.
When troubleshooting After Effects, accurately monitoring your video output can help pinpoint visual issues clearly. Investing in a professional camera monitor ensures you consistently preview footage and effects in high detail, making your editing workflows smoother and more reliable.
FAQs
Q1. What do Effect Controls do?
Through the Effect Controls panel, you can edit effects that you have already applied to your layers.
Q2. Why are Effect Controls not showing in my After Effects?
In most cases, you would have accidentally closed the Effect Controls panel. Go to the ‘Windows’ tab to make sure the ‘Effect Controls’ option is checked.
Q3. How do I activate Effect Controls in After Effects?
Choose a layer and click on the ‘Effect Controls’ from the ‘Effect’ tab.
Meta Description: Lost sight of your effects? Here are 7 simple fixes for After Effects Effect Controls when not showing. Also, unlock more ways to add effects to your project.