Stuck with a “DisplayPort No Signal” message while HDMI is smooth sailing?
The culprit could be anything from a poorly secured cable or bent pins to outdated graphics drivers or even your computer’s settings.
Dive into our step-by-step guide that explores a gamut of solutions, from the classic ‘unplug and replug’ to updating your graphic card settings.

1. Starting With The Basics
Check your monitor’s input menu to see if the DisplayPort option is accessible.
If it’s grayed out, that’s a red flag!
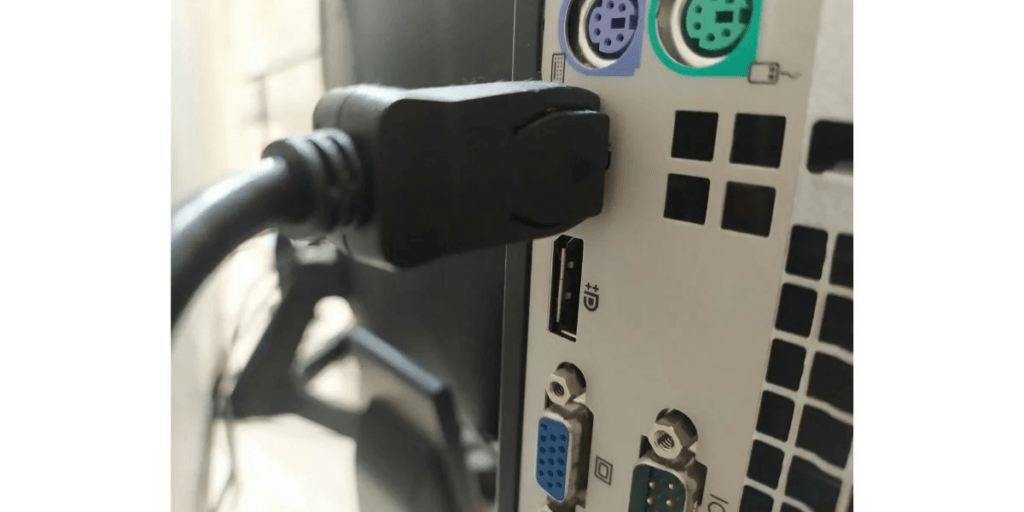
Your DisplayPort cable might not be properly secured.
So, it’s time for a second look.
2. Disconnect-Connect Work
Your DisplayPort cable is like a bridge between your computer and screen.

Think of it like when you’re trying to walk through a door; if there’s a toy in the way, you might trip!
Similarly, any tiny thing in the cable or port can mess things up.
Unhook the cable, then hook it back up.
Still seeing that pesky “No DisplayPort” signal error? Time to investigate!
Examine the Tiny Soldiers (Pins!)
Unhook your cable once more and look at the ends like you’re searching for treasure.
Any missing or bent pins? Any tiny invaders like lint?
Give a quick puff of air on both ends to clear out the dust that could be playing hide and seek in there.
Lock ‘n Load
When you plug the cable back in, push until the pointy ends make a satisfying “click.”
You don’t want that cable falling out now, do you?
3. The Monitor Reboot Technique
Here’s the funny yet accurate secret in the realm of information technology: pressing the power button off and then on can miraculously resolve a myriad of digital hiccups.
Yes, this simple, age-old trick is the darling of tech troubleshooters everywhere!
Power Down the CPU: Give your computer a break. Shut it down and disconnect it from its electrical lifeline.
Say Goodnight to the Monitor: Let your screen (monitor) take a nap too; disconnect it from the electric supply as well as the CPU.
Pause and Ponder: Wait for a fleeting 120 seconds.
Revive the Screen: Reconnect the monitor to its power source.
Energize the CPU: Plug your computer back into the wall socket.
Awaken the Beast: Press that power button and bring your computer back to life.
Illuminate the Monitor: Don’t forget to wake your screen up, too; hit its power button.
The Fine Print
Now, remember, while this reboot sorcery frequently gets the job done, it’s not a magical cure-all potion. If your tech woes persist, it might be time to dig deeper; perhaps your drivers are throwing a tantrum and need some attention.
If you find yourself doing this every time, though, maybe displayport isn’t what you need.
Besides, if you have a desktop tower PC, make sure that it is actually awake and alive!
Even if you hear fans whirring, don’t get fooled; they could be STILL in ZOMBIE mode but make you feel like they are switched ‘ON.’
See if the LED indicator is glowing, confirming your computer and display are both snugly tethered to an energy source.
This sage advice could also rescue you when your monitor screen decides to play the ‘not-going-to-light-up-today’ game.
4. Measure Twice, Plug Once
- Length Matters:
Like when you’re fishing, you don’t want your line too short or too long. Make sure your cable fits your setup snugly but isn’t stretching across the room.
- Quality Over Quantity:
You wouldn’t drink stale coffee, so don’t use a stale cable. A flimsy or overly lengthy cable can weaken your signal, making your screen look as sad as a rainy day.

- Adapter Chronicles:
If you’re using an adapter, double-check that it’s properly plugged into both the cable and your computer.
If you have multiple DisplayPorts, switch it up and see if that does the trick.
5. Dealing with Third-Party Quirks
Don’t worry, you’re not alone if you have to occasionally repeat step one with third-party DisplayPorts.
These adapters are like puzzle pieces; sometimes, you need to jiggle them a bit for a perfect fit.
It’s not a biggie and is a universal experience!
6. Choosing The Desired Display Port
Hit up your computer settings, make your way to the “Devices” section, and take a look at the available DisplayPorts to help you handpick your desired one.
- Let’s picture this: Your monitor is like a twin-towered castle with two gates—named “DP1” and “DP2.”
- If your computer saunters up to the first gate, make sure the welcoming banner reads “DP1.” And if it’s headed to the second? You guessed it; “DP2” should be the name of the game!

7. Selecting The Right Cable
While you might think “a cable’s a cable,” the devil is truly in the details when it comes to the DisplayPort and HDMI universe.
Here’s the scoop: a DisplayPort-to-HDMI cable isn’t a magical wand that works both ways.
Think of it as a one-way street that allows you to link a DisplayPort-enabled gadget to an HDMI-equipped screen.
Trying to do it the other way? That’s a no-go zone.
So, what to do for a bi-directional connectivity?
Well, invest in a converter meticulously tailored to transform your specific output into the desired input.
When browsing through online marketplaces like Amazon, pay heed to product descriptions that explicitly outline the converter’s designated transformation type.
Numerous ‘REDDIT USERS’ acknowledged that flipping two ends of the cable around the computer and monitor helped them get rid of ‘No DisplayPort Sign.’
8. Solutions Related To Graphic Cards
Quick Safety Check
Before diving into the hardware jungle, remember to unplug all cords and make sure your computer is shut down. You don’t want to risk your well-being or that of your hardware!
The “Is It In Yet?” Test
So, you’ve got a swappable GPU? Double-check it’s snugly in place within its designated groove. A loose fit could be the villain behind your DisplayPort nightmares.
The Question of Compatibility
Even if you own the crème de la crème of ultra-wide gaming displays, a malfunctioning or incompatible GPU can bring your screen to its digital knees. Ensure you’re running a driver that’s in perfect harmony with your card.
Start By Updating The Graphic Card
METHOD 1: Enter the Control Center: Device Manager.
- Hit that Start menu symbol (you know, the wavy Windows icon), or press Windows + X. This will reveal your Quick Access List.

- Choose the one labeled “Device Manager” from the list. This is the control center for all your hardware!
Unveil the Graphics Wizard: Display Adapter.
- In the Device Manager window, locate the section that says “Display adapters” and make it spill its secrets by clicking the little arrow next to it.

- Once expanded, right-click on the adapter in question and pick the “Update driver” option.
Let Microsoft Do the Scouting: Auto-Search.

- Opt for “Search automatically for drivers” and let Microsoft’s minions scour the internet for you.

METHOD 2: Windows Update.
- Sometimes Microsoft surprises you with driver updates via Windows Update. If the Device Manager turns out empty-handed, navigate to Windows Update.
- Choose “Search for updated drivers on Windows Update.”

Hit the Refresh Button: Check for Updates
- If your system doesn’t start the hunt for new software and drivers on its own, just tap that “Check for updates” button to kickstart the process.
METHOD 3- REFRESHING THE DRIVER
Disconnect from the DisplayPort monitor.
Simultaneously press the Windows logo key + Ctrl + Shift + B.
- Expect a short 2-second intermission where your screen takes a tiny nap (goes black).
- Listen out! There will be a beep sound.
Reconnect the DisplayPort cable to your computer.
- Is the monitor now nodding with recognition?
- If yes, congrats! If not, no worries. Let’s explore more fixes.
METHOD 4- REVERSE THE UPDATE
Don’t you just hate it when a recent update tosses your display into oblivion? Yes, a finicky or flawed graphics driver could ALSO be your culprit.
If your DisplayPort started ghosting you right after a driver update, here’s how to restore order:
Open the Device Manager by pressing Windows Key + X, and make your selection.

Find and right-click your misbehaving driver under “Display Adapters,” then click on Properties.

Navigate to the Driver tab and hit the “Roll Back Driver” option.

If the “Roll Back Driver” button looks unclickable, it means you’ve never updated this particular driver before.
9. The USB-C Confusion: Not Every Port Is a Jack-of-All-Trades
First things first. Not every USB-C port is a Swiss Army knife of functions.
While some are multitasking champs and can juggle power, data, and video output all at once, others are a bit less gifted and only deal with power and data.
Is Your Port Video-Savvy?
So, how do you know if your computer’s USB-C port is up for video duties? The go-to resources for this intel are:
- Your Computer’s Manual: Grab that handy booklet or PDF that came with your computer. Look for the section about ports to see what yours can handle.
- The Maker’s Website: If the manual is playing hard to get, hop onto the website of the company that made your computer. Search for your model’s specs, and find out if your USB-C port is in the video business.
Quick Fixes
If you discover that your USB-C port isn’t in the video game, here’s what to do:
- Plan B Port: Simply plug your cable into another port that can do video. No fuss, no muss.
- Adapt and Overcome: If there are no other ports, snag an adapter that can translate USB-C language into DisplayPort speak.
10. Cracking the Monitor Resolution Code
If your external screen is giving you the silent treatment (aka displaying a “no input signal” error), it might be because the two of you are not speaking the same “resolution language”.
Simply put, your computer’s graphics powerhouse could be sending signals at a resolution that your monitor can’t decipher.
Imagine trying to watch a 4K movie on an old tube TV; something’s gotta give!
To Solve This Problem
- Consult Your Monitor’s Resume: Check out your monitor’s specifications to learn its optimal and highest resolution capabilities.
- Adjust DisplayPort Specs: Validate that your DisplayPort settings are fine-tuned to a resolution and refresh rate that your monitor can smoothly process.
Quick Steps to Harmonize Your Refresh Rate
- Summon the Settings: Mash the Windows Key + I and let the Settings menu burst onto your screen.

- Navigate to Nirvana: Slide over to System > Display > Advanced Display.

- Fine-Tune That Frequency: Scour the “Choose a refresh rate” menu and gently nudge it to a mellower or suggested setting.

- The Moment of Truth: Execute a quick check to see if your screen has decided to play nice!
There you go! Did this work for you?
- Safe Mode to the Rescue: If you’re navigating this maze with a Windows PC and you’re not sure about your monitor’s spec details, boot up in safe mode.
This simple act takes the graphics down a notch, making it easier for your monitor to keep up.
11. Checking Projector Settings
To kick things off, let’s try mixing up your cable connections. Do you have an extra monitor? Awesome! Connect both HDMI and DisplayPort cables to different screens.
The Magical WIN+P Combo
Once you’re plugged in, strike the Windows key and P together. A nifty menu should pop up on the right.
- Navigate: Keep pressing the down arrow and do not stop!
- Be Patient: Wait for some mini-blackouts or flickers on your screen.
- Eureka Moment: Once the display behaves, you’ve hit the jackpot!
What’s Behind the Windows + P Curtain?
Here’s the 411: this Windows + P menu is known as the “Presentation Display Mode.” Choices range from ‘Extend Display’ to ‘Computer Only’ to ‘Projector Only.’ If your screen’s been ghosting you, it’s likely set to ‘Main Display Only,’ which is a no-go for DisplayPort monitors.
12. The Last Resort: Testing With Other Devices
- Hook up your monitor to a different gadget with a surefire video vibe.
- Monitor Blues? If the glitch remains, your monitor might be the diva in this drama.
- PC or Software Snags? If the monitor shines bright with other inputs, it’s time to side-eye your PC or its software shenanigans.
Wrapping It Up
After a deep dive into the world of DisplayPort dramas, remember that communication is key; between you and your devices, that is!
From cable clicks to driver tricks, keep your hardware handshake solid, and you’ll banish those “No Signal” blues.
So go ahead, reboot, reseat, and refresh; your digital life awaits its flawless display!
Experiencing display connectivity issues can be frustrating, especially when precision matters in video or image production. A reliable camera monitor that supports multiple input interfaces, including HDMI, could be your ideal troubleshooting companion, ensuring your workflow stays smooth and uninterrupted.
FAQs
How do I know if my DisplayPort is bad?
If your DisplayPort is bad, you’ll likely encounter a “No DisplayPort” signal error or no display at all. You can check for bent or missing pins, and also test the cable on a different device to confirm.
Why is Windows 10 not detecting DisplayPort?
Windows 10 may not detect DisplayPort due to outdated or incompatible drivers. Make sure to update your graphic card drivers and check the settings to see if the DisplayPort is recognized.
Can the DisplayPort be repaired?
Depending on the issue, a faulty DisplayPort may be repairable. For minor issues like bent pins, you can try to straighten them carefully. If the cable or port is severely damaged, it may need replacement.
What is the disadvantage of DisplayPort?
One disadvantage of DisplayPort could be compatibility issues, especially with older devices that may not have DisplayPort inputs. Also, high-quality cables can be more expensive than HDMI.
Does DisplayPort affect FPS?
DisplayPort itself doesn’t affect FPS, but it supports higher refresh rates and resolutions, which can allow for smoother gameplay if your hardware supports it.
Why use HDMI over DisplayPort?
HDMI is often preferred for home entertainment setups, as it supports both audio and video and is widely compatible with TVs and other devices.
Can RAM cause no display?
Yes, faulty or improperly seated RAM can result in no display. Make sure the RAM sticks are securely in place.
Why does my monitor say no DP signal from your device?
If your monitor says “No DP Signal,” it’s likely not receiving any video data from your computer. Check the cable connections and update your drivers.


.png)
.png) Français
Français .png) Deutsch
Deutsch .png) Italiano
Italiano .png) 日本語
日本語 .png) Português
Português  Español


