.png)
DaVinci Resolve becomes challenging when working or editing high-resolution raw files, resulting in lags and choppy playback. Moreover, the frame rate drops, and ensuring a smooth creative workflow becomes difficult. The Resolve allows for the optimization of larger media files and smooth playback.
Whether you are a professional or a new user, understanding how to optimize files is essential for faster rendering. So, following a few steps is necessary to ensure smooth workflow and real-time playback.
What is Optimized Media in DaVinci Resolve?
As the name describes, DaVinci Resolves Optimized Media refers to the optimized media for smooth performance. So, why is there a need to “optimize the media?” Optimizing Media enhances the system’s functionality by replacing it with a more efficient codec for smoother playback and processing.
The Resolve uses .dvcc files during editing to create optimized media. The .dvcc files are a segmented series of thousands of smaller files that work only with Resolve and on the same system.
Sometimes, working with 4k or 8k files becomes difficult for the system. So, the Optimized Media feature lowers the resolution without impacting the quality for a smooth workflow. The high-resolution media files require extensive processing power, which affects the editing and real-time playback. So, optimization creates lower-resolution media for smooth editing.
Note: For Optimized Media, ensure the system has enough storage because it consumes significant space during optimization. Also, available storage is essential to prevent optimization issues.
How to Generate Optimized Media?
It becomes frustrating when playing back higher-resolution media files, especially on older computers. So, Optimized Media is essential to ensure your editing software keeps up with the smooth workflow. Hereunder is the step-by-step guideline to generate optimized media to provide seamless playback.
Step 1- Importing the Media Files
- Launch DaVinci Resolve on your computer and open or create a new project.
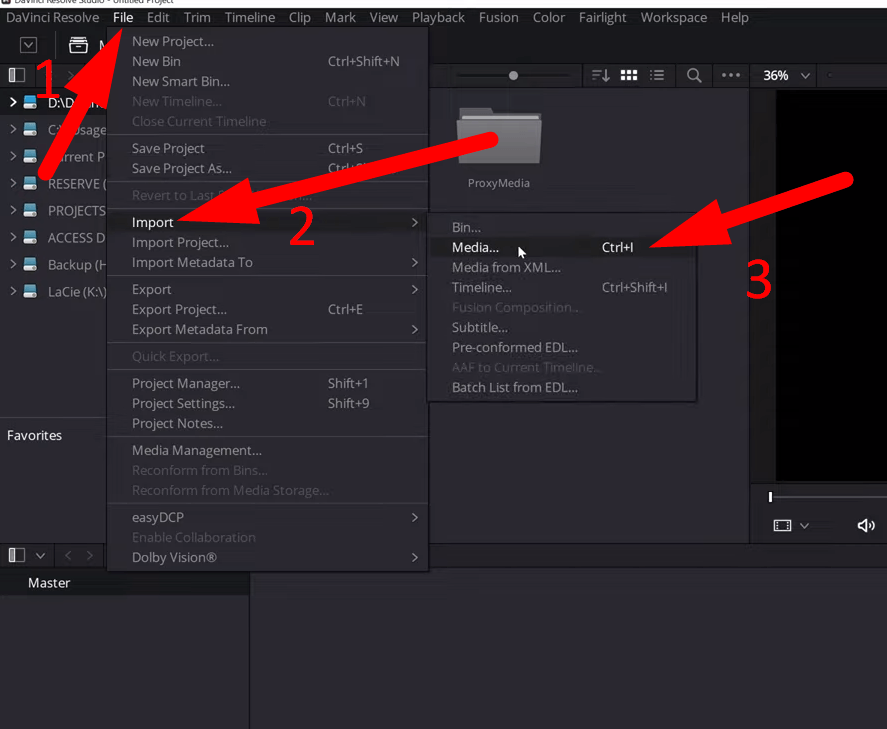
- Go to the “File” menu from the top-left and select “Import File,” then choose “Import Media.”
- Navigate to your original raw file location, select the required files, right-click them, and then choose “Add to Media Pool.”
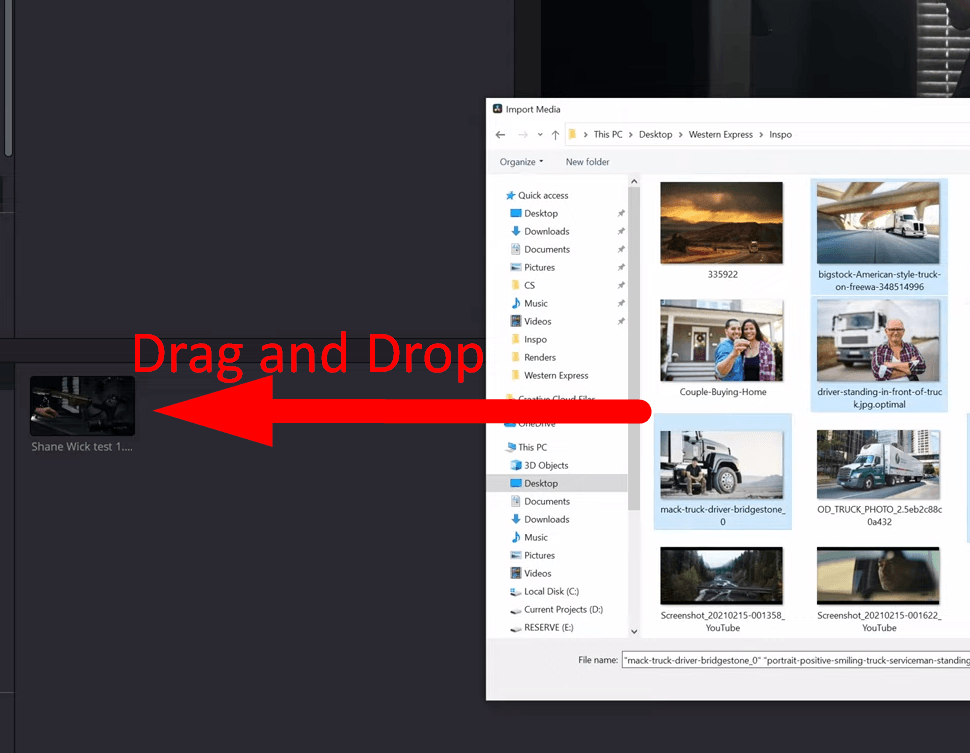
- Alternatively, select the files and drag and drop them into the media pool.
Step 2- Adjusting the Project Settings
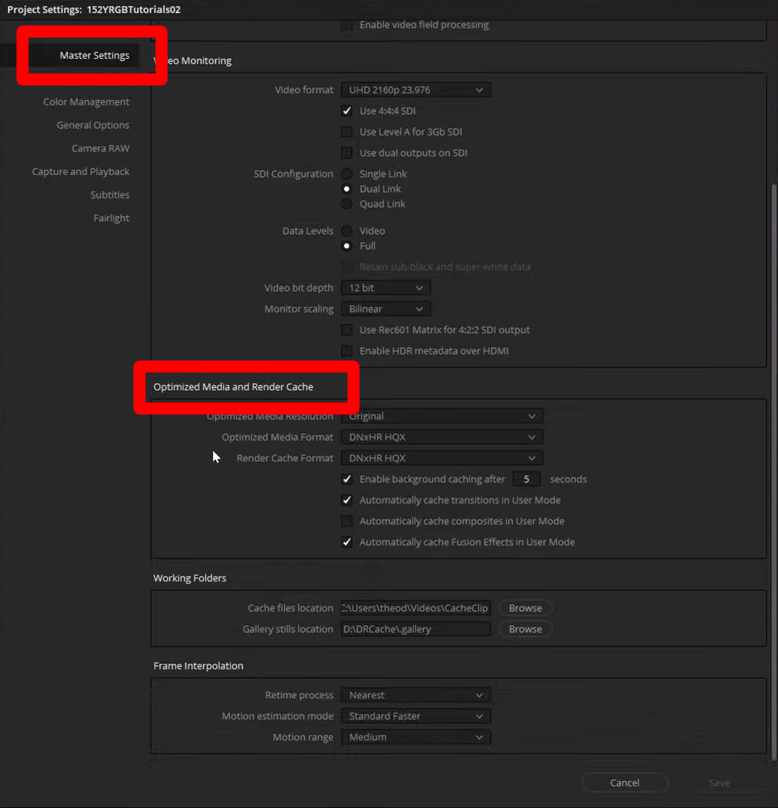
- Once files are imported, open the project settings by navigating to the “gear icon” from the bottom right corner.
- Alternatively, press the “Shift + 9” shortcut key to open the settings and choose “Master Settings.”
- Then scroll down to “Optimized Media and Rendered Cache.”
Before starting the optimization, setting the following settings for a smooth workflow is essential.
- Optimized Media Resolution
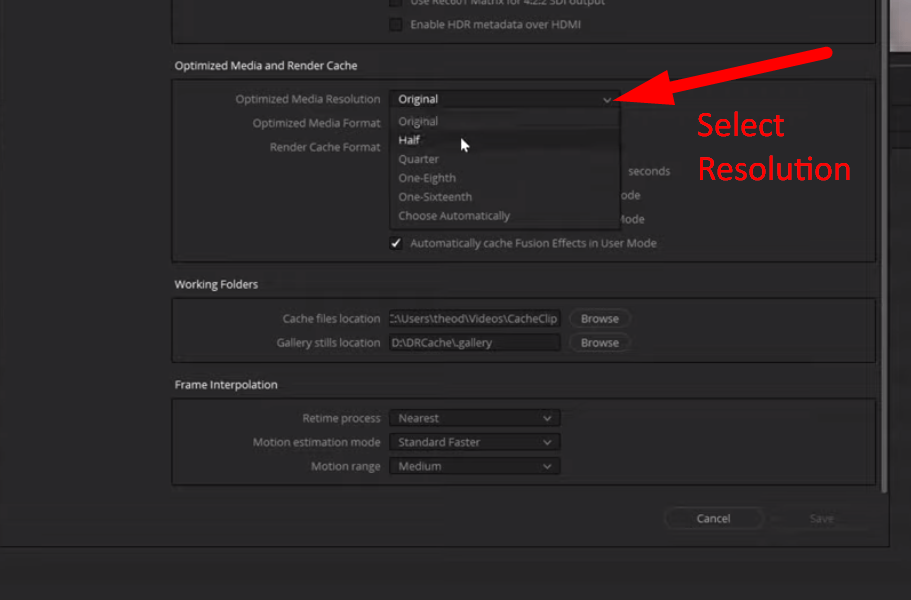
- The “Optimized Media Resolution” is default set to “Original.”
- So click on it to change the media resolution from the drop-down list. It will also enable you to select “Choose Automatically” for the desired resolution.
It’s essential if you have set the timeline to 1080 and have footage in 4k. After optimizing the resolution, the proxies will be in 1080, making them easier to work with.
- Optimized Media Format
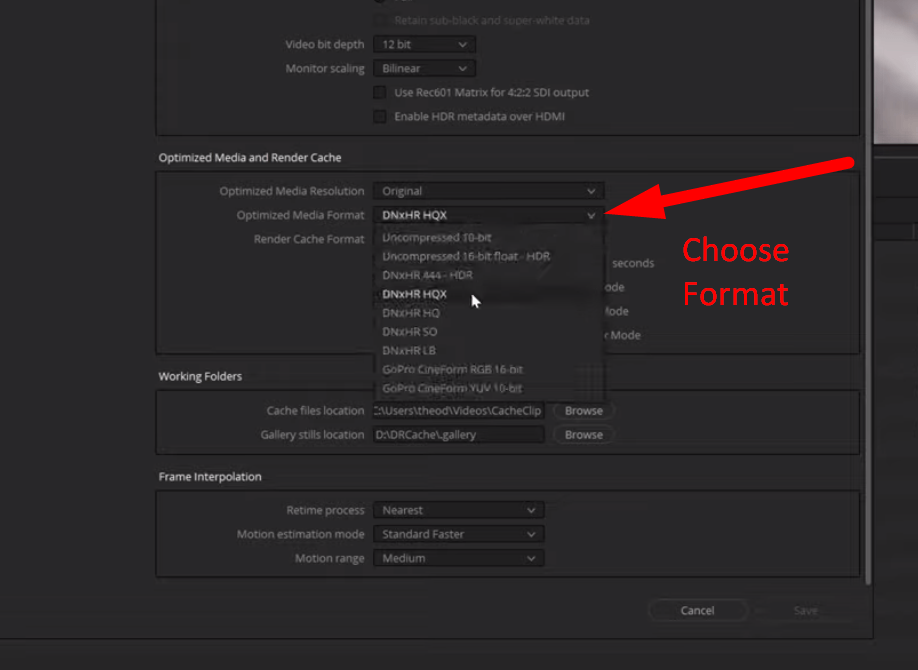
- Navigate to “Optimize Media Format” to choose the format to encode new files.
- It’s necessary to choose a smaller file format than the original file.
- If you are editing, then select a smaller file format, such as “ProRes 422LT or ProRes 422” for Mac or “DNxHR LB,” “DNxHR HD,” or “DNxHR SQ” for Windows.
- For grading, “DNxHR HDR” is the perfect option, and if you are using the “Alpha” channel, then use “ProRes 4444 or ProRes 4444XQ.”
Note: Smaller file sizes such as “ProRes 422LT” provide faster playback than ProRes 422 or ProRes 422 HQ.
- Storing the Optimized Media
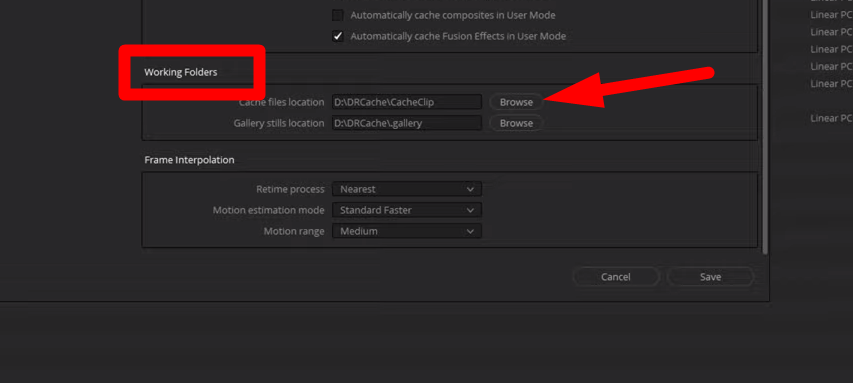
- Scroll down to the “Working Folders” section, and the optimized Media rendered is stored in the “Cache File Locations.”
- The Optimized Media will automatically save to the default “Cache Files” location.
- Click “Browse” to change the storage location and use an external hard drive to store or save the files.
- If you are satisfied after adjusting these settings, click “Save” to save the preferred changes.
Note: Saving optimized files on your computer further slows the computer and negatively impacts the project’s folder structure. So, it’s necessary to use external storage for smooth playback of your media files.
- Optimized Media in Bin
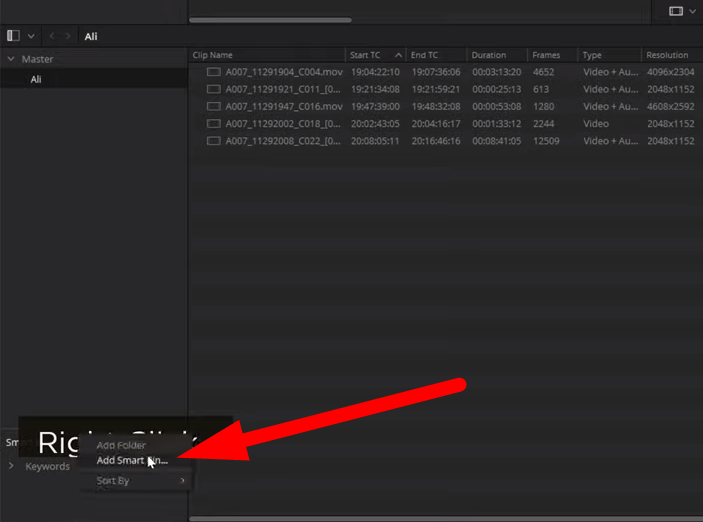
- Once in the project timeline, go to the “Smart Bins” from the bottom left, and it will show all the files.
- Right-click on “Smart Bins” and select “Add a Smart Bin.”

- Then click the “File Name” tab and choose “Video Codec” from the drop-down menu.
- Select “does not contain” under the “Contains” tab and click “Create Smart Bin.”
Bin allows you to group clips and helps you keep track of the files with optimized version availability. So, it will enable you to select specific media files that require optimization and save storage or processing time.
Step 3- Generate Optimized Media
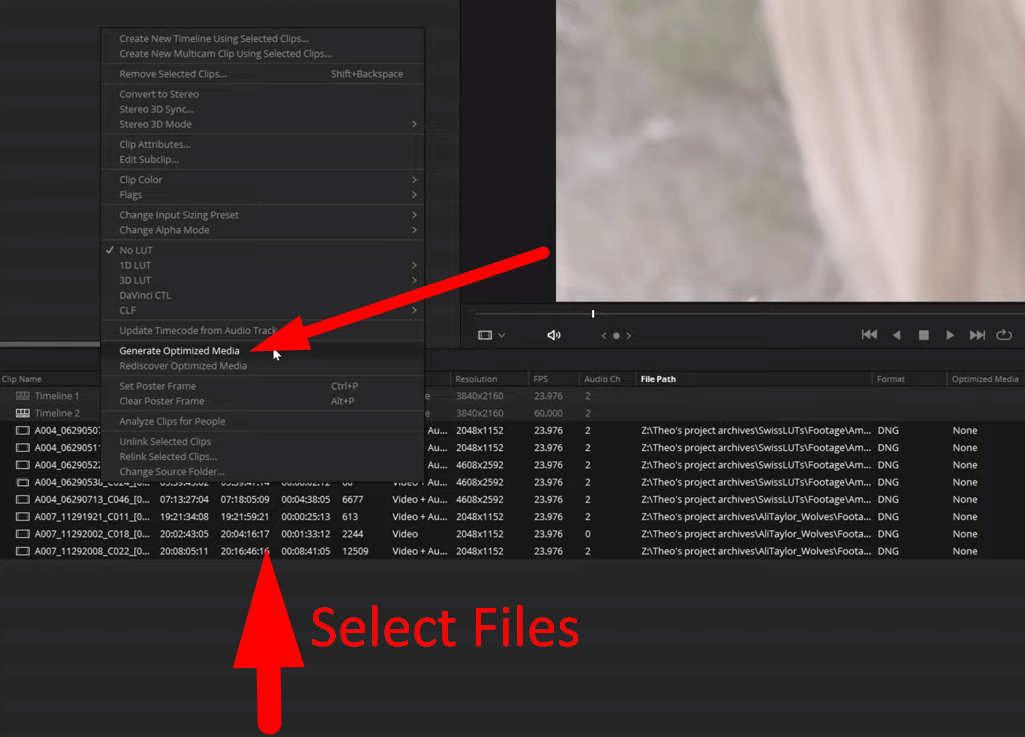
- Go to the “Media” tab from the bottom right corner and select the files you want to optimize.
- Right-click on files and choose “Generate Optimized Media.”
- It will take time to “optimize” the media depending on the number of clips you have selected, their format, and length.
After optimizing the media, the clips playback in a uniform format without dropped frames.
Step 4- Enable the Optimized Media
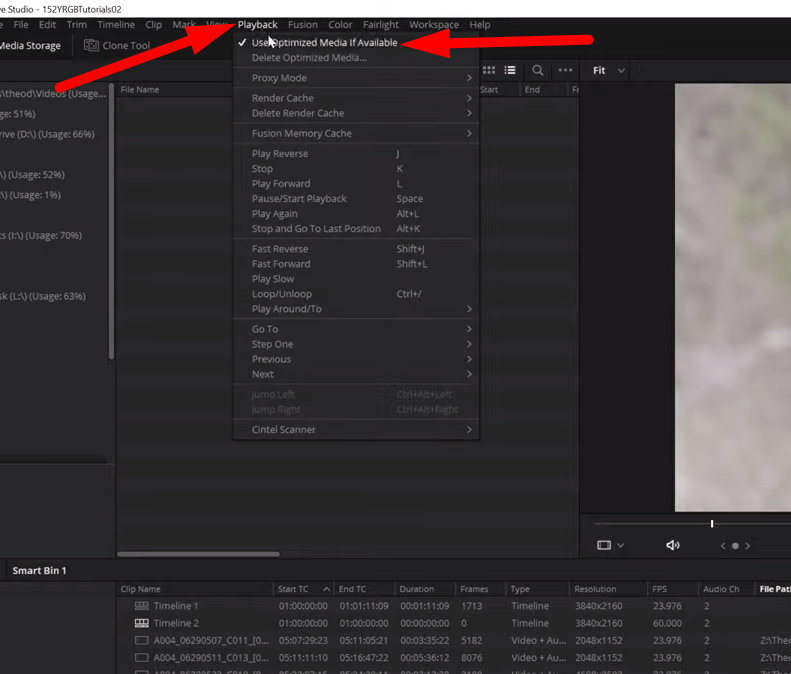
- Once the optimization is complete, open “Playback” from the main menu bar, hover over the “Render Cache” tab, and then choose “None.”
- Then check “Use Optimized Media if Available.”
Note: If your computer slows down during the process, hover over the “Timeline Proxy Mode” from the Playback menu. Choose “Half Resolution” or “Quarter Resolution,” depending on your system’s slowness.
Step 5- Disabling Optimized Media
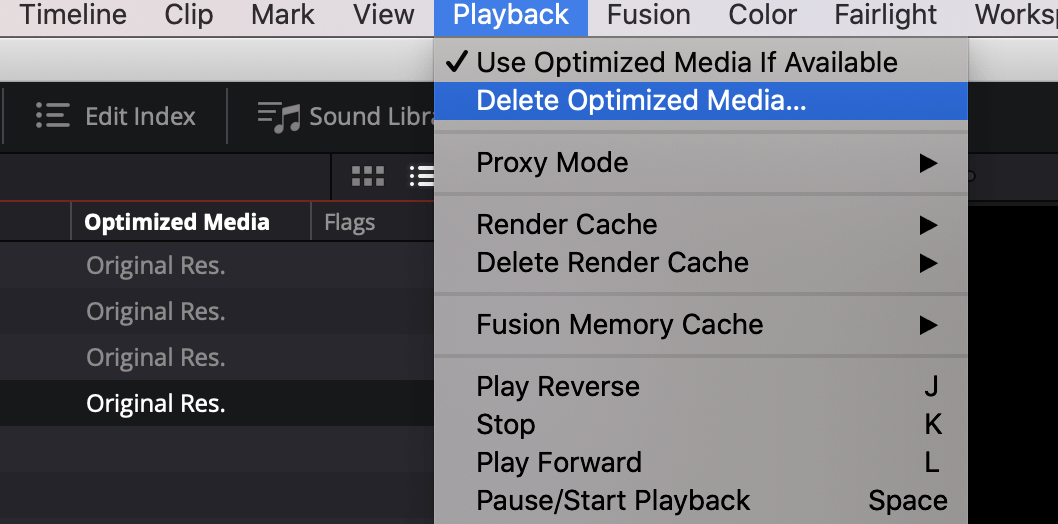
- Go to the “Playback” menu and check “Use Optimized Media if Available” to deselect it.
- It will move you back to the original raw file source.
- Moreover, open the “Render Page” by pressing “Shift + 8” and then scroll down to “Advanced Settings.”
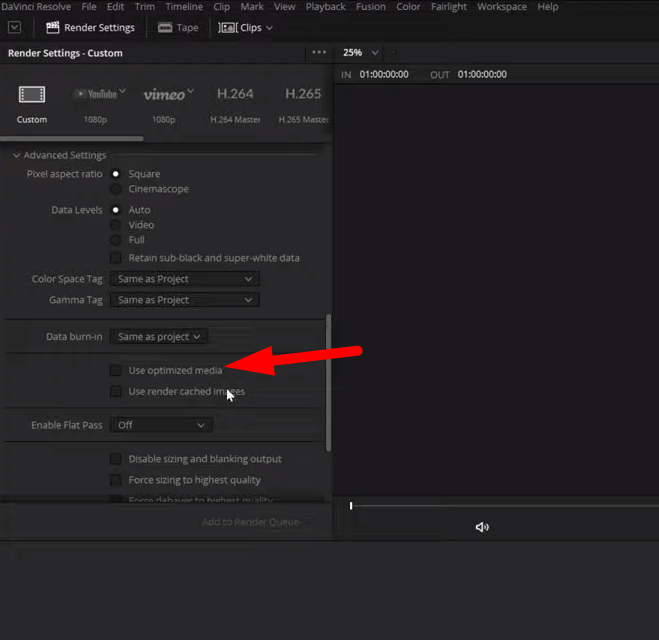
- Uncheck “Use Optimized Media” when you want to return to the original files for editing or color grading.
- From the “Playback” menu, switch off the “Timeline Proxy Mode.”
This quick on-and-off feature is handy when editing or color-grading media files. So, switching to Render Cache or Smart Mode is necessary when editing or applying effects to the playback.
Step 6- Exporting the Files
- The primary purpose of optimized Media is to ensure smooth playback and enhance the editing process.
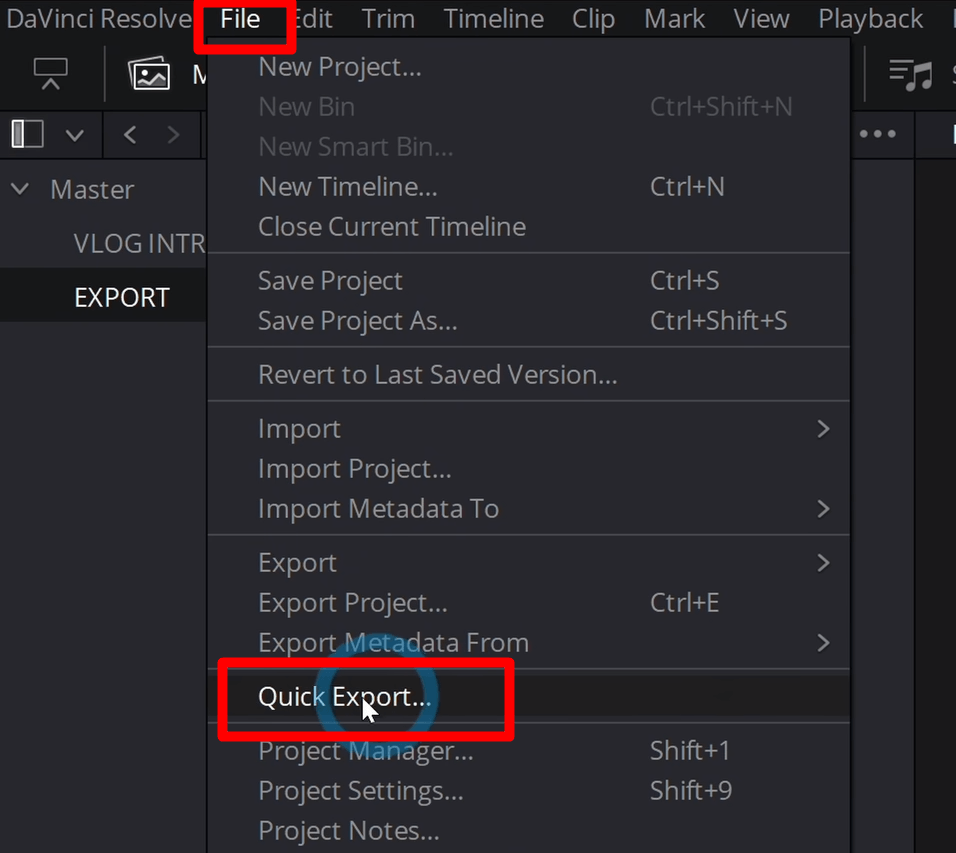
- Once satisfied with the editing, go to the “File” menu and select “Quick Export.”
- Then, choose the desired format for your video files and select the storage location.
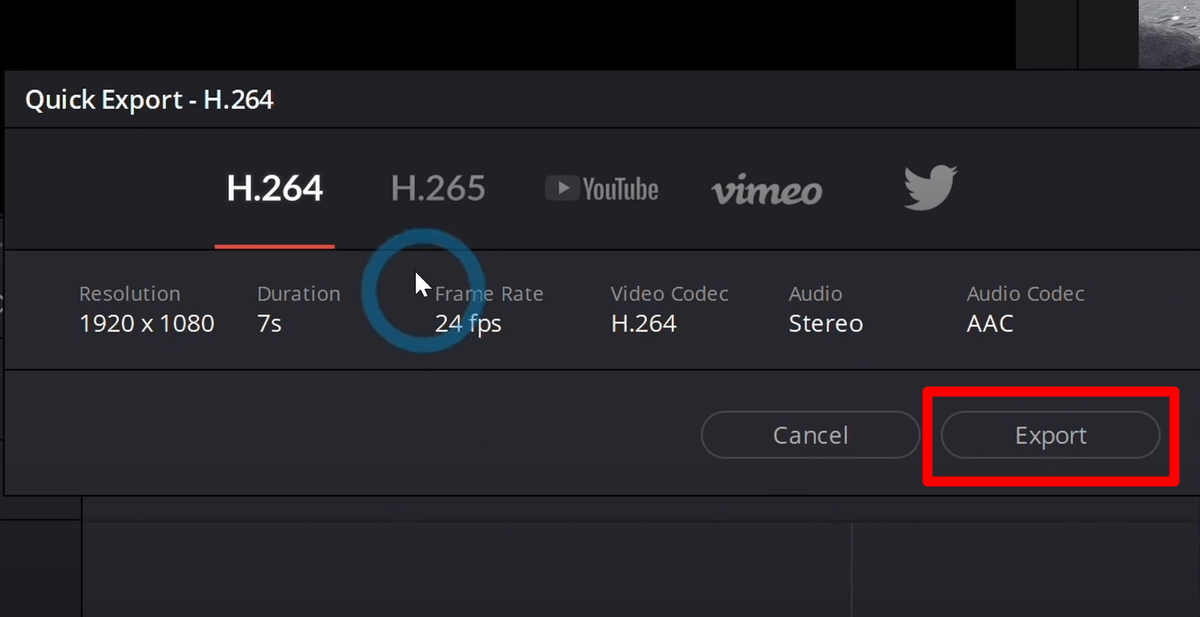
- Click “Export” to save the files.
Troubleshooting Common Issues
DaVinci Resolves Optimized Media is vital for optimal performance because it ensures the smooth playback of media files. However, it becomes frustrating when it encounters problems and slows the working process. So, here are common issues you face and how to troubleshoot them for a smooth and efficient workflow.
- Why is “Generate Optimized Media” so slow?
The Resolve will slow down the optimization process with improper network connection or if you use internal storage. Moreover, the time required to generate Optimized Media depends on the file size and duration, the codec, and the processing power of your operating system.
So, here are some fixes to solve the problem:
- Switch Resolves default storage location to local SSD because it ensures smooth performance. It also enhances its ability to read and write files during optimization efficiently.
- Ensure that individual files are rendered to smaller optimized resolutions and optimized formats.
- With the free version, the processor utilizes Windows transcoder, so it doesn’t allow hardware transcoder. Due to this, the CPU is unable to use its maximum potential.
- Switch to the full version of DaVinci Resolve to have full GPU acceleration or use additional software to transcode files.
- Why is “optimized media” generating so large files?
Optimized Media is essential to bring smoothness to choppy playback, but the error “insufficient disk space” arises. It happens with improper system setup and choosing higher resolution when optimizing the files. So, it’s essential to ensure:
- Change the default “Optimized Resolution” to lower from the raw media file.
- Set your project timeline to lower resolution and frames without affecting the quality.
- Check the codec compatibility and switch the “Optimized Format” to a lower codec like “DNxHR SQ” for optimal storage.
- Before importing the media files, set a lower bitrate for your recordings without impacting the quality.
- Optimized Media is automatically removed
After generating Optimized Media, it will automatically be removed and changes the media files to the original files. The issue arises when you close the Resolve and reopen it after some time to continue working on the files. It happens if you use an external drive and select a different path for optimized media in project settings.
- Ensure your optimized Media is stored on the correct drive from the settings.
- Change the “Optimized Resolution” and codec to lower files to ensure smooth playback.
- Also, ensure you are using an updated version and operating system.
- Unable to Generate Optimized Media
Sometimes, when you click to generate optimized media in the timeline, an error says, “Error encountered during optimized media generation. Ca.” It will stop the optimization process and doesn’t proceed further.
Moreover, after selecting “Generate Optimized Media,” the bar stops at 0%, and the bar windows close without optimizing. The error will arise if the CacheClip folder lacks space or you selected improper storage in the project settings.
From the “Finder” window, select “Resolve Cache” and choose “Cache Folder.” Then select “Optimized Media” and right-click to delete the cache. Deleting the cache folder will not affect the original media files but restore the storage.
- Ensure that the system and edit storage are the same for generating optimized media.
- Unable to change the Optimized Media Status
While Optimized Media is essential for smooth playback and editing, it becomes frustrating when you have to remove it. Even after you deselect “Use Optimized Media if Available,” the files remain optimized and don’t revert to the original media.
- Select “Smart Bin” to view a list of files, and you can analyze which files are optimized.
- Right-click to select “optimize media” and go to the project settings to choose the resolution.
- Under the “Playback” menu, select “Delete Optimized Media,” it will remove optimization from the timeline altogether.
What are the Advantages of Optimized Media in DaVinci Resolve?
Optimized Media significantly improves editing workflow and ensures smooth media playback. Here are the advantages to understand how it impacts your media files:
- Smooth Playback
DaVinci Resolve Optimized Media removes the choppy playback, ensuring smooth and efficient workflow. It reduces the processing workload by lowering the resolution without dropping frames or quality. So, it’s efficient when working with 4k or 8k files and ensures real-time playback.
- Efficient for Short Clips
While proxy files only have larger files, Optimized Media works with short clips. Therefore, it saves you time and storage when working on small files.
- Faster Editing
Optimized Media writes one file per frame and transcodes files faster. It temporarily changes the resolution and ensures a faster editing workflow. It enables you to edit or apply effects in real time without waiting for the video to catch up. Moreover, it improves the performance of media files, and you can change the optimized status after editing.
- Lower Processing Requirements
Optimized Media primarily benefits older computers because it works efficiently on low processing requirements. It allows you to enhance the playback performance by utilizing “resolutions and codecs” that are easy to process without impacting the quality.
Disadvantages of Optimized Media in DaVinci Resolve
While Optimized Media significantly improves performance, it has some disadvantages that must be considered:
- Limited Use
Optimized Media is designed for internal use within the DaVinci Resolve. So, ensuring smooth playback and enhancing the editing process is necessary. Also, it uses the .dvcc extension, which makes it difficult to share or export the optimized files to other computers.
- Optimized Media works with individual projects
While Optimized Media can be created for videos within a specific project, it will not optimize the same video in a different project. So, you have to “optimize” the media again when using it in different projects using the same DaVinci Resolve.
- Cannot see what files are optimized
It becomes difficult to see what files are optimized in the media pool. The Resolve 16 has a particular column in the media to show which files are optimized. However, this feature is unavailable in Resolve 17 and 18, so you cannot see what files are optimized from the media pool.
- Generate Large Files
Optimized media generates larger files than the original media, depending on your chosen codec and resolutions. So, it will quickly occupy all the storage space, and an error will pop up saying “insufficient storage space.”
Conclusion
Optimized media is essential for smoother performance, faster processing, and real-time playback during editing. It’s also beneficial when working on older computers to enhance processing power efficiency. So, understanding how to generate optimized media and troubleshoot issues is essential for a smoother editing experience.
The Resolve Optimized Media enables you to transform your editing by efficiently removing the choppy playback without losing quality.
Achieving optimized and color-accurate media relies greatly on precise monitoring during production and post-production. Using a professional camera monitor ensures you capture footage with accurate exposure and color balance from the start, streamlining your workflow and maximizing DaVinci Resolve’s capabilities.
Frequently Asked Questions
What is the difference between Optimized Media and Proxy Media?
Proxy Media improves the performance and speed of editing files by generating lower resolution of high-resolution media. It allows you to name and link or unlink media files adequately. Also, proxy media is generated for the whole clip.
Optimized Media temporarily replaces the media files with a more efficient codec for editing and smooth playback. It creates a unique copy of raw files to remove choppy playback and allows you to select specific segments of clips.
How to improve DaVinci Resolve performance?
Improving DaVinci Resolve’s performance is essential when working with high-quality videos to ensure smooth performance. Here are the ways:
- Check system requirements and ensure you are using the updated Resolve version.
- Select “Optimized Media” if you are running on older computers.
- Use “proxy mode” for better playback performance during editing.
- It’s necessary to optimize the cache location to enhance the Resolves efficiency.
How can I check if a clip has Optimized Media in DaVinci Resolve?
Resolve provides a list view under the media pool to check if the clip has enabled optimized media. Right-click in the media pool and select “optimized media” to view the optimized files. However, this feature is unavailable in Resolve 17 and 18 versions, and viewing Optimized Media is impossible.
Is it possible to delete optimized media in DaVinci Resolve?
Resolve 16 has a dedicated “delete” button under the playback menu. However, the feature is unavailable for the Resolve 17 and 18 versions. So, to delete optimized media, locate the CacheClip folder on your system and delete the Optimized Cache. The Resolve will stop using optimization and revert to the original media.