.png)
Burring is a crucial technique in video editing to enhance the visual experience or to hide sensitive information. DaVinci Resolve provides diverse tools to bring creativity by adding extra details to your moving objects. Whether you are a professional or an aspiring editor, adding blurry effects provides a natural effect and improves video quality.
So, DaVinci Resolve makes adding blur to moving objects easy, whether you are using the free or studio version. Here are different methods to blur part of the video or background in the Resolve to elevate your editing.
Blur video in Fusion Page vs. Color Page
DaVinci Resolve offers two methods, Fusion Page and Color Page, to blur part of the video. So, it’s essential to understand the difference between the two to choose the correct method according to your preferred needs.
Fusion blurring involves advanced masking and motion tracking. It is more flexible and manageable but includes extra steps. The Color Page is best suited for beginners because it is easy and requires a few steps. It also enables you to make non-destructive adjustments to your workflow.
Choosing the best tool
- Fusion is perfect for professionals because of its advanced controls, and it is ideal for dynamic scenes with keyframe effects.
- The color page is perfect for documentary or primary object blurring, with its quick, easy steps and user-friendly interface.
How to blur part of the video in DaVinci Resolve?
During video editing, you may encounter sensitive information you don’t want to share with the viewers. Therefore, DaVinci Resolve enables you to blur any moving objects in the media clip precisely. Hereunder are different methods with a step-by-step process compatible with free and studio versions.
Method 1- Blur the video with the Color Page
Import the Media
- Launch DaVinci Resolve and ensure you use the updated free or studio software version.
- First, click to start a new project under the “Project Manager” or select the existing project.
- Go to the “File” from the top left corner, hover over “Import,” and then choose “Media.”
- Browse the location, select the files, and the imported media will appear in the “Media Pool” window.
- Then, select the clips and drag and drop them onto the timeline.
- Using Power Window
Step 1- Open the clip in the Color tab
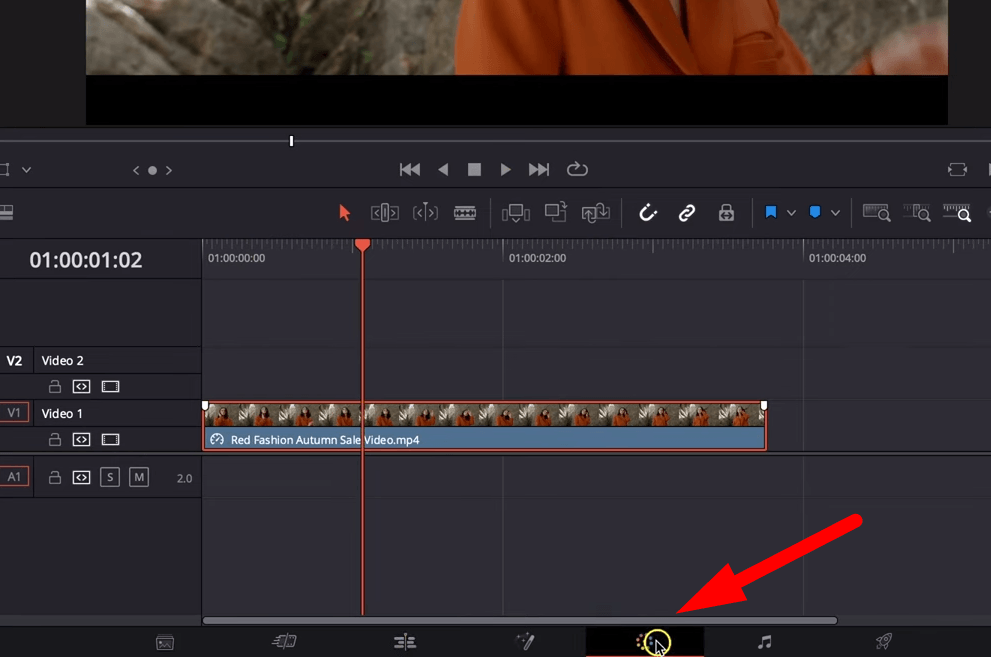
- Once the clip is in the timeline, ensure it is playing smoothly.
- Select the clip and click the “Color” correction tool from the bottom of the main menu.
- Move your playhead at the beginning of the clip.
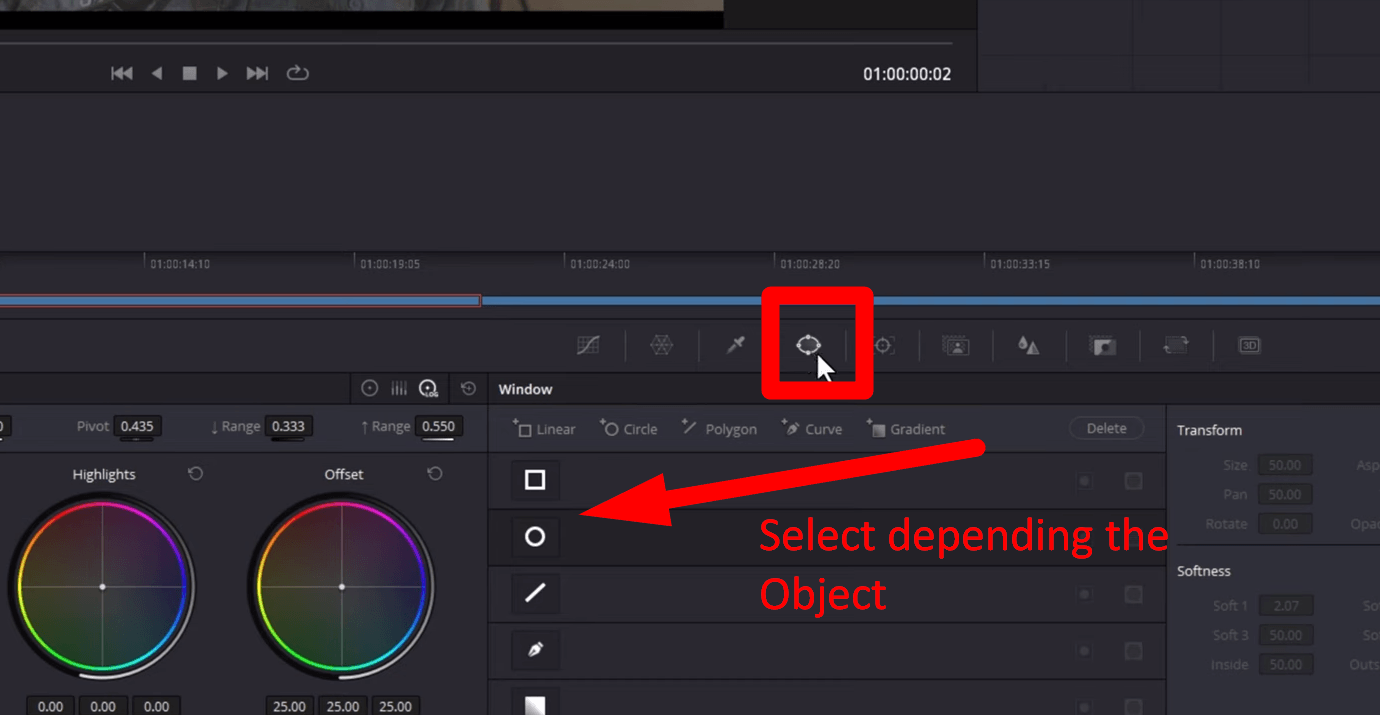
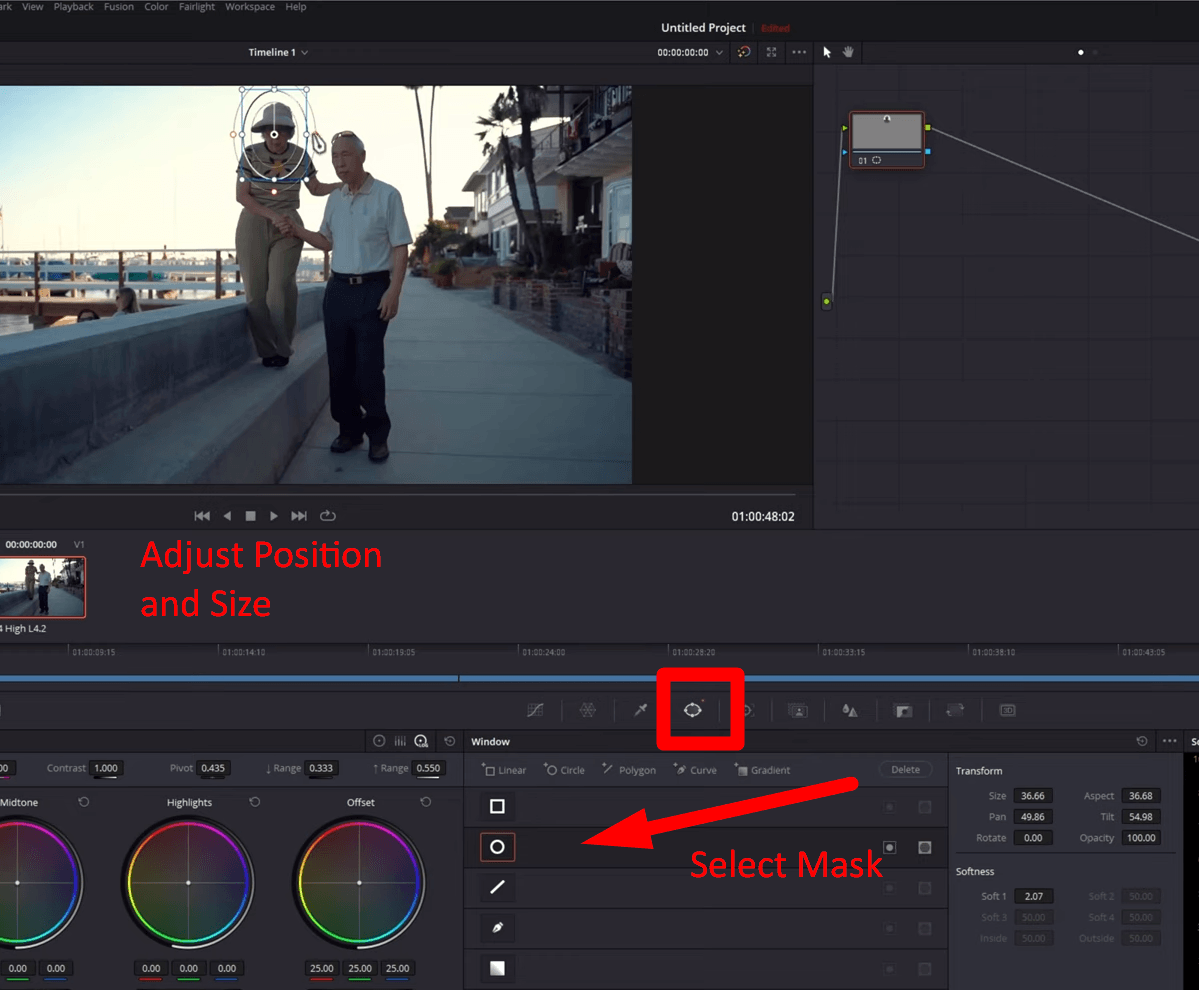
Step 2- Select the Window or mask
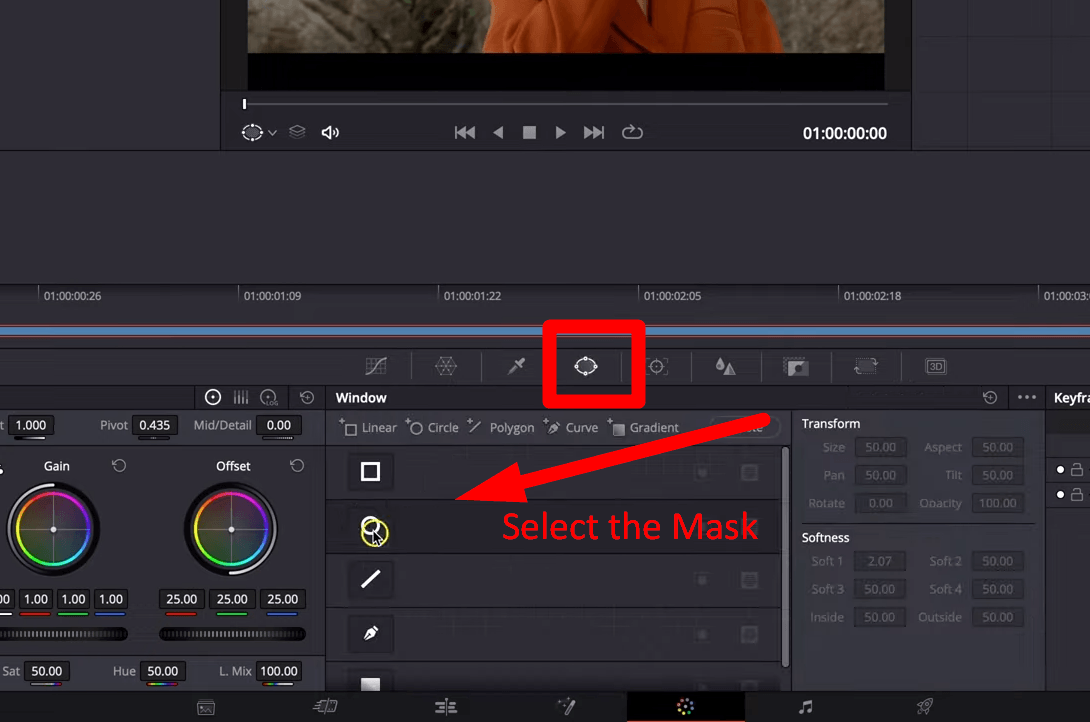
- Go to the “Window” tab or mask icon from the “Color Palettes” menu.
- Then, select the mask depending on the shape of the object that you want to blur. For instance, use “Radius Mask” to blur the face.
- Select “rectangle mask” to blur the “Logo or Number plate.”
Step 3- Adjust and Position
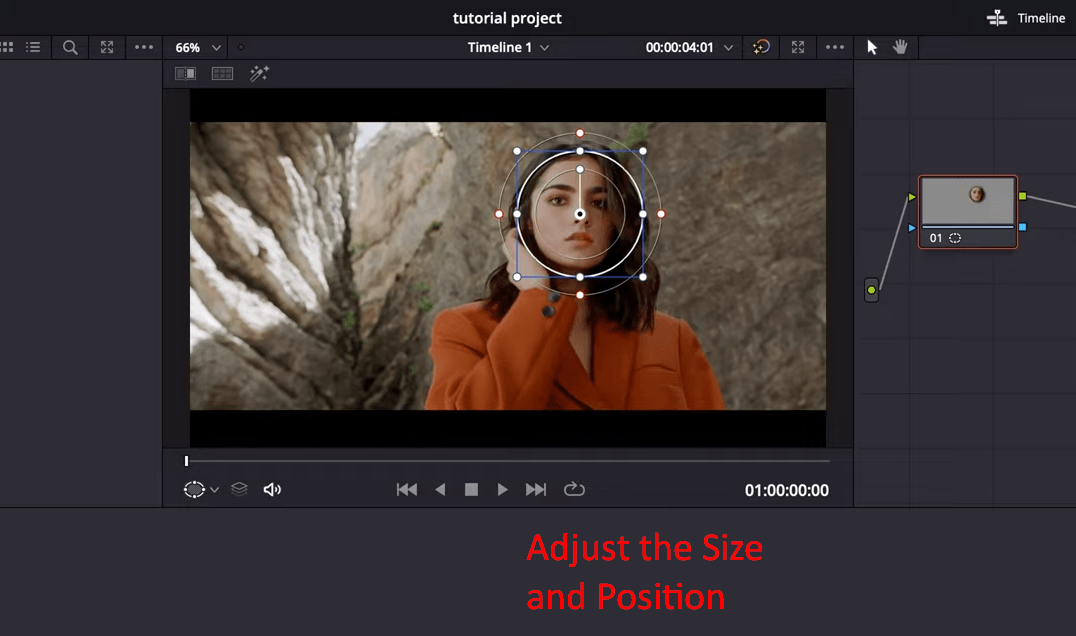
- Drag the edges of the rectangle shape to adjust it according to the object’s shape.
- Click the “+Circle” tab and position the mask to the face of the person.
- Then, drag the mask handles to scale it down so it matches the face perfectly and tracks it correctly.
- To adjust it better, zoom the clip from the top left corner and adjust the mask according to the object.
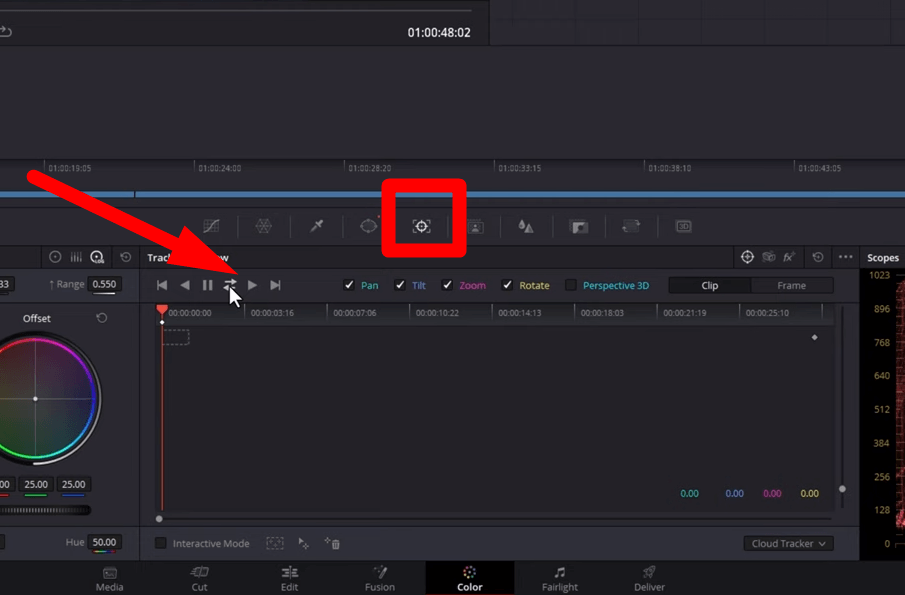
Step 4- Track Forward
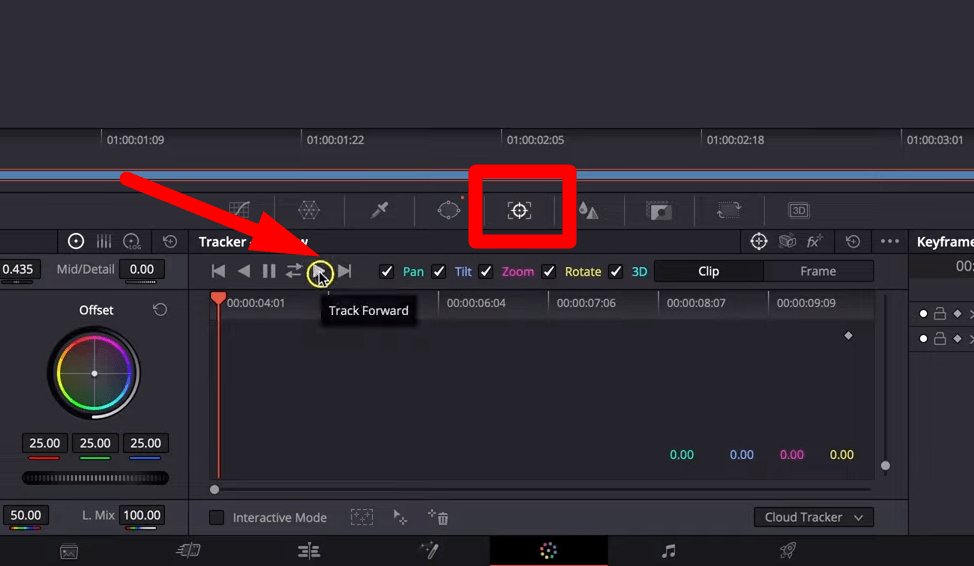
- Once it is positioned perfectly, go to the “Tracker” icon from the Color Palette menu and click the “Play” icon or “Track Forward” button from the display.
- It will enable DaVinci Resolve to analyze the marked area efficiently, even in 3D Space.
- Ensure that the Resolve completes the analysis and must not be stopped during the process.
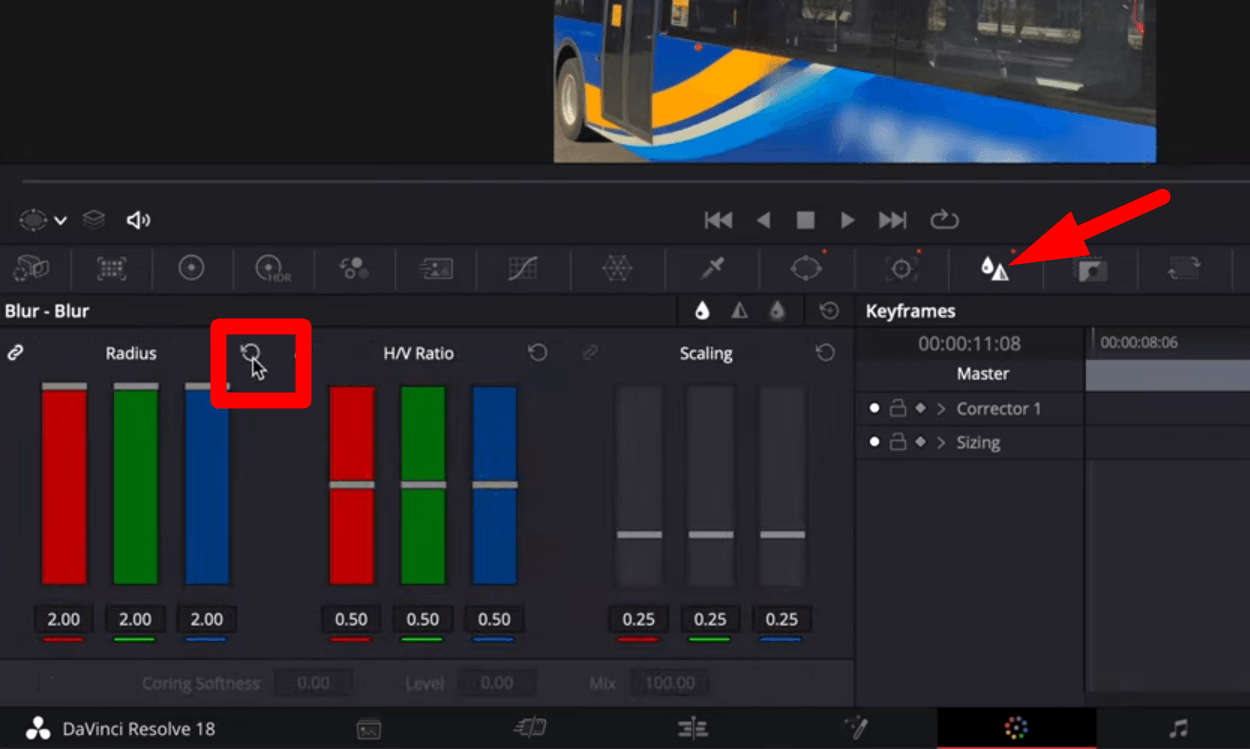
Step 5- Add Blur
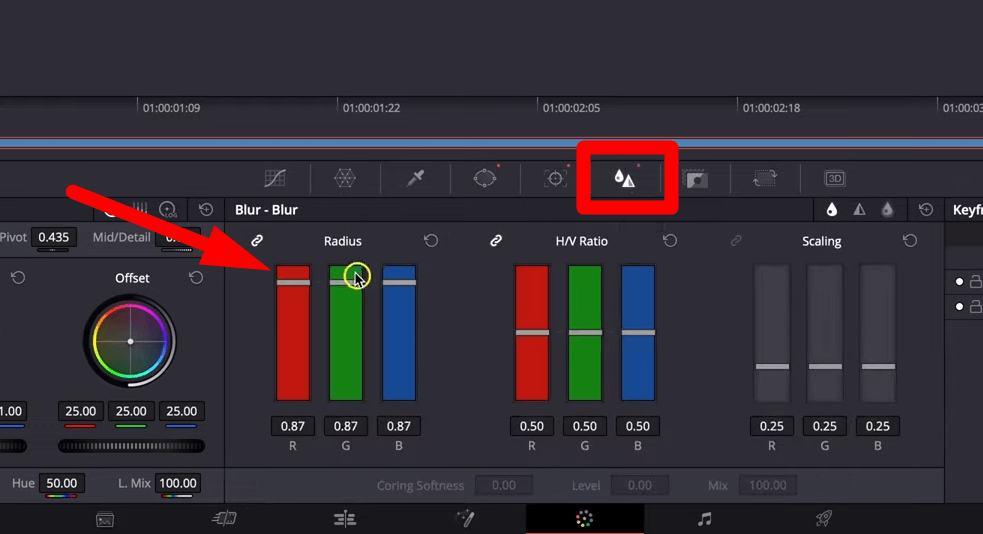
- Go to the “Blur” tab or Drop icon from the Color Palette menu, then drag the slider of the “Radius” to the maximum to blur the face.
Step 6- Analyze the Blur Effect
- Go to the “Timeline” from the “Edit” page and click to play the clip.
- Ensure it ideally analyzes and blurs the marked area with the object’s movement.
Note: You must adjust your “power window” precisely according to the shape because if it is too small or too big, blur will not work. Resolve will track the object until it leaves the frames or disappears from the clip.
- Using the Mosaic Blur Effect
The Mosaic Blur is used to pixelate the selected part, and instead of softening the image, it reduces the resolution.
Step 1- Open the Color page
- Once the clip is in the timeline, go to the “Color” page from the bottom main menu.
- The Node will appear on the right side of the preview window and will reflect the selected media clip.
Step 2- Add and Adjust the window shape
- Go to the “Window” tab or Mask icon from the “Color Palette” and select the shape depending on the object.
- The “window” will appear at the center of the media. Select the mask and drag the sliders to adjust it over the media.
Step 3- Effects Controls
- Once the mask is adjusted perfectly with the shape, go to the “Effects” controls from the top right corner of the screen.
Step 4- Drag and Drop the Mosaic Bar
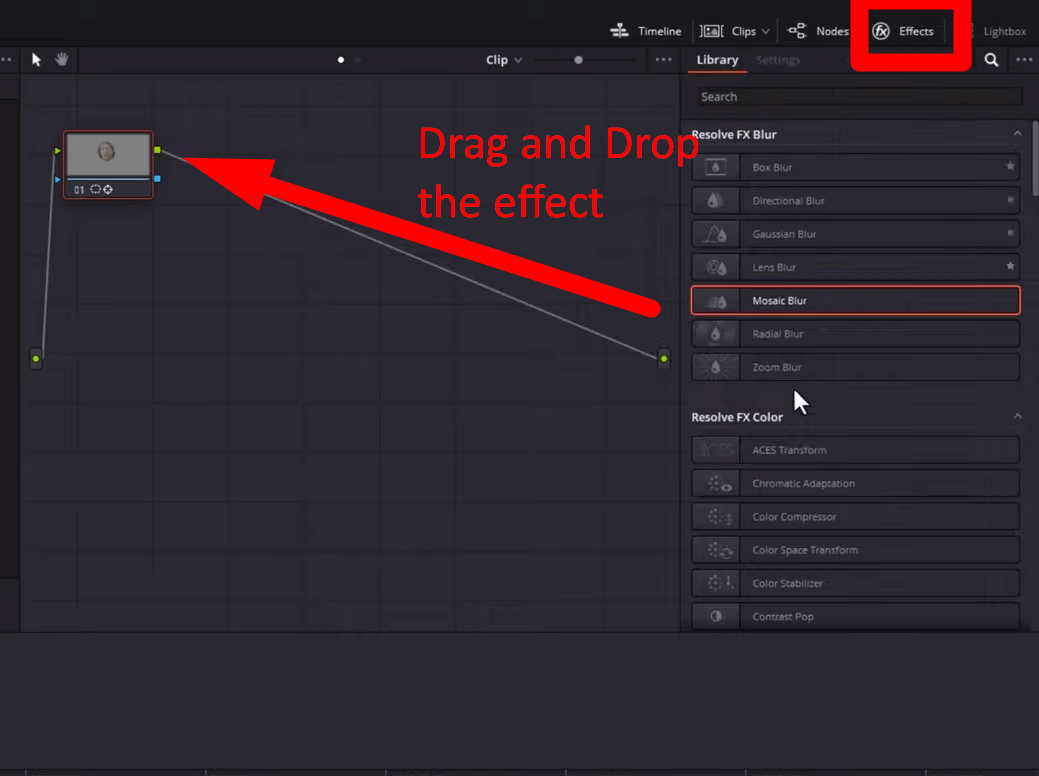
- Click the search bar and search for “Mosaic Bar” from the effects.
- Select the Mosaic Blur, then drag and drop it to the “Node” section of the clip, and it will instantly pixelate the selected area.
Step 5- Adjust the Settings
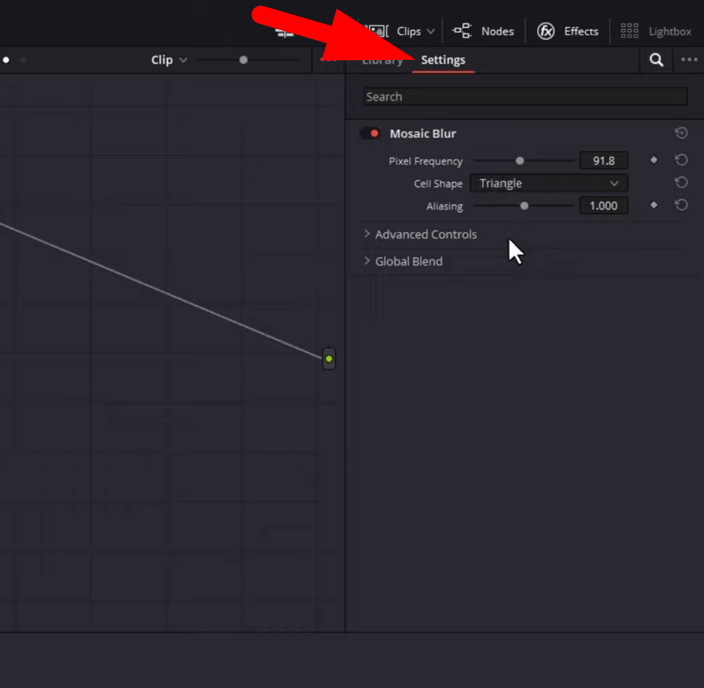
- Go to the “Settings” under the Effects Controls.
- Drag the sliders of “Pixel Frequency” to change the size of pixels and adjust “Advanced Controls” to have a better blur effect in your clips.
Step 6- Use Tracker
- However, depending on how much your subject moves, the power window must be placed more effectively in the desired area.
- Move the playhead to the beginning of the clip and select the “Tracker” tab from “Color Palette.”
- Select the “Track Forward” or Play icon, and Resolve will start analyzing and tracking the selected area.
How to blur multiple objects or faces in DaVinci Resolve?
Step 1- Color Page
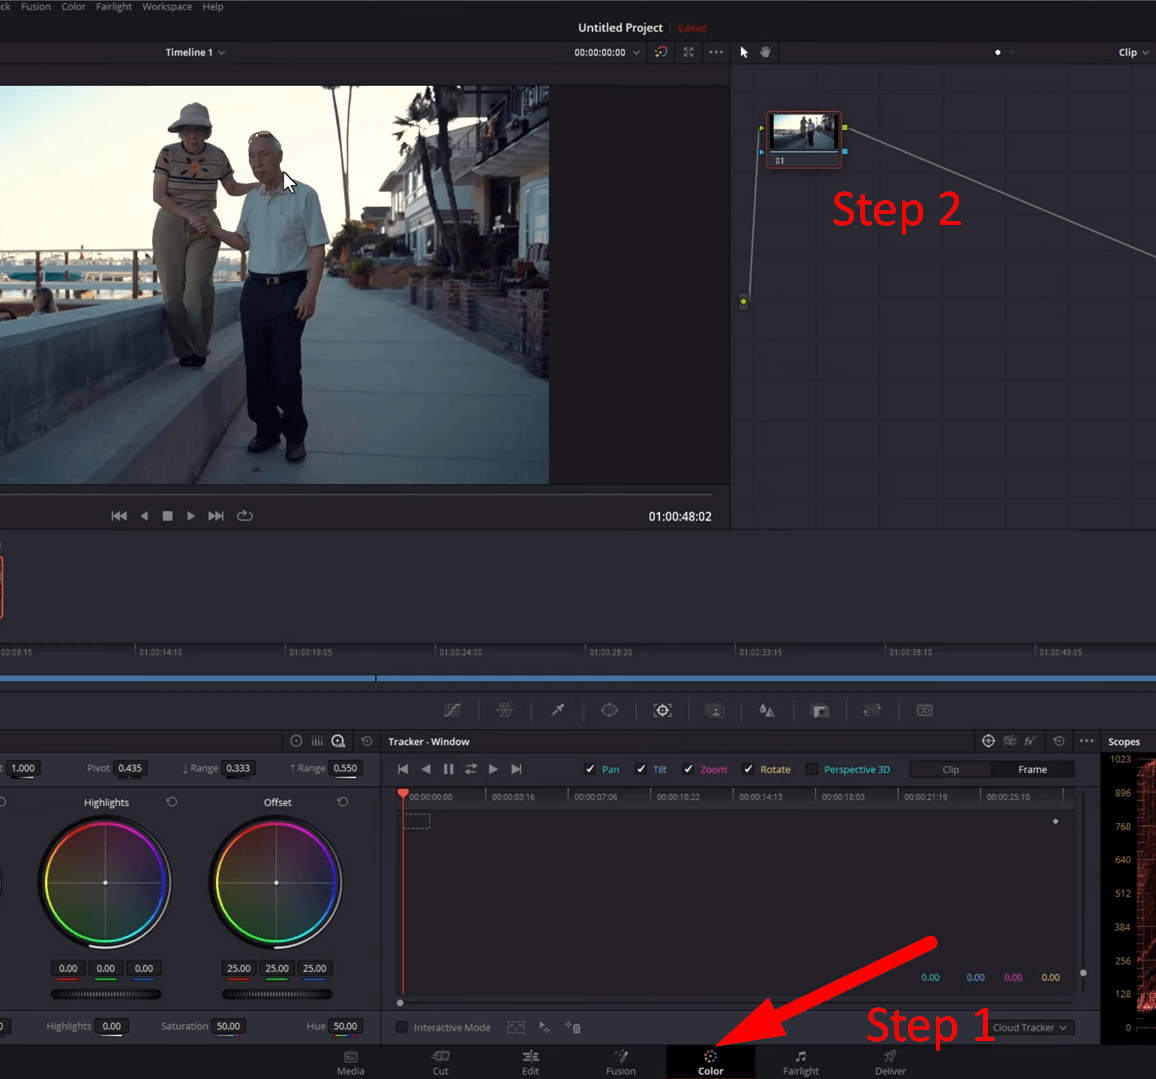
- Select the clip in the timeline, then go to the “Color” page on the bottom menu.
Step 2- Open the Node
- Ensure that you have “Node” open on the right side of the media, and if it is not appearing, click the “Nodes” icon from the top right of the screen.
Step 3- Power Window
- Go to the “Window” tab and select the mask according to the object’s shape you want to blur.
- If the selected mask does not appear in the preview media, go to the “Mask” tab under the source viewer and select “Power Window.”
Step 4- Adjust the mask
- Select and adjust the window mask according to the shape of the object.
- Now, add feather or softness to the edges by grabbing the “Red Dots” of the mask to make the media more feathered or less feathered.
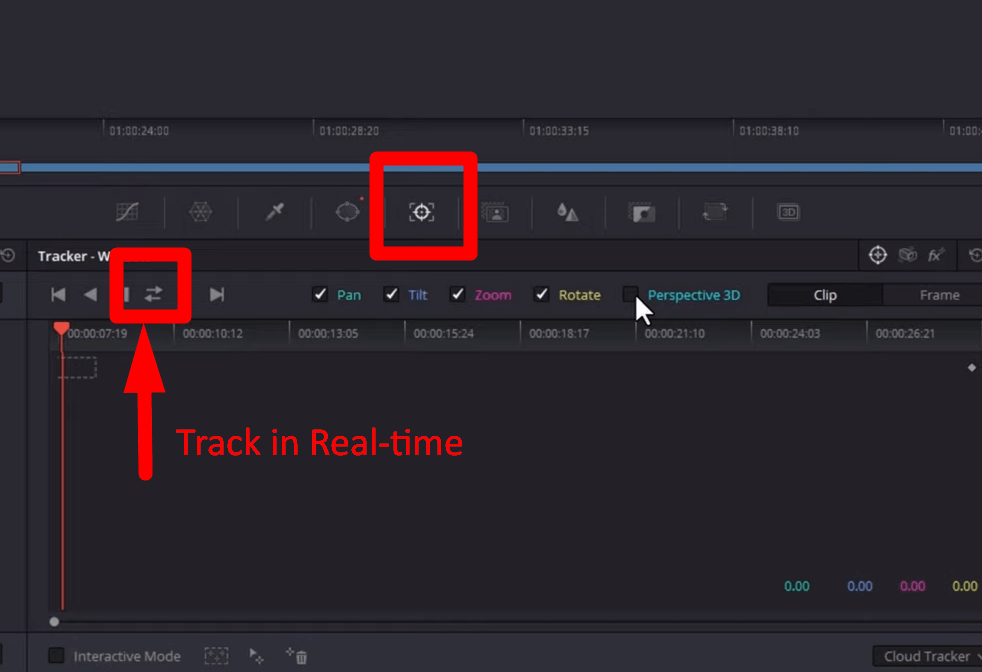
Step 5- Open the “Tracker”
- Go to the “Tracker” tab and select the “Track Forward and Reverse” tab or back and forth arrows, and it will track your face in real time.
Step 6- Add another Node
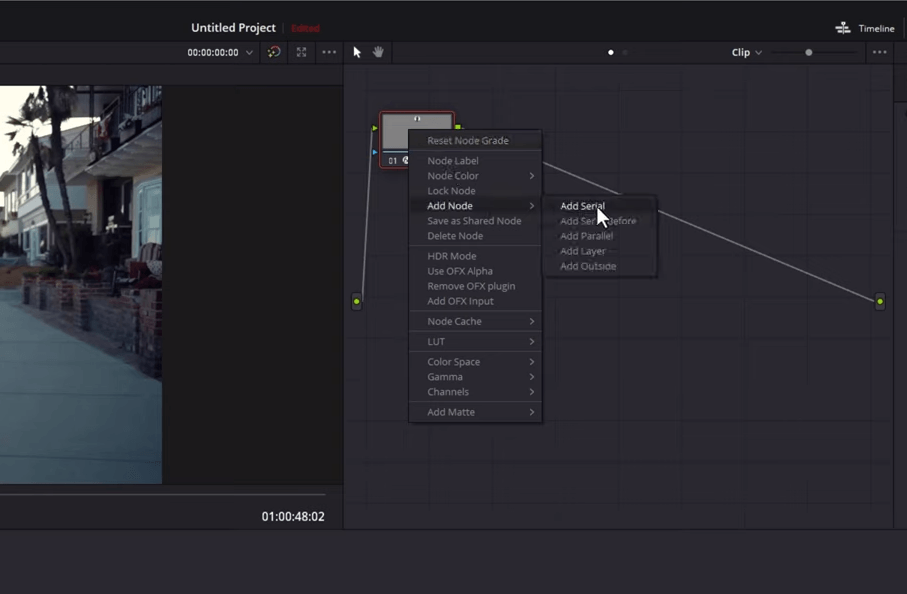
- Right-click the clip in the Node, select “Add a Node,” then choose “Add Serial” to add another node.
- Select the added Node and repeat the process by selecting another moving object and adding the mask.
Step 7- Add Blur to the Node
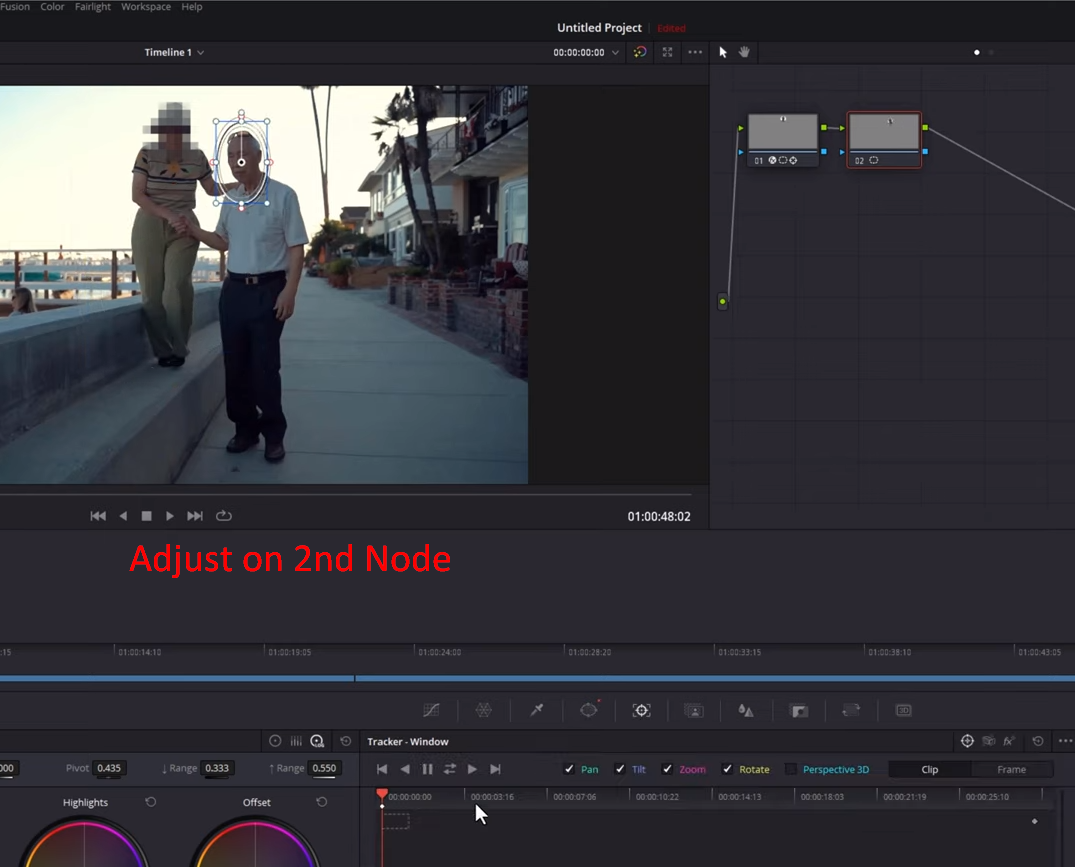
- Then, go to the Tracker tab to analyze the selected area and open the Blur tab to enable the effect.
- It will analyze the moving object smoothly and ensure it follows the marked area perfectly.
Note: Uncheck the “Perspective 3D” in the Tracker tab because it will not allow a smooth blur of the clip.
- Using Keyframes
Generally, the keyframes are used to manually adjust the “Window” or mask appearance in the clip. It is used to fine-tune the blur, fix the issues during the adjustments, and ensure smoothness.
If “Blur” stops moving or continues moving
Once the mask is adjusted, sometimes, the blur stops moving with the moving object. It happens because it tries to track something that is no longer on the screen.
Step 1- Reset the Blur Effect
- Go to the “Blur” tab from the “Color Palette” menu and select the “reset” button to remove the blur effect.
Step 2- Adding Keyframes
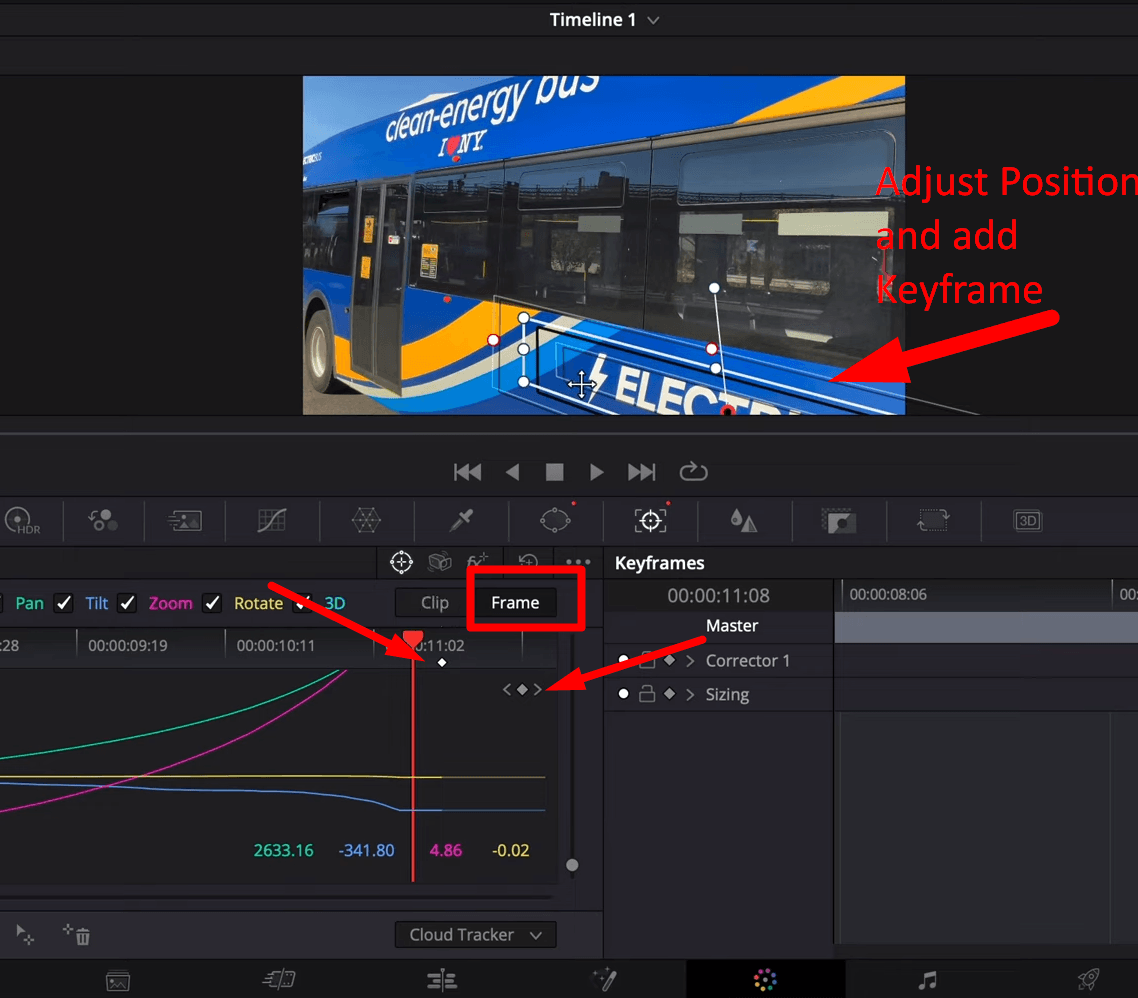
- Then, go to the “Tracker” tab and move the playhead from where it stops following the blurred area.
- Switch over to the “Frames” tab from the top right of the Tracker screen.
- Select the “Keyframe” icon and manually adjust the position of the mask over the clip.
- Carefully adjust the movement of the mask keyframe by keyframe until the selected part of the clip is on the left screen.
Step 3- Play the clip in the timeline
- Then, go to the timeline and play the clip, and you will analyze that it will be much smoother than it was previously.
Adjust the Mask Position
If, in the media clip, the object is first far away and then moves forward towards the camera, then it’s possible that the “Tracker” might not be able to analyze the area. It happens because the adjusted area becomes too large.
Therefore, adding keyframes and manually adjusting the mask position and size will make the clip uniform and smooth. So, follow the process to fine-tune or remove the “Power Window” or mask from appearing in the clip.
Step 1- Go to the “Key” control
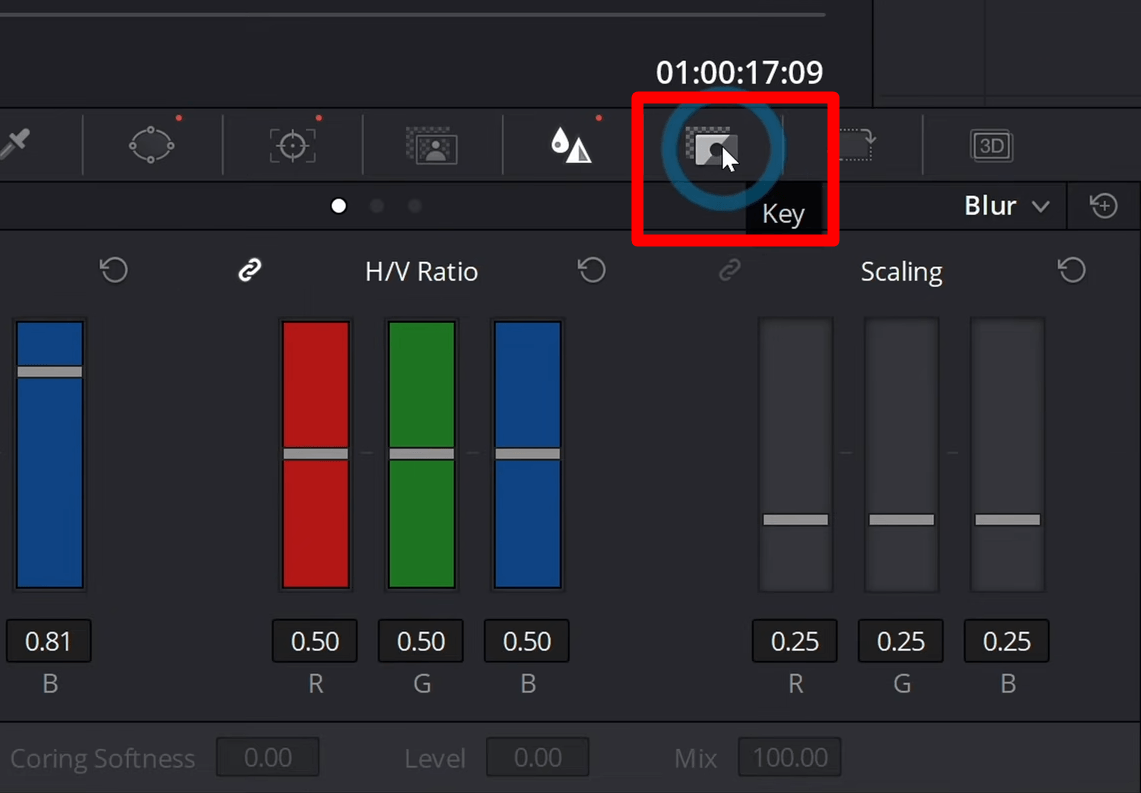
- Once the mask is adjusted, go to the “Key” palette next to the “Blur” tab.
- The “Gain Output” will show the strength of the selected Node, and it determines the intensity of the color node, such as opacity.
Step 2- Automatic Keyframe
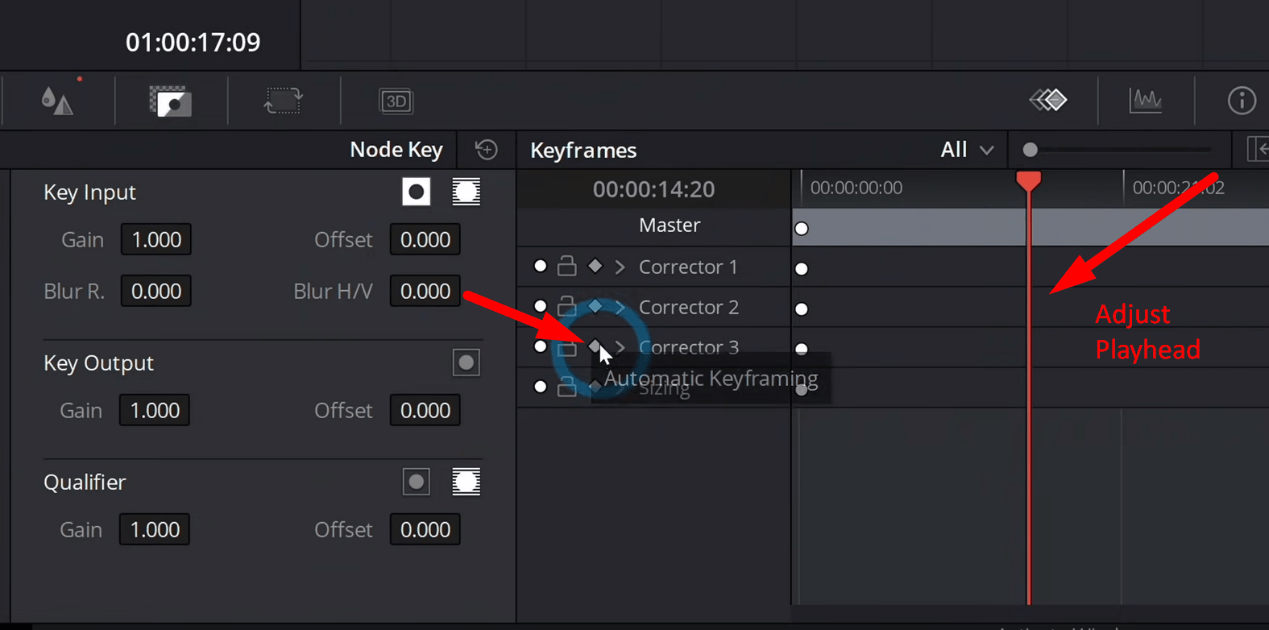
- Then select the “Corrector” you are working on or where you want to adjust the mask.
- Choose the automatic “Keyframe” icon, then move the playhead from where you want the mask to stop appearing on the clip.
Step 3- Set the Gain Output and add keyframe
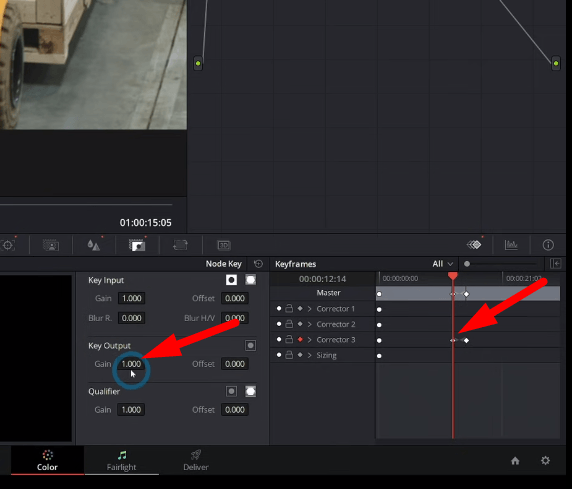
- Set the “Gain Output” to the desired seconds, and press the “keyframe icon” to add a keyframe to that point.
- Now, move the playhead to the start or where the video’s “Selected” part is fully shown.
- Go to the “Gain Output” and ensure it’s at “1.00.” Then, it will add a keyframe to this point.
Step 4- Gain Output
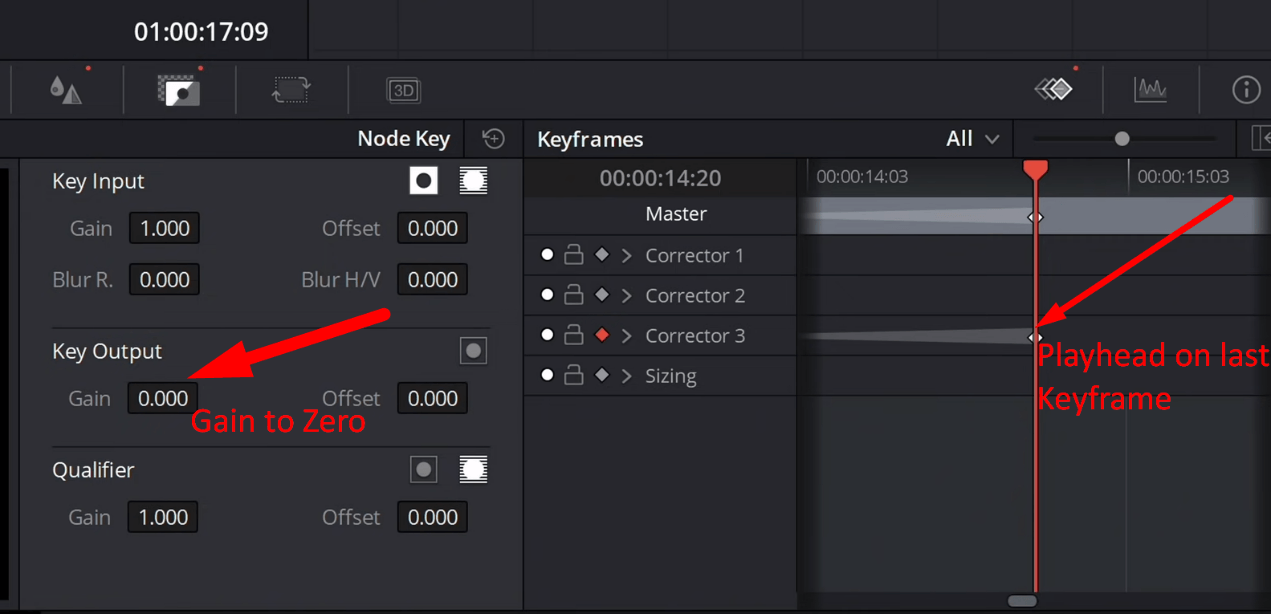
- Place the playhead on the second keyframe at the correct frames.
- Then grab the “key output gain” and push it down to the “Zero,” it will remove the mask from appearing.
- Click to play the clip to ensure the blur is perfectly adjusted and works fine.
Method 2- Blur video with the Fusion Page
Step 1- Open the Fusion Page
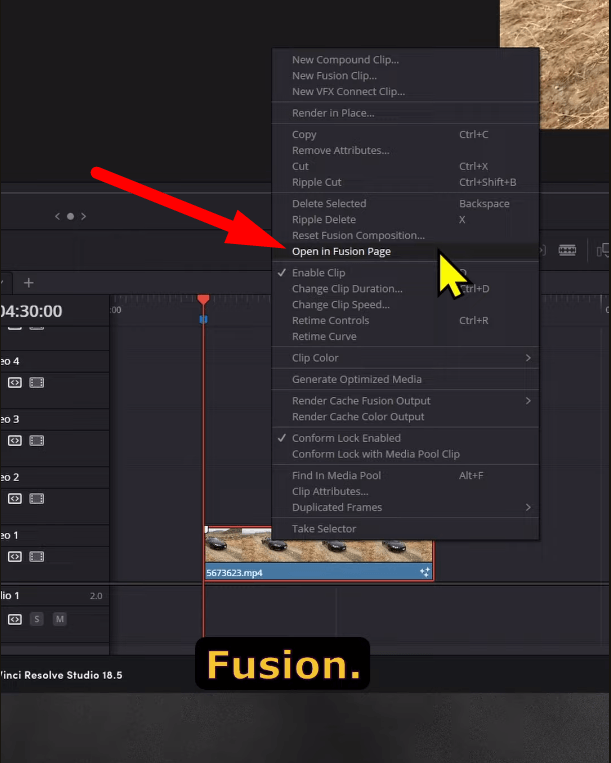
- Select the desired clip in the timeline, then right-click it and choose “Open in Fusion Page.”
- Alternatively, select the “Fusion” page from the bottom main menu.
Step 2- Select Tracker Node
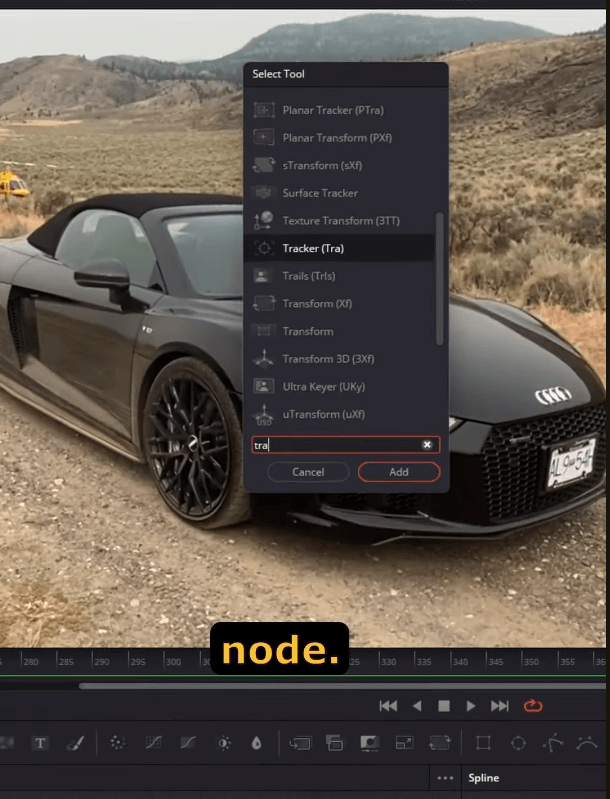
- Then press “Ctrl + Spacebar,” and it will open the “Tool” window, allowing you to select available tools.
- Navigate to the “Tracker” Node or search for the tracker node, which will appear at the center of the clip.
- Select and drag the “Tracker” on the area you want to blur over the object or subject.
Step 3- Track Forward

- Then click the “Track Forward” or “Play” icon option under the trackers tab and select “OK.”
Step 4- Blur Node
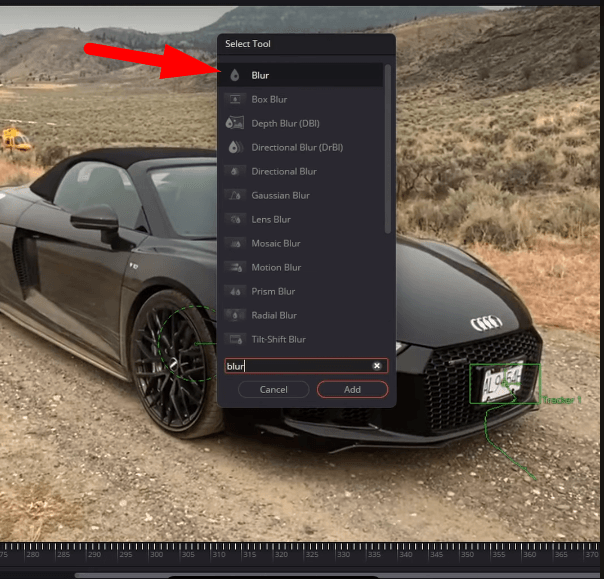
- After that, press “Ctrl + Spacebar” again and search for the “Blur Node” from the tool menu.
- Select the Blur Node and adjust the “Blur Size” from its settings.
Step 5- Add the mask
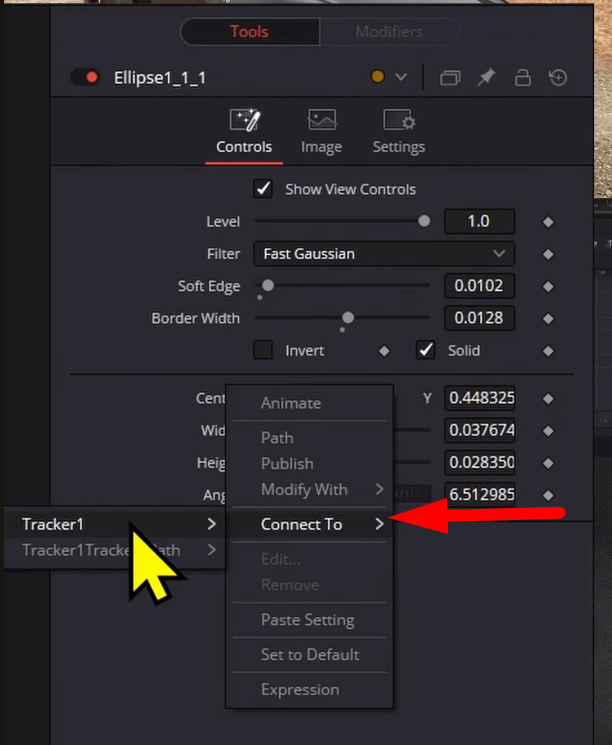
- Now add “Ellipse Mask” to these blur nodes or use a polygon mask if you want, and it depends on the shape of the object.
- Right-click on the center of the “Ellipse” window, go to “Connect To,” hover over “Tracker1 Tracker Path,” and choose “Position.”
Step 6- Play the clip
- Click to play, and Resolve will track your blurred section over the whole clip, which will remain blurred during the journey.
Review and Export the Clips
Once you are satisfied with the blur effect, go to the timeline and click to play the clip to ensure it is adjusted with movement. Follow the steps to export the final clip:
Method 1- Quick Export
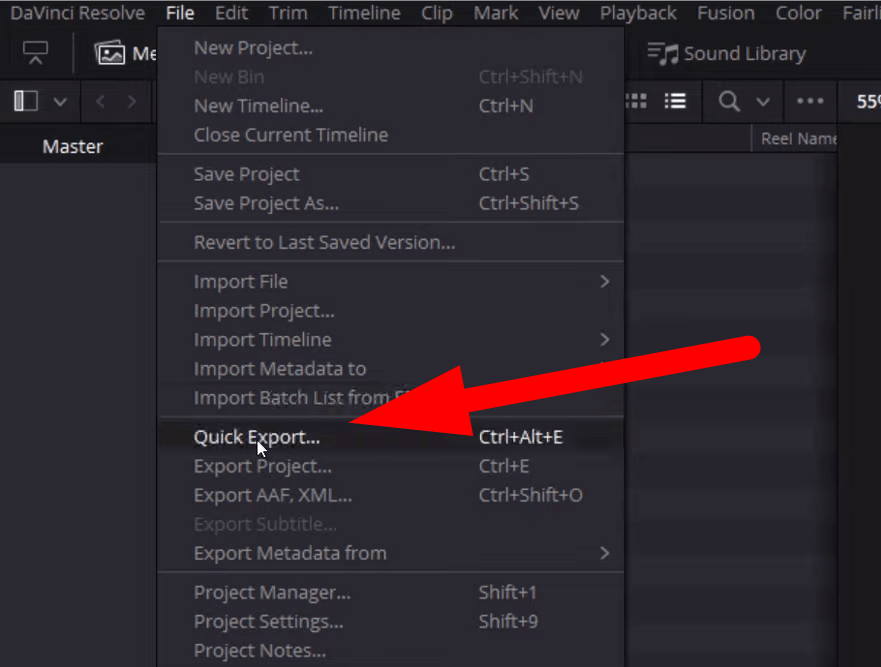
- Go to the “File” menu from the top left corner and select “Quick Export” from the drop-down.
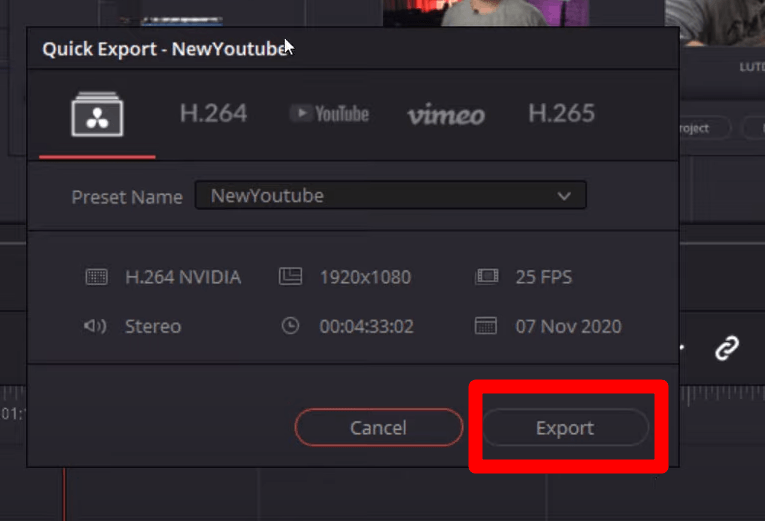
- Choose the high-quality file format and click “Export.”
- Select the desired location from where you want to save the files, then click “Save.”
Method 2- Custom Export
Step 1- Render tab

- Go to the “Deliver” tab from the bottom menu.
- Choose the “Export” option from the “Render” by selecting either “Entire Timeline” or selecting in/out points.
- The In/Out Range lets you choose a portion of the clip you want to export.
Step 2- Custom Export
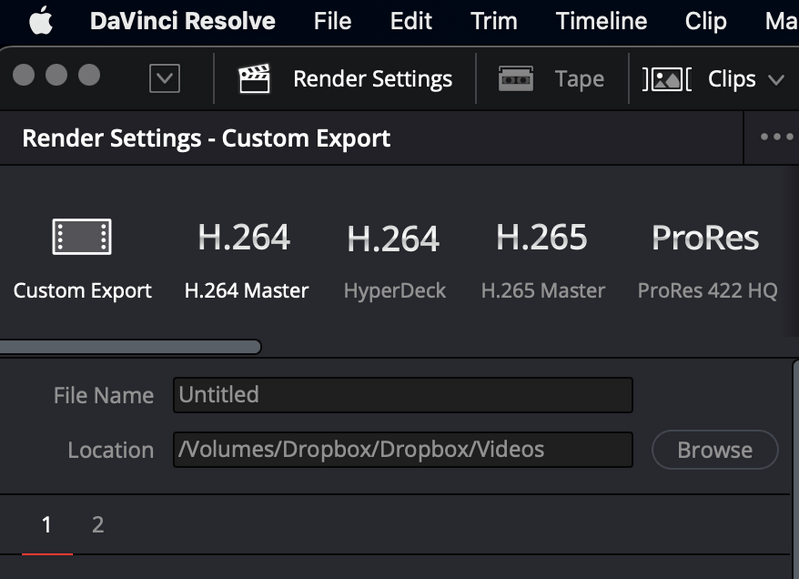
- Choose “Custom Export” under the Render Settings from the top left.
- Select the “File Name” and click “Browse” to select the location where you want to save the files.
- Scroll down, select the desired resolution, and ensure that you select 4K or 1080 for high-quality video.
- It’s necessary to choose the frame rate that matches the frames of the original video.
Step 3- Render All
- Adjust additional settings that meet your standard, then select “Add Render to Queue.”
- Select “Render All” and wait for the process to complete.
Tips and Considerations
DaVinci Resolve provides different methods to blur videos to hide details or sensitive information. Here are some essential tips and considerations to maintain the quality and blur effect.
- Power Window: Effectively use the Power Window to select the specific area that you want to blur precisely. Use keyframes to precisely adjust the size and position of the window if the object is moving forward or backward.
- Tracker: For moving objects, ensure that the Tracker smoothly tracks the selected area and stops appearing if it leaves the frames.
- Adding Feathers: Maintain the blur quality by precisely adding feathers or smoothening the edges of the selected blur part.
- Adjust Settings: Precisely adjust the Radius and intensity of the power window and customize the pixel size in mosaic blur to maintain visibility.
- Carefully add Nodes when you have to blur multiple objects in the clip.
- Keyframes: Use keyframes for moving objects and to manually adjust the appearance of blur at specific times and lengths.
- Save and Preview: Always save your work frequently and keep looking at the preview window to ensure everything looks fine.
Conclusion
Blurring is essential to hide a specific video part to avoid sharing unwanted information. Whether using the free or studio version, DaVinci Resolve can precisely blur part of the video. This guide provides diverse methods for simple and complex blurring tasks.
So, elevate your video editing skills for a creative experience to maintain the blur quality during export.
When you’re fine-tuning specific effects like selective blurring, using a high-quality camera monitor ensures you have precise control over every detail. A clear, accurate monitor helps you quickly identify and isolate exactly which parts of your footage need adjustments, streamlining your editing workflow in DaVinci Resolve.
Frequently Asked Questions
How to blur an object in the video for a specific time length?
- Use “Power Window” to mask the area for the blur effect.
- From the Effects Controls, search “Adjustment Clip” and drag it to the timeline.
- Drag it to the desired duration of the video, and it also allows you to adjust the length of it.
- Alternatively, manually adjust the blur using keyframes from the “Tracker” tab on the Color page.
What’s The Difference Between Traditional Blur And Mosaic Blur?
The main difference between these two is the visual effect that results after the blurred effect. Traditional blur provides a smooth effect by averaging the colors of the pixels and creating soft edges, ensuring depth of field. Mosaic Blur creates a pixelated effect, which makes it perfect for hiding sensitive information.
Is it possible to add blur effects to multiple clips?
Applying the same blur to multiple clips in DaVinci Resolve is possible. To do this:
- Select each clip and add blurring to it.
- Open the clips in the timeline and apply the blur effect.
- Copy the effect and paste it to the rest of the clips in the timeline.
Alternatively, select all the clips, right-click, and choose “Compound Clip.” The blur effect will be applied seamlessly to the compound clip.
How to Add Motion Blur to Videos in DaVinci Resolve?
The Resolve lets you add motion blur on the free version or studio.
- Select the clip and open the “Fusion” page from the bottom menu.
- Press “Shift + Spacebar,” then search and add the “Optical Flow” node between the MediaIn and MediaOut nodes.
- Press “Shift + Spacebar” and search “Vector Motion Blur.”
- Go to the “Inspector” panel from the top right corner to adjust the settings for the blur, and then play the clip to analyze the blur.