DaVinci Resolve is a powerful video editing software used by professionals and hobbyists alike. However, due to its extensive capabilities, achieving smooth playback can be challenging, especially when working with high-resolution footage or complex projects. A sluggish timeline can significantly hinder your editing workflow. But fear not, there are several effective methods you can employ to achieve smooth playback in DaVinci Resolve. Here’s an in-depth guide to help you speed up playback in DaVinci Resolve, ensuring a smoother editing experience.

Why Smooth Playback Matters
Imagine trying to navigate a busy intersection without proper traffic signals. That’s akin to editing with a lagging timeline, disorienting and inefficient. Smooth playback allows you to:
- Review edits seamlessly: Evaluate cuts, transitions, and effects with fluidity, ensuring precise decision-making.
- Maintain focus and flow: Eliminate stutters that break your concentration and disrupt your creative process.
- Work efficiently: Navigate your timeline quickly and confidently, saving valuable editing time.
DaVinci Resolve offers various tools and techniques to help you achieve this ideal playback experience.
Speed Up the Playback by Improving DaVinci Resolve Performance
Enhancing playback performance in DaVinci Resolve can reduce lag and prevent potential crashes. Here are effective methods to improve real-time performance:
Generate Optimized Media
DaVinci Resolve supports various media formats, but not all ensure smooth playback. Converting media files to formats like DNxHR, ProRes, or Cineform can enhance playback speed.
Steps to Generate Optimized Media
- In the Media Pool, select the files to convert.
- Right-click on the selected files and choose “Generate Optimized Media.”

DaVinci Resolve will automatically convert the files to the optimized format, ensuring smoother playback.
Generate Proxy Media
Proxy media involves creating lower-resolution versions of original files, making playback smoother and file management easier. High-resolution footage from cameras like DSLRs, drones, and action cameras often uses compressed codecs like H.265 or H.264, which can cause playback lag, especially when effects are applied.
Steps to Generate Proxy Media
- Select the source files in the Media Pool.
- Right-click and choose “Generate Proxy Media.”
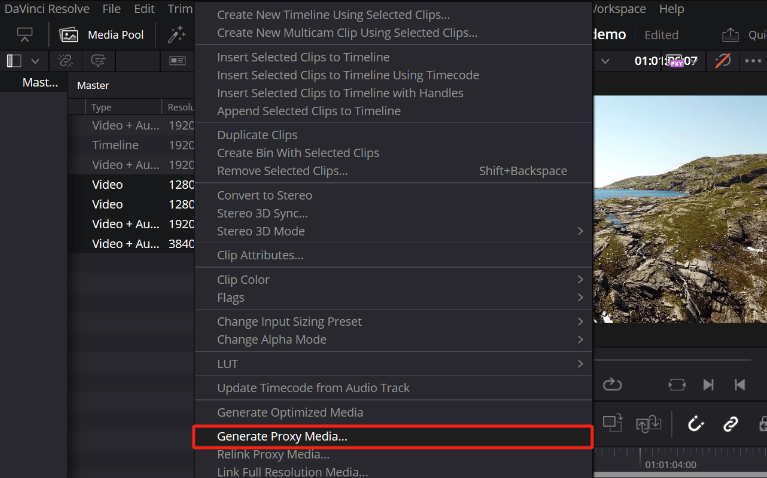
- DaVinci Resolve will display a progress window for proxy file generation.
- After generating proxy media, navigate to the Playback menu at the top of the page. Select “Proxy Handling” and ensure “Prefer Proxies” is chosen. This setting will prioritize the proxy versions of the files over the original ones, significantly improving playback speed.

Disable Unnecessary Effects
Excessive effects can slow down playback. Disabling non-essential effects can improve speed.
Steps to Disable Unnecessary Effects
- Identify effects that are not critical during the editing phase.
- Temporarily disable or bypass these effects by clicking the “Rainbow” icon on the Edit Page. This action turns off color grades and Fusion effects without altering the original clips.
Increase Hardware Performance
If optimization methods are insufficient, upgrading hardware can significantly boost performance.
Hardware Upgrades to Consider
- RAM: Adding more RAM can help handle larger files and complex projects.
- Hard Drive: Switching to a faster SSD can speed up data access times.
- Graphics Card: Upgrading to a more powerful GPU can improve rendering and playback performance, especially for high-resolution or heavily edited footage.
Use Performance Mode
Performance Mode in DaVinci Resolve optimizes the playback by adjusting image processing based on your system’s hardware configuration.
Steps to Enable Performance Mode
- Go to DaVinci Resolve > Preferences > Users > Playback Settings.
- Enable “Performance Mode.”
- Adjust additional settings such as “Hide UI Overlays” and “Minimize interface updates during playback” to further improve performance.

Performance Mode provides better playback without compromising the final output’s quality, even on older computers. However, enabling these options may limit some interface controls, such as mouse movements and power window adjustments, which consume GPU resources.
By implementing these strategies, DaVinci Resolve users can achieve smoother playback and a more efficient editing workflow, ensuring a seamless creative process.
Using Shortcut Keys to Speed Up the Playback
Understanding how to use the JKL shortcut keys in DaVinci Resolve makes adjusting playback speed straightforward. These keys, either used alone or in combination, provide quick and efficient control over playback speed.
The primary benefit of using these keys lies in their simplicity and accessibility. Both professional editors and beginners can easily learn and utilize these shortcuts. However, it’s essential to be aware of whether you intend to adjust forward or reverse playback speed.

Step 1: Open DaVinci Resolve and Play the Track
- Start by launching DaVinci Resolve and opening your project.
- Play the track you wish to edit.
Step 2: Increase Forward Playback Speed
- Press the “L” key to speed up the forward playback.
- For even faster playback, combine “Shift” with “L” (Shift + L).
Step 3: Increase Reverse Playback Speed
- Use “Shift + J” to speed up the playback in reverse.
Step 4: Slow Down Playback Speed
- Hold “Shift + K” to slow down the playback speed.
- The direction in which “Shift + K” slows down playback depends on the last key used:
- If “L” was used previously, “Shift + K” will slow down forward playback.
- If “Shift + J” was used previously, “Shift + K” will slow down reverse playback.
These shortcuts offer a flexible and efficient way to control playback speed, enhancing the editing process in DaVinci Resolve.
Speed Up the Playback by Optimising Render in Place
While the previous methods should significantly improve playback performance, DaVinci Resolve offers an additional tool: Render In Place. This option is particularly effective for clips with complex effects or color grading that strain the system’s playback capabilities.
However, there’s a trade-off. Once a clip is rendered in place, editing the original footage requires accessing the unrendered version. Here’s how to utilize Render In Place for smoother playback:
Steps to Render in Place
- Select the desired clip or track.
- Right-click and choose “Render in Place.”
- Specify the “Type of File” and “Location to Save” in the dialog box.

This method creates a new file with all applied effects, ensuring smooth playback. Editing the clip again will require access to the original version.
Adjust Timeline Resolution
While high resolution is crucial for final video quality, it can demand more processing power during editing, leading to playback lag. DaVinci Resolve allows you to temporarily reduce the timeline resolution for smoother playback, particularly beneficial when working with 4K footage. Lowering the timeline resolution reduces the workload on your system, resulting in smoother playback.
Steps to Adjust Timeline Resolution
- Open DaVinci Resolve and go to “Project Settings.”
- Under “Timeline Format,” select “Timeline Resolution.”

- Check the box labeled “Use Custom Settings” before making changes.

Always remember to revert to the original resolution before exporting to avoid lower-resolution output.
Change Timeline Proxy Resolution to Speed Up Playback
Adjusting the timeline proxy resolution can also improve playback performance. While lesser-known, adjusting timeline proxy resolution offers a significant performance boost. This approach mirrors the concept of proxy editing in other software like Adobe Audition.
DaVinci Resolve displays lower-resolution proxy files during editing, reducing the processing load and enabling smoother playback. The original high-resolution files remain untouched, ensuring pristine final output.
Steps to Change Proxy Resolution
- Open the “Playback” menu in DaVinci Resolve.
- Select “Proxy Mode.”
- Choose between “Half Resolution” and “Quarter Resolution.”

This adjustment changes the resolution for editing purposes but does not affect the final render quality.
Bypass Color Grades and Fusion Effects for Speeding Up the Playback
Disabling color grades and Fusion effects can smooth playback, especially if these effects are resource-intensive. If the previous methods haven’t yielded optimal playback performance yet, consider temporarily bypassing color grades and Fusion effects. These complex effects can significantly impact playback speed.
Important Note: Bypassing effects removes them from the timeline view, but they are not permanently deleted. You can easily re-enable them later. However, be mindful that this method eliminates the visual effects you’ve applied to the clip during the bypass period.
Steps to Bypass Effects
- Navigate to the “Edit Page” in DaVinci Resolve.
- Click on the “Bypass Color Grades and Fusion Effects” icon, which resembles a “Rainbow.”
This will disable all applied effects temporarily, improving playback speed.
Rendering Cache to Speed Up the Playback
For those familiar with DaVinci Resolve 12.5 or 14, rendering the cache is another effective method to improve playback performance. This process involves pre-rendering clips, which can help in smoother playback.
Step 1: Select Clips in Timeline
- Highlight all the clips in your timeline.
- Right-click on the selected clips and choose “Render Cache Clip Source.”

Step 2: Enable User Render Cache
- Go to the “Playback” menu.
- Ensure “User” is enabled under “Render Cache.”

These steps will pre-render the clips, storing them in the cache to enhance playback speed, reducing lag and ensuring a smoother editing experience.
Speed Up the Playback on the Timeline in DaVinci Resolve
DaVinci Resolve offers several methods to speed up video playback on the timeline. Follow these steps for efficient speed adjustments:
- Open DaVinci Resolve and create a new project.
- Navigate to the “File” menu and select “Import Media.” Choose the video clip you want to adjust and import it into your project. Drag the clip onto the timeline for editing.
Using Change Clip Speed
Step 1: Open Edit Page
- Go to the timeline and right-click on the clip.
- Select “Change Clip Speed.”

Step 2: Adjust Speed
- Enter the desired speed percentage (e.g., 200% for double speed).
- The corresponding duration and FPS will be displayed.
- Click “Change.”

Using the Speed Adjustment Tool
Step 1: Open Cut Page
- Click on the equalizer icon.
- Then, select the speedometer icon to access speed options.
Step 2: Set Speed
- Enter the desired speed (e.g., 2x, 3x).
- The adjusted duration will be shown, and you can also select the speed curve.

Using Retime Control
Step 1: Enable Retime Controls
On the Edit Page, right-click the clip and select “Retime Controls” or press Ctrl+R.
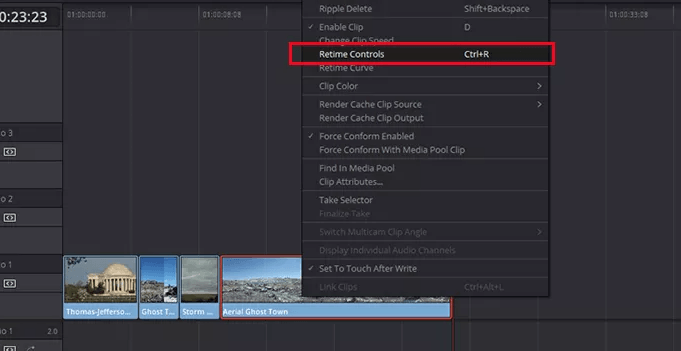
Step 2: Adjust Speed
- A percentage will appear at the bottom of the video in the timeline.
- Open the drop-down menu, select “Change Speed,” and set the desired speed.
- Alternatively, create a speed point by moving the playhead and selecting “Add Speed Point.” Drag the speed point left or right to adjust the speed of specific portions.

Using the Retime Curve
Step 1: Access Retime Curve
Right-click the clip in the timeline and select “Retime Curve.”

Step 2: Modify Speed
- Click the down arrowhead next to “Retime Frame” and select “Retime Speed.”
- Adjust the curve to modify the speed, moving it up to increase speed and down to decrease it.

These methods offer flexibility and precision in adjusting playback speed, enhancing the efficiency of your editing workflow in DaVinci Resolve.
Advanced Techniques & Tips for Uncompromising Performance
For projects pushing the boundaries of DaVinci Resolve’s capabilities, consider these advanced strategies:
Cache Management
DaVinci Resolve automatically caches frequently accessed clips and effects to improve playback performance. However, this cache can grow large over time. Regularly clearing the cache can free up storage space and potentially enhance playback.
- Go to DaVinci Resolve preferences.
- Navigate to the “User” tab.
- Click on “Delete Render Cache.”
- Confirm the deletion by clicking “Delete.”
Fusion Effects Optimization
Fusion, DaVinci Resolve’s built-in compositing tool, offers powerful effects but can sometimes impact playback. Here are some tips:
- Utilize ResolveFX instead of Fusion effects: ResolveFX offers a simplified version of many common effects, often with better playback performance.
- Render Fusion effects as clips: Complicated Fusion effects can be pre-rendered into separate clips for smoother playback within the timeline.
- Disable unnecessary effects: Review your timeline and disable any effects not currently needed for editing.
Disk Optimization
The speed and performance of your storage drives significantly affect playback. Ensure your project files are stored on a fast SSD for optimal performance. Consider using a dedicated RAID system for even faster data access, particularly when working with high-resolution footage.
System Optimization
Beyond software settings, consider optimizing your entire system for improved editing performance. This might involve:
- Upgrading your hardware: Invest in a system with a powerful CPU, ample RAM (ideally 32GB or more), and a dedicated GPU for DaVinci Resolve.
- Closing unnecessary applications: While editing, close any background programs that might be consuming system resources and potentially impacting playback performance.
- Disabling startup programs: Certain programs that launch automatically at startup can slow down your system. Consider disabling unnecessary startup programs to free up resources for DaVinci Resolve.
Troubleshooting Laggy Playback
If you’re still experiencing laggy playback even after implementing these strategies, consider these troubleshooting steps:
- Identify bottlenecks: DaVinci Resolve offers performance monitoring tools to identify potential bottlenecks in your system. Look for spikes in CPU, RAM, or GPU usage that might be causing playback issues.
- Update software: Ensure you’re using the latest version of DaVinci Resolve. Updates often include performance optimizations and bug fixes.
- Check for compatibility issues: Verify that your system hardware and drivers are fully compatible with the current version of DaVinci Resolve.
Conclusion
Speeding up playback in DaVinci Resolve involves a variety of techniques and tools to enhance editing efficiency and reduce lag. Key methods include generating optimized and proxy media, adjusting timeline resolution, using performance mode, and bypassing color grades and Fusion effects. Additionally, utilizing JKL shortcut keys, changing clip speed, using the speed adjustment tool, enabling retime controls, and modifying the retime curve provide granular control over playback speed. Rendering cache and rendering in place offer further optimization for resource-heavy projects.
Implementing these strategies ensures a smoother editing experience and better real-time performance in DaVinci Resolve, whether working on simple edits or complex projects.
Thank you for reading this guide on speeding up playback in DaVinci Resolve. Your feedback helps improve future content. Please share your thoughts, experiences, or any additional tips you might have.
- Did you find these methods helpful?
- Which technique worked best for you?
- Do you have any other suggestions for enhancing playback performance?
Feel free to leave a comment or review below!
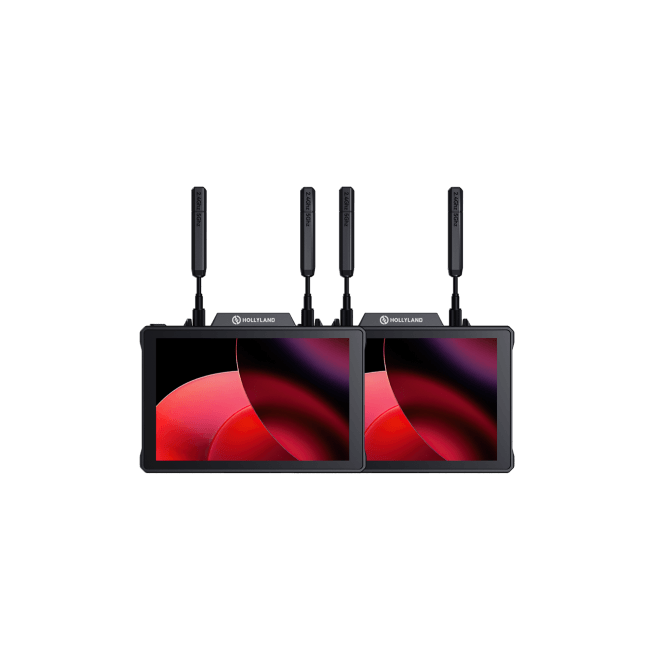
When editing in DaVinci Resolve, clearly seeing each clip’s playback detail makes your workflow much quicker and smoother. A high-quality camera monitor can help you accurately preview your footage, significantly streamlining your editing process.
Frequently Asked Questions
How do you speed up a clip to a specific duration in DaVinci Resolve?
To speed up a clip in DaVinci Resolve, place the footage on the timeline, right-click on the clip, and select “Change Clip Speed.” In the settings window that appears, input the desired speed value or frames-per-second rate.
What is the shortcut for playback speed in DaVinci?
The shortcut keys to speed up playback in DaVinci Resolve are “Shift + L” for forward playback and “Shift + J” for reverse playback.
How do you enable 2x speed with a long press?
By long-pressing the play gesture, a message will appear on the screen indicating ‘Playing at 2x speed.’ Releasing the mouse or trackpad will pause the video.
Why is DaVinci Resolve’s playback speed too fast?
Playback speed may become too fast if specific plugins or effects are applied to a clip. Removing these plugins or effects can help normalize the playback speed.
How can you speed up DaVinci Resolve performance?
To enhance DaVinci Resolve performance:
- Check system requirements.
- Enable Render Cache.
- Use optimized media.
- Utilize Proxy mode.
- Optimize cache location.
- Render in place.
- Consider upgrading to DaVinci Resolve Studio.
Why is DaVinci Resolve’s playback speed too slow?
Playback speed can slow down due to color grading and advanced effects. Bypassing color grading and Fusion effects can streamline playback.
How do you speed up DaVinci export?
Speeding up the export process can be achieved by choosing a different codec or reducing the resolution. A powerful GPU and CPU also significantly enhance export speed.
How do you speed up rendering in DaVinci Resolve?
Enable Render Caches to speed up rendering:
- Go to “Playback” and then “Render Cache.”
- Select “Smart” and save the settings.
Is DaVinci Resolve Studio faster?
DaVinci Resolve Studio offers faster performance by allowing users to switch between CPU and GPU. It also supports multiple graphics cards, enhancing speed and efficiency, especially on a Mac Pro.













.png)


