.png)
Some players on PC face issues with their microphone in Helldivers 2. Sometimes the game forces their Bluetooth headset mic to stay active. Other times, players cannot even switch to a better desk microphone. Because of this, poor sound quality can become a real problem during gameplay. However, there are ways to fix these microphone troubles quickly. So, if you wonder about how to change the microphone in Helldivers 2, these methods offer simple solutions. They work best for the PC version of the game.
Let’s get into solutions without further waiting!
Method 1: How to Change Microphone Input in Helldivers 2?
In this method, you will understand the step-by-step process of changing the microphone input in the Helldivers 2 PC game. In other words, if you have multiple microphones in your setup, you can follow these instructions to select a mic for voice communication in the game. Only that specific microphone will work.
- Step 1: On PC, while on the main screen or during the game, press the Windows + G button to open the game bar
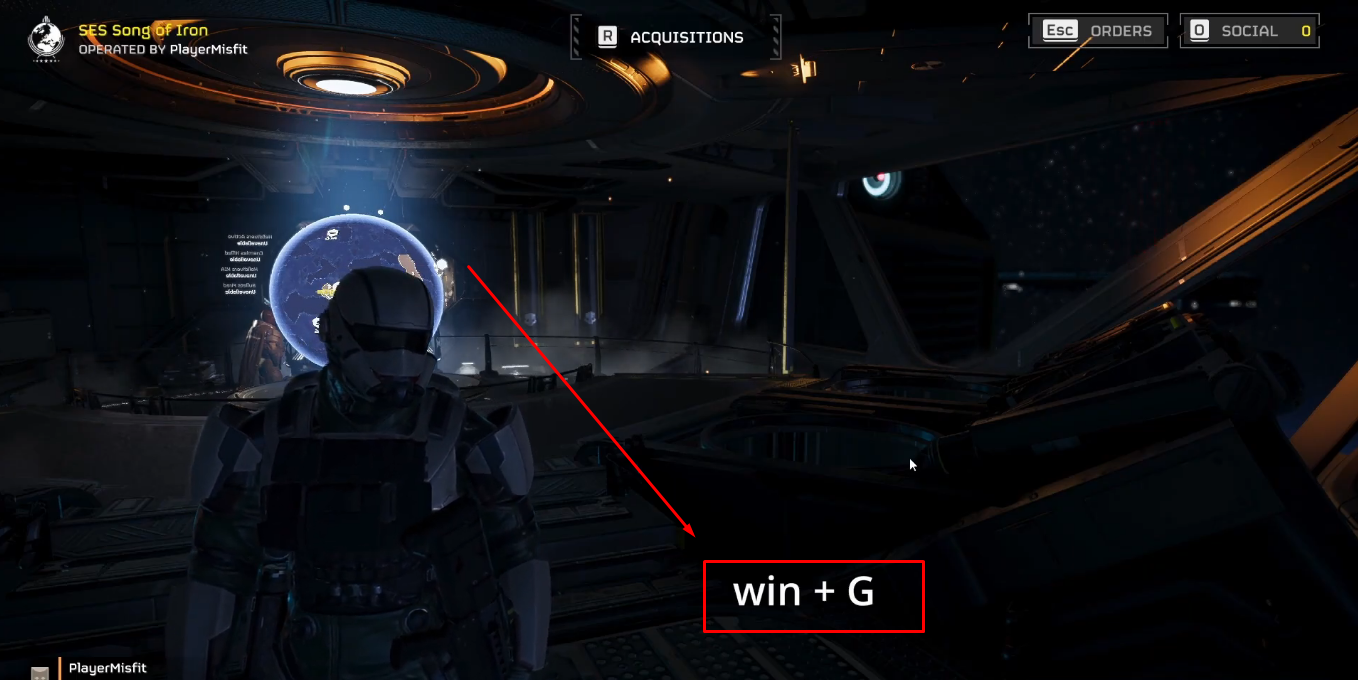
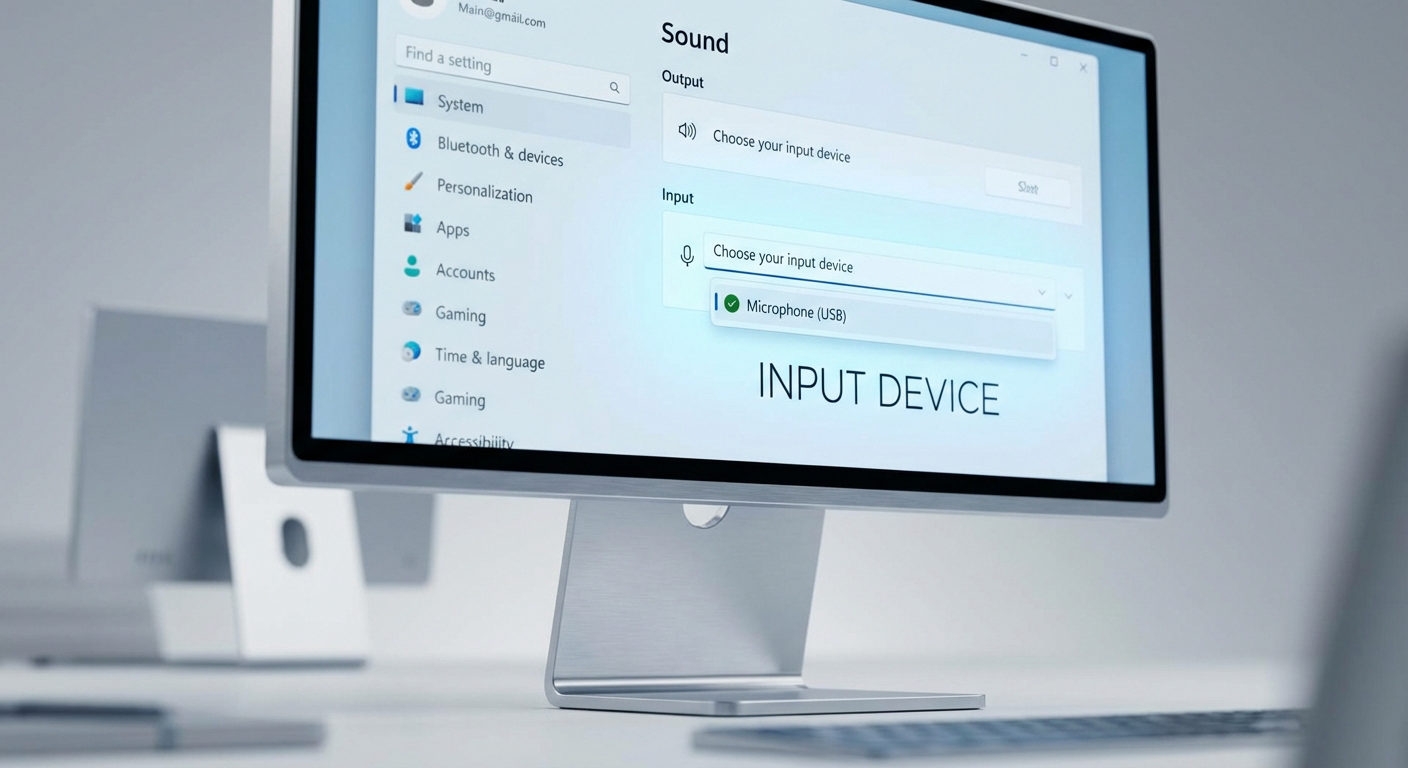
If you can see the names of the microphones attached to your system, click to select the microphone you want to keep as the default mic for Helldivers 2. If not, then:
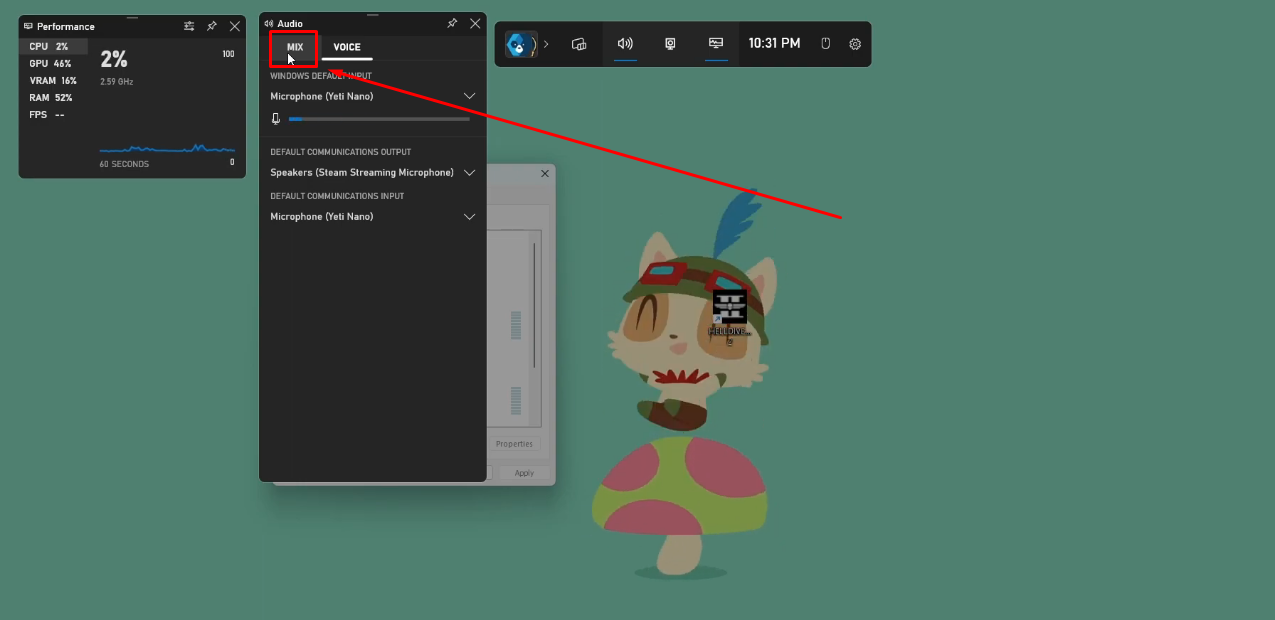
- Step 2: Go to the “VOICE” tab on the top area of the dialog box when you press Win + G, and click on it
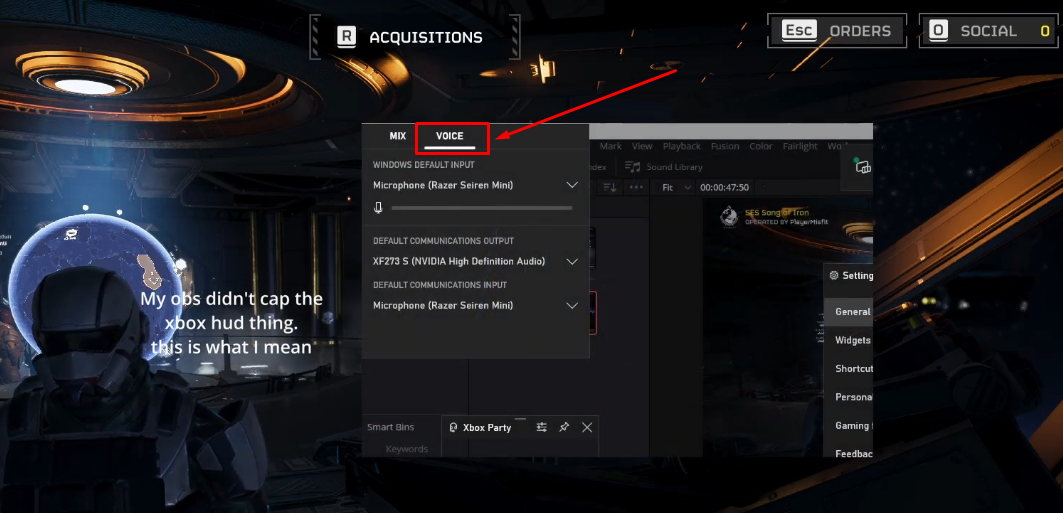
- Step 3: In the “VOICE” option, you will see the “WINDOWS DEFAULT INPUT” section. There, you will notice the microphone set as the default input device for the game.
So, click on the small arrow to open the dropdown menu. Then, choose the name of the microphone you want to use for the game
- Step 4: Now, test the microphone during the game to ensure it’s working properly. You can communicate with your teammates or other players for confirmation
Method 2: How to Change Bluetooth Headphones Mic to a Different Microphone in Helldivers 2?
Sometimes Helldivers 2 picks the wrong microphone by default. It may use a headset or AirPods instead of the desk microphone. There is a simple way to fix this issue. This method will show how to change the microphone in Helldivers 2 and pick the device you prefer.
NOTE: It is a bit lengthy tutorial, so try not to miss any step. For your ease, we have divided this method into three sections.
Section 1: Checking the Default Input and Output Audio Source on Your PC
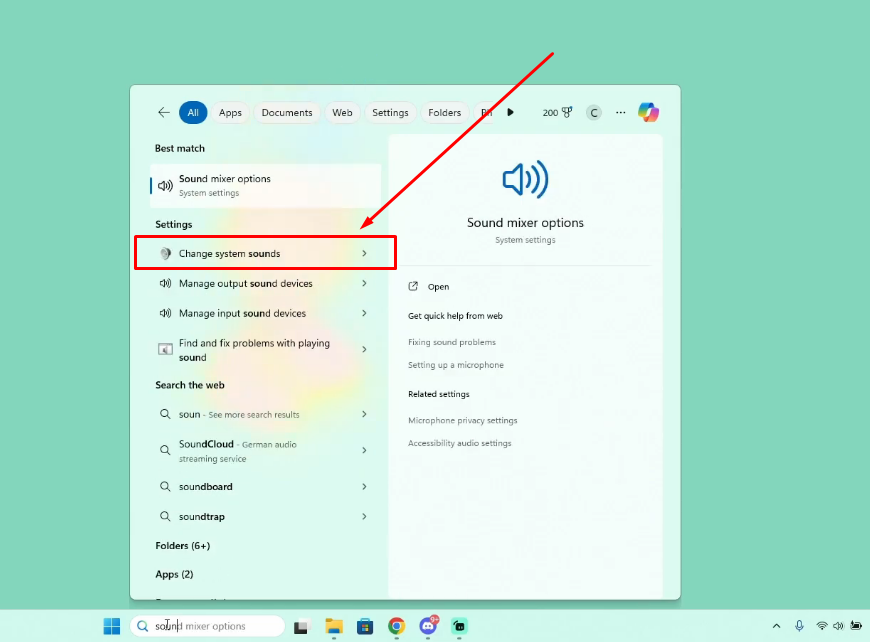
- Step 1: First of all, close Helldivers 2 on your Windows computer
- Step 2: Once done, click on the search bar next to the “Start” menu icon and type “Change system sounds.” When you see the option, click on it
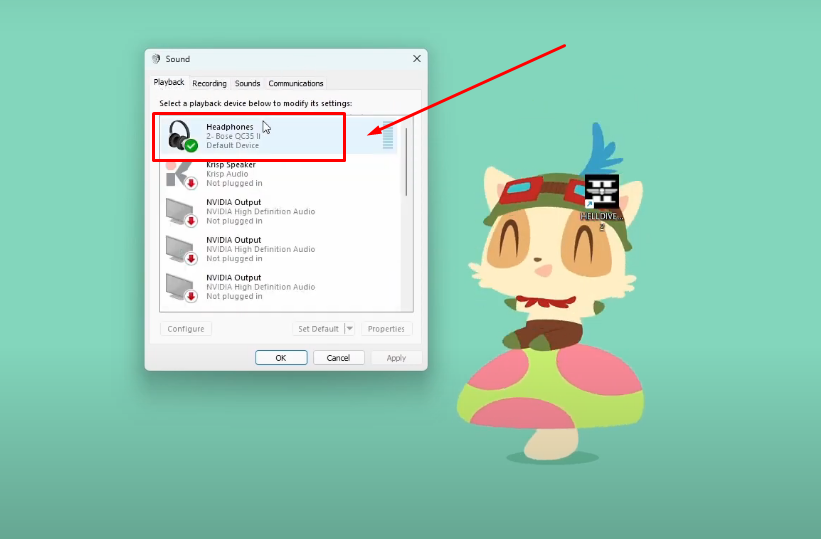
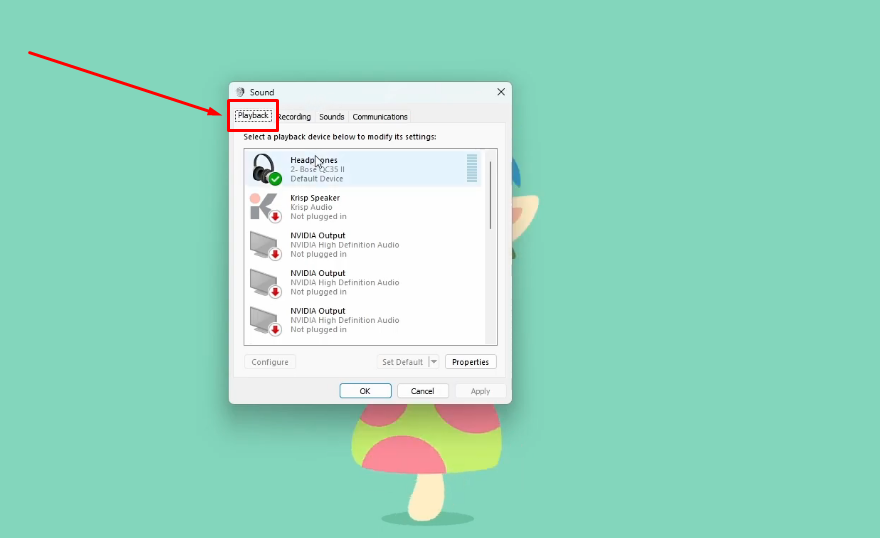
- Step 3: In this step, you need to ensure whether or not your headphones are connected and working with your PC.
On the “System Sounds” dialog box, look for the “Playback” tab at the top of the window and select it to view all the available audio output sources, such as your speakers and headphones. Ensure your Bluetooth headphone with a mic is set as the default playback device, as shown in the screenshot below
- Step 4: Likewise, to confirm the microphone is detected by your computer, click on the “Recording” tab (next to Playback). Scroll down until you find the name of the mic with a “green tick” icon, like this

NOTE: Remember, to change the microphone in Helldivers 2 from a headset to another mic, the audio should be heard through your headphones, while the voice should be routed into the game through the external microphone (for example, your desktop mic) after disabling the headset mic.
Section 2: Choosing the Right Audio Input and Output Device for Your Game
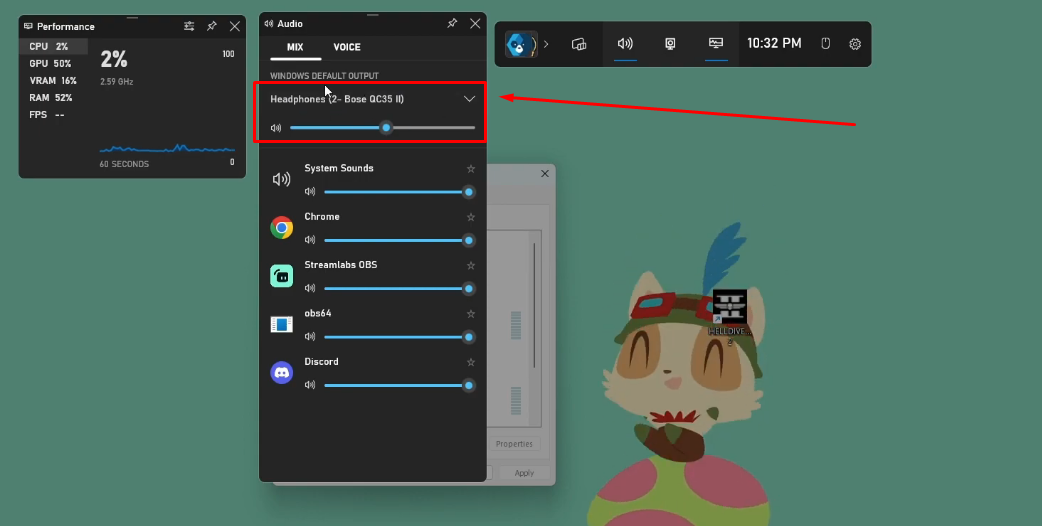
- Step 5: Press “Windows + G” on your computer, and click on the “MIX” tab
- Step 6: Check if your Bluetooth headphones are selected in the “WINDOWS DEFAULT OUTPUT.” If not, click on the downward arrow icon, and choose the headphones
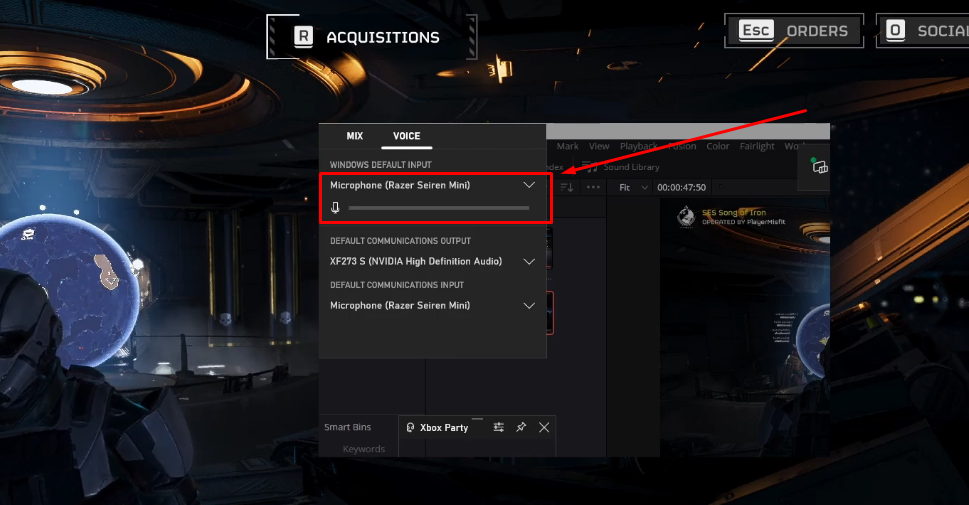
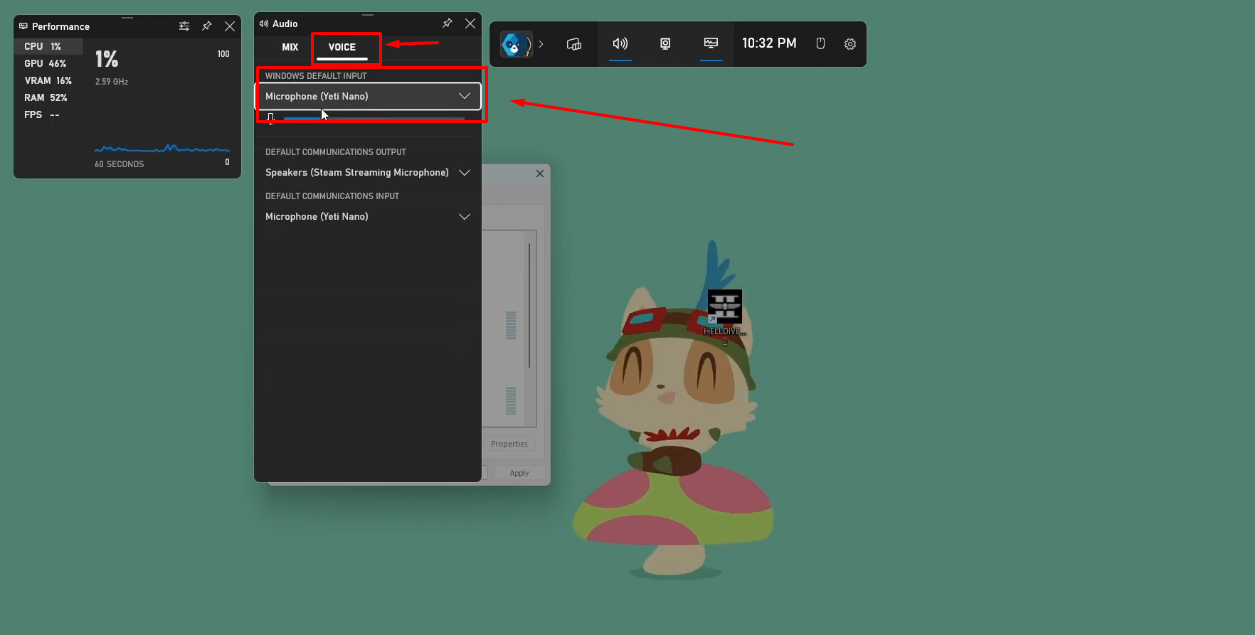
- Step 7: Next, click on the “VOICE” tab. Here, ensure that the correct microphone is selected in the “Windows Default Input” section. If not, click on the downward arrow to pick the right mic
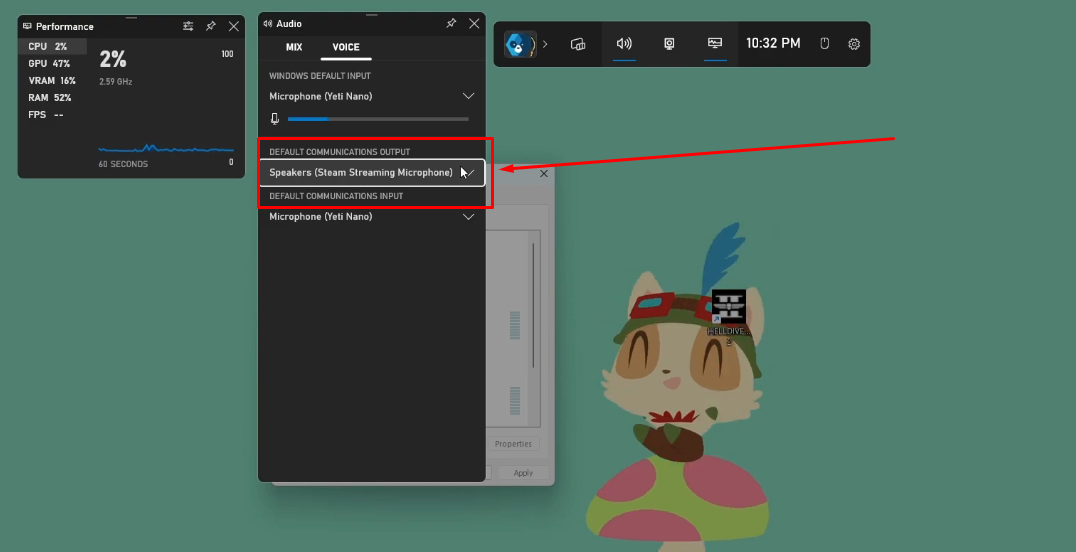
- Step 8: Now, go to the “DEFAULT COMMUNICATIONS OUTPUT” section to confirm whether or not your headphones are selected for hearing the gaming audio. If some other device, such as Speakers, is chosen, click on the dropdown menu, and select your headphones from the list

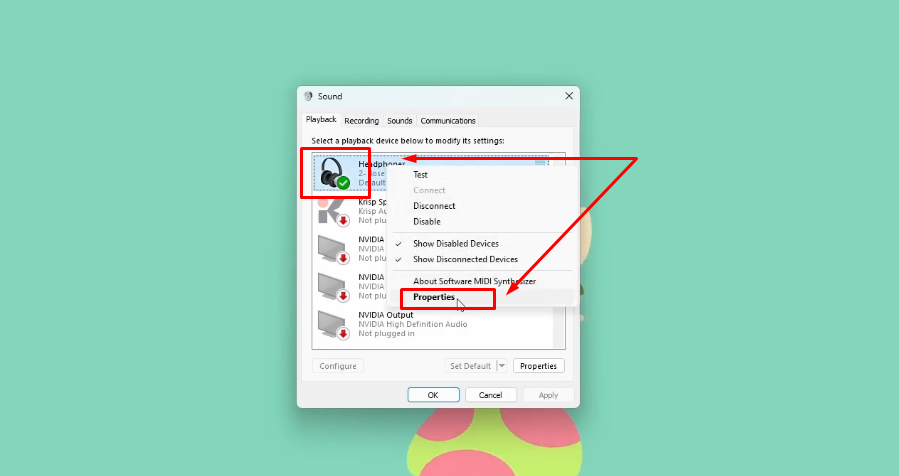
- Step 9: Go back to the “System Sounds” dialog box (from Step 1 to Step 3), right-click on the “Headphones” in the “Playback” tab, and click “Properties”
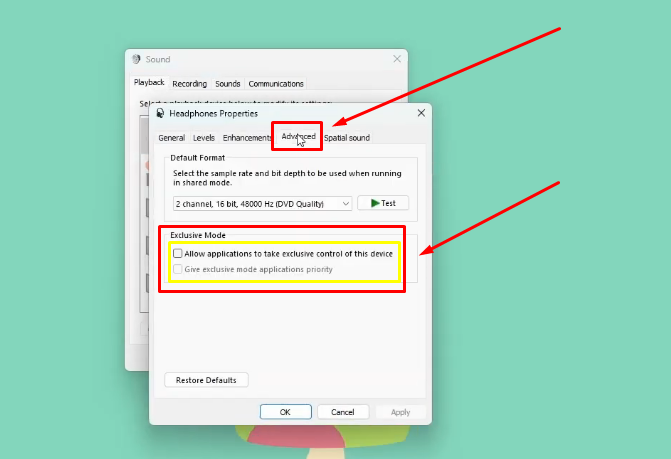
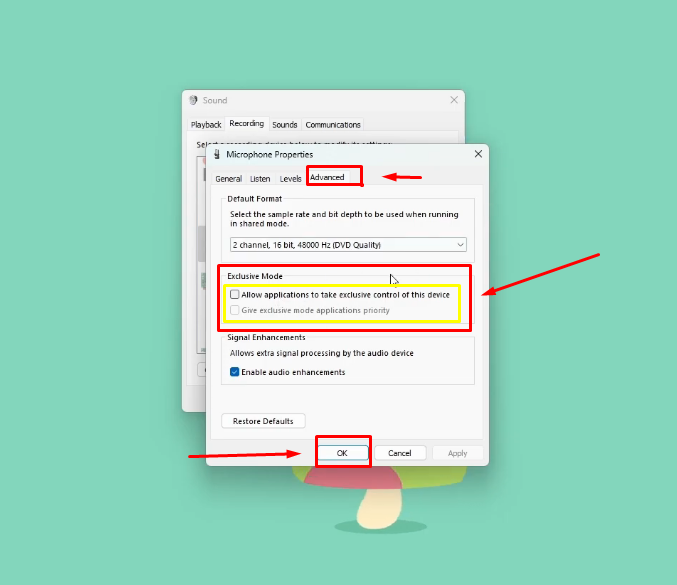
- Step 10: On the “Headphones Properties” window, click on the “Advanced” tab, and uncheck the two options inside the “Exclusive Mode” section, and hit “OK”
- Step 11: Similarly, on the “System Sounds” window, click on the “Recording” tab. Then, right-click on the microphone that is connected, but you don’t want to use it for the game. Click “Properties,” select the “Advanced” tab, and uncheck both options available in the “Exclusive Mode” section. Once done, click “OK”
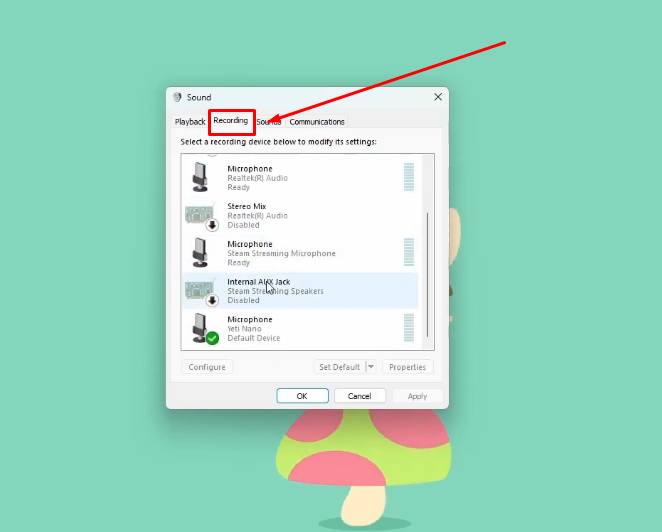
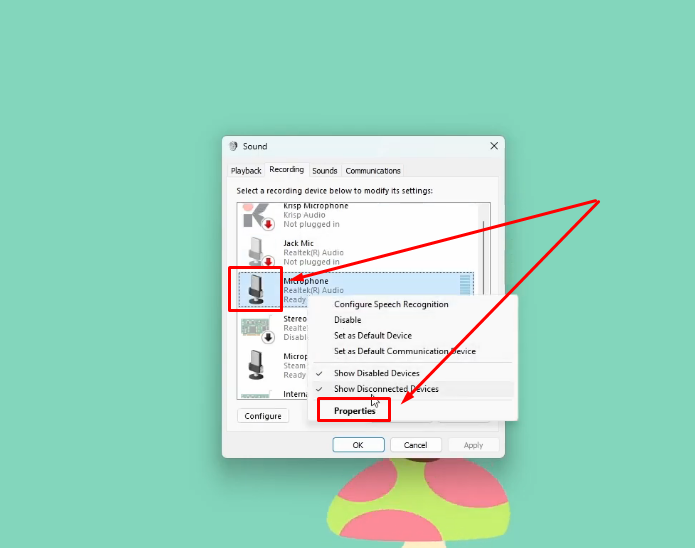
NOTE: You will need to repeat the instructions mentioned in Step 11 for the microphones, except for the one that you desire to use in Helldivers 2.
Section 3: Disabling the Bluetooth Headset Microphone
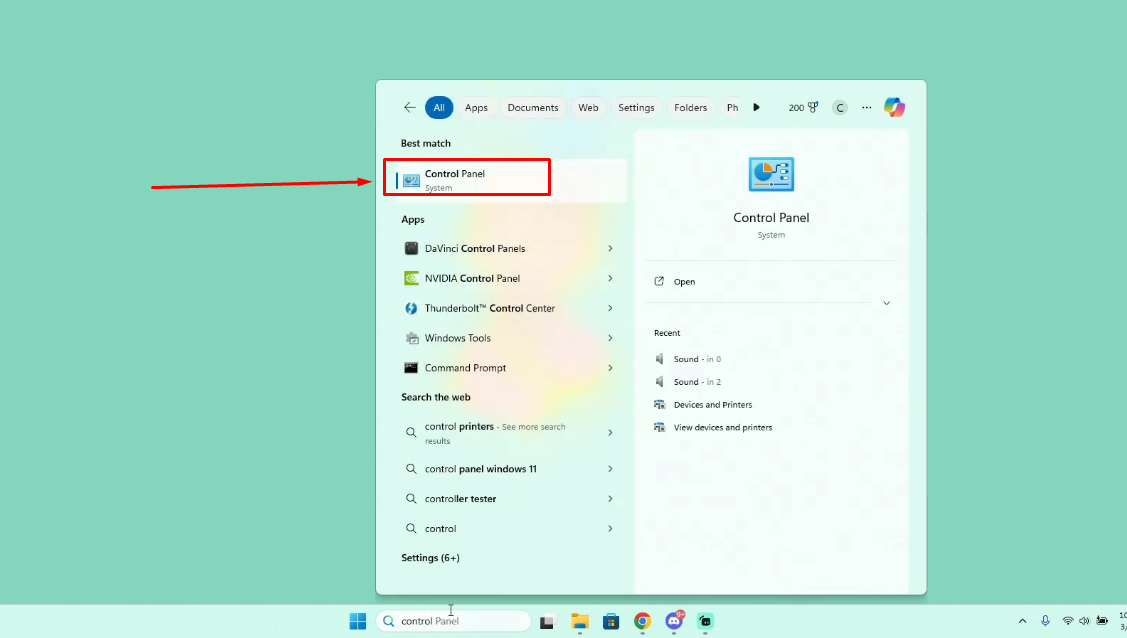
- Step 12: Open “Control Panel” on your PC
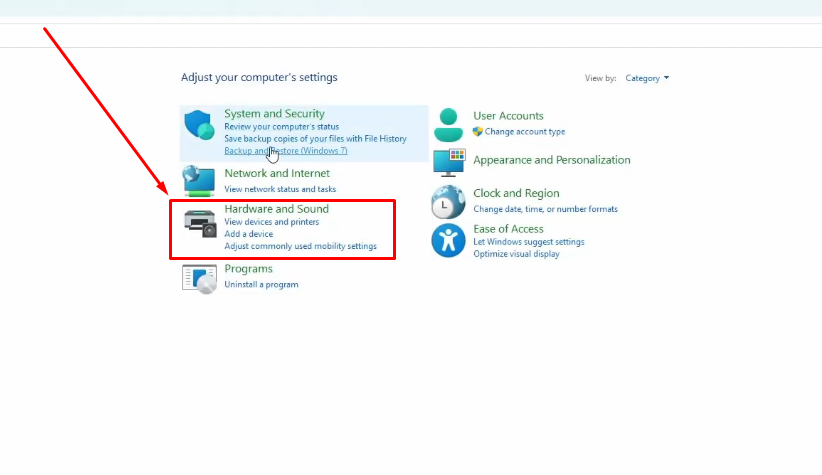
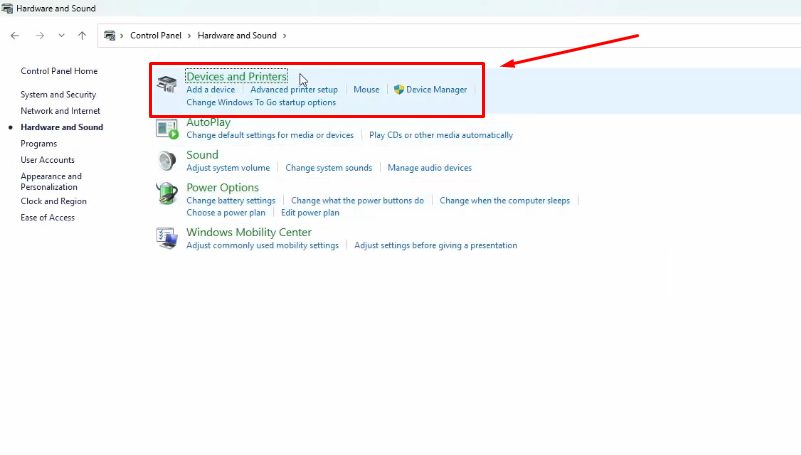
- Step 13: Navigate to the “Hardware and Sound” option and click on it
- Step 14: Select “Devices and Printers”
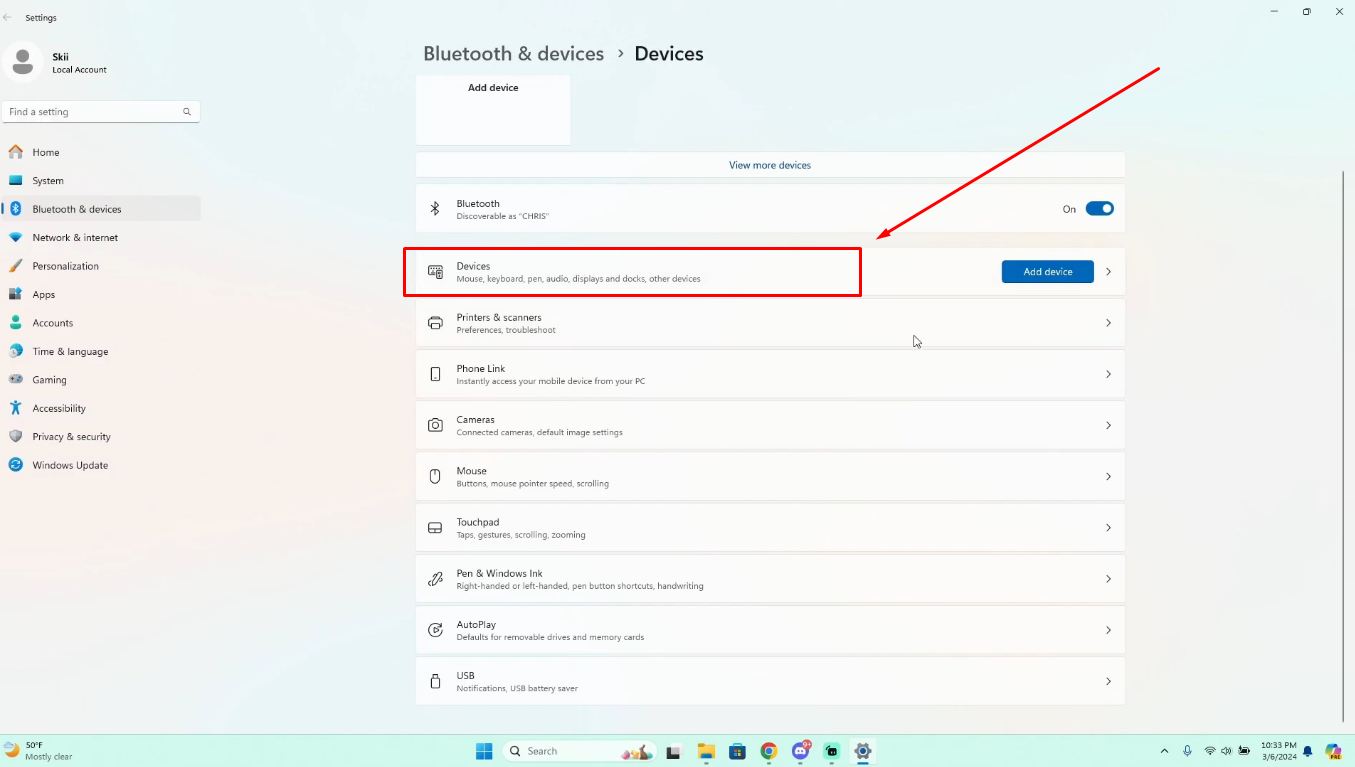
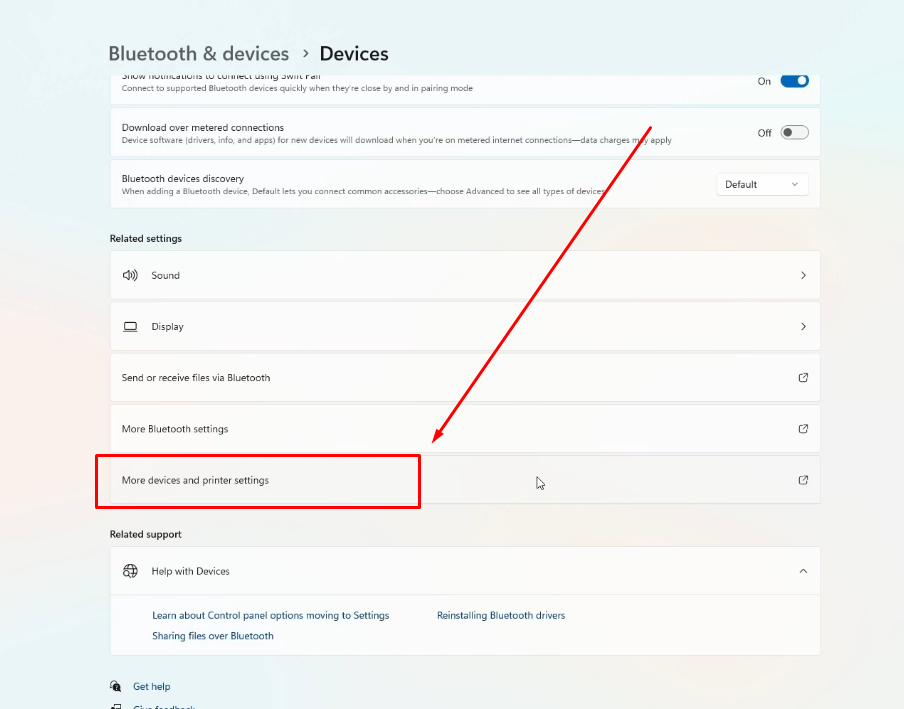
- Step 15: Now select the “Devices” option. When you are on a new page, scroll down to “More devices and printer settings” and click on it
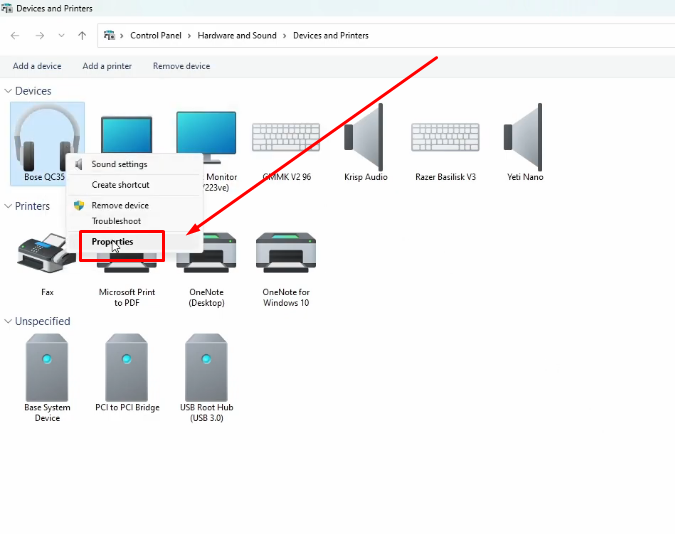
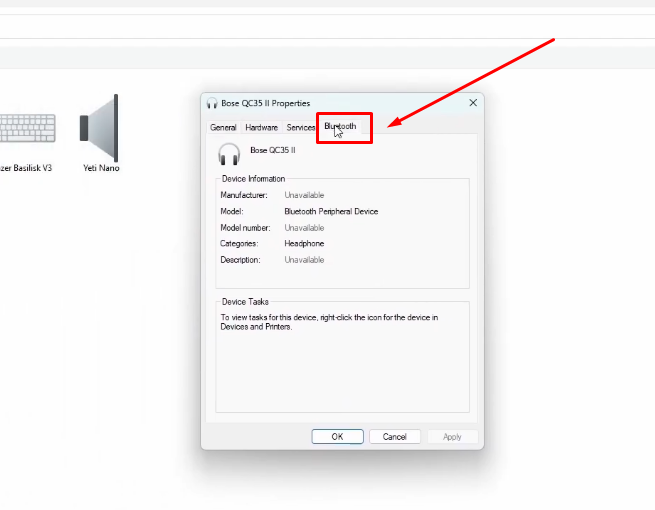
- Step 16: Locate your Bluetooth headphone icon, right-click on it to open the menu, and click on the “Properties” option
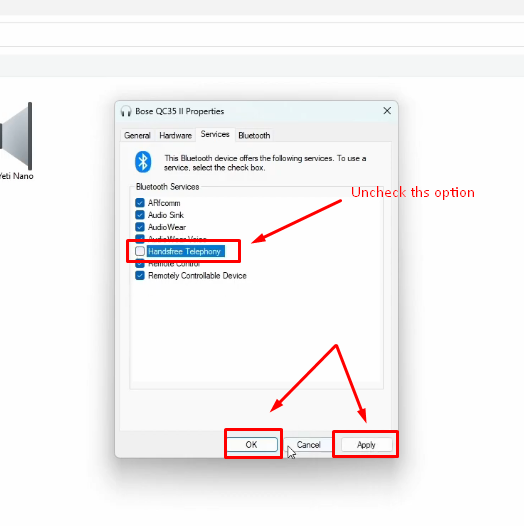
- Step 17: When the Properties window appears, click the “Bluetooth” tab at the top. Choose the “Services” tab on the next pop up window. Uncheck the “Handsfree Telephony” option from the list of Bluetooth services, and click “Apply” and “OK”
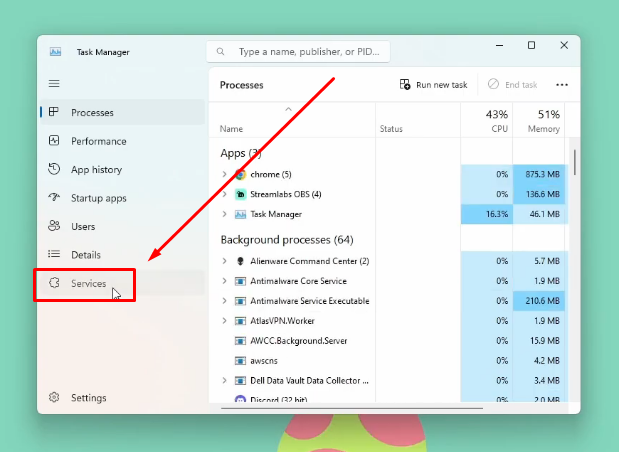
- Step 18: Search “Task Manager” in the search field next to the “Start” button and click on it when the option appears

- Step 19: On the “Task Manager” window, locate the “Services” option in the left sidebar, and click on it
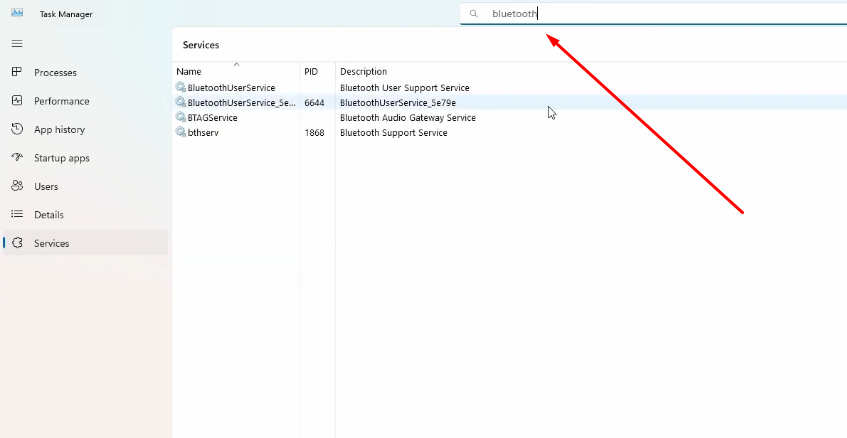
- Step 20: Type “Bluetooth” or “BTGService” in the search box at the top of the screen. Upon finding the “BTAGService” option in the list, right-click on it to confirm the “Stop” option is greyed out, which means this service is not started yet
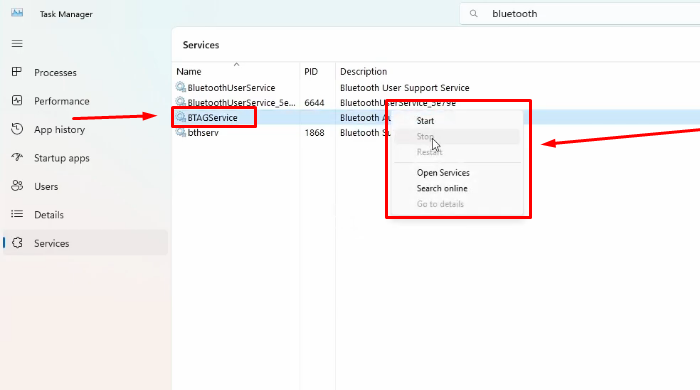
- Step 21: Then, click on the “Open Services” option in the same menu

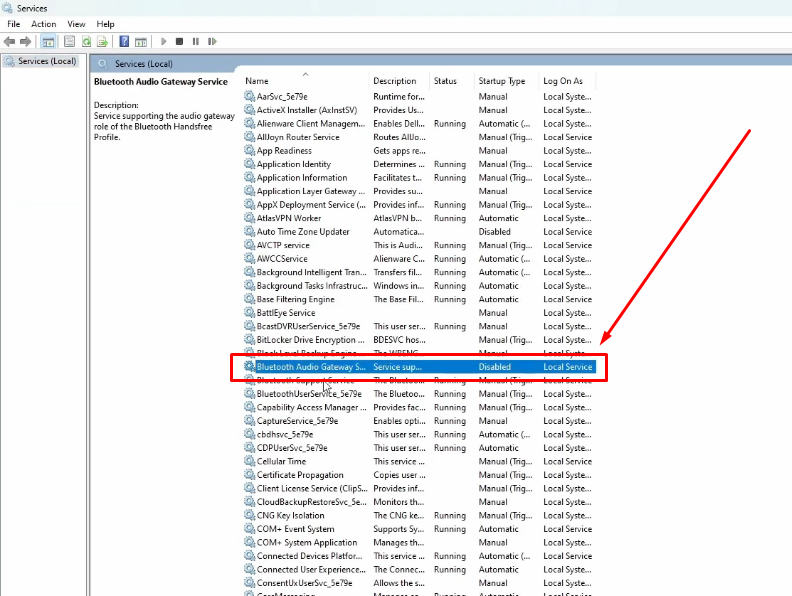
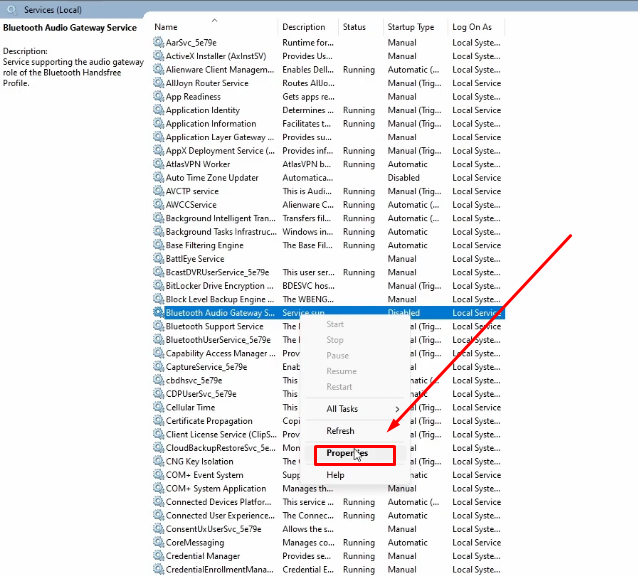
- Step 22: Locate “Bluetooth Audio Gateway Service,” right-click on it, and choose “Properties”
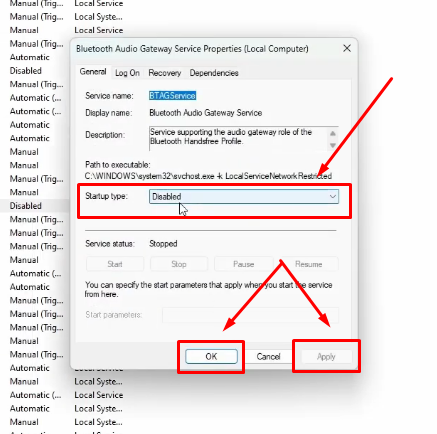
- Step 23: Lastly, click the dropdown menu next to the “Startup type” option. Select “Disabled” and click “Apply” and “OK”
- Step 24: Restart your computer and open Helldivers 2. Now, your headset mic will be changed to a different mic that you have selected.
NOTE: You can always enable your Bluetooth headphones’ microphone by choosing “Enabled” (See Step 23).
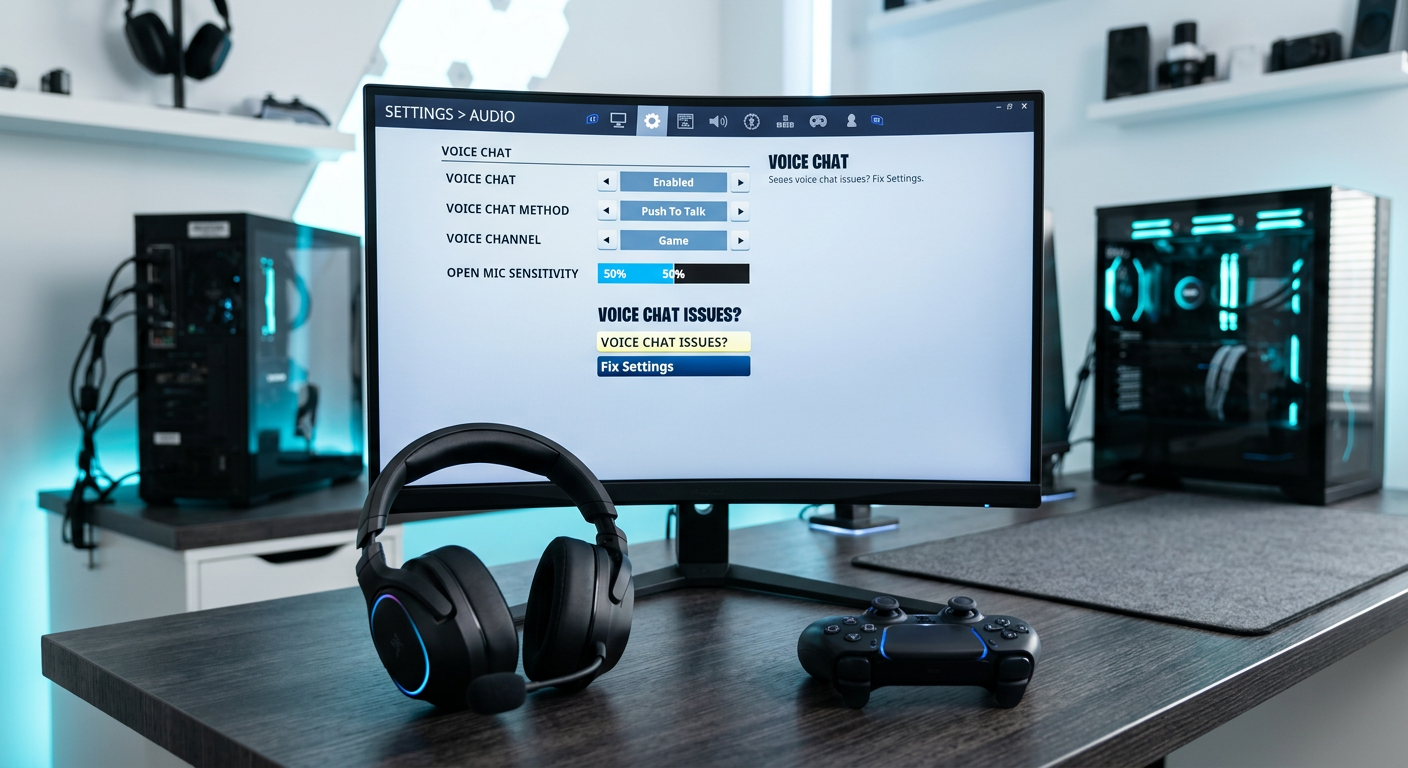
Method 3: How to Change Microphone / Voice Chat Modes in Helldivers 2?
Changing mic modes or voice chat modes in Helldivers 2 is pretty straightforward:
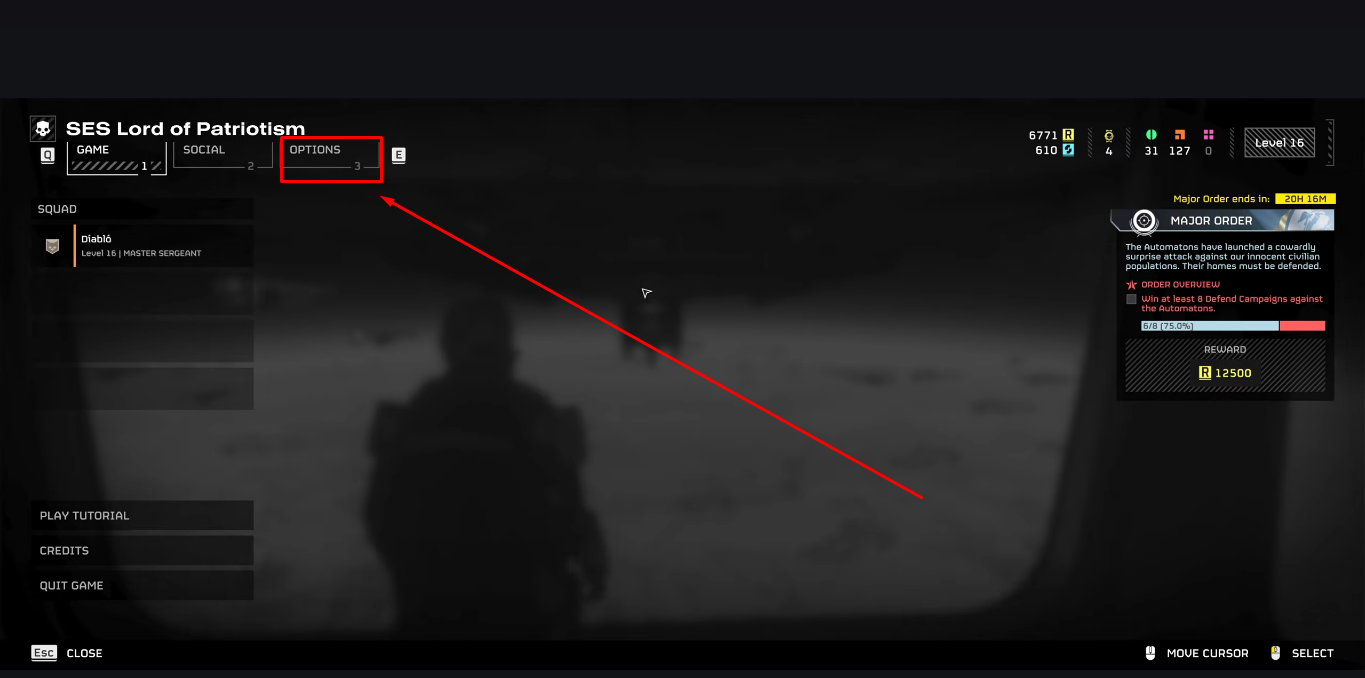
- Step 1: Pause the game and click on “Options”
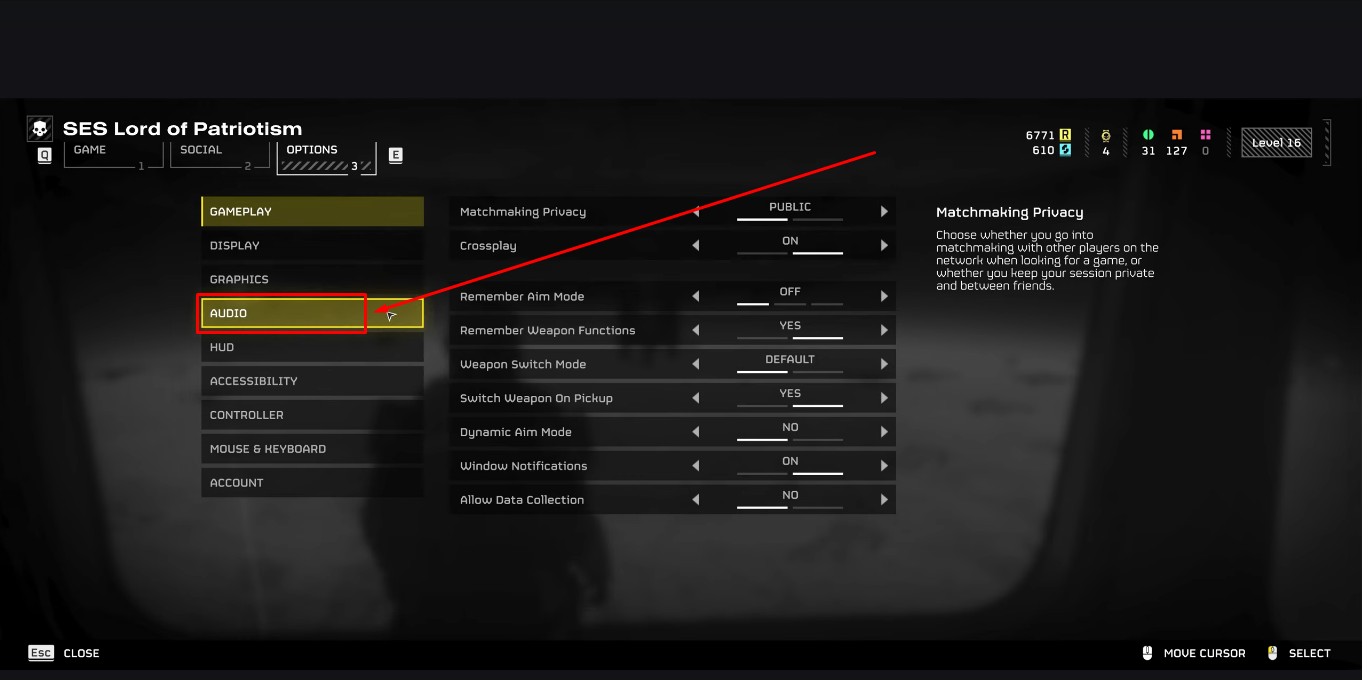
- Step 2: Choose “Audio” from the list
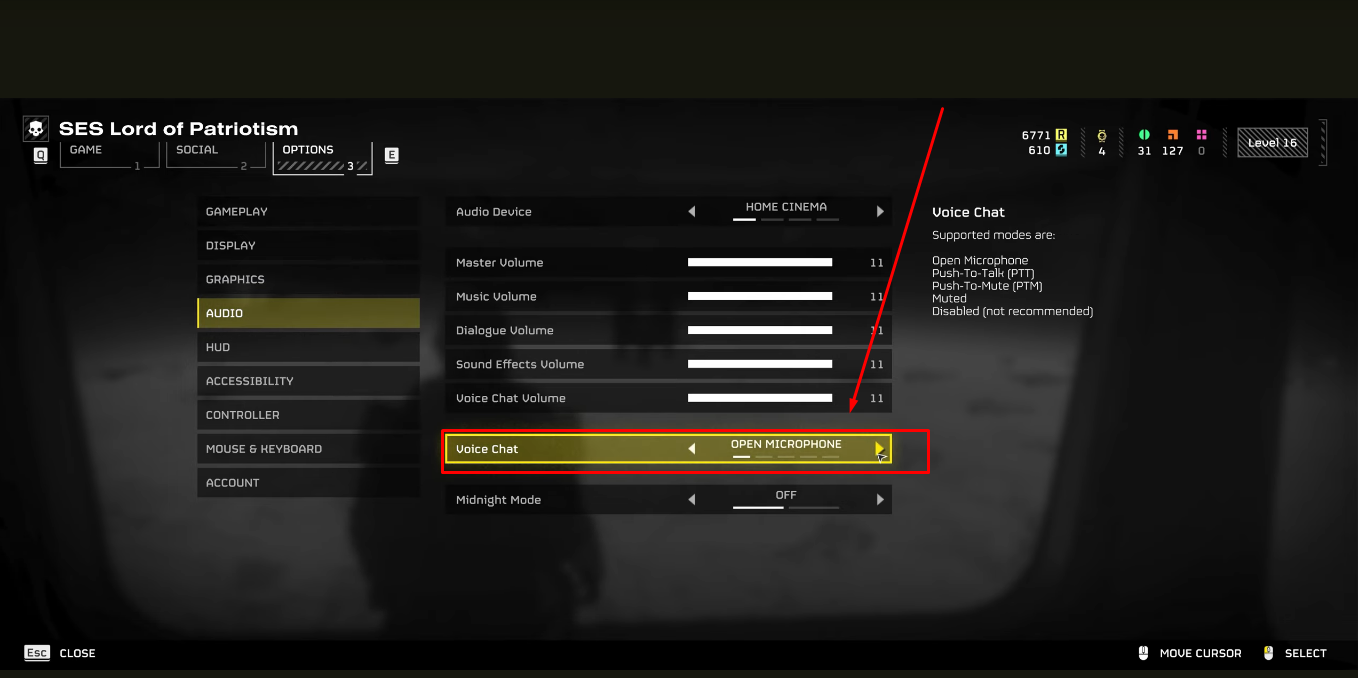
- Step 3: Go to the “Voice Chat” option
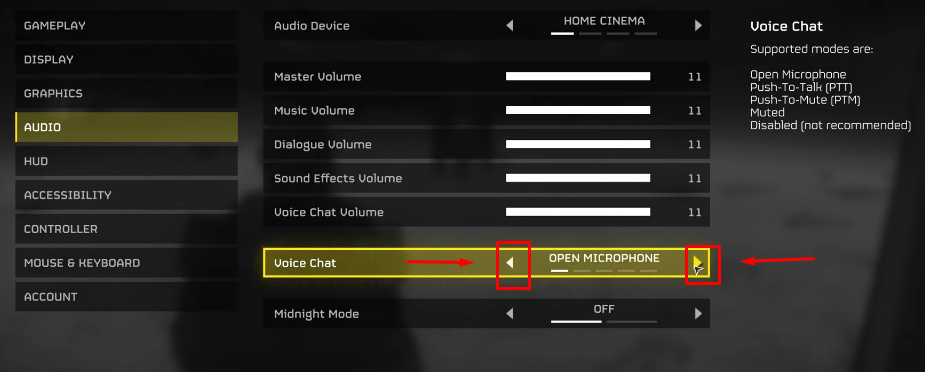
- Step 4: Click on the left or right arrow to select the modes, such as Open Microphone, Push-to-Talk, and more
Pro Tip: Communication is key in the online world. Whether streaming, vlogging, or podcasting, a reliable microphone makes things like putting melted butter on a French toast. That’s why content creators use wireless microphone kits, like the Hollyland Lark M2S, for seamless communication.

Hollyland LARK M2S - Wireless Hidden Microphone
An ultra-discreet wireless microphone featuring a clip-on transmitter for an “invisible” fit.
Key Features: No-Logo Fit | Ti+ Design | 48 kHz/24-bit
The Lark M2S is a wireless lavalier microphone featuring a logo-free transmitter, making it ideal for use in any environment. The mic doesn’t droop on your clothing, ensuring your confidence always stays high due to its strong titanium clip-on. With its universal compatibility, Lark M2S can be used with various devices, including computers, smartphones, and cameras.
Conclusion
Good communication during missions in Helldivers 2 depends on the microphone. Players can quickly change their mic input through the game’s settings menu. This makes it easier for the system to pick the right device without problems. Moreover, choosing a USB or built-in microphone instead of a Bluetooth headset helps a lot. This switch reduces connection issues and improves voice quality during missions.
Besides that, players should spend time learning about the different mic modes. Adjusting these modes in the settings can make voices sound much clearer. With these simple changes, players can enjoy smoother team communication.
Frequently Asked Questions about Changing Microphone in Helldivers 2
Q1. How can you change the push-to-talk button in Helldivers 2?
First, access the main menu to begin the process. Then navigate to Options and select the Audio tab. After that, switch the voice chat setting to Push-to-Talk mode. Next, open either Mouse & Keyboard or Controller settings and choose Change Bindings. Within the Communication section, locate the Push-to-Talk action and assign a new key or button.
By default, Caps Lock handles this function on PC. However, changing it remains possible at any moment. Consequently, selecting a binding that suits personal comfort and gameplay style enhances communication efficiency during missions. Players then confirm the new control in settings.
Q2. Why is my microphone not working in Helldivers 2?
First, check the system sound settings on the PC. Then search for Change system sounds within Windows. After opening that panel, switch to the Recording tab. Next, right-click the microphone device and set it as both the default and the default communication device. Also, disable any extra microphones to avoid conflicts. Then, access the microphone properties and uncheck Allow applications to take exclusive control.
Finally, close the panel and restart Helldivers 2 before testing the mic again. Following these steps ensures that the game can detect the chosen device properly and prevents other applications from blocking microphone access during missions.
Q3. How do you use a microphone in Helldivers 2 on PS5?
To use a microphone on PS5, press R3 during gameplay. Then the Social menu will open on the screen. Next, press R1 to access the Options submenu. After that, scroll down to reach Audio settings. Select a voice chat mode such as Push-to-Talk or Open Mic. Also, verify the controller’s mute button beneath the PlayStation logo.
If its light glows, press it once to unmute the mic. Lastly, exit any existing party chat session. Staying in party chat disables the game’s built-in voice system automatically. Remember to save any changed control settings afterwards.
Q4. How can players mute others in Helldivers 2?
Start by opening the menu with Esc on PC. Alternatively, press Options on a controller. Then head into the Game tab to view squad members. From there, choose the player whose voice you wish to mute or lower. This action immediately silences their audio or reduces their volume.
Consequently, unwanted noise or distractions are minimized during missions. Also note that muting others applies only to voice chat audio. Next, return to gameplay once the adjustment completes. These simple steps grant full control over in-game communication. Enjoy clearer teamwork thanks to these.