Have you ever imagined controlling your OBS Studio setup remotely? For instance, controlling a live stream on your gaming PC, right from your mobile or tablet?
If your answer is “yes”, the OBS WebSocket plugin is exactly what you have been looking for. For those using OBS v28 or later, you already have it. For others, you need to install a separate Web socket plugin from its official site and then configure it inside OBS.
However, this may not simple as it seems. So, we have curated this detailed guide, which explains the all technical aspects of installation, and the magic wonder of Web sockets.
OBS: A Brief Overview
“OBS”, may not be a new term for those who often livestream. However, for those unaware, let’s understand it with a small example.
Have you seen a television studio, where various cameras, graphics, and audio sources are combined to produce a show? OBS Studio offers a digital version of that. Technically, Open Broadcaster Software (OBS) is an open-source platform video streaming platform.
It is a personal control room. Here, you can ‘mix’ different video feeds, like your webcam feed and your computer’s screen, layer them with graphics or animations, and even enhance the audio. This ‘mixture’ is then broadcast live to platforms like YouTube, Twitch, or Facebook, or simply recorded for later use.
What is a Web Socket?
Another technical term is web socket. In the web communications world, data usually moves between a user’s device (like a computer or a phone) and a server.
Traditional methods, like the HTTP protocol (in webpages), follow a request-response model: you request a webpage, and the server responds with the data. But what if you want real-time interaction, like in a chat application or a live sports score update? This is where Web sockets come into play.
Web socket is a full-duplex communication protocol i.e. it allows two-way communication simultaneously. A couple of applications of web sockets are:
- Live Chat Applications
- Online Gaming
- Live Sports or News Updates
- Stock Trading Platforms
What does OBS Web Socket do?
OBS Web socket is an extension plug-in for OBS which allows it to be controlled remotely via some external programs. For instance, with OBS WebSocket, you don’t need to be directly in front of your OBS Studio interface to manage it. Instead, you can control it from another device. This feature is handy for streamers who might have OBS running on a computer and want to control their broadcast from a mobile device.
Developers may use this feature to write scripts or create bots that interact with OBS Studio. This can automate certain actions, like switching scenes based on specific triggers or events.
Perquisites for installing OBS web socket?
Web socket is supported on all Windows, Linux, and IOS versions where you’ve OBS installed. The operating system requirements for OBS installation are as follows:
For Windows users, your machine should be equipped with a DirectX 10.1 compatible GPU. Additionally, you should be running at least Windows 10, release 1809, or any subsequent versions. The all-new Windows 11 is also compatible.
macOS enthusiasts will need either an Intel or the latest Apple Silicon CPU. In the graphics department, an OpenGL 3.3 is essential. In terms of the operating system, ensure you have macOS 11, fondly known as “Big Sur”, or any later versions.
Lastly, for those on Linux, it’s necessary to have an OpenGL 3.3-compatible GPU. When it comes to the display environment, either the X window system or Wayland would suffice.
Similarly, you need to have OBS v27 or earlier to install it. For later versions, it comes pre-installed within the OBS package itself.
Before installation, we would recommend you get comfortable with the basics of OBS Studio, such as setting up scenes, adding sources, and starting a stream or recording. It will help you get the most out of the remote control and automation features WebSocket offers.
Step-Wise Guide to Installing Web Socket
Now, that you’ve fulfilled the requirements, it’s time to reveal the step-wise procedure for installing the OBS Web socket.
- Close the OBS program, if you’re currently using it.
- Browse to the official site, (https://github.com/obsproject/obs-websocket/releases/tag/4.9.1). Download the installer file or the zip file. The steps vary for each case.

- If you downloaded the installer file, run it and it will automatically install the web socket. However, if you’ve downloaded the zip file, extract its contents and copy them to the root folder where OBS is installed.
- It may be in the directory (C:\Program Files\obs-studio) or (C:\Program Files (x86)\obs-studio). You may copy this path and paste it into the file manager to locate the folder.
- Run the OBS software. Navigate to ‘Tools’. Under it, you will find ‘WebSocket Server Setting’.

- Make sure the ‘Enable WebSocket Server’ is bookmarked. Check the server port, usually, it is ‘4455’.
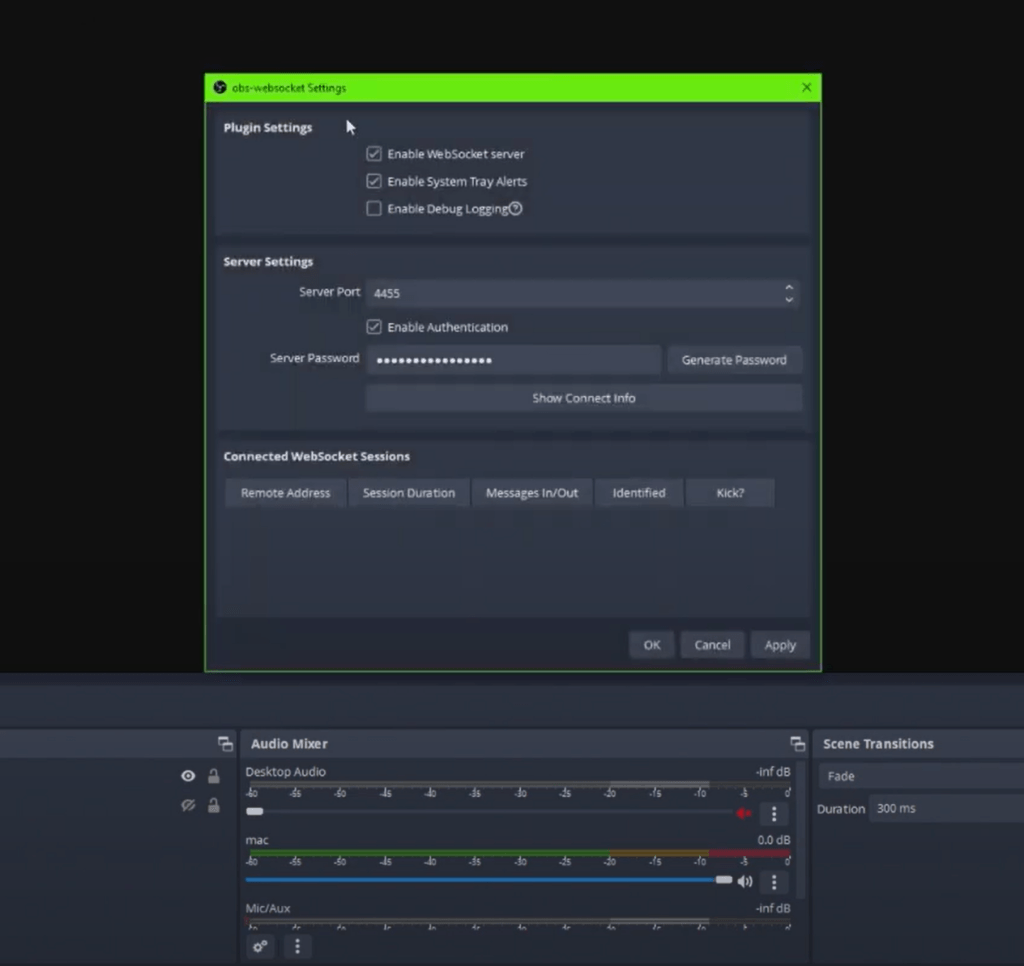
- The WebSocket has been installed and recognized by now. You may choose ‘Show connect info’ to get the credentials for login.

Applications that WebSocket
As mentioned before, the purpose of web sockets is to give remote access to other apps. Several web and mobile apps support the OBS web socket. Some officially listed applications are:
- Touch Panel
- Streamer. bot
- Obs-Tablet remote
- Lioran Board
- Steam Control
We will discuss OBS web socket integration with a couple of these apps.
OBS Tablet
OBS Tablet is an online site through which you can remotely control the OBS studio. However, you need to be over the same network as the OBS device.
- Visit the OBS Tablet site, and enter the host and port details.

- Next, it will ask you about the authentication password. Copy that from OBS and paste.
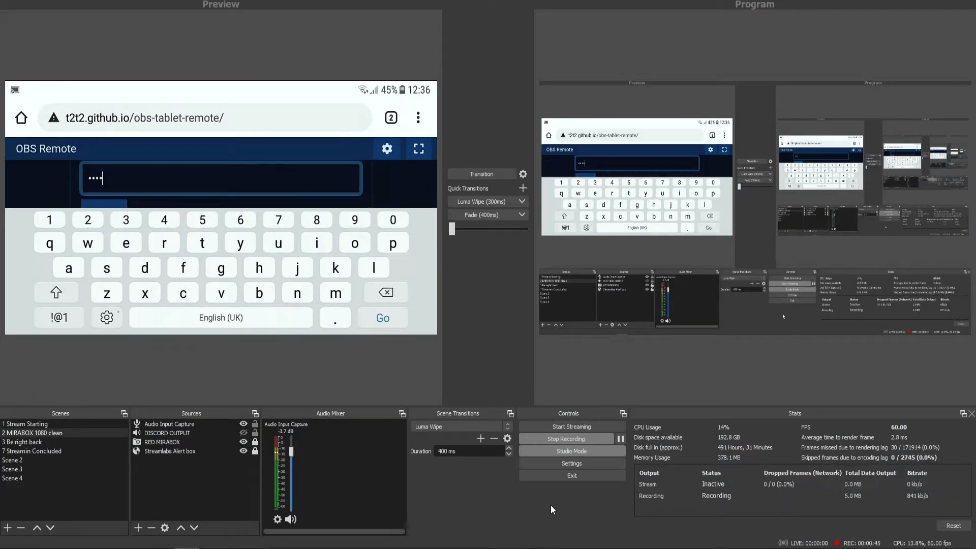
- You’ve OBS controls on your device. You can configure scenes and anything media controls you want.

Touch Portal
Touch portal is another smart solution to remotely control your bulky PC software, including OBS from your smartphones, Mac, and Windows devices.
Here’s a short method of how you can use it on Windows:
- Go to the official site and download the app for the platform you’re interested in. It is available for Android, Windows, MacOS, iOS and iOS devices.

- Once you’ve downloaded the app, the interface looks like this. Navigate to the ‘Settings’ tab and select ‘OBS’.
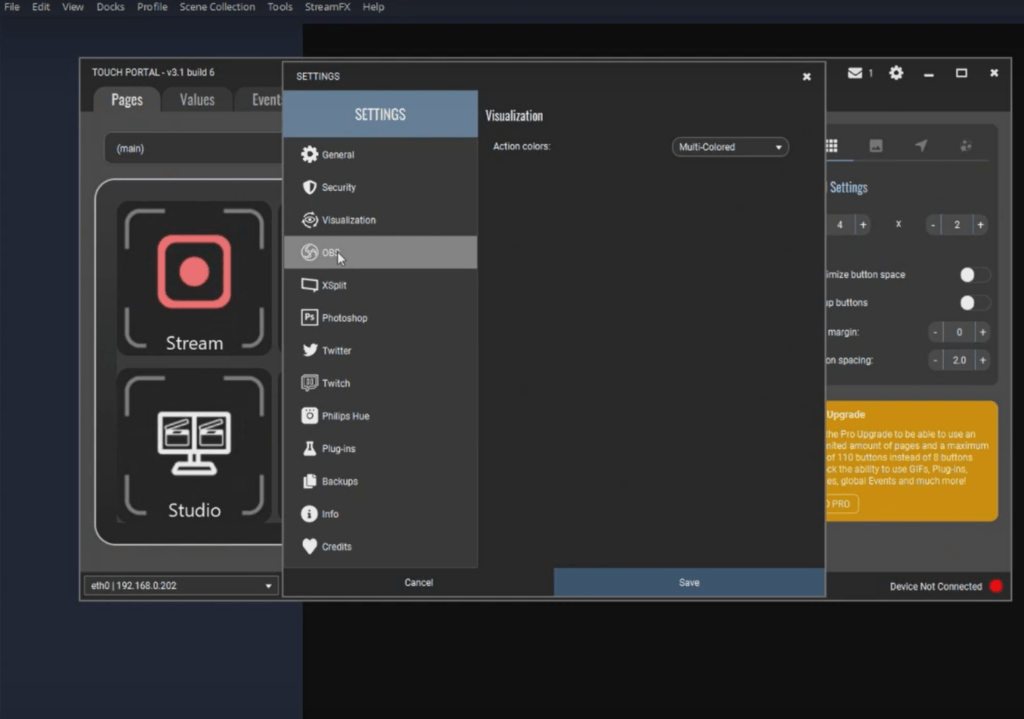
- Input asked details, ‘IP’, ‘WebSocket Details’, and ‘Password’.

- Once you enter these, you get access to the ‘stream’, ‘record’, ‘volume’, and ‘mic’ controls.

Common WebSocket Connection Issues and Solutions
The promise of real-time communication through WebSockets can sometimes be hampered by various technical snags. Connection failures are one such hiccup. Let’s unravel some common culprits behind these failures and their solutions.
Firewall Blocks the Connection
Firewalls are designed to prevent unwanted communications, and sometimes they might mistakenly block WebSocket connections. To make sure the firewall isn’t blocking web socket, follow these steps:
- Go to ‘Control Panel’ and move on to ‘Windows Defender FireWall.’

- Navigate down to ‘Allow apps to comm. through firewall’. Make sure the box next to the OBS studio is checked.

Devices not on the same network
For WebSocket communication, especially in local scenarios, both devices should be on the same local network. You need to match the IP addresses of both devices.
Also, ensure that there’s no VPN or proxy interference. If you’re using VPNs, consider disconnecting them and retrying the connection.
If on a corporate network, be aware that they might have multiple subnets or restrictions. Try testing on a personal network or contact the network administrator.
Incorrect Credentials
Remember, we set some authentication credentials when setting up the OBS web socket! They’re a chance you got them wrong and that’s why you’re receiving an error “Failed to connect to server”.
Double-check the credentials you’re inputting. Ensure no accidental spaces or capitalization errors. Reset credentials if you’re unsure of them. You’ll have to go to setting OBS to do that.
Final Words
With an increase in content creators over the globe, the digital landscape is evolving with new tools and applications. OBS is one such tool that eased up video streaming services. An additional add-on is the Web Socket, which facilitates real-time, interactive communication between OBS and other applications.
To effectively utilize this tool, we highlighted the necessary system requirements tailored for different operating systems. We hope the installation steps will seamlessly help you install and use the OBS Web socket with other remote apps.
Now that you’ve successfully set up OBS Web Socket to streamline your live streaming workflow, upgrading your video quality can further enhance audience engagement. Consider pairing OBS with a professional streaming camera to achieve crisp, high-definition visuals that effortlessly captivate your viewers.
FAQs
How do I use WebSockets with OBS?
If you’re running OBS v28 or later, you can simply navigate to the ‘tools’ tab. Next, go to the ‘OBS Web Server Setting’ to authenticate, configure, and use it with remote apps like Touch Portal. For the earlier versions, first, download a separate Web socket file and install it. Then, you may repeat the same procedure as described in the earlier case.
Can I use OBS Web Socket with Streamer Bot?
Yes, OBS websocket does work with Streamer Bot. Along with that, it supports Lioran Board, Steam Control, and Touch Control
How do I change my Websocket on OBS?
Open OBS. Move to the ‘Tools’ Tab. Find ‘WebSocket Server Setting’ under it. You will see an ‘Enable authentication’ check box. Turn it on and customize ‘port’ and ‘password’.


.png)


