.png)
All streamers and content creators know that high-quality audios and videos are crucial to building and engaging an audience. However, choosing the perfect buffer size and OBS settings can be a bit difficult, and if you make the wrong decision, you may end up making low-quality streams. To help increase your reach and establish a loyal audience, this guide covers the buffer size and other OBS settings that are best for high-quality streaming.
Learning how to choose the right output quality settings and understanding how they affect your video impact can help you create better and more engaging live streams using the set-up capabilities and internet latency you have. Let’s dive right in!
What is a Buffer Size?
The buffer size in a streaming platform determines the amount of streaming data or any other type of media file that can be pre-loaded while a person is watching a video. Once streaming data enters the main buffer, it’s instantly split into video and audio buffers. This buffered data is then temporarily saved as a cache on your device before you start watching the stream.
For a clearer understanding, imagine this buffered data as downloaded data. Once you start watching the stream, this buffered data allows you to enjoy the content or video without any interruptions.
However, a higher buffer size isn’t always a good thing. While raising the buffer size can increase the quality of your stream, it comes at a cost. If there’s a sudden scene change or high motion in your video, it can fill up the buffer at a much faster rate than the average maximum bitrate, leading to latency problems for both you and your audience.
For instance, if you’ve set the buffer size to 6000 and the maximum bitrate to 3000, your stream encoder could decide to utilize 5000 of the buffer for more complex scenes. Since your average bitrate will remain the same, this greater buffer size will make your network data incredibly spiky, making your streams harder to watch.
By achieving a balance and setting the right buffer size, you can constrain the variable bitrate and try to prevent your video from buffering during the complex portions. With a controlled buffer size, the stream encoder will only use high bitrates for a couple of seconds and only when the bitrate before and after is sufficiently low for the video player to catch up, ensuring a smooth viewing experience.
Best Buffer Size for Video Streaming in OBS
Setting the right buffer size and other video settings can significantly impact the quality of your live streams. If your output settings are too low, the video might end up being pixelated, choppy, or blurry. On the other hand, settings that are too high can make the video too large or too difficult to share and upload. Ultimately, choosing the best OBS settings comes down to finding the right balance.
To put it simply, the buffer size is the amount of data that OBS Studio buffers before sending your video stream. A larger buffer size results in a more variable stream, making it more difficult for your audience to watch or download it. However, it also reduces dropped frames, so if people are able to download it, your video will look much better.
On the other hand, a smaller buffer size results in a more consistent stream bitrate, making it easier for people to download and watch your streams. However, keep in mind that your stream will then be of a lower quality.
If you’re streaming using OBS Studio, then it’s best to simply use the default buffer size and leave the custom buffer turned off. This is because the buffer size set by OBS Studio is the same as the bitrate, achieving a good balance between quality and latency.
If you manually set the buffer size, make sure you set it to less than the bitrate. If you set it higher than the bitrate, your stream will be harder for your audience to watch. For this reason, it’s best to avoid a custom buffer size and use the default setting set by OBS Studio.
What is a Good Bitrate?
The audio and video bitrates determine the amount of upload speed you want to use. The bitrate is closely related to the buffer size, and like the buffer size, pushing for a higher bitrate and a higher resolution reduces playback quality. A higher bitrate doesn’t always guarantee better quality – in fact, an extremely high bitrate can sometimes result in an unstable stream as well. For this reason, it’s much better to have a stable and smooth video stream at a lower resolution, such as 720p, than trying to stream at 4K and getting only frozen or choppy videos. However, expert streamers prefer using a special streaming camera with 1080p resolution, like the Hollyland VenusLiv, to stream on OBS. Such devices ensure constant and uninterrupted streams. Moreover, 1080p is a widely considerable video resolution that shows clear visuals.
If you have a standard streaming setup, then it’s best to have a maximum bitrate of 3500 kbps. Any higher and it might become harder for your audience to watch your stream before they inevitably give up.
If you’re using variable bitrate, then the actual bitrate will change according to the complexity of every scene. If you have a higher upload speed, remember that your audience will need to have an equivalent download speed in order to view your stream. Try not to set a bitrate of more than 3500 kbps unless you have access to transcoders or are a partnered streamer.
Make sure you consider your audience, your internet connection, and your hardware before setting a buffer size and bitrate. Lastly, remember that you’re most likely to lose viewers because of frustrating and broken playback and not because of non-HD or lower-resolution videos.
Best Bitrate Settings for OBS Studio
The default OBS video bitrate and audio bitrate settings are in low definition. Fortunately, you can easily customize these settings according to your resolution and achieve a high-quality video stream. Some of the recommended bitrate settings for various resolutions include:
Ultra-Low Definition or ULD
- Video Bitrate: 350 Kbps
- H.264 Profile: Main
- Resolution Width: 426 px
- Resolution Height: 240 px
- Audio Bitrate: 64 Kbps
Low Definition or LD
- Video Bitrate: 350 to 800 Kbps
- H.264 Profile: Main
- Resolution Width: 640 px
- Resolution Height: 360 px
- Audio Bitrate: 64 Kbps
Standard Definition or SD
- Video Bitrate: 800 to 1200 Kbps
- H.264 Profile: High
- Resolution Width: 854 px
- Resolution Height: 480
- Audio Bitrate: 128 Kbps
High Definition or HD
- Video Bitrate: 1200 to 1900 Kbps
- H.264 Profile: High
- Resolution Width: 1280 px
- Resolution Height: 720 px
- Audio Bitrate: 256 Kbps
Full High Definition or FHD
- Video Bitrate: 1900 to 4500 Kbps
- H.264 Profile: High
- Resolution Width: 1920 px
- Resolution Height: 1080 px
- Audio Bitrate: 256 Kbps
You can easily modify audio settings in OBS Studio as well. The software allows you to add and customize audio devices, such as external microphones and desktop audio.
If you’re only streaming audio, then an OBS video bitrate setting of 64 Kbps will be more than enough. However, make sure that the audio bitrate setting is somewhere between 192 and 320 Kbps for higher-quality audio output.
Keep in mind that a higher audio bitrate will result in a clearer and crisper sound for your audience. This is especially important when you’re streaming higher-resolution videos, so make sure your audio bitrate keeps up with your video bitrate as you increase the resolution of your video streams.
Best Bitrate Settings for Other Streaming Platforms
The ideal bitrate varies with different platforms as well. The optimal streaming settings for these platforms include:
Youtube
- 240p: 300 to 700 Kbps
- 360p: 400 to 1000 Kbps
- 480p: 500 to 2000 Kbps
- 720p: 1500 to 4000 Kbps
- 720p (60fps): 2250 to 6000 Kbps
- 1080p (30fps): 3000 to 6000 Kbps
- 1080p (60fps): 4500 to 9000 Kbps
- 1440p (30fps): 6000 to 13000 Kbps
- 1440p (60fps): 9000 to 18000 Kbps
- 4K (30fps): 13000 to 34000 Kbps
- 4K (60fps): 13000 to 34000 Kbps
Twitch
- 720p (30fps): 3000 to 5000 Kbps
- 1080p (60fps): 4000 to 6000 Kbps
How to Change Bitrate in OBS Studio
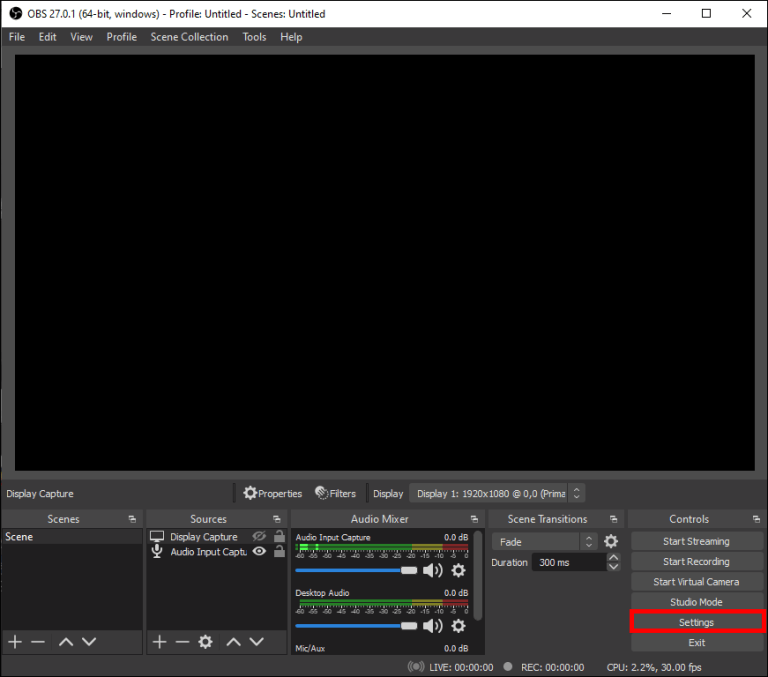
In order to change OBS output settings, here’s what you need to do:
- Launch OBS Studio
- Click on ‘Settings’ in the lower-right corner of your screen.
- Select ‘Output’ from the left pane.
- Leave the ‘Output Mode’ to ‘Simple,’ but change the ‘Video Bitrate’ to 800 Kbps and the ‘Audio Bitrate’ to 128 Kbps for a stable and functional live stream. It’s best to consider your internet speed and hardware and then choose a bitrate that best suits your requirements.
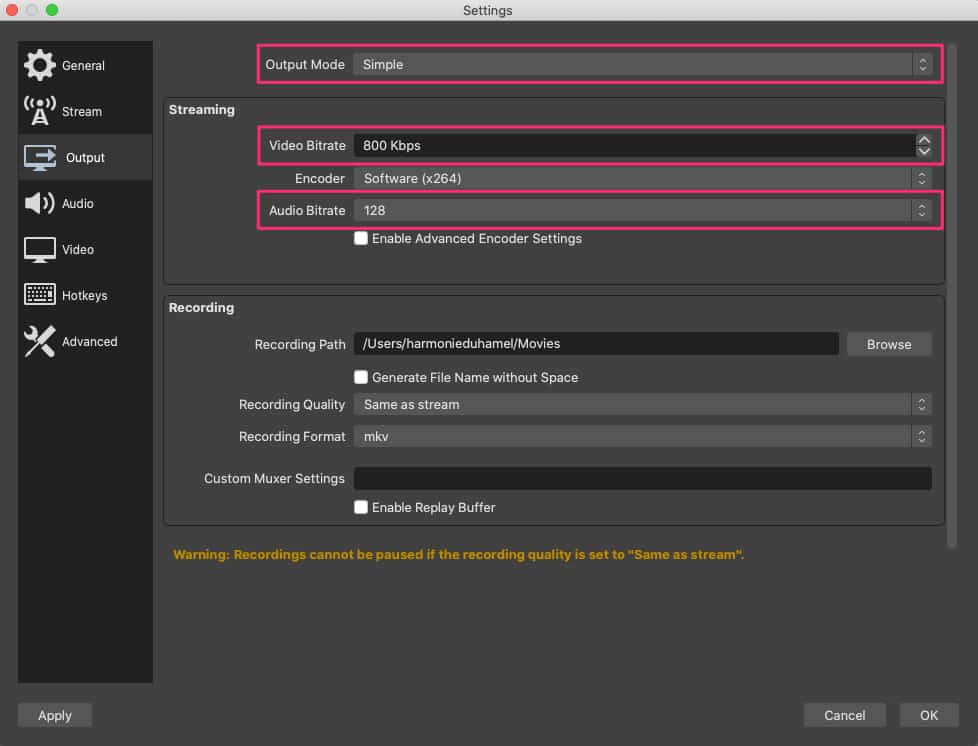
You can make further changes to the audio and video quality of your stream through the ‘Audio’ and ‘Video’ tabs. However, you’ll only need to customize the audio bitrate and video bitrate in the Output mode to optimize the resolution of your output.
Conclusion
Choosing the right buffer size and other encoder settings can be incredibly confusing, but hopefully, this guide can help you determine the best OBS settings to achieve high-quality video streams.
By using these recommended settings as a starting point, you can easily produce fun live streams. As you become more comfortable with OBS Studio, you can tweak the settings until you get something that’s perfect for your setup and needs.
FAQs
What buffer size should I use for video streaming on OBS?
A larger buffer size increases audio latency but reduces CPU load. On the other hand, a smaller buffer size tightens hardware to software response but increases the load on your PC, which might lead to audio dropouts on less powerful computers. For this reason, it’s best to use the default buffer size on OBS or choose one that’s lower than the video bitrates.
Which OBS replay buffer setting is the best?
It’s best to keep the OBS replay buffer somewhere between 30 seconds to 4 minutes. Anything longer won’t make sense, and you’ll be much better off with a standard recording.