


.png)
If you’ve used Apple’s AirPods, you probably get why people love them; they look good, connect easily, and sound great. But when it comes to blocking out noise, things can get a bit confusing, especially with the second-gen AirPods. A lot of people think they come with noise cancelling, but they actually don’t.
So just to be clear: AirPods 2 don’t have active noise cancellation (ANC). That feature is only in the AirPods Pro and AirPods Max. But that doesn’t mean your AirPods 2 are useless in noisy places. With a few simple tricks, you can still improve the sound and cut out some background noise.
In this guide, we’ll show you how to get the best sound from your AirPods 2, how to reduce outside noise, and what to do if you’re thinking about upgrading to a model that has real noise cancelling.
Why AirPods 2 Can’t Support Noise Cancelling – A Technical Breakdown
AirPods 2 lack active noise cancellation (ANC) because they’re missing the hardware required to make it work. ANC isn’t just a software toggle, it relies on a specific system of microphones and internal processors that work together to cancel out ambient sound.
Here’s how ANC works on models like the AirPods Pro:
- Outward-facing microphones detect external noise.
- Inward-facing microphones monitor what you’re hearing inside your ear.
- A dedicated H1 or H2 chip analyzes this data in real time and generates an anti-noise waveform to cancel it out before it reaches your ears.
AirPods 2, while equipped with the first-generation H1 chip, lack these additional microphones and processing pathways. They also don’t have the in-ear silicone tips that help create a physical seal, something critical for ANC to function effectively. Without that seal, even the best anti-noise signal would leak out or be overpowered by incoming sounds.
Tips to Improve Your Listening Experience with AirPods 2
Even without any adjustments, AirPods 2 deliver a solid audio performance. But if you want to get the most out of them, especially in environments with background noise, there are a few smart tweaks and tips that can make a noticeable difference.
Control Center Options
The Control Center offers a fast and easy way to manage many of your AirPods settings. Once your AirPods are connected to your iPhone:
- Swipe to open the Control Center.
- Press and hold the volume slider.
- A menu will appear with various audio options, while AirPods 2 won’t show noise cancellation toggles (that’s for AirPods Pro), you may still see settings like Spatial Audio if supported.

But there’s more you can do.
To unlock extra audio controls:
- Go to Settings > Control Center
- Tap “Add a Control” and choose Hearing
This adds a small ear icon to your Control Center. When tapped, it allows you to:

- Check your AirPods battery level
- Access features like Live Listen, Conversation Boost, and Background Sounds
Background Sounds can have calming effects like rain or ocean waves directly through your AirPods, great for focus or relaxation.
If you don’t see these features available:
- Go to Settings > Accessibility > Hearing Control Center.


- Then select Control Center and tap the green plus icon next to any feature you’d like to enable.
While AirPods 2 don’t support active noise cancellation, using tools like Background Sounds and Live Listen can still help you create a more controlled, quieter listening environment.
Live Listen
Live Listen is an accessibility feature that works with any AirPods model, including AirPods 2. It amplifies sounds captured by your iPhone’s microphone and plays them directly through your AirPods, essentially turning your phone into a remote mic.
Originally designed to assist those with hearing challenges, Live Listen can also be used creatively, for example, as a basic audio baby monitor or to help you hear a conversation more clearly in a noisy environment.
To enable it:
- Make sure Hearing is added to your Control Center (via Settings > Control Center > Add Hearing).
- Swipe down to open Control Center.
- Tap the ear icon (Hearing).
- Select Live Listen to activate it.

Headphone Accommodations
If you want more control over how your AirPods 2 sound, Apple offers several tools to personalize your listening experience.
Start with the EQ Settings
For Apple Music users, you can adjust the audio balance by going to:
- Settings > Music > EQ


- Choose from presets like Bass Booster, Treble Reducer, or Vocal Booster based on your preference.

If you’re using apps like Spotify, you’ll find similar EQ controls within the app’s settings.
Go Deeper with Headphone Accommodations
For more advanced audio customization, head to:
Settings > Accessibility > Audio/Visual > Headphone Accommodations

Here, you can:
- Choose from Balanced Tone, Vocal Range, or Brightness
- Improve soft sounds using a simple slider
- Fine-tune the output to match your unique hearing profile

Try the Custom Audio Setup
Want a tailored experience?
- Tap Custom Audio Setup within the Headphone Accommodations menu.

- Your AirPods will play a series of sample sounds, you’ll choose which ones sound best to you.
- The system will use your responses to create a custom sound profile for your ears.

How to Turn ON Noise Cancelling On Other Airpods Models
If you’re using AirPods Pro or AirPods Max, you can enable Noise Cancellation directly from your iPhone. There are two main ways to do this:
Option 1: Using Control Center
- Connect your AirPods Pro to your iPhone.
- Swipe down from the top-right corner of your screen to open Control Center.
- Press and hold the volume slider (you’ll see your AirPods icon when connected).
- A menu will expand, tap “Noise Control.”

- Choose one of the three modes:
- Noise Cancellation (blocks out background sound)
- Transparency (lets outside sound in)
- Off (disables both modes)
This method is the fastest way to toggle noise control settings while you’re on the go.
Option 2: Through iPhone Settings
If you’re using AirPods Pro or AirPods Max, you can also enable noise cancellation through your iPhone’s Bluetooth settings.
Follow these steps:
- Open the Settings app on your iPhone and tap Bluetooth.
- Locate your AirPods Pro in the list of devices and tap the “i” icon next to them.
- Scroll down to the Noise Control section and tap Noise Cancellation.

Once selected, your AirPods will actively block out background noise for a more immersive listening experience.
How to Turn On Noise Cancellation on Mac
If you’re using AirPods Pro with your Mac, you can enable Noise Cancellation through your system settings. Here’s how to do it:
Step-by-step guide:
- Connect your AirPods to your Mac via Bluetooth.
- Open System Preferences and go to Bluetooth.

- Find your connected AirPods in the device list and click “Options” next to them.

- Under the “Noise Control Toggles Between” section, select Noise Cancellation.
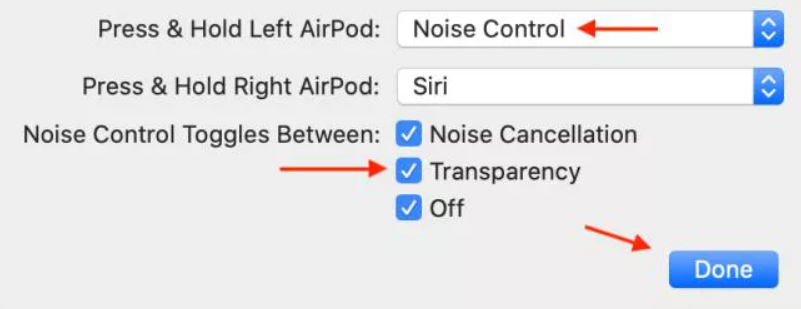
- Uncheck the box labeled “Off”, then click Done.
Once set up, you can easily toggle Noise Cancellation on or off by pressing and holding the force sensor on the stem of your AirPods Pro.
Confused with AirPods Pro? Here’s How to Turn On Noise Cancelling
The fastest way to switch between Noise Cancellation, Transparency Mode, and Off is by using the built-in controls on your AirPods Pro or AirPods Max—no need to open your phone.
For AirPods Max
- Make sure you’re wearing the headphones and they’re powered on.
- Press the Noise Control button on the right earcup.
- This button is flat, silver, and located opposite the Digital Crown (used for volume and playback).
- Each press will cycle through the available modes: Noise Cancellation, Transparency, and Off (unless customized in settings).

For AirPods Pro (1st & 2nd Generation)
- While wearing your AirPods Pro, press and hold the force sensor on the stem of either AirPod.
- You’ll hear a chime confirming the switch between modes.

If you’re using AirPods Pro (2nd generation), you also have access to Adaptive Audio, a smart mode that blends noise cancelling and transparency, automatically adjusting based on your surroundings.
AirPods 2 vs AirPods Pro: Should You Upgrade for Noise Cancelling?
If you’re currently using AirPods 2 and are considering an upgrade for enhanced noise cancellation, it’s important to understand the differences and determine if the upgrade aligns with your needs.
| Feature | AirPods 2 | AirPods Pro |
| Active Noise Cancellation | Not Supported | Suppported |
| Transparency Mode | Not Available | Available |
| Customizable Fit (Ear Tips) | No | Yes |
| Adaptive EQ | No | Yes |
| Water & Sweat Resistance | No | Yes (IPX4 rated) |
| Spatial Audio | Limited | Full Support |
| Price Range | Lower | Higher |
Who Should Consider Upgrading the AirPods
The section below is for people who are confused if upgrading to AirPods with built-in ANC is worth or not.
Frequent Travelers and Commuters
If you often find yourself in noisy environments like airplanes, trains, or bustling city streets, the active noise cancellation (ANC) feature in AirPods Pro can significantly enhance your listening experience by reducing ambient noise.
Remote Workers and Professionals
For those who work from home or in shared spaces, the ANC and improved microphone quality in AirPods Pro can lead to clearer calls and fewer distractions, making virtual meetings more productive.
Audio Enthusiasts
If you’re passionate about music or podcasts, the Adaptive EQ and customizable fit of the AirPods Pro deliver a richer and more immersive sound experience compared to AirPods 2.
What If You Don’t Want to Spend More?
These are some affordable options if you’re looking for something cheaper:
Refurbished AirPods Pro
Opting for refurbished AirPods Pro can be a cost-effective way to enjoy premium features without paying the full price. Ensure you purchase from reputable sellers to guarantee quality and warranty support.
Alternative Options
Consider other earbuds that offer ANC and high-quality sound at competitive prices. For instance, the Beats Fit Pro provides a secure fit and robust sound quality, while the Sony WF-1000XM5 is renowned for its exceptional noise cancellation and audio performance.
Conclusion
If you’re using AirPods 2, it’s good to know what they’re really made for and what they’re not. They’re still great when it comes to stable performance, easy connection, and working smoothly with other Apple devices. But they weren’t designed to block out a lot of outside noise.
Once you understand that, it becomes easier to use them the right way, or even think about upgrading if needed. If cutting out background noise is super important to you, trying to force these AirPods to do that won’t help much. What you need is a pair that’s actually built for that job.
So instead of guessing what your AirPods can do, it’s better to pick something based on what you really need. Taking the time to understand your actual use case will help you invest in the right gear once, instead of getting stuck in a cycle of trying to make the wrong product fit your needs.
Frequently Asked Questions (FAQs)
How can I make my AirPods Gen 2 sound better?
While AirPods Gen 2 don’t offer active noise cancellation, there are several ways to improve your sound experience. Start by ensuring a secure fit; third-party silicone covers or memory foam tips can help reduce outside noise and enhance bass response.
You can also adjust your audio settings using your iPhone’s EQ (Settings > Music > EQ) or explore Headphone Accommodations under Accessibility for a more personalized sound profile. Keeping your AirPods clean and free of earwax or debris can also improve audio clarity.
How do I turn on noise cancellation on AirPods 2?
You can’t turn on noise cancellation on AirPods 2 because they don’t have the hardware to support active noise cancellation (ANC). Unlike AirPods Pro or AirPods Max, AirPods 2 lack the required internal and external microphones and the noise-cancelling chip that makes ANC possible.
However, you can reduce distractions using features like Live Listen or Background Sounds, which help mask ambient noise through software-based audio adjustments.
Why is my AirPods 2nd-gen noise cancelling not working?
If you’re trying to use noise cancelling with AirPods 2 and it’s not working, it’s likely because this feature isn’t supported on that model. Only AirPods Pro and AirPods Max have ANC capabilities. AirPods 2 don’t include the hardware components, like in-ear tips, multiple microphones, or ANC processing, that are necessary for true noise cancellation. If you need ANC, consider upgrading to a compatible model.


