


.png)
You film a great video, then play it back and hear a ton of echo. Happens, right? But you can’t let this go.
Bad audio quality makes the most confident speakers or content creators sound less professional.
Is there anything you can do about it? Yes. Why not?
In this article, we are going to talk about how to make a video’s audio less echoey.
6 Ways to Fix Echo and Get Clearer Audio in Your Videos
You might need fixes before you hit record and after you’re done, too, so here are some tips that cover both.
Method 1: Record in a Better Environment (Before Recording)
First things first, before you hit record, you must cross-check if the recording space is set up for good audio. Hard surfaces bounce your voice, so use a smaller room with rugs, curtains, or furniture to absorb the echo. Here’s what you should do:
- Lay a rug or carpet on hard floors.
- Hang thick curtains or a blanket behind you.

- Add soft furniture like a sofa or cushions to the room.
- Close doors and windows to cut outside noise.
- Turn off fans, ACs, and anything that hums.
- If possible, record in a smaller, furnished room.
Method 2: Tweak Echo Settings in Post-Production
So now, if you have recorded your video and it still sounds echoey, it’s time to use your post-production tools. Most editing software offers echo or reverb removal features you can use with just a few clicks. Let’s take an example of a commonly used tool, i.e., Adobe Audition. Just follow these steps to tweak echo settings:
- Import your audio track
Go to File → Open, find the audio file on your computer, and load it into Audition.

2. Highlight the audio you want to fix
Now, to select the entire file: Edit → Select → Select All. If you want to edit just a portion of the audio, simply click and drag over the exact part you want to edit.

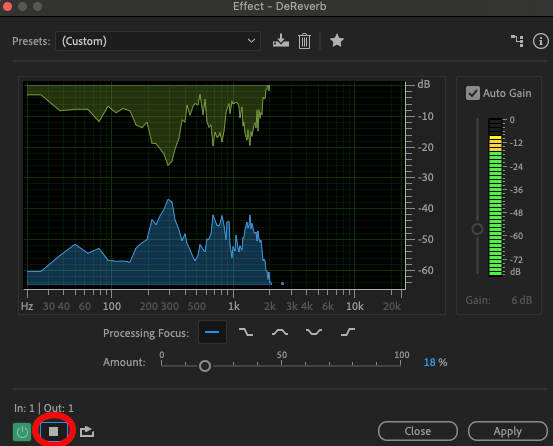
3. Access the DeReverb tool
In the top menu, go to Effects → Noise Reduction/Restoration → DeReverb.

4. Tweak the echo reduction amount
Move the main slider slowly to remove echo, using the “Preview” option to check changes as you go, and avoid pushing it too far to prevent the audio from sounding distorted.

5. Apply your changes and save the file
- When you’re happy with the sound, click Apply
- Save the cleaned-up version via File → Save As
And that’s all!
Method 3: Use a Dedicated External Microphone
Even after pre- and post-recording, something doesn’t feel right? Well, one of the biggest reasons your audio sounds echoey is because the built‑in camera or laptop mics pick up the room noise, the reflections, and even the fan in the corner. Switching to a good external microphone instantly improves clarity because it’s designed to capture only what’s in front of it.
A great option is the Hollyland LARK MAX 2. It not only records in 32‑bit float, which keeps your audio clean even in both indoor and outdoor environments, but also has OWS Bluetooth monitoring, so you can hear your recording in real time and fix issues instantly.
Method 4: Use AI-Powered Echo Removal Tools
These days, AI can handle a lot of audio cleanup work for you. AI tools like AudioCleaner.ai can remove echo and background noise automatically, saving you hours in editing. Here’s how to do it for free:
Steps:
- Upload Your File: Go to AudioCleaner.ai and upload your audio or video file, such as MP3, WAV, M4A, MP4, etc.

- Choose Enhancement Options: Select from features like Remove Noise, Remove Long Silences, Eliminate Hesitations, AutoEQ, Studio Sound, and more based on what your file needs.

- Select Content Type: Pick the category that best matches your audio, such as Podcast, Voice-over, Interview, Music, or Lecture.

After that, click on the “Enhance Media” button.

- Download Your Clean Audio: Once processing is done, simply download your cleaned-up file and use it right away.
Method 5: Layer Soft Background Audio in Post
If a small amount of echo is still noticeable after cleanup, you can mask it with a subtle background track. You must have seen that this technique is commonly used in podcasts, vlogs, and even professional film editing to make voices sound fuller and reduce the perception of room echo.
Steps:
- Choose the right background audio: Select and download soft ambient music, gentle instrumental tracks, or a clean loop of room tone from a website like Pixabay.

- Add it to your editing software: Import the chosen track into your timeline and position it under your voice track.

- Volume: Keep the background audio very low. –20 dB to –30 dB. So it supports your voice, not competes with it.
- Match the tone of the track to your content: Tutorials and explainer videos – neutral room tone. Vlogs and creative content – light instrumental music.
- Final mix: Play the whole track from start to finish and listen with headphones. The echo should feel less noticeable, and the voice should be clear and easy to follow.
Method 6: Normalize and EQ
It’s one of the most basic methods for improving the audio quality. Echo can make voices sound thin and volume inconsistent. Normalizing and EQing your audio can make it sound fuller and clearer, even if some echo remains.
Steps:
- Use your editing software’s “Normalize” or “Loudness” function. It will bring it up to a level without distortion.
- Reduce mid and low-mid (200–500 Hz) slightly as echo builds up here.
- Boost 3–6 kHz to make it sound clearer and more in your face.
- Play and adjust until it cuts through without sounding harsh.
Conclusion
That’s how to get rid of echo in a video’s audio. Even though the methods mentioned above work best for this purpose, it’s suggested to invest in a good microphone. It’s because this simply enhances your audio quality and saves a lot of time.
FAQs
1. What causes an echo in video and audio?
Echo occurs when your voice or sound waves bounce off hard surfaces. These reflections are then picked up by the microphone, making the audio sound hollow or distant.
2. Can I completely remove echo from a recording?
Yes. But it can be tricky. Preventing echo during recording by using the right mic and space is always better than trying to remove it later with editing or AI tools.
3. Do I need expensive equipment to fix the echo?
Not at all. Even affordable external microphones combined with simple changes like recording in smaller rooms can drastically reduce echo and improve your audio quality overall.
4. Can AI tools remove echo?
Yes. Modern AI tools like AudioCleaner.ai can quickly remove echo and background noise automatically. It makes them a convenient option for beginners and professionals without advanced editing skills.
5. Which method works best for beginners?
Using a good external microphone is the most reliable fix. It captures clear audio at the source, minimizing echo and saving you time on editing later, even in echo-prone rooms.
