.png)
Trusting your camera’s LCD screen is one of the most common mistakes in filmmaking. You think the image is bright enough, but it’s not! That’s how regular monitors trick the eyes.
To get consistent, professional results, you need a tool like False Color.
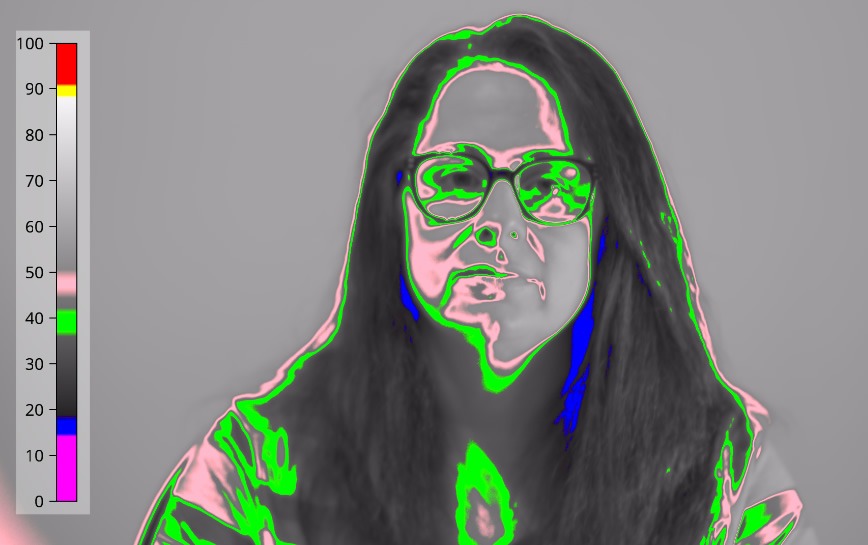
Think of False Color as a “heat map” for your exposure. Instead of showing you the image as the human eye sees it, this mode replaces the image with a specific color palette based on luminance (brightness) values. It strips away the texture and detail, leaving you with a clear, color-coded map that tells you exactly where your light levels sit on the IRE scale.
What is a False Color Chart?

False Color is an exposure monitoring tool that assigns specific colors to luminance values based on the IRE scale. It allows filmmakers to instantly identify overexposed highlights (often Red), underexposed shadows (Purple/Blue), and properly exposed skin tones (Pink/Green) without relying on the brightness of their monitor.
If you learn this chart, you can set exposure without guessing. Whether you are shooting in a dark room or under bright sunlight, the False Color values remain absolute.
Understanding the IRE Scale: The Backbone of False Color
False Color is built on the IRE scale (Institute of Radio Engineers).
Think of IRE as a percentage ruler for light. It measures exactly how bright or dark every pixel in your image is. The scale typically runs from 0 to 100, representing the dynamic range of a standard Rec.709 video signal.
Here is the breakdown of the two critical extremes:
- 0 IRE (Absolute Black): This is the floor. At 0 IRE, the sensor is recording no light information. If your shadows hit 0, they are “crushed.” Even if you try to fix it in post-production, you will only get noise or black pixels, not details.
- 100 IRE (Absolute White): This is the ceiling. At 100 IRE, the sensor is fully saturated. This is known as “clipping.” Any detail in this range (like texture in a cloud or a bright window) is lost forever and will appear as a flat, featureless white blob.
Why this matters:
False Color takes this numerical scale and paints it. Instead of guessing if a highlight is at 90 IRE (safe) or 100 IRE (clipped), the monitor assigns a specific color (usually red) to anything hitting 100 IRE. By understanding that the goal is usually to keep your image data strictly between 0 and 100, you can instantly spot where your exposure is failing.
How to Read a False Color Chart (Color Key)
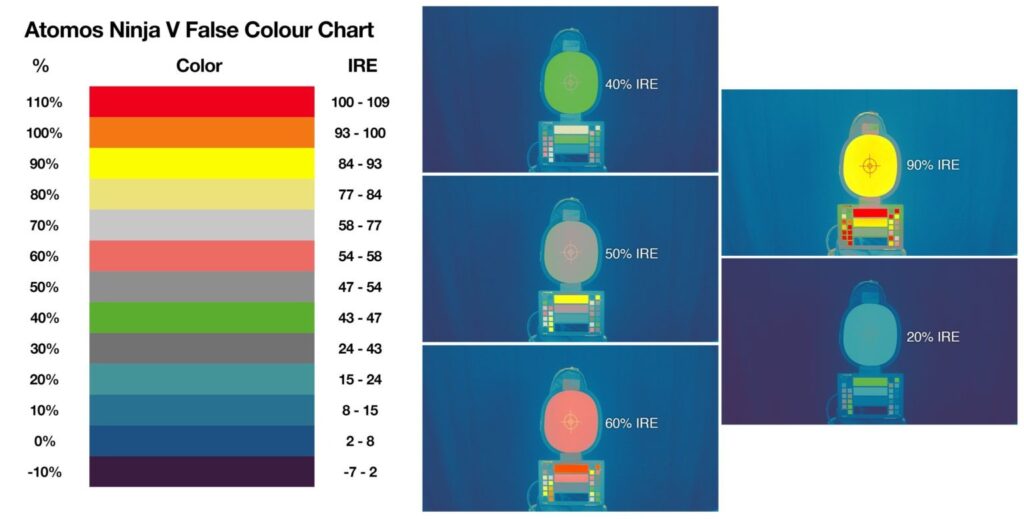
Different cameras like ARRI, RED, and Sony, or monitors like SmallHD and Hollyland, might use slightly different colors, but the danger zones and skin tones stay the same. Therefore, the goal is pretty simple: Keep your subject in the safe colors (Pink/Green/Grey) and keep essential details out of the danger zones (Red/Purple).
Standard False Color Reference Table
Use this table as a quick reference guide for most standard false color tools.
| Color Indicator | IRE Range (Approx.) | Meaning | Action Required |
|---|---|---|---|
| Red | 95 – 100 IRE | Clipping (White) | Stop Down. Detail is lost; highlights are blown out. |
| Yellow | 80 – 95 IRE | Near Clipping | Caution. Safe for bright light sources (windows, lamps), but risky for faces. |
| Pink | 50 – 70 IRE | Lighter Skin Tones | Perfect. Typical target for Caucasian skin or highlighted areas of darker skin. |
| Green | 40 – 50 IRE | Darker Skin / 18% Grey | Perfect. Typical target for darker skin tones or the shadow side of a face. |
| Grey | 40 – 42 IRE | Middle Grey | Baseline. Use this to expose a grey card for neutral exposure. |
| Blue / Purple | 0 – 10 IRE | Crushed Blacks | Open Up. Detail is lost in the shadows; image will be noisy. |
Decoding the Critical Zones
1. The Danger Zones (Red & Purple)
If you see Red on a forehead or a white t-shirt, you have lost that data forever. It will be pure white in post-production. Similarly, Purple indicates “crushed blacks,” meaning there is no texture in the shadows.
- Pro Rule: A light bulb can be red, and a cave can be purple, but a person’s face should never be those colors.
2. The Skin Tone Zone (Pink & Green)
- Pink: Often represents roughly one stop over 18% grey. For lighter skin tones, you generally want the illuminated side of the face to show Pink.
- Green: Often represents 18% grey or slightly above. For darker complexions, or the shadow side of a lighter face, Green indicates a healthy exposure.
3. The Baseline (Middle Grey)
If you are using a standard 18% Grey Card to set your base exposure, it should appear Green or Grey on your monitor (depending on the specific brand’s mapping). Once your grey card “lights up” in the correct color, you know your base ISO and aperture are technically correct for the scene.Note on Brand Variations: Always check your specific monitor’s manual. For example, ARRI False Color is the industry standard, but some external monitors use a “Spectrum” mode that introduces more colors (like Orange or Teal) for finer gradients. Stick to the ARRI standard whenever possible for consistency.
Step-by-Step: How to Use False Color for Perfect Skin Tones
Here’s a simple way to get a true skin exposure every time using a False Color chart.
1. Activate False Color

Turn on the False Color tool on your external monitor or camera. Your image will instantly turn into a psychedelic heat map. Do not panic; this is simply your luminance values being translated into color data.
2. Identify and Expose for Skin Tones
You need to adjust your lighting (intensity), aperture (f-stop), or ISO until your subject’s skin lands in the correct color zone.
While every False Color chart varies slightly by manufacturer, the general standards are:
- For Lighter Skin Tones (Caucasian/Pale): Aim for Pink.
- Pink usually represents roughly 70 IRE (highlights on the face).
- If you see Yellow or Red on the skin, it is overexposed.
- If you see Green or Grey, it is likely underexposed.
- For Darker Skin Tones: Aim for Green or Dark Grey.
- Darker complexions typically reflect less light, sitting between 40–55 IRE.
- Aim to have the highlights of the cheekbones or forehead touching the upper edge of Green or transitioning into Pink depending on the specific depth of the skin tone.
Action: Rotate your lens aperture ring or adjust your key light brightness until the “target color” covers the lit side of the subject’s face.
3. Check for Dangerous Highlights (Clipping)

Once the skin looks good, scan the rest of the frame. Look for bright Red patches.
- Red indicates 95–100 IRE, meaning those areas are clipping and losing data.
- If a practical light or the sun is red, that is usually acceptable.
- Note: If you see Red on your subject’s forehead, nose, or cheekbones, you are “clipping the skin channel.” You must stop down or diffuse the light immediately, or that data will be unrecoverable in post-production.
4. Deactivate and Compose
False Color is an analytical tool, not a compositional one. It is distracting to frame a shot while looking at a predator-vision heat map.
- Once exposure is locked, turn False Color OFF.
- Return to your standard Rec.709 or Log view to check focus, framing, and color contrast.
- Trust the reading you just took—even if the image looks slightly flat on the monitor, the data proves your exposure is mathematically correct.
False Color vs. Other Exposure Tools (Zebra, Waveform, Histogram)
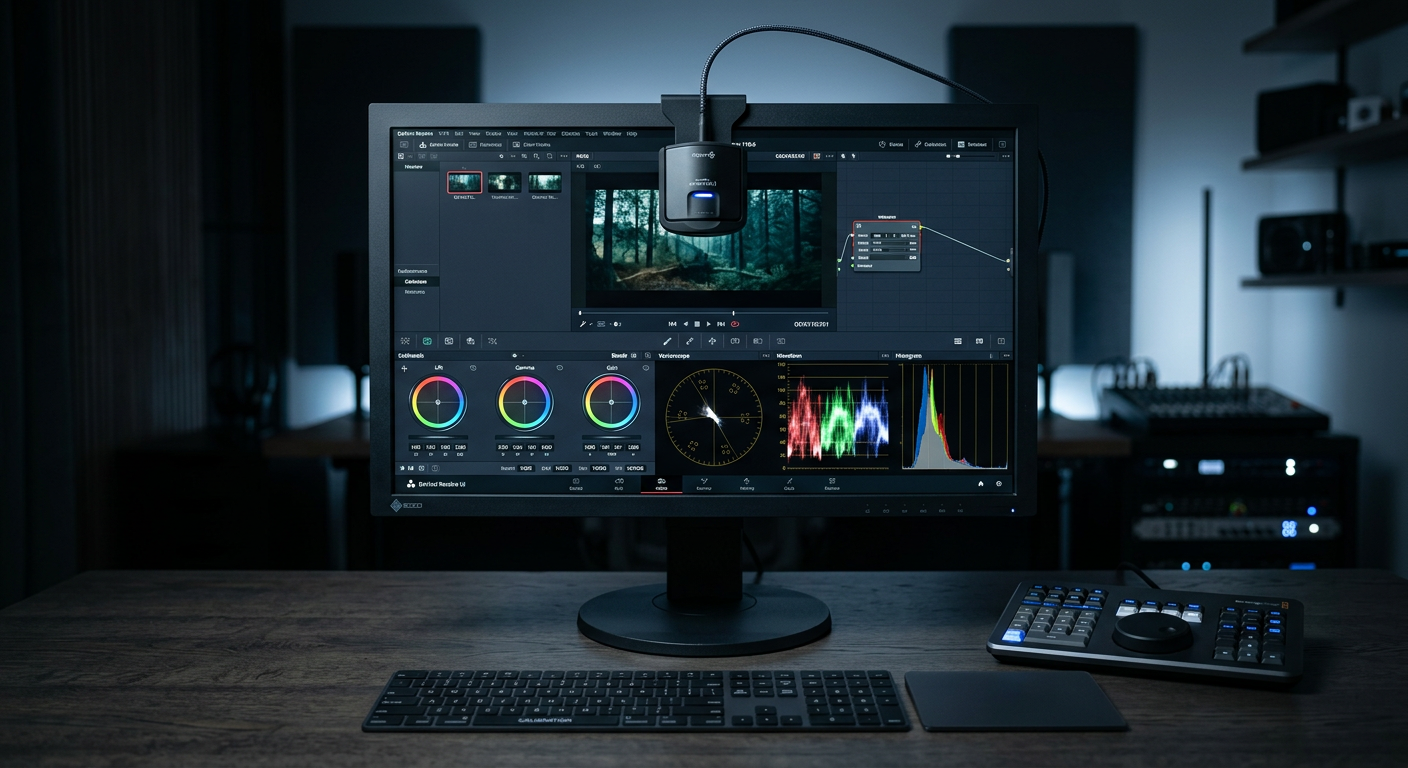
Modern cinema cameras and monitors like the Hollyland Pyro 5 offer a suite of exposure tools. While each has its own uses, most require mental effort to understand. However, False Color stands out because it provides spatial context, as it tells you exactly where your exposure values land on the image itself.

Hollyland Pyro 5 - 5.5” Portable Camera Monitor
A 5.5-inch camera monitor that combines a transmitter, receiver, and high-brightness touchscreen into one unit.
Key Features: 5.5 Inches & 1500 Nits | 1 TX & 4 RX | 400m LOS Range | SDI & HDMI | Dual-Band | Camera Control
Here is how False Color compares to the standard alternatives.
The Histogram: Good for Data, Bad for Context

The histogram is the most common tool, found on everything from iPhones to cinema cameras. It shows a graph of the brightness distribution across the entire image.
- The Problem: It is global, not spatial. A histogram can tell you that something in your shot is overexposed, but it won’t tell you if it’s the sun in the sky (acceptable) or your actor’s forehead (unacceptable).
- The Verdict: Use it for a quick check of overall dynamic range, but never rely on it for lighting specific subjects.
Zebra Stripes: The “Danger” Warning

Zebras are a binary tool. You set a threshold (e.g., 100 IRE or 70 IRE), and the camera overlays striped lines on any part of the image that exceeds that limit.
- The Problem: It only shows one or two specific values. If you set Zebras to 100% to protect highlights, you have absolutely no data regarding your shadows or mid-tones. It shows you what’s risky, but it doesn’t help you control the light.
- The Verdict: Works well for quick documentary filming to prevent clipping, but not for fine-tuning exposure.
Waveform Monitor: The Technical Standard

Professional DPs often rely on the Waveform because of its precision. Unlike the Histogram, the Waveform has horizontal spatial accuracy. If a bright object is on the left side of the frame, the spike on the graph appears on the left.
- The Problem: It lacks vertical context. It overlays your image and sometimes gets in the way. You have to think about which waveform spike belongs to which object, which can be slow.
- The Verdict: The gold standard for balancing lighting ratios in a controlled environment, but significantly slower to read than False Color.
Why False Color Wins
False Color is the only tool that creates a direct visual map. It paints the exposure data directly onto the object. You don’t have to look at a graph and wonder, “Is that spike the lamp or the window?” You simply look at the lamp; if it’s red, it’s clipping. If the face is pink, it’s exposed correctly.
Comparison at a Glance:
| Feature | Histogram | Zebras | Waveform | False Color |
|---|---|---|---|---|
| Data Type | Global Graph | Threshold Warning | Horizontal Graph | Full Image Overlay |
| Spatial Context | None | Yes (Limited) | Horizontal Only | 100% Spatial |
| Best Used For | Quick dynamic range check | Preventing clipping (Safety) | Precise lighting ratios | Skin tones & scene balance |
| Readability | Low (Abstract) | High (Simple) | Medium (Technical) | High (Intuitive) |
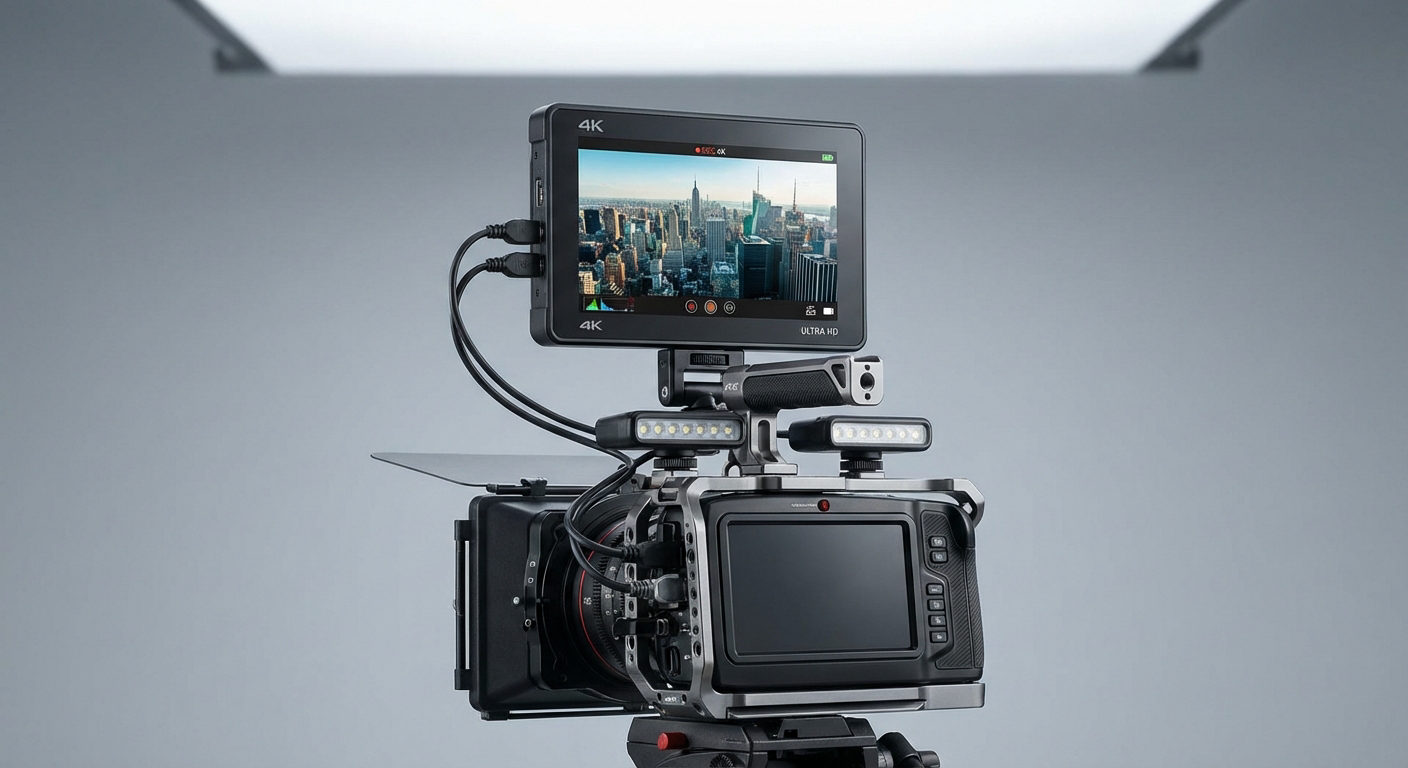
The Gear: How to Get False Color on Your Setup
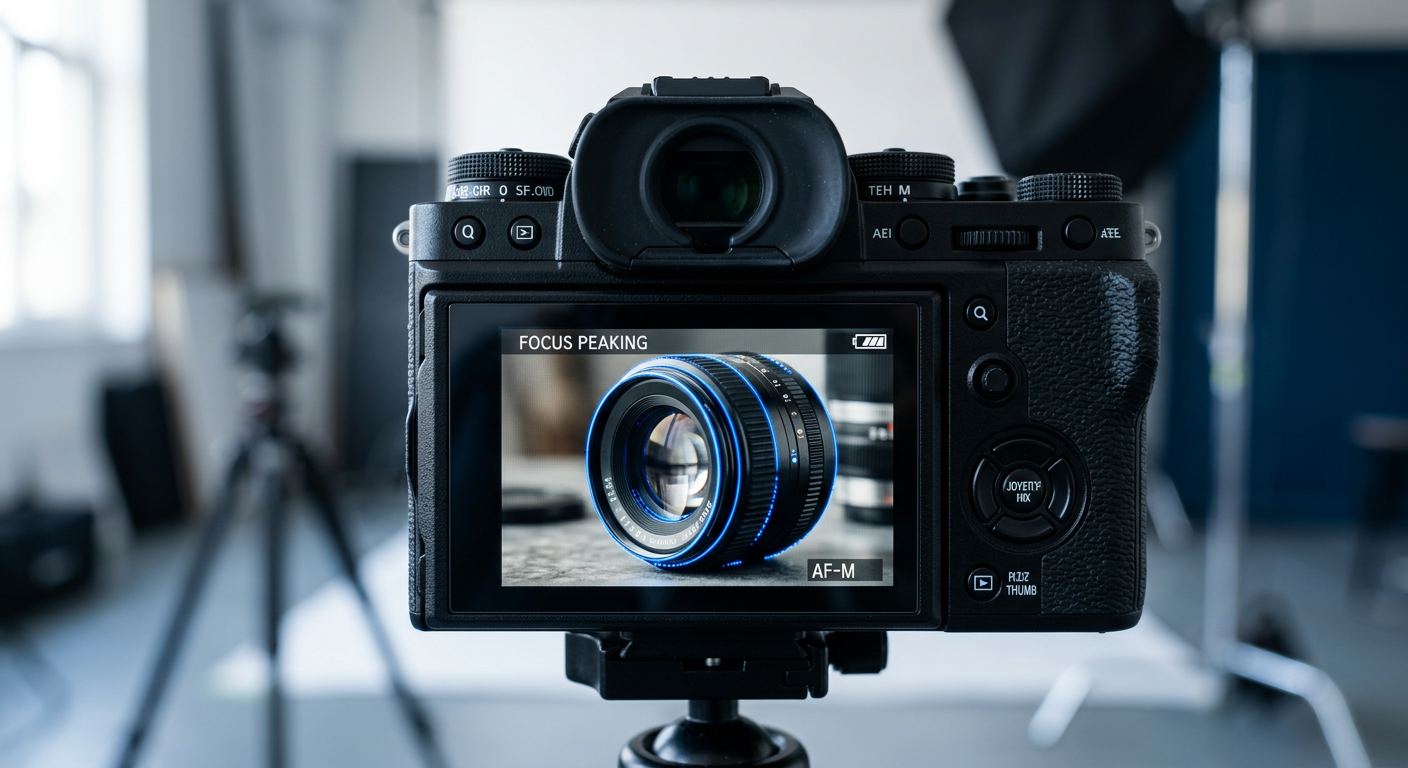
If you are shooting with a dedicated cinema camera (like a RED Komodo, ARRI Alexa, or Blackmagic Pocket Cinema Camera), you likely have a False Color button mapped to a custom key. However, the vast majority of mirrorless hybrid cameras and DSLRs (such as the Sony Alpha series, Canon R series, or Panasonic Lumix) do not have internal False Color.
These cameras rely on simpler tools like Histograms or Zebras. These tools are useful, but they don’t show which part of the image hits 50 IRE. They just represent the overall light distribution. To fix this, you need an external monitor. A dedicated monitor takes the clean video feed from your HDMI or SDI port and processes the signal to generate a False Color overlay in real-time.
One-Stop-Solution: Hollyland Pyro 5
The Hollyland Pyro 5 gives you a power pack in a compact 5.5-inch display. This 3-in-1 transceiver gives strong control wherever you shoot. You can master your composure with features like:
- 1500 Nits Brightness: Super clear visibility under bright sunlight
- Pyro Ecosystem: Works effortlessly with Pyro S, Pyro H, and Pyro 7
- Advanced Image Analysis: False Color, Zebra Pattern, and loads of other tools for image accuracy
- 3D LUT: Offers 5 built-in LUTs for consistent color-grading
Advanced Workflow: Monitoring Exposure Remotely

When it comes to serious filmmaking, you will rarely find the Director of Photography (DP) or Gaffer standing behind the camera. Instead, they view the recordings from a Video Village. This is a separate area with high-end, color-calibrated monitors so they can focus on exposure and lighting while the operator handles composition. And to make it all work, the camera’s feed needs to go to a bigger screen to use False Color without getting in the operator’s way.
The Wireless Link: Why Latency Matters
When you are adjusting lights based on a monitor reading, speed is everything. If there is a lag between the camera sensor and your monitor, you might over-adjust a dimmer or miss a lighting cue.
This is where a robust wireless video transmission system becomes a critical exposure tool.
- Real-Time Feedback: You need a system with ultra-low latency. If the camera pans into a bright window, you need to see the False Color shift to “Red” (clipping) instantly.
- Signal Integrity: The wireless feed must be clean and stable. Artifacts or signal drops can be mistaken for image noise or focus issues.
Another Solution: Hollyland Pyro S
For crews moving beyond HDMI cables, systems like the Hollyland Pyro S are industry standards for establishing this link.
Hollyland Pyro S - 4K Low-Latency Transmitter
A wireless 4K video transmission system with HDMI & SDI, utilizing auto dual-band frequency hopping technology.
Key Features: 400m/50ms | 1TX & 4RX | Dual Band | HDMI & SDI
- Hollyland Pyro S: Ideal for multi-person crews, this system utilizes Auto Dual-Band Hopping (ADH) technology that automatically switches between 2.4GHz and 5GHz. This ensures that even on sets crowded with other wireless signals, the video feed remains stable. Plus, this single wireless transmitter sends signals to 4 receivers simultaneously, supporting up to 4K/30fps image quality. It allows the DP to view the footage on a dedicated monitor while the director or client watches on a separate tablet or screen at the same time.
How to Set It Up
- Clean Feed: Set your camera to output a “Clean Feed” (no internal overlays) via HDMI/SDI to the Hollyland transmitter.
- Transmission: The Hollyland Pyro S sends the signal wirelessly to the receiver at Video Village.
- Analysis: Connect the receiver to a large production monitor.
- Exposure Check: Activate the False Color tool on the production monitor, not the camera.
This method allows the DP to toggle False Color on and off to check skin tones (Pink/Green) and highlights (Yellow/Red) independently, leaving the camera operator’s view uncluttered for framing and focus.
Pro Tips for Shooting Log vs. Rec.709 with False Color
Filmmakers often run into this when switching from standard profiles to Log. If you don’t understand how your monitor handles False Color with LUTs, you might ruin your exposure. Keep in mind that False Color shows the brightness of the video, but it looks very different on a flat Log image compared to a Rec.709 image with a LUT.
The “Log Squeeze” Effect
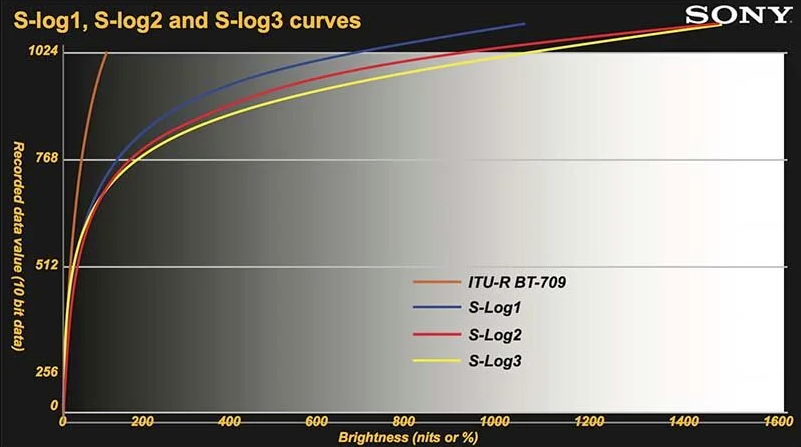
Log profiles (like S-Log3, C-Log, or V-Log) are designed to maximize dynamic range by flattening the image. This compresses the luminance values on the IRE scale.
- In Rec.709: Middle Grey is typically found around 40–50 IRE (often Green or Pink on charts).
- In Log: Middle Grey shifts downwards significantly. For example, Sony’s S-Log3 places Middle Grey at 41%, while Canon C-Log3 places it around 35%.
If you try to expose a Log image using standard Rec.709 False Color targets (looking for Pink skin tones at 50-60 IRE), you will likely overexpose your footage by several stops.
The Golden Rule: Measure the Sensor, Not the LUT
Many external monitors let you add a 3D LUT to see the final footage. However, the important thing is to know whether False Color is reading the raw Log signal (input) or the LUT signal (output).
1. Monitoring Post-LUT (The Danger Zone)


If your False Color tool reads the signal after the LUT is applied, you are measuring the color grade, not the actual data the sensor is capturing.
- Risk: A high-contrast LUT might crush shadow detail to 0 IRE or clip highlights to 100 IRE on the monitor, making you think you’ve lost data. In reality, the Log file still has plenty of information in those areas.
- When to use it: Only use this to check lighting ratios (contrast) for the final look.
2. Monitoring Pre-LUT (The Safe Zone)


For technical accuracy, you should always check False Color on the flat Log image.
- Benefit: This tells you exactly what the sensor is recording. If the Log signal hits Red (Clipping), that data is truly gone.
- Workflow: Toggle your LUT OFF to check exposure with False Color, adjust your aperture/lighting, and then toggle the LUT back ON for composition.
Pro Gear Tip: High-end monitors like the Hollyland Pyro 5often allow you to configure whether exposure tools analyze the input source or the LUT output. Always verify this setting in your menu before the shoot begins to ensure you aren’t making decisions based on false data.
Frequently Asked Questions (FAQ)
What is the correct IRE for skin tones?
There is no single “perfect” number, but generally, human skin tones fall between 40 IRE and 70 IRE.
- Lighter Skin Tones: Typically sit between 60-70 IRE. On many false color charts, this often registers as Pink or Light Grey.
- Darker Skin Tones: Typically sit between 40-55 IRE. This usually registers as Green or Dark Grey.
- The Golden Rule: Consistency matters more than the specific number. Once you determine where your subject’s skin looks best on your specific sensor, aim to hit that same IRE value for every shot in the scene.
Should I expose for Pink or Green?
This depends entirely on the color map your monitor uses (e.g., ARRI, RED, or Hollyland standard) and the subject you are filming.
- Pink (Usually ~70 IRE): Often indicates caucasian skin highlights or one stop over 18% grey. If you are filming a subject with pale skin, seeing Pink on the cheekbones is usually a sign of perfect exposure.
- Green (Usually ~40 IRE): Often represents 18% Grey or darker skin tones. If you are filming a subject with deep skin tones, you generally want their key-lit side to read Green.
Important: Always check the color key (legend) on your specific monitor, such as the Mars M1 Enhanced, as manufacturers may use slightly different palettes.
Can I use False Color in post-production?
Yes. While False Color is primarily a production tool for capturing data, it is excellent for shot matching in editing software like DaVinci Resolve or Adobe Premiere Pro.
- Auditing Footage: Turn on False Color in your grading suite to see if your highlights are actually clipped or just bright.
- Consistency: If you are matching two cameras, use False Color to ensure the skin tones in Shot A generate the same color value as the skin tones in Shot B.
Why does my False Color look different on different monitors?
If your readings look wrong, it is usually due to one of two reasons:
- Manufacturer Standards: Different brands map IRE values to different colors. ARRI False Color is different from RED False Color. Stick to one standard to build muscle memory.
- Log vs. LUT: This is the most common error. If you apply False Color to a flat Log signal, the image will look muted (mostly grey/green) because the data is compressed. If you apply it after a Rec.709 LUT, the contrast stretches, and you will see more Red (clipping) and Purple (crushed blacks). Always know if your monitor is analyzing the Source (Log) or the Look (LUT).
Conclusion: Stop Guessing, Start Exposing
Using your camera screen or eyes to check exposure is not reliable. Ambient light, screen brightness, and eye strain can make you think a shot is fine when it’s under or overexposed. But guess what? False Color fixes this. It turns exposure into something you can see clearly. By showing brightness as colors, you know your skin looks good, shadows keep detail, and highlights are safe. Nevertheless, to use it properly, you need an external monitor that tells the truth.