.png)
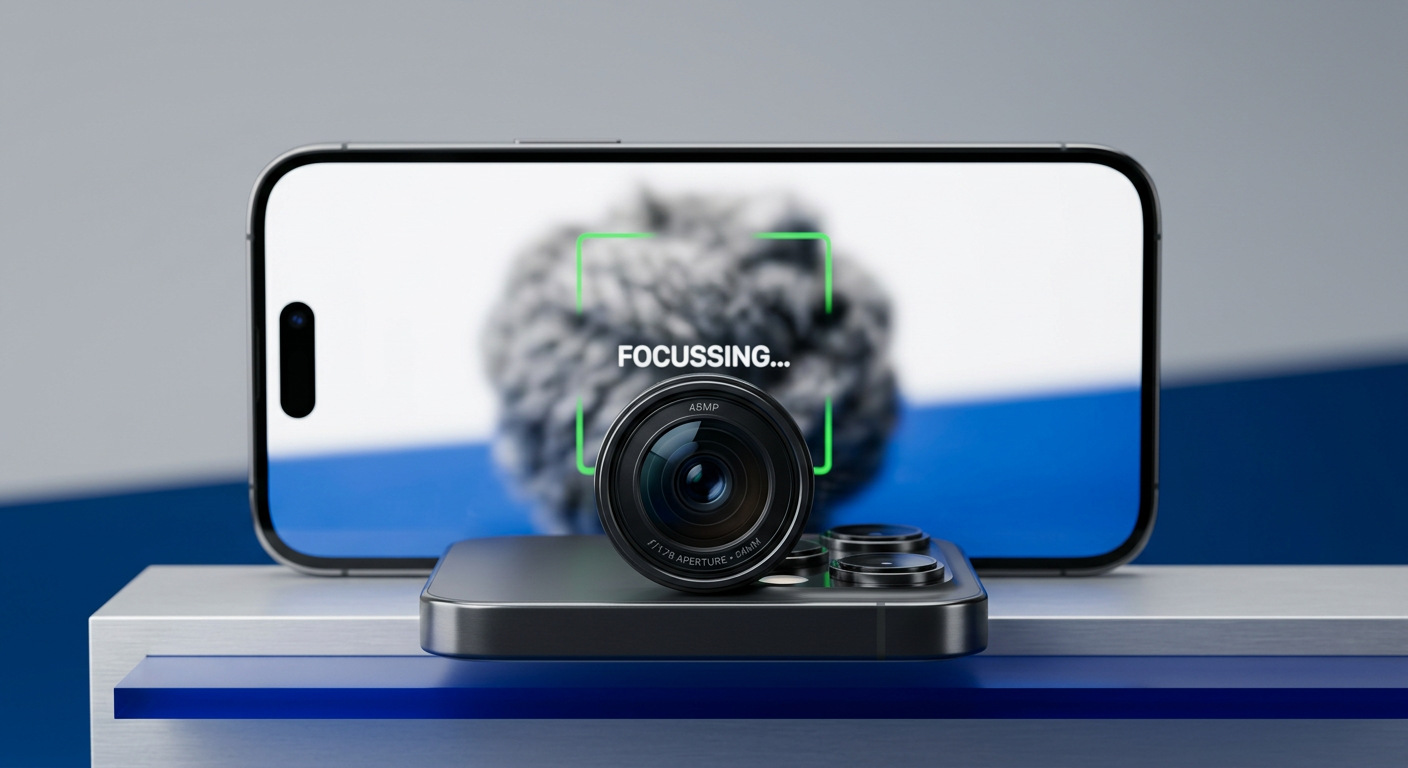
Autofocus is powerful, but it isn’t perfect—especially for macro work, low light, or cinematic video. You might be confused about focus peaking and how it helps. Well! It shows exactly what looks sharp while you shoot.
Focus peaking is the industry-standard tool for mastering manual focus
So here, you will learn how focus peaking works. We’ve also shared some thoughtful reasons why you should use it over autofocus.
What is Focus Peaking and How Does It Work?

Focus Peaking works by digitally analyzing the image for areas of high contrast. When your image is in focus, the edges are sharp (high contrast). If it’s blurry, the edges look soft (low contrast). The camera recognizes the sharp edges and puts a colored highlight on them, usually red, yellow, or white.
The Technology Behind the “Shimmer”
Focus peaking relies on an edge-detect filter similar to those used in image editing software. The camera’s processor scans the live video feed millions of times per second to find distinct transitions between light and dark.
- Blurry Image: Edges are soft and gradual. The processor detects low contrast and displays no peaking highlights.
- Sharp Image: Edges are crisp and abrupt. The processor detects high contrast and immediately “paints” that specific area with your chosen peaking color.
What You See in the Viewfinder
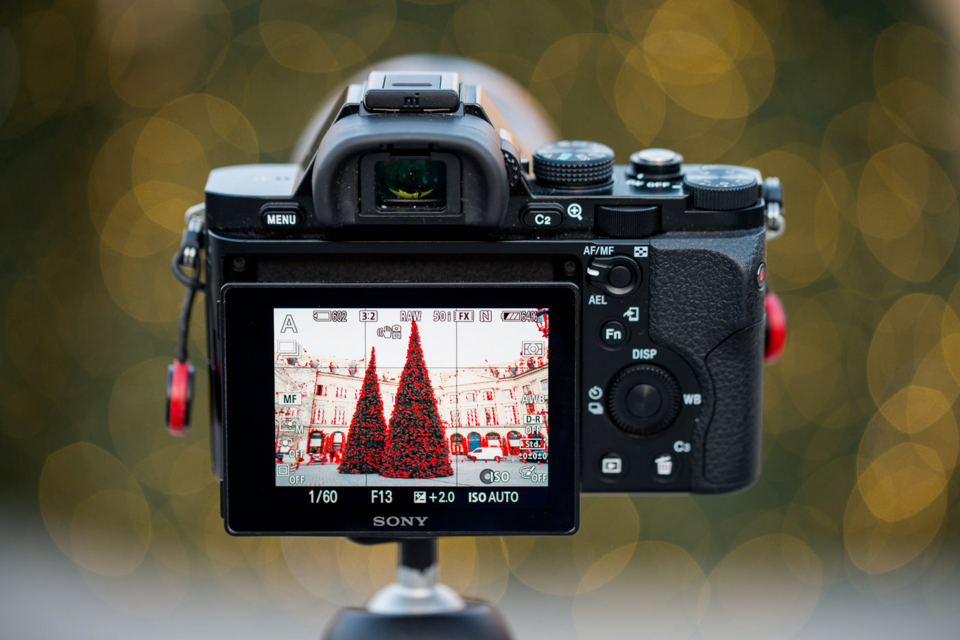
When you enable focus peaking and begin rotating your lens’s focus ring, you will see a colored “shimmer” or “static” appear on objects as they enter the depth of field.
For example, if you are filming a portrait:
- As you turn the focus ring, the background might shimmer red (indicating the background is sharp).
- As you continue turning, the red highlight moves forward to the subject’s ears.
- Finally, the red highlight settles on the subject’s eyes and eyelashes.
Once the highlights show up right where you want, you can tell your shot is sharp without staring at the small screen. Yes! No more squinting at your camera’s LCD.
Why You Should Use Focus Peaking (vs. Autofocus)
Modern Autofocus (AF) systems work for general snapshots, but for creative work, trusting the camera to choose your focal point often leads to ruined footage.
Focus peaking makes manual focusing way easier by digitally highlighting sharp areas using colors. It’s faster than just relying on your eyes and helps you get accurate shots even in challenging areas like low light or with a shallow depth of field.
1. Macro Photography

When you’re shooting macro, the area that’s in focus (depth of field) is usually super tiny (sometimes less than a millimeter).
- The AF Problem: Autofocus often struggles to lock onto the specific texture you want (like the eye of an insect) and instead jumps to a leg or a leaf in the background.
- The Peaking Solution: Focus peaking shows you exactly which part of your subject is sharp. You can actually see the highlight shimmer across it, so you know the moment the important detail is in focus.
2. Video Production

When shooting a video, if a lens is constantly hunting for focus, it can totally ruin a shot.
- The AF Problem: If a subject moves slightly or an object crosses the frame, AF systems often “pulse” or hunt for focus. This creates a distracting “breathing” effect that makes footage look amateur.
- The Peaking Solution: Professional videographers rely on manual focus to ensure consistency. Peaking allows you to execute a smooth rack focus (shifting focus from a foreground object to a background object) with confidence, knowing exactly when your target is sharp without the camera guessing for you.
3. Low Light Environments

Autofocus sensors need enough light and contrast to do their job.
- The AF Problem: In low light, cameras have trouble finding edges, so the lens keeps hunting back and forth (zooming in and out). It happens because it cannot find a focal point and therefore fails to lock on.
- The Peaking Solution: Even in grainy, low-light conditions, focus peaking can detect edge contrast that the AF system misses. By switching to manual and watching for the highlight overlay, you can lock focus in the dark much faster than an automated motor can.
4. Using Vintage Lenses
One of the biggest advantages of mirrorless cameras is the ability to adapt vintage “legacy glass” (like old Canon FD, Nikon AI, or Minolta lenses).
- The AF Problem: These lenses have no electronic contacts, meaning autofocus is impossible.
The Peaking Solution: Focus peaking makes manual focusing on vintage lenses faster and more accurate than it ever was on the original film cameras. You can get that classic vintage look while keeping everything sharp with modern clarity.
How to Set Up and Use Focus Peaking (Step-by-Step)
While every camera manufacturer (Sony, Canon, Nikon, Fujifilm) buries the setting in a slightly different menu, the workflow for enabling and using focus peaking is universal. Follow these five steps to take full control of your manual focus.
- Switch to Manual Focus (MF)
Focus peaking generally will not activate while you are in Autofocus mode. First, switch your lens or camera body to MF.
- On the Lens: Look for a physical switch labeled AF/MF and slide it to MF.

- On the Body: Some cameras (like Fujifilm or older Nikon DSLRs) have a physical dial on the front or top of the body.

- In the Menu: If your lens lacks a switch (common with Sony E-mount or Canon RF kit lenses), go into your camera’s “Focus Mode” settings and select Manual Focus.

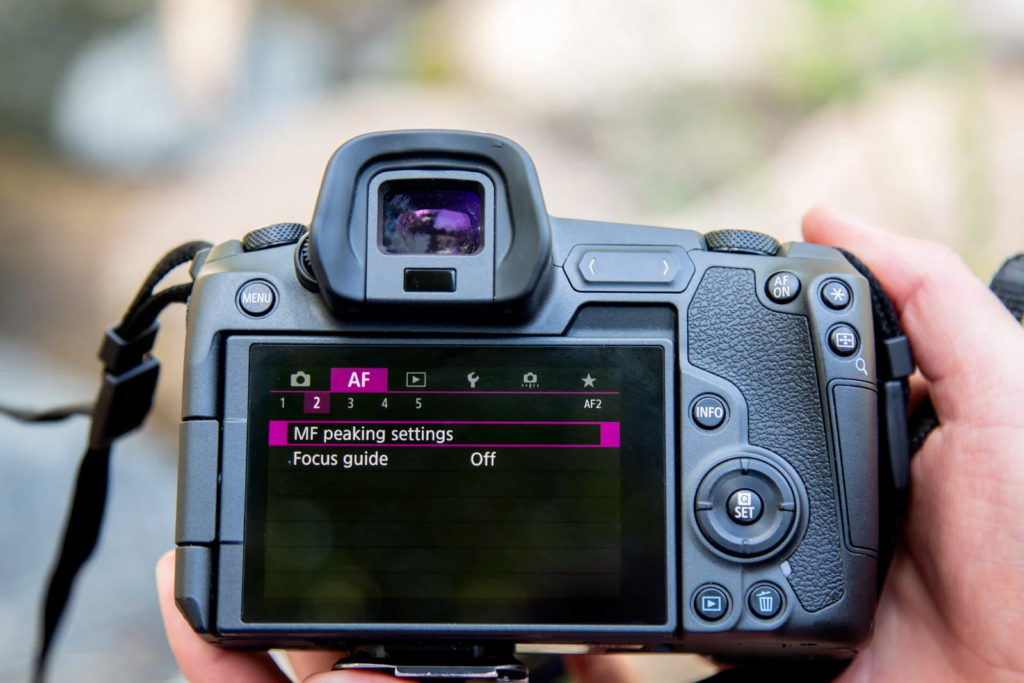
- Enable Peaking in the Menu
Navigate to your camera’s settings. This is typically found under “Focus Assist,” “Display Settings,” or the “Shooting Assist” tab. Look for an option labeled Peaking Setting or Peaking Display and turn it ON. - Choose Your Peaking Color

Don’t just stick with the default color. You need a color that contrasts heavily against your specific subject and background so the highlights are clearly visible.
- Red: The industry standard. Great for landscapes and architecture. Avoid using red when shooting portraits, as it can blend in with skin tones.
- Yellow/White: Excellent for low-light situations where red might get lost in the shadows.
- Blue: Ideal for shooting warm subjects, sunsets, or anything with red/orange hues.
- Set the Sensitivity Level (Peaking Level)

This controls how “strict” the camera is about what it considers to be in focus.
- Low Sensitivity (Recommended): Most cameras can be picky. They only highlight edges that are pretty sharp. This is harder to see but offers the highest precision for macro or 4K video.
- High Sensitivity: The camera is easy to use. It shows parts that are mostly in focus, so the edges are easy to see. But here’s a twist! At the same time, it can make a soft shot look sharp. So the best situation to use this is when you need to shoot quickly.
- Rotate the Focus Ring

Look at your LCD screen or Electronic Viewfinder (EVF). As you rotate the focus ring on your lens, you will see a colored “shimmer” or static-like noise appear on the edges of objects.
- The Goal: Rotate the focus ring while watching your screen. Keep going until the colored highlights are brightest on your subject’s most important part, usually the eyes.
- The Result: When the highlights fully cover the edges, that area is perfectly sharp, and you’re ready to take the shot.
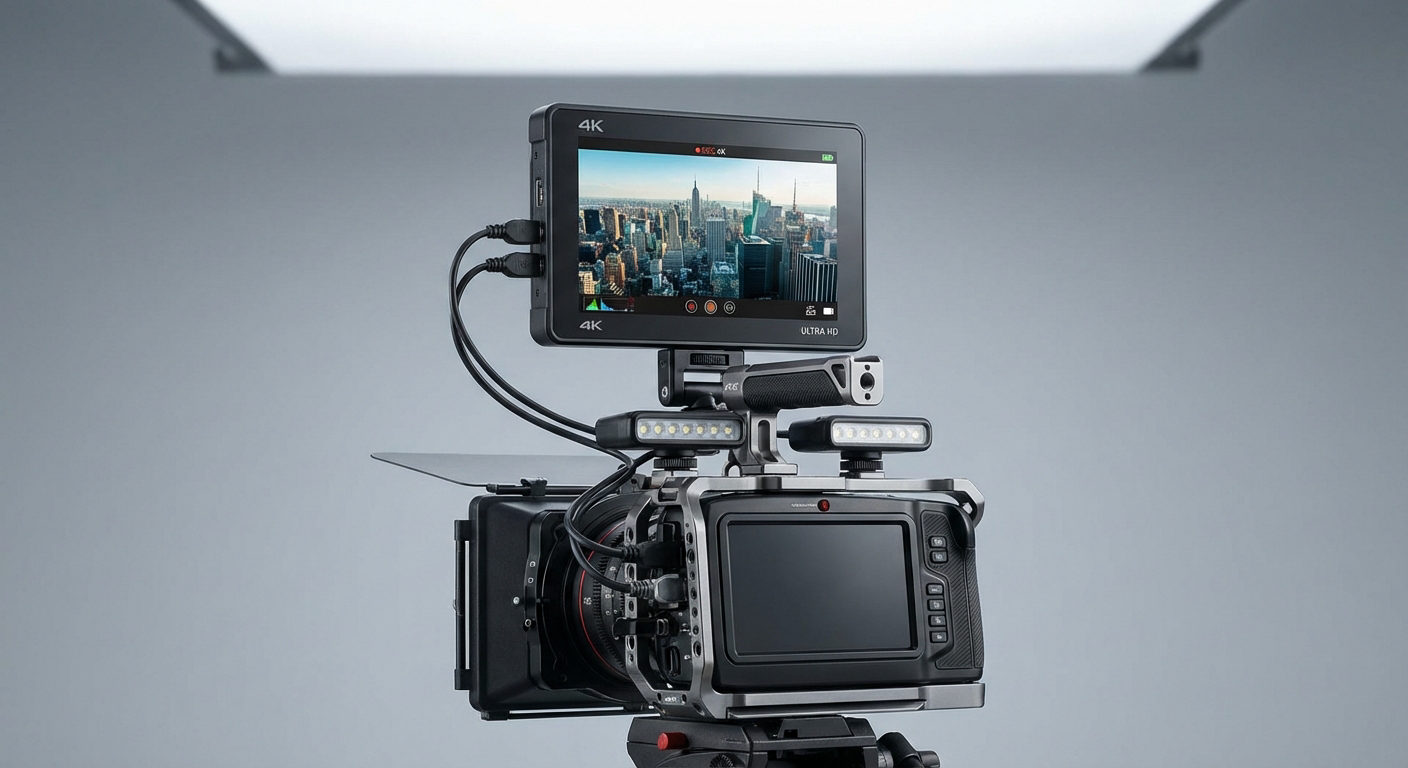
Advanced Technique: Using Focus Peaking with External Monitors
Relyingsolely on a 3-inch LCD screen has its limits. When you are shooting in 4K or 8K resolution, the details are so fine that a small camera screen simply cannot display enough resolution for you to judge critical sharpness accurately. What looks sharp on a 3-inch screen often looks soft when blown up on a desktop monitor.That’s why professionals almost always use external monitors, like ones from Hollyland, Atomos, or SmallHD. These bigger screens, usually 5 to 7 inches or more, make it much easier to see focus peaking highlights. Plus, external monitors have better peaking controls. Unlike your camera’s built-in options, they let you adjust the intensity, thickness, and color of the overlay so it never gets in the way of your shot.
The “Focus Puller” Workflow & Wireless Transmission
In high-end productions, the person moving the camera (the operator) is rarely the person controlling the focus. That job belongs to the 1st AC (Assistant Camera), also known as the focus puller.
To pull focus accurately without physically touching the camera—which could shake the rig or crowd the operator—crews use a wireless workflow. This is where Wireless Video Transmission Systems become the industry standard.
With a system like the Hollyland Pyro 5, your camera sends a clean and high-quality video feed straight to the focus puller’s monitor. But that’s just the beginning! Focus peaking becomes much easier with this tool because it’s a:

Hollyland Pyro 5 - 5.5” Portable Camera Monitor
A 5.5-inch camera monitor that combines a transmitter, receiver, and high-brightness touchscreen into one unit.
Key Features: 5.5 Inches & 1500 Nits | 1 TX & 4 RX | 400m LOS Range | SDI & HDMI | Dual-Band | Camera Control
- 3-in-One Device: The monitor, transmitter, and receiver are all in one, so you don’t need extra gear, and the team can work smoothly.
- 1500 Nits Brightness: Focus peaking is simple to see even in bright sunlight, so outdoor focusing is simple.
- Strong Pyro Ecosystem: It connects effortlessly with other Pyro series devices, including Pyro S, Pyro H, and Pyro 7, keeping the system reliable and well-synced.
By keeping framing and focus separate, your visuals stay sharp and look good. Whether you’re shooting alone or with a crew using wireless feeds, using focus peaking is the fastest way to get great shots..
Common Focus Peaking Mistakes to Avoid
These are the most common mistakes to avoid when using manual focus.
1. The “High ISO” Trap
Unfortunately, digital noise (grain) caused by high ISO settings also looks like high contrast to your camera’s processor.
When shooting in low light with a high ISO (e.g., ISO 3200 or above), the entire screen may look like it is covered in “static” peaking highlights. This makes it impossible to distinguish the actual subject from the background noise.
- The Fix: In low-light scenarios, reduce your peaking sensitivity to Low or turn peaking off entirely and rely on Focus Magnification instead.
2. Setting Peaking Level Too High

Most cameras offer sensitivity settings: High, Mid, and Low.
- High Sensitivity: The camera is quite generous about what it counts as “in focus.” It will highlight areas that are acceptable but not critically sharp.
- Low Sensitivity: When you need true accuracy, it is wise to set the sensitivity to Low or Mid.
Beginners often set sensitivity to High because it makes the highlights easier to see. However, this often results in images that look sharp on the small LCD screen but appear soft when viewed on a 4K monitor. For critical work, always use Low or Mid sensitivity to ensure true precision.
3. Ignoring “Focus Magnification” (Punch-In)

Focus peaking gives you a wide view, and not a close-up. It’s great for quickly identifying the focal plane, but it usually isn’t accurate enough for tiny details, like an actor’s eyelashes or the texture of a product.
Never rely only on peaking for static shots. Use peaking to get the focus 90% of the way there, then activate your camera’s Focus Magnification (Punch-In) feature to verify the final 10%. Peaking gets you in the neighborhood; magnification rings the doorbell.
4. Shooting Through Obstructions
Because peaking loves hard edges, it struggles when you are shooting through foreground elements like chain-link fences, dirty windows, or foliage. If you see the foreground glowing with your peaking color, do not assume your subject is also sharp. Always check that the shimmer has passed the obstruction and settled on what you want to focus on.
Frequently Asked Questions (FAQ)
Does focus peaking show up in the final photo or video?
No, absolutely not. Focus peaking is strictly a display overlay used for monitoring purposes, much like your battery life indicator, histogram, or zebra stripes. While you see the colored highlights on your LCD screen or electronic viewfinder (EVF) while shooting, they are not recorded onto the memory card. Your final image will be clean.
Which focus peaking color is best to use?
There is no single “best” color; the right choice depends entirely on your shooting environment. You need a color that creates the highest contrast against your subject so you can see it clearly.
- Red: The most common standard, but avoid it if you are filming red flowers or warm skin tones.
- Yellow/White: Excellent for low-light situations or darker subjects.
- Blue: Ideal for warm scenes (sunsets, deserts) where red or yellow might blend into the background.
Is focus peaking available on DSLR cameras?
Yes, but with limitations. Because DSLRs use an optical viewfinder (mirrors), they cannot display digital overlays like peaking through the eyepiece. However, most modern DSLRs (like the Canon 5D Mark IV or Nikon D850) offer focus peaking when you switch to Live View mode using the rear LCD screen. Mirrorless cameras generally offer a better experience because they can display peaking in both the LCD and the electronic viewfinder.
Can I use focus peaking with Autofocus?
In most cases, yes. Many camera manufacturers (including Sony and Fujifilm) offer an “AF+MF” mode. This allows the autofocus to get you close to the target, while focus peaking remains active to show you exactly what is sharp. This is incredibly useful for verifying that the AF system hasn’t accidentally locked onto the background or an eyelash instead of the pupil.
Conclusion
Focus peaking isn’t just a colorful overlay. It makes manual focusing easier while letting you see exactly what’s in focus. By showing contrast in real time, it helps you trust your eyes, even when filming wide open or in 4K. Whether you’re looking at your camera’s LCD or sending a high-resolution feed to a Hollyland wireless monitor, the correct use of focus peaking is the best way to get cinematic sharpness.
Your Next Step:
Don’t just read about it—build the muscle memory.
- Grab your camera and switch the lens to Manual Focus (MF).
- Enable Focus Peaking in your menu (try Red, High Level).
- Aim at a stationary object like a coffee mug or a plant.
- Rotate the focus ring back and forth until the “shimmer” lands perfectly on the texture of the object.
Once you master this on a still subject, you will be ready to tackle moving subjects and professional video work with confidence.