



































.png)
 简体中文

Adobe Audition is a professional audio editor, but its hardware setup is less intuitive than most consumer recording tools. If your microphone appears in your operating system but disappears in Audition, or you can’t find the preferences that control audio input, this guide covers every step. You will connect your microphone, configure audio hardware preferences, route your input to a track, calibrate recording levels, and run a test recording to confirm everything is working.
What You Need Before You Start
Quick checklist before opening Adobe Audition:
- Microphone type: USB mic (connects directly), XLR mic (requires an audio interface), or a wireless system with a receiver that connects via USB-C or 3.5mm to an audio interface
- Operating system: Windows 10/11 or macOS 10.13 or later
- Adobe Audition version: CC 2019 or later
- Driver status: ASIO driver installed on Windows for lowest latency; CoreAudio on macOS is built in
Demo device for this tutorial: The Hollyland LARK MAX 2 wireless microphone system. Components used throughout:
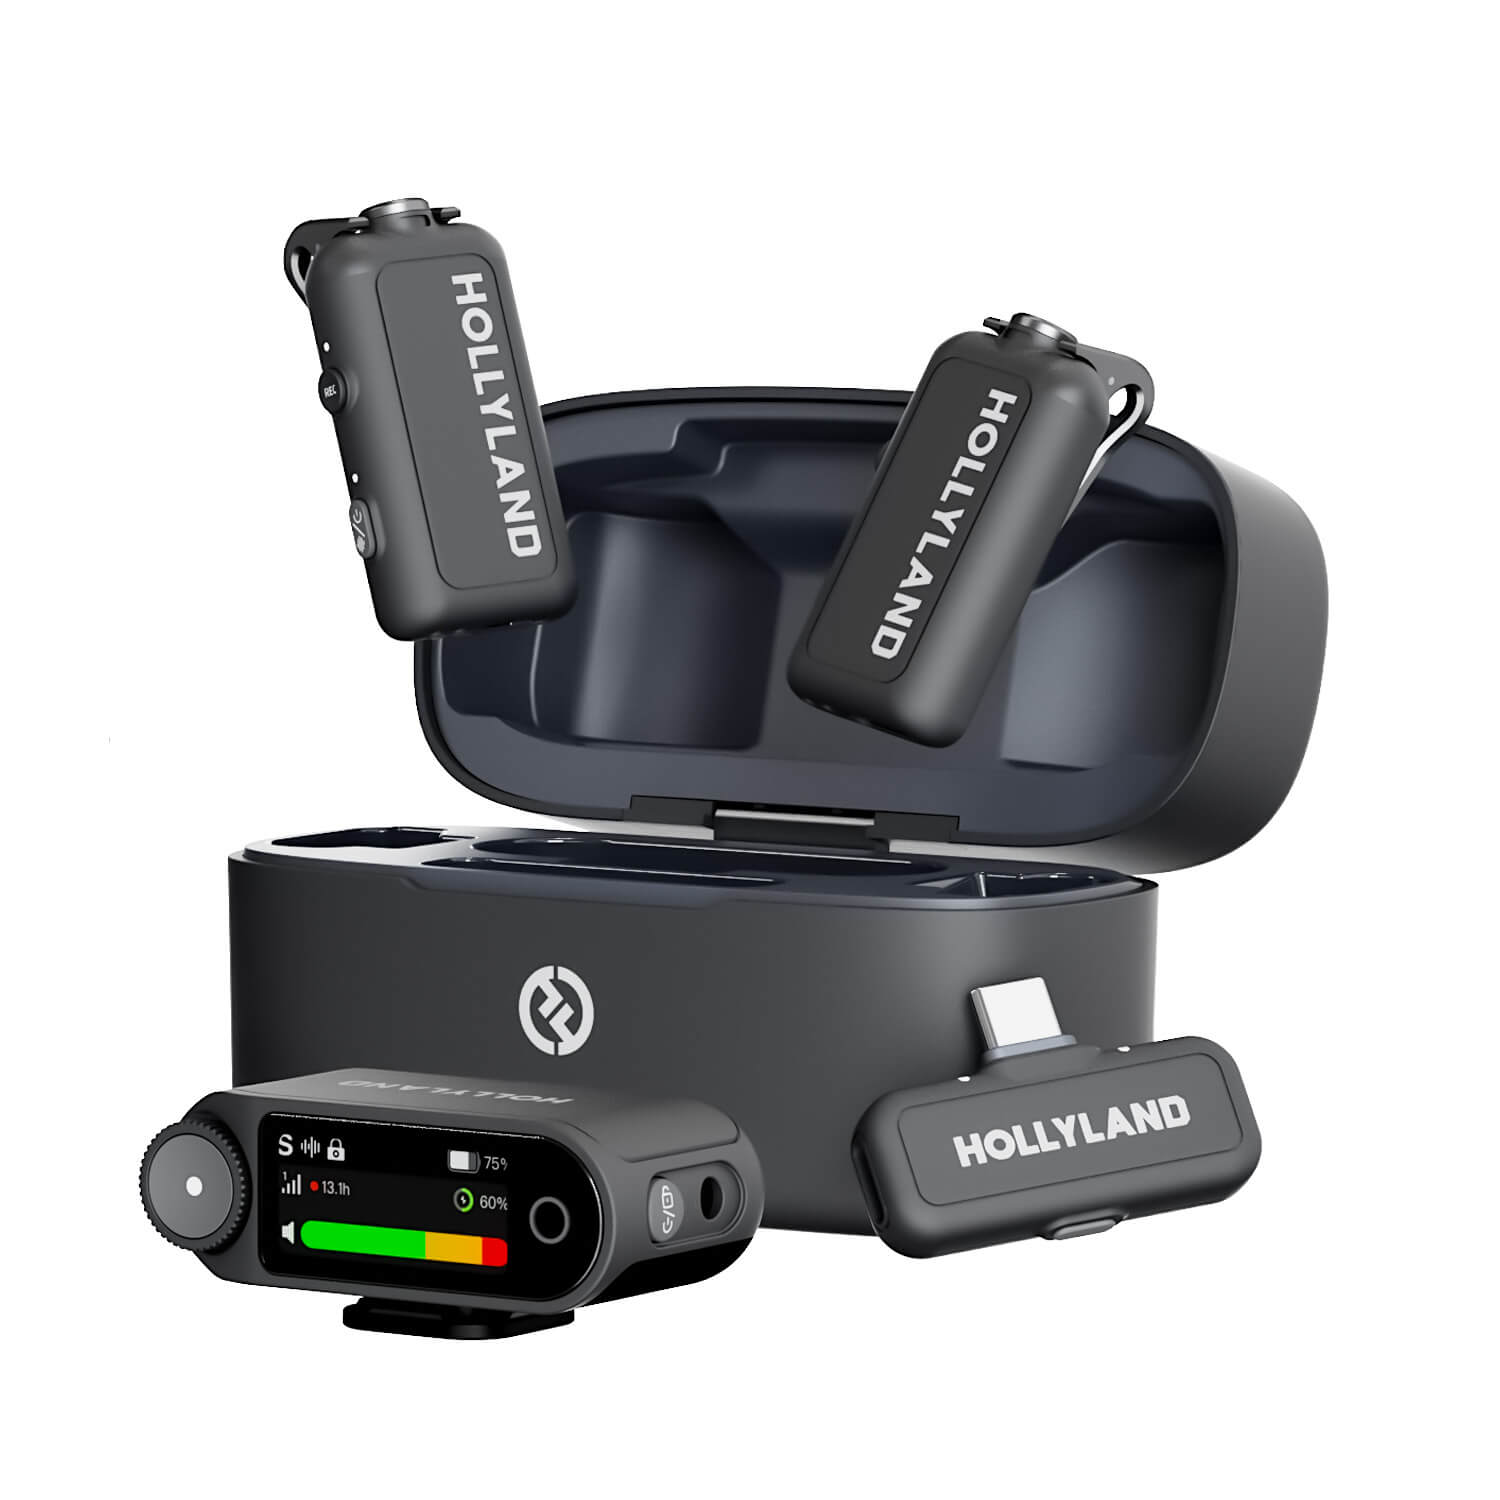
Hollyland LARK MAX 2 - Premium Wireless Microphone System
A premium wireless microphone for videographers, podcasters, and content creators to capture broadcast-quality sound.
Key Features: Wireless Audio Monitoring | 32-bit Float | Timecode
- TX transmitter clip
- Camera RX unit
- OWS wireless earphones
- USB-C cable
- Confirm the receiver is charged before starting. A solid LED on the RX unit indicates a full charge; a blinking LED means it is still charging.
Step 1: Connect the Hollyland LARK MAX 2 to Your Computer
The most common cause of a microphone not appearing in Adobe Audition is that the device was never confirmed as recognized by the operating system. Complete the hardware connection first and verify it in the OS before opening Audition.
The Hollyland LARK MAX 2 transmitter and receiver normally pair automatically when both units are removed from the charging case. If they fail to connect automatically, you can pair them manually using the following steps.
Note: In this guide, we have used the LARK MAX 2’s Camera receiver (RX) to connect to a PC. You can also plug the LARK MAX 2 USB-C receiver into your computer.
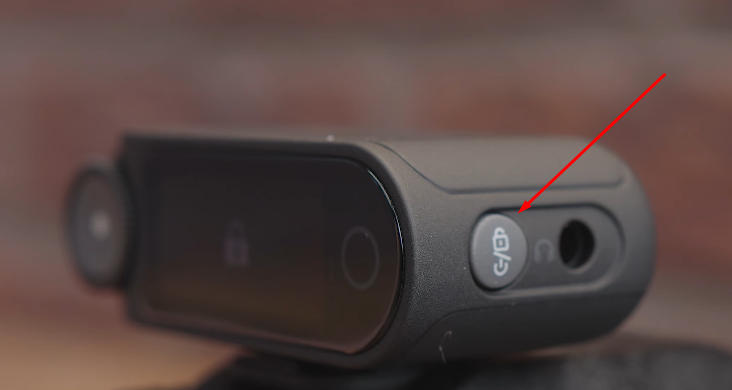
- Turn Off LARK MAX 2’s TX and RX. Switch off both units by pressing their power/multifunction buttons for 3 seconds.
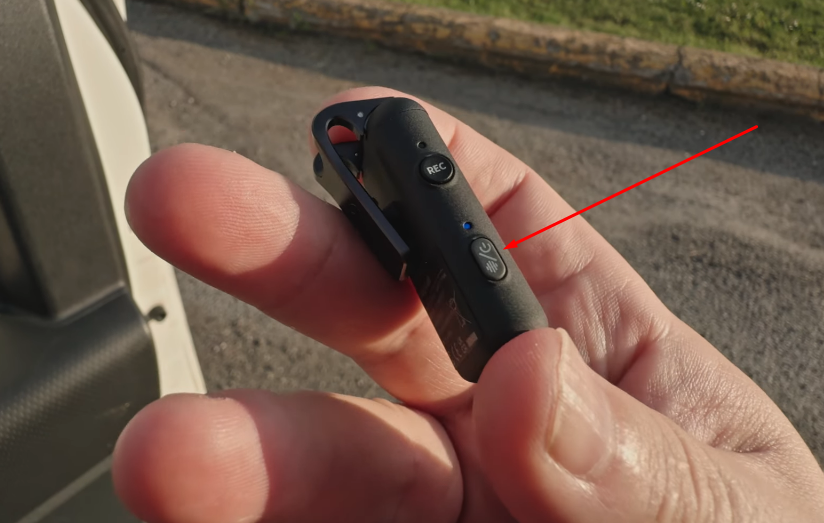
- Put TX into pairing mode. Make sure the LARK MAX 2 microphone/transmitter (TX) is powered off. Then, press and hold its power/multifunction button for 6 seconds. The LED will turn on, indicating that the TX has entered pairing mode.
- Put RX into pairing mode. Keep the Camera RX powered off and press and hold its power button for 6 seconds to activate its pairing mode.
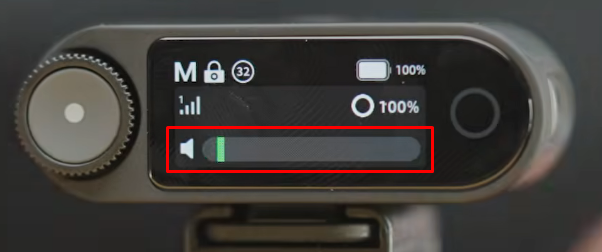
- Verify pairing. Once both units have paired successfully, the Camera RX touchscreen display will indicate the successful connection by displaying signal strength and volume level of the connected transmitter.
The TX will display a solid blue LED, confirming that it is paired with the RX.
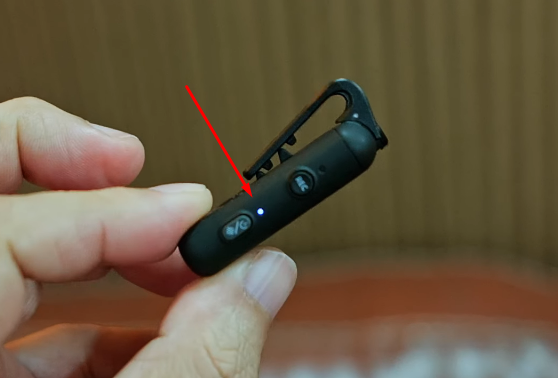
- Check the TX mute state. Press the power/mulifunction button on the transmitter twice in a row to mute or unmute. When unmuted, the LED shows a steady blue or green color, depending on the current state. When muted, the LED typically shows solid red. Confirm the TX is unmuted before proceeding. Recording with a muted transmitter is one of the most common causes of no signal in Audition.

- Set the receiver gain to a mid-level starting point. Adjust the gain level on the Camera RX unit and set it to roughly the midpoint. You will fine-tune this in Step 4.
- Connect the receiver to your computer. Connect one end of the included USB-C cable into the LARK MAX 2 Camera RX and the other into your PC’s USB-C port. If USB-C is not available, you can use an adapter to connect the cable to the standard USB port.
- Confirm the device appears in your OS audio settings.
On macOS, open System Settings and navigate to Sound > Input.
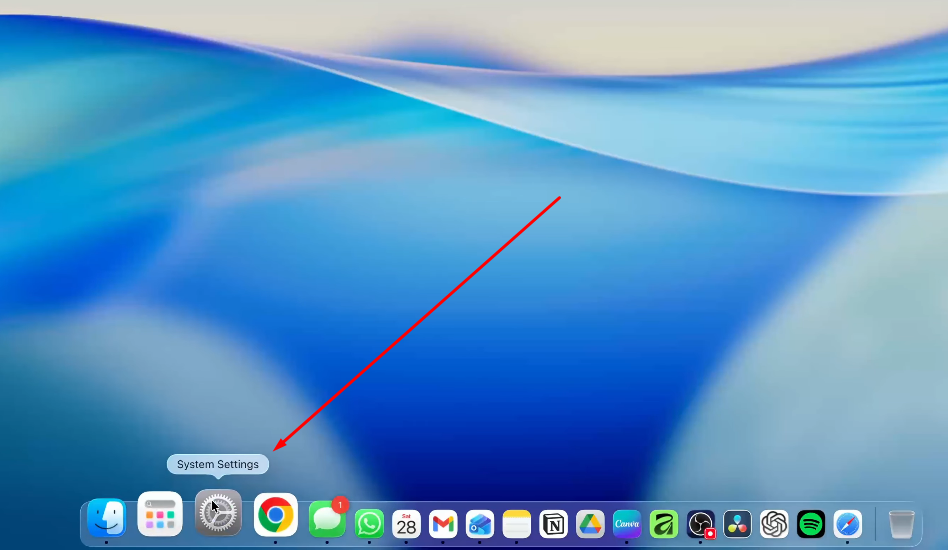

On Windows, right-click the speaker icon in the taskbar, open Sound Settings, and check the Recording devices list. The LARK MAX 2 (or a USB device name) must appear here before Audition can detect it. If it does not appear, recheck the cable and try a different port.

Note: Do not open Adobe Audition until the device appears in the OS audio input list. Audition scans available devices on launch. If the device connects after Audition is already open, you will need to restart Audition or re-scan in Preferences for it to appear.
Step 2: Configure Audio Hardware in Adobe Audition Preferences
This is the step most users skip or misconfigure. Selecting the wrong device class is the primary reason a microphone shows up in Windows or macOS but not inside Adobe Audition.
- Open Audition’s Audio Hardware Preferences. On Windows, go to Edit > Preferences > Audio Hardware. On macOS, go to Adobe Audition > Settings > Audio Hardware.

- Select the correct Device Class.
- Windows: Choose ASIO if your audio interface includes an ASIO driver (most interfaces from Focusrite, Universal Audio, and similar brands include one). ASIO delivers the lowest latency. If no ASIO driver is available, choose WDM-KS or MME as a fallback.
- macOS: Select CoreAudio. This is the correct and only option on Mac.

- Select the Default Input device. In the Default Input dropdown, choose the LARK MAX 2 receiver. Match the device name exactly to what appeared in your OS audio settings in Step 1.
- Select the Default Output device. Choose your speakers or headphones for playback. This controls where you hear audio during playback, not what you record.

- Set the sample rate to 48 kHz. The LARK MAX 2’s native specification is 48 kHz / 32-bit float. Setting Audition to 48 kHz matches that rate exactly, which means no sample rate conversion occurs between the device and the software. This preserves signal integrity across the entire chain.

- Click OK to save preferences and close the dialog.
Pro Tip: If the Default Input dropdown does not list your device after selecting the correct Device Class, close Preferences, fully quit Audition, reconnect the hardware, and relaunch. The device scan happens at startup, not while Audition is running.
Step 3: Set Up a Recording Track and Assign the Mic Input
Adobe Audition offers two recording workflows. Choose the one that fits your project.
Option A: Waveform Editor (quick single-file recording)
- Go to File > New > Audio File.

- Enter a name for your file. Select the Channels option. For example, you can choose Mono for voice recordings. Then set Sample Rate to 48000 Hz (48 kHz). Select 24-bit or 32-bit (float) under Bit Depth. Once everything is set, click OK.

- Press the red Record button in the transport bar. Audition records directly to this file using the Default Input set in Preferences.

- Press Stop when finished.
This path works well for simple one-take recordings without a session structure.
Option B: Multitrack Session (recommended for podcasts, voiceover, and structured projects)
- Go to File > New > Multitrack Session. Set the session sample rate to 48 kHz and click OK.


- In the Multitrack Editor, right-click the track area. Select Add Mono Audio Track from the available options. Alternatively, open Multitrack > Track to add one. Choose the option to insert a new mono audio track.

- In the track header, click the input selector dropdown (arrow symbol pointing right). If unassigned, the dropdown displays None instead. Select Mono, then choose your microphone’s input channel. The LARK MAX 2 records one microphone signal from one TX clip. Choosing mono instead of stereo prevents split-channel recordings. It also prevents audio from recording on one side.
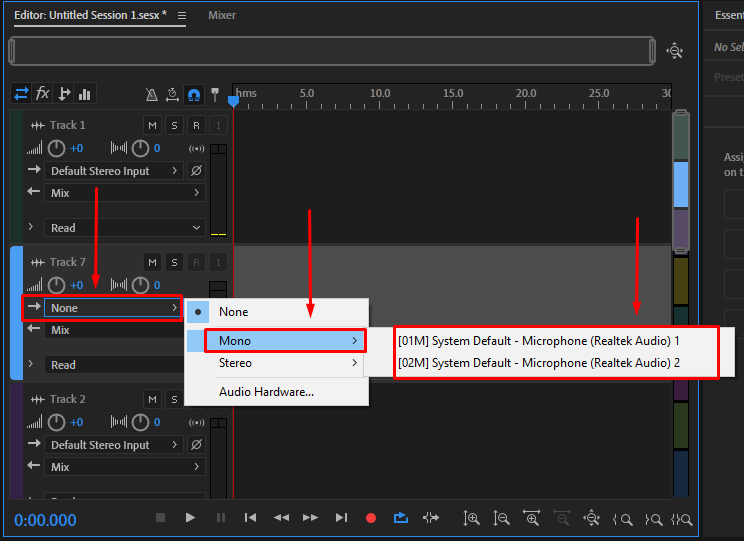
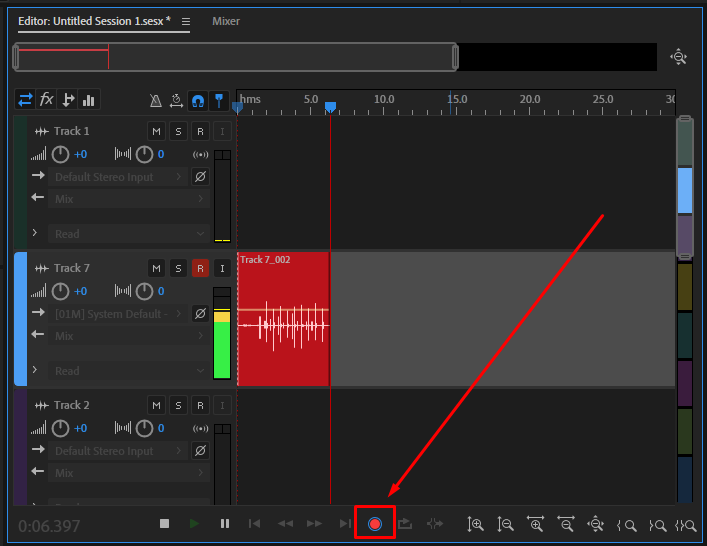
- Click the R (Record Arm) button on the track header to arm the track. The button illuminates to indicate the track is ready to record.

- Click the red Record button in the bottom transport bar. Recording starts immediately after you press this button. When finished, press Stop to end recording.
Note: The LARK MAX 2 TX transmitter also captures a 32-bit float internal backup recording onto onboard storage. This is a separate hardware backup and is independent of what Audition captures. Your Audition recording draws from the live signal coming through the receiver.
Step 4: Set Recording Levels and Enable Input Monitoring
With the track armed, you can now see and hear the microphone signal inside Audition.
- Enable Input Monitoring. Click the I (Input Monitoring) button on the track header in the Multitrack Editor. The track’s level meter will begin responding to incoming audio.

- Speak into the microphone and watch the level meters on the track. Your target peak level for voice is between -18 dBFS and -12 dBFS. This range keeps the signal audible and clean while leaving enough headroom to prevent clipping.

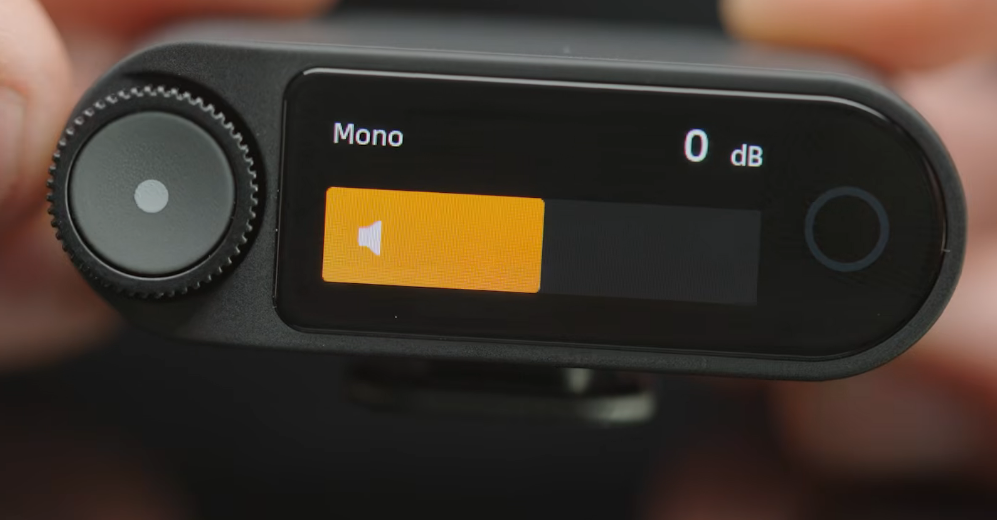
- Adjust gain at the hardware level first. Use the knob and the rotate wheel on the LARK MAX 2 Camera RX interface to select the Mic Gain option from the menu. Then, increase or decrease the gain level until the peak level in Audition lands in the target range. Always start with hardware gain rather than software adjustments to maintain the cleanest signal path.

- Fine-tune in Audition if needed. Once the hardware gain is set, make small adjustments using the track fader or clip gain in Audition if minor correction is still needed.
- Watch for clipping. If the level meters hit red, the signal is clipping. Reduce the receiver gain immediately. Clipping distortion cannot be repaired in post-production.
- Confirm the TX mute state. If the level meters show no response when you speak, check the TX mute LED. Press the mute button to toggle to the active state if the transmitter is currently muted (See Step 1).
AI Noise Cancellation: If the LARK MAX 2’s AI Noise Cancellation is active (controlled on the TX or through the associated app), ambient noise is filtered at the hardware level before the signal reaches Audition. Test with it enabled to establish your best baseline signal before recording. To activate or deactivate noise cancellation, press the power/multifunction button on the TX once. The solid green LED indicator confirms that noise cancellation is enabled.
Step 5: Run a Test Recording and Confirm the Setup
- Press Record in Audition’s transport bar.
- Speak a short test phrase of around ten seconds.
- Press Stop.
- Press the Spacebar to play back the recorded clip.
Pass criteria for a successful setup:
- Audio waveform is visible (not a flat line)
- Peak levels fall between -18 dBFS and -12 dBFS
- No red clipping indicators appear in the level history
- Voice sounds clean with no obvious noise floor problems
- Playback quality matches what you heard through hardware monitoring
If the test recording passes all five checks, the setup is complete. Save your Multitrack Session preset and note the Audio Hardware Preferences settings so they persist for future sessions.
Pro Tip: If the Audition take shows an unexpected problem, check the LARK MAX 2 TX’s onboard backup recording. If the backup sounds correct but the Audition recording does not, the issue is on the software or driver side. If both recordings share the same problem, the issue originates at the transmitter or connection point.
Troubleshooting: Microphone Not Showing Up or No Signal in Adobe Audition
| Symptom | Likely Cause | Fix |
|---|---|---|
| Device not listed in the Default Input dropdown | Wrong Device Class selected, or device connected after Audition launched | Switch to ASIO (Windows) or CoreAudio (macOS); close and relaunch Audition with hardware connected first |
| No signal on the track level meter | TX transmitter is muted | Check TX mute LED; press mute button to toggle to the active state |
| Signal present but very low | Receiver gain set too low | Increase gain via the RX unit’s gain dial |
| LARK MAX 2 not listed in Audio Hardware Preferences | Receiver not paired, powered off | Confirm solid blue paired LED on both TX and RX |
| Sample rate mismatch error on launch or recording | OS device sample rate differs from Audition’s setting | Match all three: OS sound settings, LARK MAX 2 output rate (48 kHz), and Audition Preferences |
| Track produces silence despite signal showing in meters | Track not record-armed, or wrong input channel selected | Click the R button on the track header; verify a mono input channel is selected in the track input dropdown |
FAQs
Q: Can I use a wireless microphone with Adobe Audition?
Yes. A wireless system works in Audition the same way any wired device does, as long as the receiver is connected and recognized by the OS. Connect the LARK MAX 2 Camera receiver via a USB-C cable into your PC directly, confirm it appears in your OS audio input list, and select it as the Default Input in Audition’s Audio Hardware Preferences. No special configuration is required beyond those steps.
Q: What is the best sample rate to use in Adobe Audition for voice recording?
Use 48 kHz for voice, podcast, and video audio work. It is the broadcast and video production standard, and it matches the LARK MAX 2’s native 48 kHz output rate exactly, which means no sample rate conversion occurs in the signal path. Set 48 kHz in both your OS audio device settings and Audition’s Audio Hardware Preferences to keep the entire chain consistent.
Q: Why is there an echo or delay when I monitor my microphone in Adobe Audition?
This delay comes from your audio driver’s buffer settings. Open Audio Hardware Preferences and lower the buffer size. Try 256 or 128 samples to reduce the delay.
Conclusion
Your microphone setup in Adobe Audition is now complete. The Hollyland LARK MAX 2 receiver is connected, the correct device and sample rate are set in Audio Hardware Preferences, your track is armed with the right mono input, levels are calibrated to the -18 to -12 dBFS range, and a test recording confirms the signal is clean. The logical next step is to build out a full Multitrack Session for your podcast or voiceover project, or to explore Audition’s noise reduction and EQ tools to polish the recorded audio.
