



































.png)
 简体中文

Getting clean, synced audio is one of the most practical skills a videographer can develop. Whether you’re plugging a shotgun mic directly into your DSLR, pairing a wireless system for an interview, or aligning a separate recorder’s track in your NLE, each method has its own steps and failure points. This guide covers wired connections, wireless pairing, and post-production syncing. You can choose your preferred method and follow each step confidently.

What Does “Syncing a Microphone with a Camera” Actually Mean?
The word “sync” means different things depending on your setup. In the most common context, it refers to physically connecting a microphone so its signal routes directly into the camera’s audio input — the camera records the mic’s audio in real time, already aligned with the video. In a second context, sync means aligning audio recorded on a separate device with the camera’s video track during post-production.

This guide covers both. Wireless pairing receives the most attention among these three methods. This is because many creators are trying it for the first time.
Method 1: Wired Microphone Connection to Camera
Wired connections are the most direct way to route a microphone signal into a camera. Most cameras accept a standard 3.5mm mic input, so the process is close to plug-and-play once you have the right cable.

Steps:
- Identify your camera’s audio input. Look for a 3.5mm TRS port labeled “MIC” on the camera body. Sony ZV-series and Canon EOS mirrorless cameras typically include this input. Action cameras and phones may require an adapter.
- Match your cable type. A shotgun mic or lapel mic with a 3.5mm plug usually uses a TRS connector. If your camera uses a TRRS combo jack, you need a TRRS cable or a TRS-to-TRRS adapter. Using the wrong type can result in no signal or single-channel audio only.
- Use an XLR adapter when needed. Professional mics with XLR outputs require an XLR-to-3.5mm adapter or a dedicated XLR preamp to connect to consumer camera inputs. Most cameras cannot supply phantom power through their 3.5mm input, so condenser mics that require phantom power need an external preamp with its own power source.
- Set the camera input to external microphone. In the camera’s audio menu, switch the input source to “External Microphone” if that option exists. Some cameras default to the internal mic even when a cable is plugged in.
- Verify signal on the audio meter. Speak into the microphone and confirm the camera’s level meter is responding. If there is no movement, recheck the cable type and input selection.
Note: If your camera lacks a dedicated mic input entirely, routing audio through an external monitor or field recorder on your rig is the more practical long-term solution.
Method 2: Wireless Microphone Sync with Camera (Step-by-Step)
Wireless microphone systems eliminate cable runs between the subject and the camera, making them the standard choice for interviews, documentary work, and solo content creation. The workflow has a few more steps than a wired connection, but once you understand the TX (transmitter) and RX (receiver) relationship, it becomes fast and repeatable.
The steps below use the Hollyland LARK MAX 2 as the tutorial reference. It is a two-person wireless system with 32-bit float internal recording on the TX, AI Noise Cancellation, real-time monitoring via OWS earphones, and an RX unit that connects to the camera via 3.5mm TRS and mounts on a cold shoe.
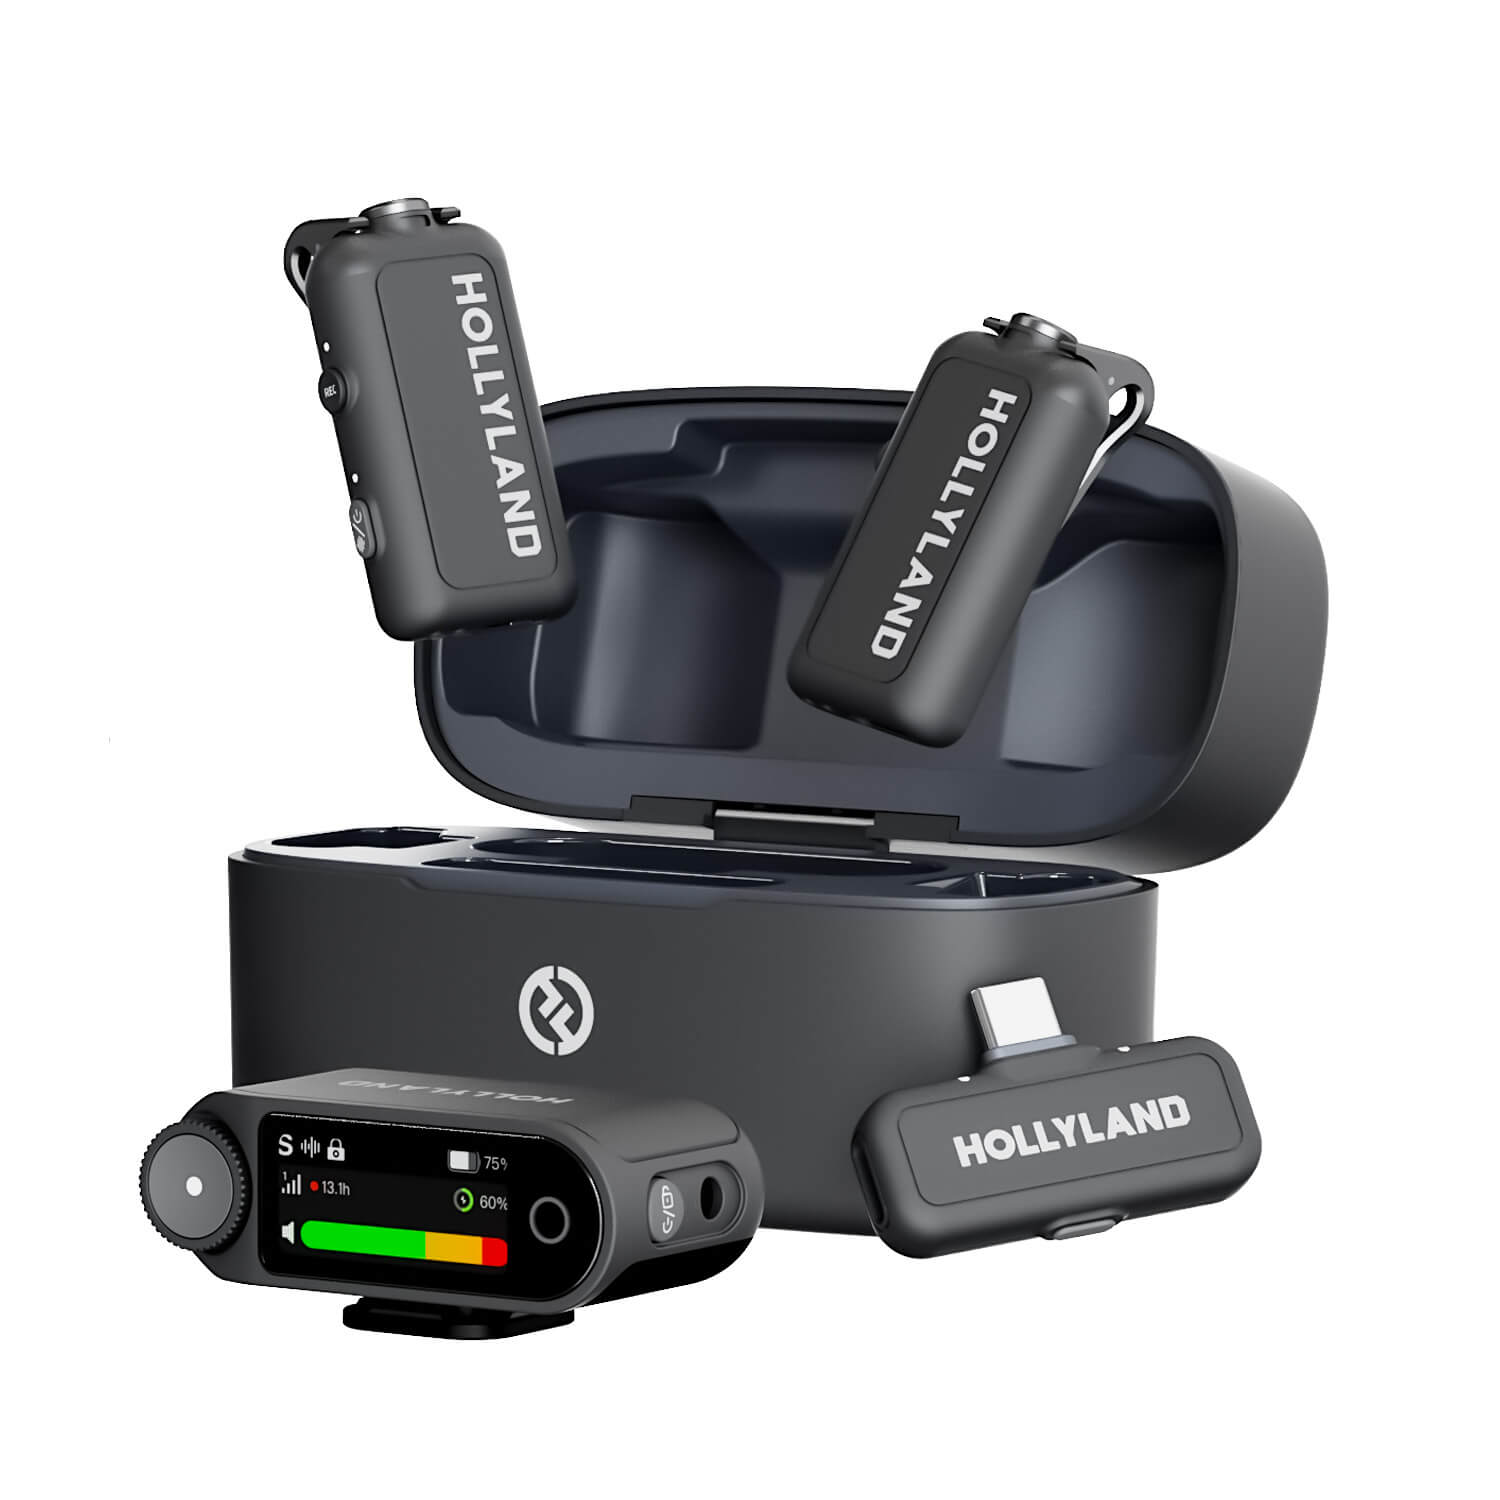
Hollyland LARK MAX 2 - Premium Wireless Microphone System
A premium wireless microphone for videographers, podcasters, and content creators to capture broadcast-quality sound.
Key Features: Wireless Audio Monitoring | 32-bit Float | Timecode
Step 1: Power On and Pair the Transmitter and Camera Receiver
- Make sure the TX and Camera RX units are charged. Then remove both units from the charging case.
- The LARK MAX 2 TX and RX come pre-paired from the factory. Both units should recognize each other automatically within seconds of powering on.
- During the pairing sequence, the LEDs on the TX.. Once pairing is confirmed, both LEDs turn solid blue. This is your visual confirmation that the units are connected and the audio channel is active.
To make sure the Camera RX is also paired, check the OLED touchscreen for pairing confirmation. When the transmitter is linked to the receiver unit, you should see the signal strength for each connected TX.
How to Pair LARK MAX 2 TX and Camera RX Manually?
The transmitter and Camera RX should pair as soon as you remove them from the charging case. If automatic pairing fails, follow these manual instructions:
- Press and hold the power button on both units for 3 seconds to turn them off.


- Confirm that the LARK MAX 2 mic/transmitter (TX) is off. Hold its power/multifunction button for 6 seconds until the LED activates, signaling entry into pairing mode.
- With the Camera RX still off, hold its power button for 6 seconds to put it into pairing mode.
- Allow both devices to establish a connection. The Camera RX touchscreen display will indicate when pairing is successful.
- Look at the transmitter’s LED. A solid blue light confirms that the TX has connected to the RX.

Step 2: Mount the Receiver and Connect It to the Camera
- Mount the RX on your camera’s cold shoe. The LARK MAX 2 Camera RX has a cold shoe foot on its base. Slide it into the camera’s hot shoe or cold shoe mount and press until it locks into the correct orientation.
- Locate the 3.5mm TRS output port on the Camera RX body. This is the port that sends the received audio signal to the camera.

- Connect the included 3.5mm TRS-to-TRS cable from the Camera RX output port to the camera’s 3.5mm mic input.
- No phantom power is required. The LARK MAX 2 RX runs on its own USB-C rechargeable battery. You do not need to enable phantom power on the camera, and the 3.5mm input would not supply it regardless.
Note: Route the cable cleanly to avoid tension on the RX unit or the camera’s mic jack. A right-angle 3.5mm adapter can help with cable management on compact rigs.
Step 3: Set Camera Audio Input Levels
With the RX connected, configure the camera’s audio settings to accept the signal cleanly without clipping or excessive noise.
- Open the camera’s audio menu. On most Sony Alpha cameras, this is under the camera icon tab. On Canon EOS R series bodies, look in the red camera menu pages.
- Switch to manual audio level control. Disable Auto Gain Control (AGC). Auto gain constantly adjusts input levels, creating audible pumping artifacts and making waveform alignment harder in post.
- Set input gain to a conservative starting point. Because the LARK MAX 2 Camera RX outputs at a camera-compatible level, you don’t need to push camera gain high. Start around 50 to 60 percent of the camera’s input gain range and adjust based on the meter reading.
- Adjust capture gain on the Camera RX if needed. Microphone gain adjustments are accessible directly from the camera receiver. Begin by opening its settings and selecting the required controls.
- Push the physical control knob/dial downward to access the menu.

- Scroll by rotating the dial until Mic Settings shows on the OLED touchscreen display. Tap it to enter the settings page.

- Select Mic Gain to display the available configuration methods. Choose whichever adjustment method you need:

- Auto: Automatically adjusts the microphone sensitivity and input levels dynamically in real time.
- Custom: Adjust the gain intensity manually for each connected Hollyland LARK MAX 2 TX transmitter.

- Enable AI Noise Cancellation via the HollyAudio App if you are shooting in a noisy environment. With NC on, the camera’s audio meter will show a cleaner baseline during silence, which makes gain calibration more accurate. Here’s how to activate noise cancellation from the HollyAudio app:
- Open the app and make sure you’re connected to LARK MAX 2 using the Bluetooth connection.
- Scroll down to the “NC Level” option and toggle it on.

- Once done, the noise cancellation adjustment bar will appear. Adjust it to set noise cancellation levels as per your needs. Also, when the noise cancellation is active, the LED indicator on the transmitter unit will turn solid green.


- Use the 32-bit float internal recording as a safety net. The LARK MAX 2 TX records internally at 48 kHz / 32-bit float. If camera gain ends up miscalibrated during a take, the TX’s internal file captures every level without clipping and can be retrieved as a clean backup in post. You can begin this onboard recording feature by pressing the “REC” button on the transmitter.

Step 4: Monitor Audio in Real Time Before Rolling
For wireless monitoring with the OWS earphones, make sure the Camera RX is properly connected to the camera and paired with the earphones.
- First, connect the Camera Receiver (RX) to the digital hot shoe. Confirm that the hot shoe icon is visible on its display screen.
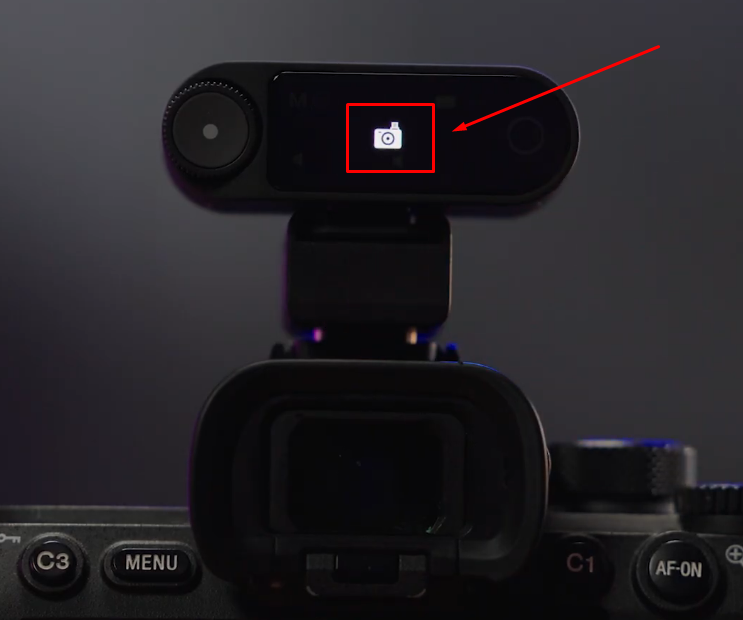
- Sony camera users with a compatible series should connect a 3.5mm TRS to 3.5mm TRS cable between the receiver’s 3.5mm TRS audio output jack and the camera’s monitoring jack.

- If you are using another camera brand or model, take both included 3.5mm TRS to 3.5mm TRS cables. Connect the longer cable to the Camera RX’s 3.5mm TRS headphone jack and the camera’s monitoring input. Attach the shorter cable to the camera’s audio input and the Camera RX’s output jack.

- Turn on the LARK MAX 2 transmitter and the Camera RX. Check that the two units are paired.
- Remove the OWS wireless earphones from the charging case to let them connect automatically to the Camera RX.

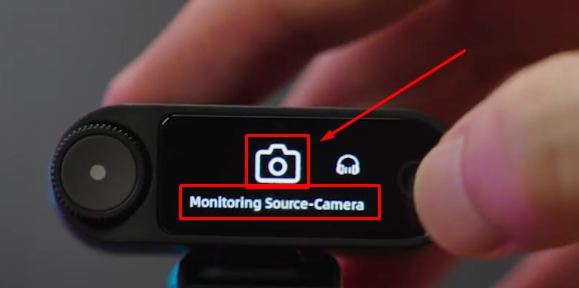
- On the receiver, press the knob button to open the menu. Go to Monitoring and choose Wireless.
- Select RX from the Monitoring Source settings to hear the audio feed directly from the receiver hardware. If you want to hear the camera’s output audio in real time, select Camera instead. This source also makes it possible to listen to playback audio through the OWS wireless earphones after recording.

How to Manually Pair OWS Wireless Earphones?
Factory pairing is already provided for the OWS wireless earphones and Camera Receiver. But you should still confirm that the connection is active before using the earphones. Monitoring will be unavailable if the earphones are not paired with the Camera RX. If you encounter this issue, manually establish the pairing as follows before proceeding with the receiver menu settings:
- Place the OWS wireless earphones inside the charging case.
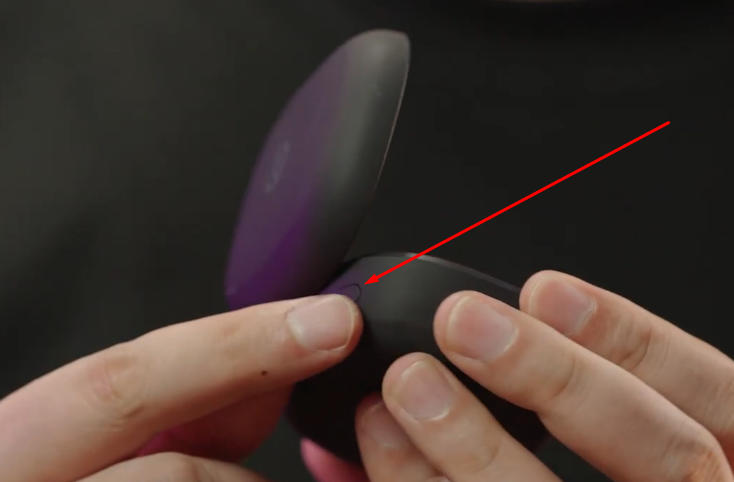
- Open the lid and press the case’s side button 3 times to switch the monitoring earphones mode to 2.4GHz. Once switched, the LED indicator on the earphones will flash white.

- Press the knob button on the Camera RX to bring up the menu.
- Select Monitoring, go to Wireless, and turn the wheel to Earphone Connection. Tap this option.

- Choose Delete Pairing and tap Confirm.


- On the OWS charging case, hold the side button for 6 seconds. This puts the OWS wireless earphones into the pairing state.
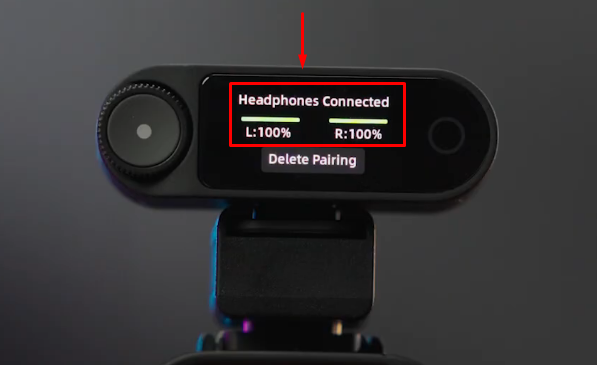
- Check the Camera RX display after pairing. The Headphones Connected message confirms that the devices are connected.
Use EQ to Fine-Tune Audio
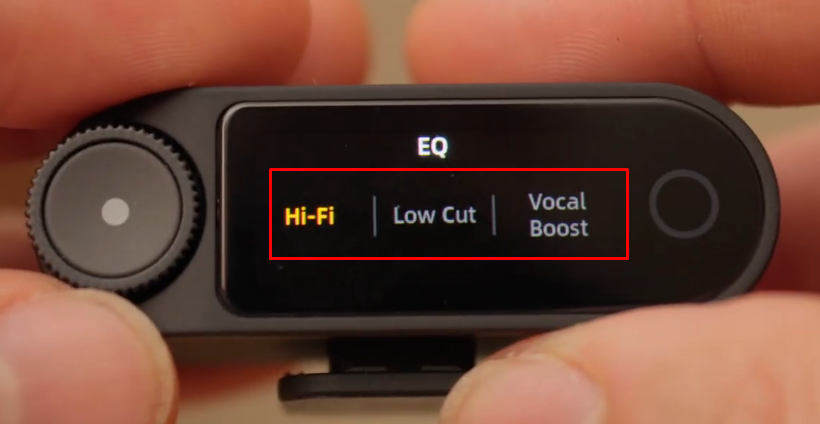
You can adjust three modes of EQ directly from the LARK MAX 2’s Camera receiver. Here’s how to do it.
- Press the knob button on the camera RX to open the menu.
- Go to Mic Settings.
- Rotate the knob dial until you see the EQ icon and tap it.

- Choose from the available EQ options (Hi-Fi, Low Cut, Vocal Boost).
Method 3: Syncing Audio Recorded on a Separate Device in Post-Production
Some workflows use a dedicated field recorder alongside the camera to capture higher-quality audio, then align those tracks in editing. This approach requires a deliberate sync point and careful NLE setup.

Steps:
- Set matching sample rates before you roll. Both your camera and external recorder should be at 48 kHz. Mismatched sample rates are the leading cause of audio drift over long takes.
- Create a sync point with a clap or slate. At the start of each take, bring the recorder into frame and clap your hands sharply or strike a clapperboard. The transient creates a visible waveform spike and a visible visual marker in the video.
- Record the take on both devices simultaneously. The camera captures scratch audio; the recorder captures the clean signal. Both run from the same clap.
- Import both files into your NLE. In Premiere Pro, DaVinci Resolve, or Final Cut Pro, place the video clip and the external audio clip on the same timeline sequence.
- Align waveforms manually or with an automated tool. Zoom into the waveform view and match the clap transient in the scratch audio to the matching transient in the recorder’s track.
- Mute or remove the camera’s scratch audio once the external audio is confirmed aligned.
Note: If you are using the Hollyland LARK MAX 2, the TX’s 32-bit float internal recording can serve as the separate audio source in this workflow. Retrieve the file via USB-C from the TX after the shoot, then run it through the same clap-sync process above. See Method 2 for the full recording setup.
Camera Audio Settings That Directly Affect Sync Quality
Getting clean audio isn’t only about the microphone. These three camera-side settings have the greatest impact on whether your audio holds together in post.
- Sample rate set to 48 kHz. Most professional video projects and broadcast standards use 48 kHz. If the camera and recorder are set to different rates, audio drifts noticeably on takes longer than a few minutes. The LARK MAX 2 outputs at 48 kHz; match the camera to that setting.
- Manual gain over auto gain. Disable AGC when using any external microphone. Auto gain responds dynamically to ambient noise, creating level pumping that cannot be cleanly removed in post. Manual gain holds a fixed level across the entire take.
- Audio recording format and bit depth. Some cameras encode audio at 16-bit PCM or use a compressed audio track in certain video modes. Where possible, select the highest-quality audio option in your camera’s video format menu — uncompressed PCM alongside the video file is the preferred setting on most mirrorless cameras.
Common Sync Problems and How to Fix Them
Problem 1: No audio signal on the camera meter after connecting the receiver.
Confirm that the LARK MAX 2’s transmitter and Camera receiver units are both paired to each other. The easiest way is to verify that the LED indicator light on the TX is solid blue. The Camera RX shows the signal strength of the connected TX.
Note: The USB-C receiver unit of the LARK MAX 2 version also has LED indicator lights. If they are solid blue, it means the unit is paired to the TX. But since the Camera RX doesn’t have any LED indicator, it is always wise to look for the pairing confirmation as described above.
Problem 2: Audio is present but too low or distorted.
Low signal typically means camera input gain is set below the output level of the RX — increase gain gradually while watching the meter. Distortion means the opposite: reduce input gain. Also confirm the TX mute state; a muted TX passes only residual noise with no voice signal.
Problem 3: Audio drifts out of sync over a long take in post-production.
Drift occurs when the camera and the audio source are running at different sample rates. Confirm the LARK MAX 2 internal recording is at 48 kHz and that your NLE project sequence is also at 48 kHz. Mismatches introduced at export are the second most common cause.
Frequently Asked Questions
Can I sync a wireless microphone to any camera?
Most cameras with a 3.5mm TRS mic input accept wireless receivers directly. Some action cameras and entry-level DSLRs lack dedicated microphone inputs. These cameras need brand-specific adapters or external recording equipment. For example, you may need a USB-C to 3.5mm adapter. Always choose the TRS cable with two black rings. This cable connects wireless receivers to cameras correctly. The TRRS cable has three black rings and suits smartphones. Using the wrong cable can cause missing or distorted audio.
Why does my microphone cause a delay when synced to my camera?
Quality wireless systems like the LARK MAX 2 keep transmission latency well below 20ms, which is inaudible during playback. Most users notice delays when monitoring their audio through headphones. This delay occurs between speaking and hearing their voice. It comes from the camera’s headphone output. This issue affects monitoring, not the recorded audio file.
Do I need a cable if I’m using a wireless mic?
A wireless microphone doesn’t always mean a cable-free camera setup. The transmitter sends audio wirelessly to the camera’s receiver. For most cameras, the receiver needs a separate connection. A short 3.5mm TRS cable connects it to the camera’s microphone input.
Some setups allow you to skip this extra cable. Compatible digital hot-shoe adapters provide a direct camera connection. Sony’s MI Shoe is one example of this technology. Smartphone users can connect receivers through their USB-C ports. Certain newer transmitters also pair directly through Bluetooth. This option works with compatible cameras and smartphones.
How do I sync audio and video in Premiere Pro?
Start by adding both files to your Premiere Pro timeline. Place the external audio below the camera’s original audio track. Select both clips, then right-click and choose Synchronize. In the pop-up window, select Audio or Audio Track Channel. Click OK to let Premiere Pro compare both audio waveforms. It checks dialogue, background sounds, or claps for matching points. The software then lines up both recordings automatically. Later, mute or remove the camera’s original audio. Finally, link the video clip with the external recording.
What’s the best way to sync a microphone with a camera for interviews?
A wireless receiver-on-camera setup is the most practical approach. The subject wears the TX lapel mic, the RX mounts on the camera’s cold shoe, and audio routes directly into the camera without cables between subject and operator. The Hollyland LARK MAX 2 is purpose-built for this workflow, with dual-TX capability, hardware gain control, and 32-bit float internal recording for critical takes.
Conclusion
These three methods cover most microphone and camera setups. You can connect directly, pair wirelessly, or sync separate recordings later. Before filming, record a short test and check playback. Make sure the audio matches and the levels sound right. For important recordings, turn on the Hollyland LARK MAX 2‘s 32-bit float internal recording as backup.
