


































.png)
 简体中文

Getting a webcam working well on video calls takes less time than most people expect. This guide covers every stage of the process, from mounting and connecting the camera to configuring resolution, audio, and AI tracking inside Zoom, Microsoft Teams, or Google Meet. Each step is built around the Hollyland Lyra, a 4K AI webcam designed specifically for conferencing and live streaming, so every instruction maps directly to the hardware and software screens you will actually use.

Hollyland Lyra - 4K AI Webcam
A flagship 4K AI webcam featuring a large 1/1.5″ CMOS sensor, smart auto-framing, and studio-grade 48 kHz/24-bit audio for effortless streaming and conferencing.
Key Features: 1/1.5″ CMOS & 4K30 | AI Tracking & Auto Framing | 48 kHz/24-bit Audio

What You Need Before You Start
Before starting, confirm you have the following on hand:
- Hollyland Lyra webcam with its included monitor/laptop clip mount
- USB-C to USB-C cable (included in the box) or the USB-C to USB-A adapter for computers without a USB-C port
- A computer running Windows 10, Windows 11, or macOS
- An active account with Zoom, Microsoft Teams, Google Meet, or another supported conferencing platform
- Optionally, a Hollyland LARK A1 wireless microphone for presenter-style audio
For the best output quality, plan to use a USB 3.0 port. You can identify one by the blue tab inside the port opening.
Step 1: Mount and Position Your Webcam
Correct placement is one of the biggest factors in how you appear on video calls, so it is worth spending a couple of minutes here before connecting anything.
The Lyra comes with a magnetic monitor mount that attaches to flat laptop lids and thicker monitor bezels without needing tools. To attach it:
- Fit the little front section of the mount across the top edge of the laptop bezel.

- Fold the rear support back toward the screen lid. The weight underneath counterbalances the rear arm and holds everything securely without squeezing the display.

- Bring the Lyra camera above the mount. The magnets will lock it onto the upper platform.
- Raise or lower the camera with the separate hinge until your eye line is aligned.
At 80 g and 60 × 33.3 × 37 mm, the Lyra is light enough to sit comfortably on even a thin laptop lid. Its 82-degree field of view naturally frames your head and shoulders at a typical desk-to-screen distance of 50–60 cm, so no wide-angle attachment is needed.
Choosing the Right Camera Angle
Tilt the Lyra’s lens so it points straight at your face rather than upward. An upward-facing angle creates an unflattering perspective and often captures more ceiling than call participants want to see. Aim to keep your face 60–90 cm from the lens for a natural head-and-shoulders composition. If your monitor sits below eye level, a few degrees of forward tilt compensates effectively.
Step 2: Connect the Webcam to Your Computer
The Lyra is UVC (USB Video Class) compliant, which means Windows 10/11 and macOS recognize it automatically without requiring a driver installation.
- Locate the USB-C port on the back of the Lyra unit.

- Connect one end of the included USB-C cable to the Lyra and the other end to a USB-C port on your computer.

If your computer only has USB-A ports, attach the included USB-C to USB-A adapter first.


- Wait a moment. Windows will display a “device connected” notification and list the Lyra under Cameras in Device Manager. On macOS, it will appear in System Information under the USB section.

- Check the Lyra’s LED indicator. It will illuminate when the camera is actively streaming to an application and turn off when idle.
Note: If the Lyra is not detected, try a different port or swap the cable. On macOS, check System Settings > Privacy and Security > Camera and confirm your conferencing app has been granted camera access.
Step 3: Install HollyStudio and Configure Video Settings
The Lyra functions as a plug-and-play webcam without any software, but HollyStudio is what unlocks resolution control, digital zoom, AI Tracking and Smart Auto Framing, noise cancellation, and every other advanced feature. Install it before your first call.
- Visit the Hollyland website and navigate to the HollyStudio download page for your operating system.
- Download, install, and launch the application.

- HollyStudio will auto-detect the connected Lyra and open a live preview. If you have more than one camera connected, select the Lyra from the device dropdown at the top of the interface.
Setting Resolution and Frame Rate
In HollyStudio, open the Resolution dropdown from the top of the preview screen and use the Resolution and Frame Rate dropdowns to choose your output format.
| Resolution | Frame Rate | Best For |
|---|---|---|
| 3840 × 2160 (4K) | 30 fps | Local high-resolution recording alongside the call |
| 1920 × 1080 (1080p) | 60 fps | Most broadband-connected Zoom and Teams calls |
| 1920 × 1080 (1080p) | 30 fps | Reliable HD on average home broadband |
| 1280 × 720 (720p) | 30 or 60 fps | Low-bandwidth or unstable network conditions |
For the majority of remote workers, 1080p at 60 fps is the best starting point: smooth motion, sharp detail, and a manageable demand on upload bandwidth. Choose 4K30 only if your conferencing platform can use it, and you want a high-resolution local recording running in parallel.

Adjusting Digital Zoom and Field of View
HollyStudio’s Image Control page includes a Focal Length slider that helps with digital zooming. It runs from 1x to 4x. At 1x, the Lyra’s full 82-degree field of view is active, framing head and shoulders naturally at typical desk distances. Increasing the value tightens the framing digitally by cropping into the sensor area.
For most desktop setups where the camera sits 60–80 cm from your face, a zoom value between 1.2x and 1.5x produces a naturally close composition without visible quality loss. Avoid going beyond 2x unless the camera is unusually far from the subject, as higher digital zoom reduces effective sharpness.

Exposure and White Balance
On the Image Control page of the HollyStudio app, use the Exposure (EV) and White Balance sliders to control brightness and color accuracy.
- Exposure: The Exposure (EV) slider in HollyStudio lets you adjust the Lyra webcam’s overall image brightness. Move it to brighten or darken the picture as needed.
- White Balance: Auto white balance works well for most calls. You can also manually adjust this slider. If skin tones look too warm or too cool, switch to manual and move the color temperature slider until colors look accurate.
ADD IMAGE
Step 4: Set Up Your Audio
The Lyra’s built-in microphone records at 48 kHz / 24-bit, a significant step above the 16 kHz standard of most laptop microphones. On calls, the result is noticeably cleaner and more natural-sounding speech.
To configure audio in HollyStudio:
- The Hollyland Lyra’s built-in microphone activates automatically when connected via USB. If another microphone is set as the default, select the Lyra manually in your computer’s sound settings or conferencing app.
- Enable the Intelligent Noise Cancellation toggle. This AI-driven noise reduction is designed to attenuate background noise by up to approximately 25 dB, making it effective against HVAC hum, keyboard clatter, street traffic, and other common call disruptors.

- Speak at a normal volume and observe the input level meter to confirm your voice is being captured cleanly.
Direct Wireless Mic Connection (Lyra + LARK A1)
If you stand up during calls, present from a distance, or want professional lavalier-quality audio, the Lyra includes a built-in wireless microphone receiver that accepts the Hollyland LARK A1 wireless microphone transmitter directly. No base receiver is required.

Hollyland LARK A1 - Affordable Wireless Microphone
A perfect starter mic for creators on a budget. It’s simple to use and features effective noise cancellation.
Key Features: 48kHz/24-bit | 3-Level Noise Cancellation | 54-Hour Battery
- Launch HollyStudio from your computer.
- Click the gear icon below the preview screen to open Settings, then open the Audio Settings tab.
- Scroll down until Bluetooth appears and turn on its toggle.

- Select Start Pairing to place Lyra in pairing mode.

- Leave the LARK A1 transmitter switched off and hold its power button for 6 seconds. A flashing blue LED shows that pairing mode is active.

- Lyra will pair automatically with the LARK A1 TX, and its transmitter LED will turn solid blue.
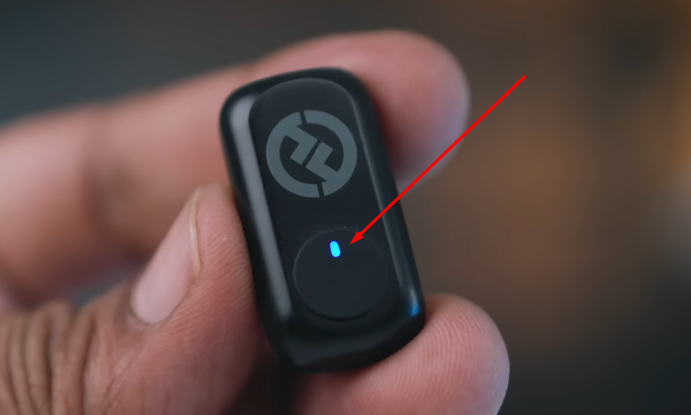
- And when Lyra and LARK A1 are connected and in use, the LED will turn solid green.

Step 5: Select the Webcam in Your Video Conferencing Platform
With the Lyra connected and HollyStudio configured, navigate to your conferencing app’s settings to assign the correct camera and microphone. Once connected via USB, the Lyra appears in platform device lists as “Hollyland Lyra” for video and “Hollyland Lyra Microphone” for audio.
Zoom
- Open the Zoom desktop application. Click your profile image, then select Settings from the menu.

- Select the Video & effects tab and open the Camera dropdown.


- Choose Hollyland Lyra.
- Select the Audio tab and open the Microphone dropdown.
- Choose Hollyland Lyra Microphone (or your LARK A1 input if connected), then click Test Mic to verify the audio level.
Microsoft Teams
- In Microsoft Teams, click the Settings and more option and choose Settings.

- Open the Devices tab.

- Under Camera, select Hollyland Lyra from the dropdown and confirm the preview updates accordingly.

- Under Microphone, select Hollyland Lyra Microphone or your LARK A1 input.
- Click Make a test call to verify that both video and audio are working correctly through playback.
Google Meet
- Open Google Meet in a browser and start or join a meeting.
- Click the gear icon to open Settings.

- In the Video tab, choose Hollyland Lyra from the Camera dropdown.


- In the Audio tab, choose Hollyland Lyra Microphone from the Microphone dropdown.
- Close the settings panel. Your preview tile will update to show the Lyra feed.
Note: If Google Meet requests camera or microphone access in the browser, allow it at both the browser permission level and, on macOS, through System Settings > Privacy and Security > Camera.
Step 6: Enable AI Tracking and Smart Auto-Framing
If you tend to shift position, stand up, or gesture during calls, the Lyra’s AI Tracking and Smart Auto Framing features keep you centered in frame without requiring manual camera adjustment each time.
To activate these features in HollyStudio:
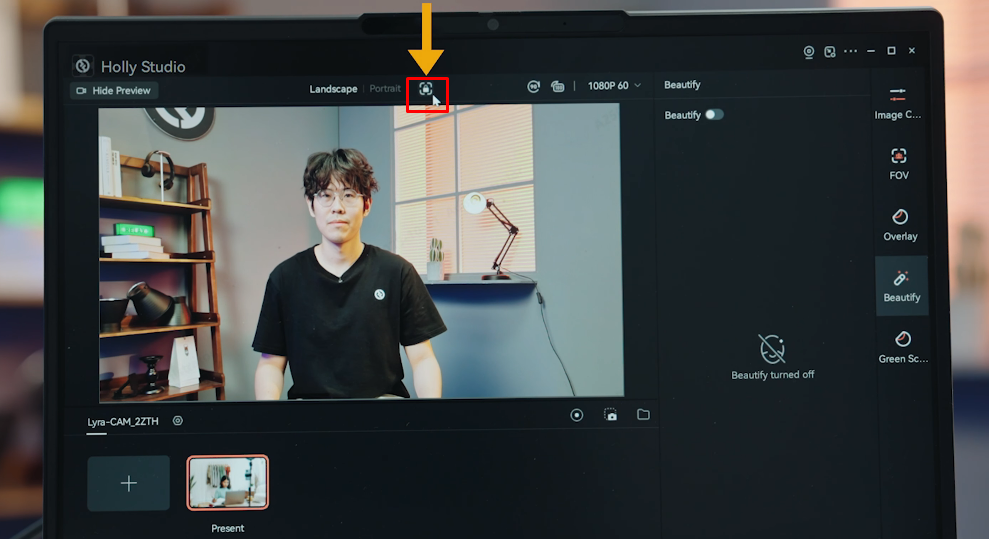
- On the main screen, click on the frame icon above the preview screen. A padlock icon will appear once it is clicked.
- Look for the gear icon under the preview screen, and click it to open the Settings dialog.
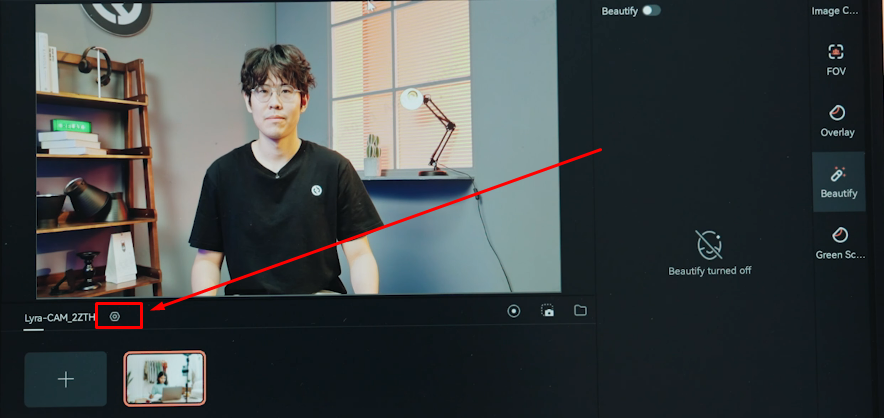
- From the left menu, click Camera Settings.
- Toggle Face Priority Focus on.

- Navigate to the FOV page.
- Find the Smart Framing section, deselect None, and enable the auto framing (image tile) option beside it.

Bonus Step: Quick and Easy Virtual Background with Hollyland Lyra
The HollyStudio app features a Green Screen Keying option that allows you to use a virtual background in just a few clicks. Here’s how to do it:
- Open the Green Screen page from the menu on the right.
- Turn the Green Screen Keying switch on.

- Click the Custom tab and select the + button.

- Import the image you want as your new background.

- Make an RGB color adjustment if required.
- Move the intensity slider to change the background look in the live webcam display.

- In the preview screen, point at the background image. Hold the left mouse button and drag it up or down, left or right.
Optimize Your Environment for Better Video Calls
With the Lyra fully configured, a few environment adjustments provide the final layer of call quality:

- Face your light source. Position your desk so a window or lamp faces you from the front. Backlighting from a window behind you turns your face into a silhouette regardless of camera capability.
- Add a key light if the room is dim. A ring light or small LED panel placed in front of your face fills shadows and evens skin tone. The Lyra’s 1/1.5-inch sensor and F/1.8 aperture already outperform most webcam sensors in low light, but a dedicated light source still produces a visible improvement.
- Simplify your background. A tidy wall or neutral backdrop reduces visual distraction and improves the accuracy of the Lyra’s AI background removal feature.
- Use a wired internet connection where possible. An Ethernet cable reduces the packet loss that causes conferencing platforms to drop video resolution mid-call.
- Close bandwidth-heavy background tasks. Large downloads or cloud backups competing for upload bandwidth can degrade call quality even on a fast connection.
- Run a test call before important meetings. Use Zoom’s Test Call or Teams’ Make a test call feature to catch any audio or video issues in advance.
Frequently Asked Questions
Does the Hollyland Lyra work without installing drivers?
Yes. The Lyra is UVC-compliant and recognized as a plug-and-play webcam on Windows 10/11 and macOS the moment you connect it via USB-C. No driver installation is required. HollyStudio is separate, optional software that you install to access advanced controls like AI Tracking and Smart Auto Framing, noise cancellation, digital zoom via the Focal Length slider, and exposure adjustments.
What is the best resolution setting for Zoom and Teams calls?
For most broadband connections, 1080p at 60 fps delivers smooth, detailed video without placing heavy demand on upload bandwidth. The Lyra also supports 4K recording at 30 fps during calls. Most conferencing platforms limit or lower live video resolution when network conditions become poor.
Why does the webcam look blurry in my video call?
Check that the resolution in HollyStudio’s Resolution dropdown is set to 1080p or higher. Then confirm your conferencing platform has selected the Lyra as the camera source rather than defaulting to the built-in laptop camera.
How do I stop the camera from being active when I am not on a call?
Disconnect the USB-C cable or close both HollyStudio and your conferencing application completely. The Lyra’s LED indicator turns off when the camera is not actively streaming, confirming it is no longer capturing video or audio. Physically disconnecting the cable is the most reliable way to ensure the camera is fully inactive.
Conclusion
Getting the Hollyland Lyra ready for video calls takes just six steps. Mount it at eye level, connect through a USB-C or USB-A adapter, and adjust HollyStudio settings. Set the resolution, exposure, and noise cancellation to match your needs. Then select the Lyra in your meeting app and enable AI Tracking and Smart Auto Framing. Its plug-and-play setup gets you ready for a live call within a few minutes. You can also visit the Hollyland Lyra product page for complete specifications.
