


































.png)
 简体中文

Your laptop’s built-in camera doesn’t have to limit your Google Meet calls. Whether it’s broken, blurry, or underwhelming, your smartphone camera is almost certainly better, and with the right setup, Google Meet can select it as a webcam source. This guide explains every method for iPhone and Android, the camera-selection step most people skip, and what to do when the phone isn’t recognized.

What You Need Before You Start
Before starting, make sure you have everything listed below.
iPhone:
- iOS 16 or later (iOS 17+ recommended for Continuity Camera)
- macOS Ventura or later for Continuity Camera, or Windows for Camo by Reincubate
- A Lightning or USB-C cable for wired connections
- Both devices on the same Wi-Fi network for wireless methods
- Google Meet open in a desktop browser (Chrome recommended)
Android:
- Any Android version for DroidCam, or Android 14 or later for native mode
- A USB-C cable for wired connections
- Both devices on the same Wi-Fi network for the DroidCam Wi-Fi method
- Google Meet open in a desktop browser
How to Use an iPhone as a Webcam for Google Meet
An iPhone’s rear camera provides better video quality than most laptop webcams. This makes it a good upgrade for Google Meet calls. Two options are available, depending on your computer. Mac users can try Apple’s built-in Continuity Camera, while Windows users can choose Camo.
Method 1: Continuity Camera (Mac + iPhone, No App Required)
Continuity Camera is Apple’s native solution. It requires no third-party software and connects wirelessly once enabled.
- Confirm your iPhone is running iOS 16 or later and your Mac is on macOS Ventura or later.
- Sign in to the same Apple ID on both your iPhone and your Mac.
- On your iPhone, go to Settings → General → AirPlay & Continuity (or AirPlay & Handoff) and confirm that Continuity Camera is toggled on.
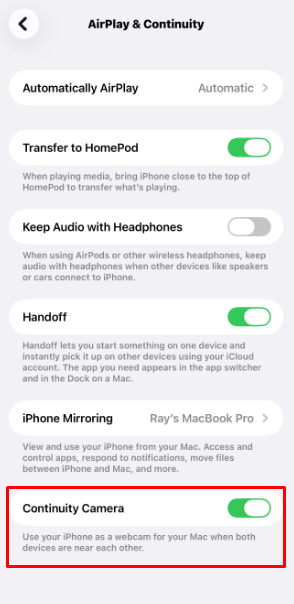
- Enable both Wi-Fi and Bluetooth on both devices. The two devices do not need to be on the same network, but Bluetooth must be active on both.
- Mount your iPhone in landscape orientation near your laptop screen using a clip mount or phone stand.
- Open Google Meet in Chrome or Safari on your Mac and start or join a meeting.
- macOS automatically detects your iPhone as a camera source. On the pre-call preview screen, click the arrow next to the camera icon and select your iPhone from the list.
- To switch during a live call, click the three-dot More options menu at the bottom of the screen, then go to Settings → Video → Camera and choose your iPhone.
Method 2: Camo (Windows and Mac)
To turn your phone into a Google Meet webcam on Windows, install Camo Camera on your phone and Camo Studio on your PC. Connect both devices over Wi-Fi by scanning a QR code. You can also connect them with a USB cable. Android users must enable USB debugging first. Finally, select Camo as the camera in Google Meet.
- Download Camo Camera from the Apple App Store.

- Get Camo Studio for Windows or Mac from the official Camo website.

- Open Camo Camera on your iPhone and allow camera and microphone access.
- Next, launch Camo Studio on your Windows PC or Mac.
- In Camo Studio, click “Pair a Device” to display a QR code. On your phone, tap the Wi-Fi icon and scan the code.
Note: You can also connect your phone using a USB data cable. If you connect via cable, select your iPhone in Camo Studio’s device dropdown.
- Open Google Meet on your Windows PC or Mac and join a meeting. You can also start a new meeting from your browser.
- Open the settings gear during the meeting. Before joining, you can click the arrow beside the camera icon. Go to the Video settings tab and select Camo as your camera source.
- Open Camo Studio on your computer to adjust video settings. You can change the resolution, zoom, framing, and background blur. Make these adjustments before or during your Google Meet call.
How to Use an Android Phone as a Webcam for Google Meet
Android users have a couple of options for Google Meet. DroidCam supports most modern Android phones running Android 5.0 or later. It connects to a computer through Wi-Fi or USB. Android 14 and newer also support a built-in USB webcam mode on compatible devices. This option lets you connect without installing extra apps.
Method 1: DroidCam (Recommended for All Android Versions)
DroidCam works with virtually every Android phone and supports Windows, macOS, and Linux on the computer side.
- On your Android phone, install the DroidCam app from the Google Play Store.

- On your computer, go to the dev47apps website and download the DroidCam Client for your operating system. Install it.


- For USB connection (recommended):
- On your phone, go to Settings → About Phone and tap Build Number seven times to unlock Developer Options.

- Navigate to Settings → Developer Options and enable USB Debugging.
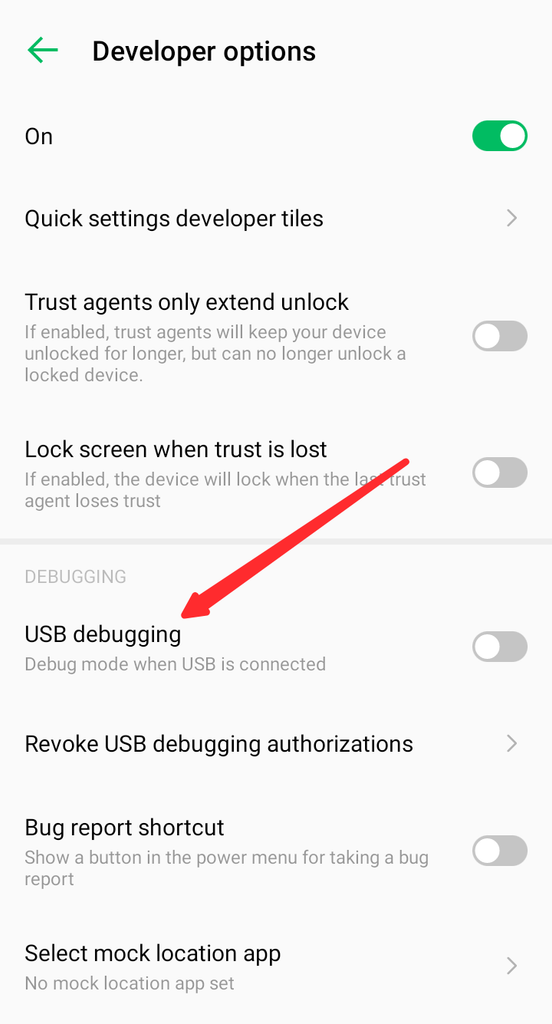
- Connect your phone with a USB-C cable. Tap Allow on the USB debugging authorization prompt.
- In the DroidCam desktop client, select the USB tab. The client will detect your phone automatically.
- For Wi-Fi connection:
- Make sure both devices are on the same Wi-Fi network.
- Open DroidCam on your phone and note the IP address and port shown on screen (default port is 4747).
- Enter those values into the DroidCam desktop client and click Start.
- Confirm the Video checkbox is ticked in the desktop client.
- Open Google Meet, go to Settings by clicking the gear icon→ Video → Camera, and select DroidCam Virtual Camera.
Note: Enabling USB Debugging is only required for the USB method. It is a developer setting and does not affect normal phone operation once you disconnect.
Method 2: Android 14+ Native USB Webcam Mode (No App Needed)
If your phone runs Android 14 or later, you can use the built-in USB webcam feature without installing any software.
- Connect your Android phone to your laptop using a USB-C cable.
- Pull down the notification shade on your phone and tap the “Charging this device via USB” notification.
- Under Use USB for, select Webcam.
- Your phone now registers as a UVC-compliant webcam on your computer. No drivers are required.
- Open Google Meet and go to Settings → Video → Camera.
- Select your phone from the list. It will appear as your phone’s model name or as “USB Video Device / Android Camera.”
Note: To check your Android version, go to Settings → About Phone. If the Webcam option does not appear in step 3, your device manufacturer may not have enabled this feature even on Android 14. Use DroidCam as a reliable fallback.
Troubleshooting: Phone Camera Not Showing Up in Google Meet
If something is not working, one of these three issues is almost always the root cause.
1. Virtual camera not recognized by the browser
The phone app may have stopped streaming or was not fully active when the browser launched.
- Fix: Close Google Meet, reopen the DroidCam or Camo Camera app on your phone, wait until it shows an active connection, then refresh Google Meet in the browser. If you just installed a driver, re-grant camera permissions at chrome://settings/content/camera.
2. USB connection not working
- On Android: Confirm USB Debugging is enabled and you tapped “Allow” on the authorization prompt. Check that the USB mode is set to “Webcam” or “File Transfer,” not “Charging only.”
- On iPhone: Confirm you tapped “Trust This Computer” when connecting the cable. Try unplugging and reconnecting.
3. Wi-Fi connection dropping or lagging noticeably
Wireless virtual camera connections are sensitive to network congestion and interference.
- Fix: Switch to a USB cable for a stable, low-latency connection. If you must stay on Wi-Fi, check that no firewall is blocking the default DroidCam or Camo Camera. Temporarily disabling the firewall to test will confirm whether it is the source of the problem.
When Your Phone Isn’t Enough: Using the Hollyland Lyra Webcam for Google Meet
Using a phone as a webcam has a few drawbacks. Virtual camera drivers can add 200 to 500 milliseconds of delay. Wi-Fi connections may drop during meetings, interrupting your calls. Long meetings can also drain your phone’s battery quickly. Plus, you may need a special mount to keep your phone steady above your laptop screen. If these problems keep repeating, a dedicated webcam can solve them all.

The Hollyland Lyra is a USB-C webcam built on a 1/1.5” CMOS sensor with a 50MP effective pixel count, an f/1.8 aperture, and an 82-degree field of view. It outputs 4K/30fps or 1080p/60fps video and is UVC-compliant, so Google Meet recognizes it as a standard webcam with zero driver installation. Here is the full setup.

Hollyland Lyra - 4K AI Webcam
A flagship 4K AI webcam featuring a large 1/1.5″ CMOS sensor, smart auto-framing, and studio-grade 48 kHz/24-bit audio for effortless streaming and conferencing.
Key Features: 1/1.5″ CMOS & 4K30 | AI Tracking & Auto Framing | 48 kHz/24-bit Audio
- Attach the Lyra to your monitor. Use the built-in clip to mount Lyra on the top edge of your laptop lid or external monitor. Adjust the clip grip to fit your screen’s thickness, then tilt the hinge so the lens angles down naturally toward your face.


- Connect via USB-C. Plug Lyra’s USB-C cable into a USB-C port on your computer. Or on your computer’s USB-A port with the help of the adapter.


- Confirm plug-and-play recognition. Windows 10/11 and macOS detect Lyra immediately as “Hollyland Lyra” with no driver installation needed. Verify recognition in Device Manager on Windows, or System Information under Cameras on macOS.
- Set resolution and frame rate in HollyStudio. Open HollyStudio, go to the Resolution dropdown at the top of the preview screen, and choose your output: 1920×1080 at 60fps for smooth motion, or 3840×2160 at 30fps (MJPEG) for maximum detail.

- Select the camera in Google Meet. Go to Settings (gear icon) → Video → Camera and choose “Hollyland Lyra” from the dropdown. The live preview will display the full 82-degree field of view at your selected resolution.


- Enable AI Tracking and Smart Auto Framing. In the HollyStudio app:
- Click the frame icon at the top of the screen preview. A padlock icon will appear inside the frame once you click it.


- Click the gear icon below the preview screen to access Settings.

- Select the Camera Settings tab from the left menu.
- Switch on Face Priority Focus.

- Next, open the FOV page.
- Under the Smart Framing section, deselect None and select the image tile beside None to activate auto framing.

.
- Set your digital zoom level. Use the Focal Length slider on the Image Control page of the HollyStudio app to zoom in and zoom out. Set a value between 1x (full 82-degree view) and 4x (tight crop). Set this before joining the meeting.

- Select the Lyra microphone in Google Meet. Go to Settings → Audio → Microphone and select “Hollyland Lyra” to activate the built-in 48 kHz/24-bit microphone with intelligent noise cancellation.
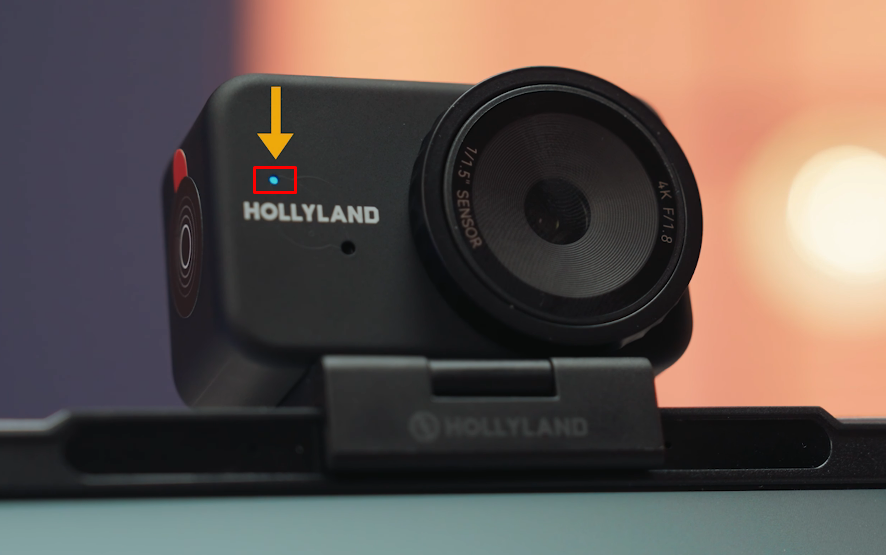
- Check the LED indicator. A solid blue LED means Lyra is paired and is Ready to Use. Once the LED turns solid green, it means Lyra is connected and actively streaming.
Frequently Asked Questions
Can I use my Android phone as a webcam for Google Meet without installing an app?
Yes, if your phone supports Android’s built-in “Device as Webcam” option. Google Pixel 6 and newer models support it with Android 14 or later. Some other manufacturers may not include this option. Connect your phone to your computer with a USB data cable. Swipe down from the top of your screen to open notifications. Tap “Charging this device via USB” and select “Webcam” under “Use USB for.” Your computer should recognize the phone as a standard UVC webcam. It should then appear in Google Meet’s camera list. To check your Android version, open Settings and select About Phone.
Does using my phone as a webcam for Google Meet drain the battery fast?
Yes, especially when your phone connects over Wi-Fi. Streaming and processing video continuously consumes a lot of power. A USB connection reduces battery drain from wireless use. Still, a computer’s USB port may not supply enough power to keep the battery charged. Your phone could slowly lose power during the call. For longer meetings, connect your phone to a wall charger with a long cable. This helps supply enough power throughout the meeting.
Why does my phone camera show in the camera list but Google Meet displays a black screen?
The virtual camera app (DroidCam or Camo) is most likely not running or has dropped its connection on the phone side. Relaunch the app on your phone, wait for it to show an active connection status, and then reload Google Meet in your browser. This resolves the black screen in the majority of cases.
Can I use my phone as a webcam for Google Meet on a Chromebook?
ChromeOS has limited support for virtual camera drivers, so DroidCam may not work reliably. The most compatible option on a Chromebook is Android 14’s native USB webcam mode, which presents the phone as a standard UVC device without requiring extra software. Confirm your phone’s Android version before attempting.
Does this work on the Google Meet mobile app, or only on desktop?
The phone-as-webcam method is meant for desktop and laptop computers. It lets you use your smartphone as the camera during computer-based meetings. The Google Meet mobile app can also accept external camera inputs on supported Google Workspace accounts. These include document cameras and external USB webcams. The “Share content from camera” option allows this connection.
Conclusion
For most users, the fastest starting point is Continuity Camera if you have an iPhone and a Mac, or DroidCam over USB if you’re on Android or Windows. In both cases, the critical final step is selecting the virtual camera inside Google Meet’s video settings before or during the call. If you find yourself repeating the phone setup routine before every meeting, the Hollyland Lyra offers a permanent, plug-and-play alternative with a meaningful upgrade in image and audio quality.
