.png)
Anyone who uses a microphone knows how painful it is to end up capturing noise in their audio recording. Be it a fan, a car horn, an air conditioner, the keyboard click sounds, or people talking behind you, they all have the power to simply ruin the hours of hard work.
While not every creator, singer, or vocalist can afford a professional studio for recording audio, there are a few ways to mitigate unwanted sounds that microphones capture.
So, whether you’re an experienced creator or a newcomer who just bought a new mic. If you want to learn how to reduce background noise from a microphone, this article is for you.
Part 1: How to Reduce Background Noise from a Microphone on a Windows PC/Laptop?
Many users may think that getting rid of background noise is only possible when the audio is processed on heavy recording tools and DAWs. Although that’s true, tweaking a few audio settings can also help reduce the audio clutter that your microphone picks from the environment.
So, here’s how you can do it if you have a Windows computer.
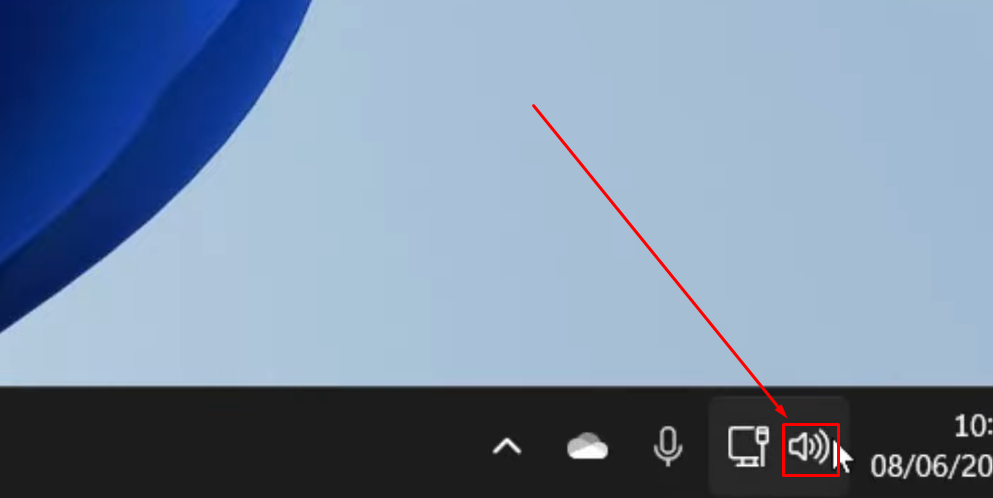
- Step 1: Open your PC or laptop. Take the cursor to the bottom-right of the screen and right-click on the “Sound” icon
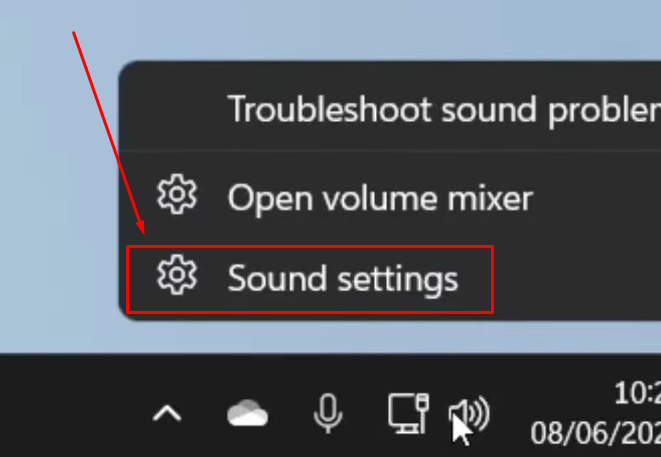
- Step 2: You will see a few options in the pop-up menu. From there, click “Sound settings” with a gear icon
- Step 3: A new window will open in your computer with various options on the left and right panels of the screen. Look for the “System” option on the left and click on it. Then, select the “Sound” option from the menu on the right
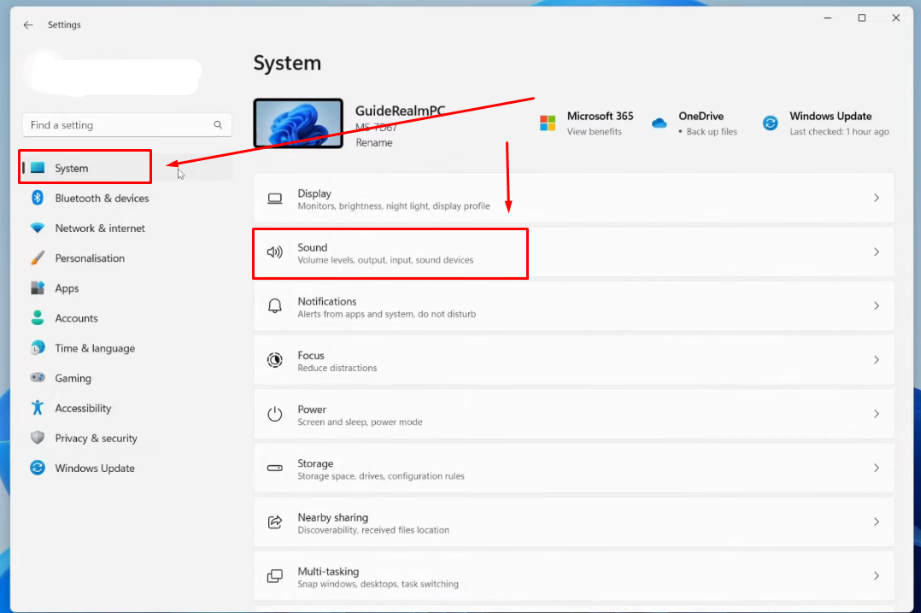
- Step 4: On the “Sound” page, scroll down to the “Input” section
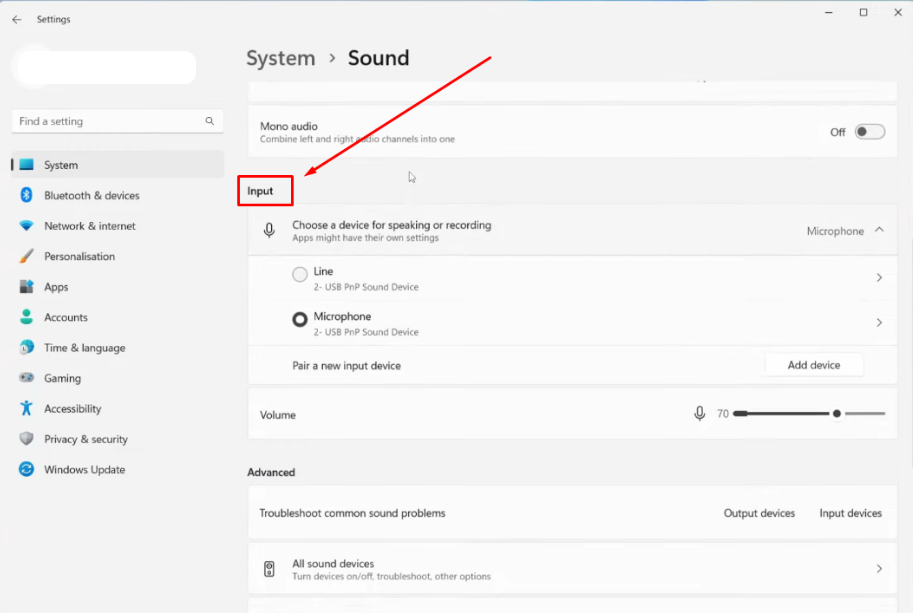
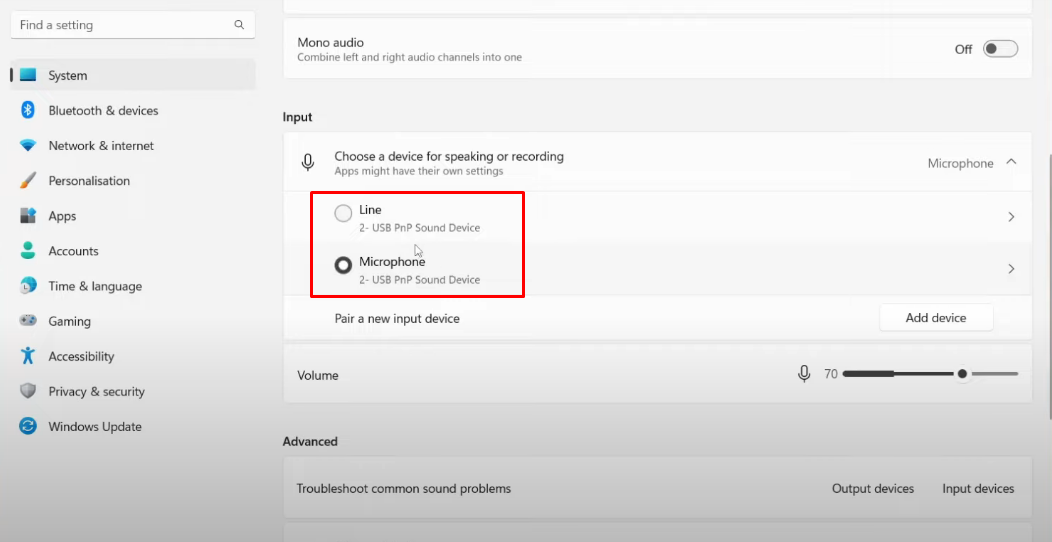
Here, you need to make sure that the correct microphone is selected.
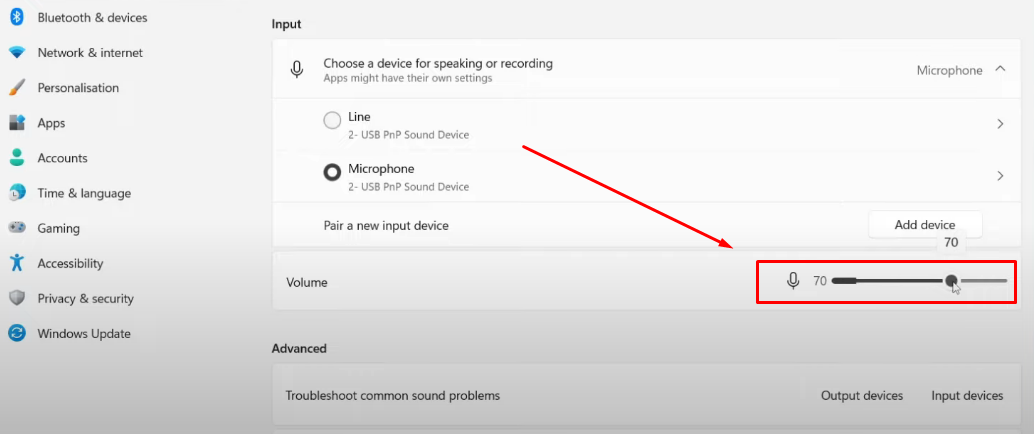
- Step 5: After choosing the mic, go to the “Volume” option. You will notice a microphone icon with an adjusting level, indicating the microphone gain set in your PC. If it is full, click and drag the volume slider to “70” (you can adjust it according to your preference)
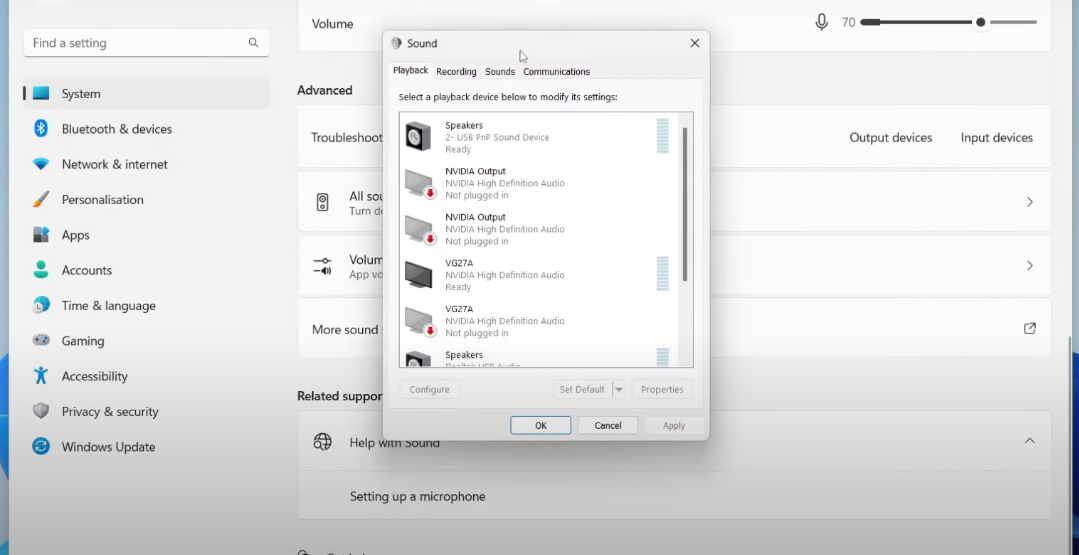
- Step 6: Be on the same window, scroll down to the “More sound settings” option, and click on it
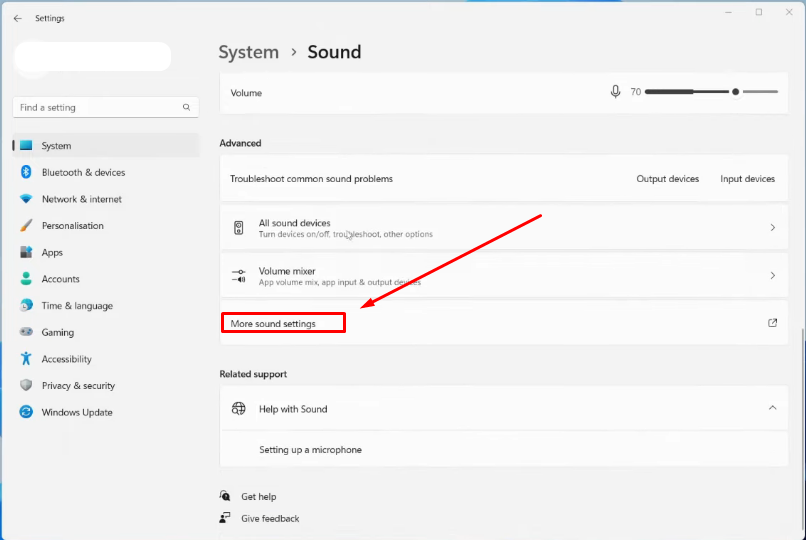
Once do that, you will see a new window appearing on your screen, like this.
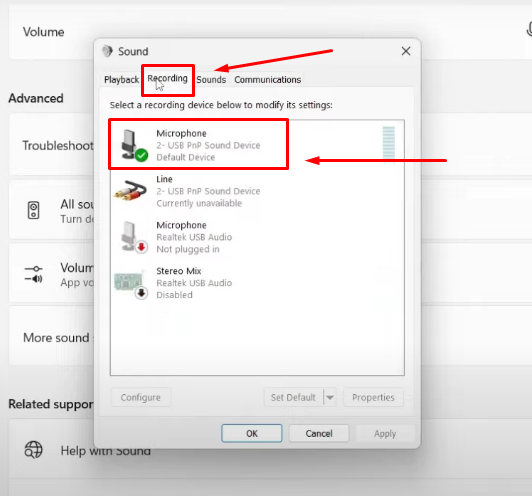
- Step 7: Click on the “Recording” tab to see the “Default Device” (active microphone on your PC), and double-click on that microphone to enter the “Microphone Properties”
- Step 8: When the properties window appears, click on the “Advanced” tab and select the “2 channel, 16 but, 480000 Hz (DvD Quality)” option from the dropdown menu. Then, click “Apply” and “OK”

- Step 9: Now, open any voice recording software to test the microphone. This time, the audio should be without noise from the microphone
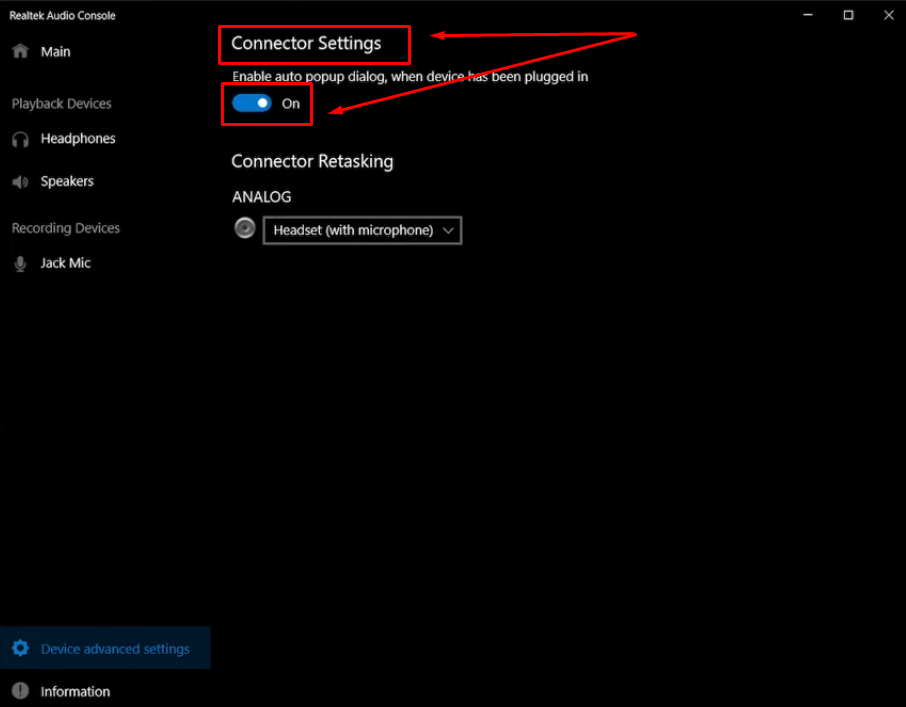
NOTE: Some users may also see the “Enhancements” option, depending on the hardware/Windows version. If the “Enhancements” are enabled, disable them or vice versa and check the difference in noise.
Part 2: How to Reduce Background Noise from a Microphone on MacOS?
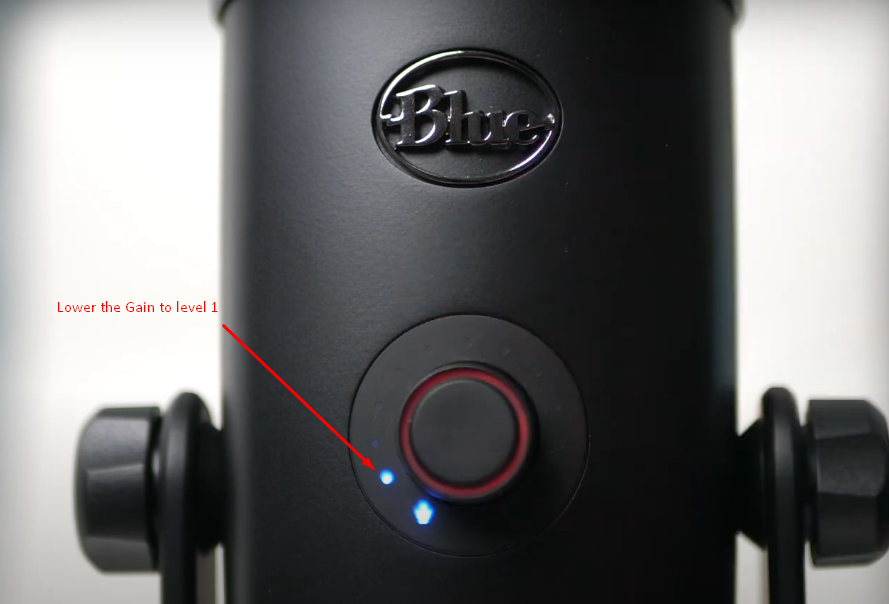
If your microphone captures surrounding noises, it’s possible that your Mac’s audio settings are not set correctly. If your microphone comes with a gain button, you will need to keep it on the lowest level and then modify the microphone’s settings from system preferences. And if your mic doesn’t have a gain button. On the other hand, some mics come without a gain button but they still need correct tuning from the settings to reduce noise.
So, whatever microphone you have, if it is noisy on your Mac, follow these steps to fix this issue.
- Step 1: Make sure the microphone is connected to your Mac, and it is showing sound input
- Step 2: it has a gain button, use it to set the gain level to 1 (the lowest). If it lacks a gain button, ignore this step and carry on with the next one
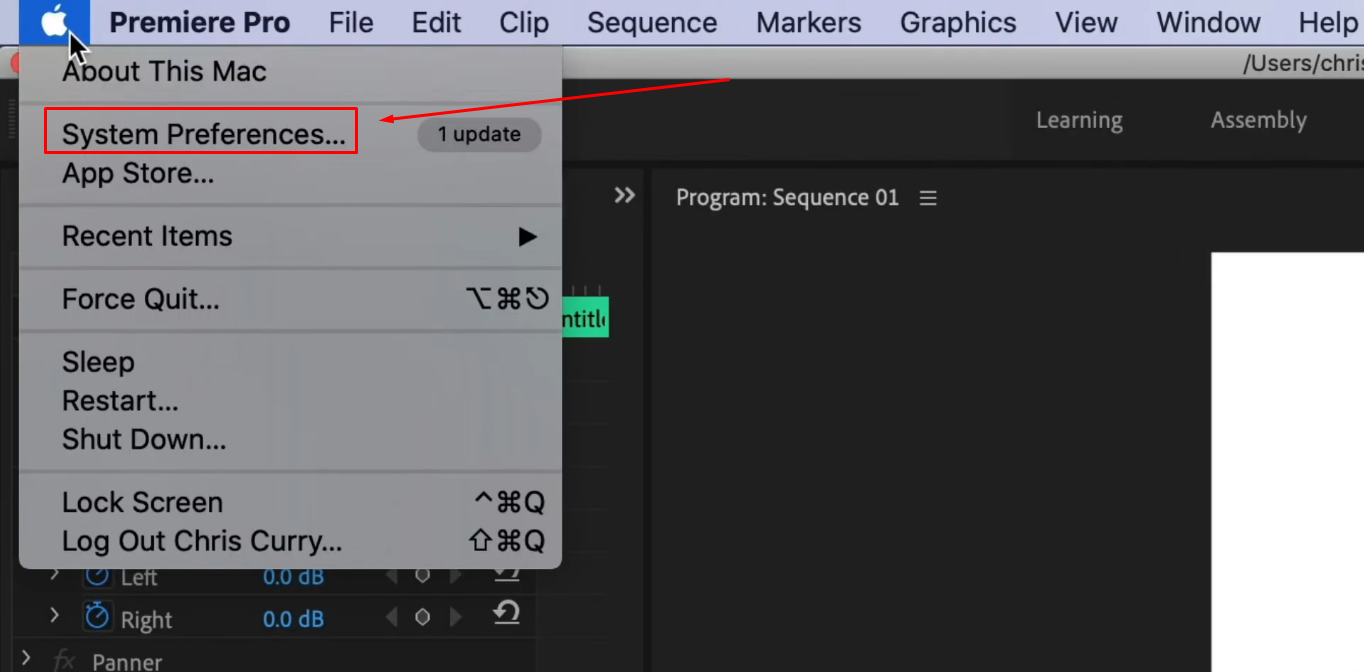
- Step 3: Go to the Apple menu on the top-left corner of the screen. Click on the “Apple” icon and select “System Preferences…” from the menu
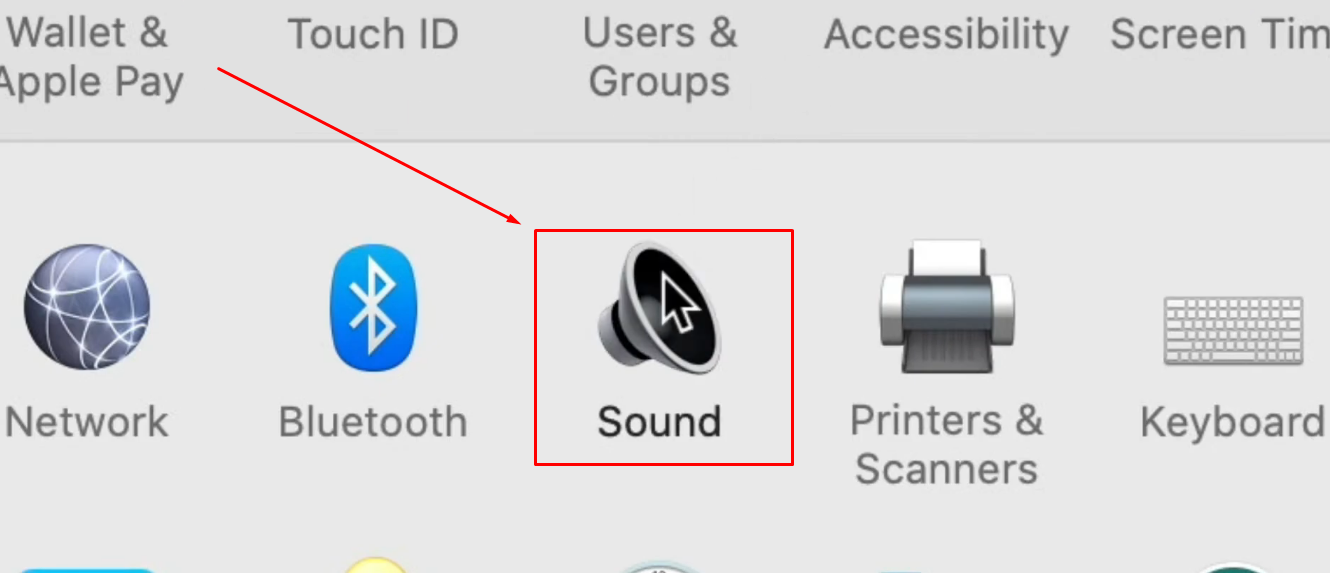
- Step 4: Selecting this option will take you to various system settings. You will notice several icons related to Mac’s features and functions. So look for the “Sound” option with a speaker symbol and click on it
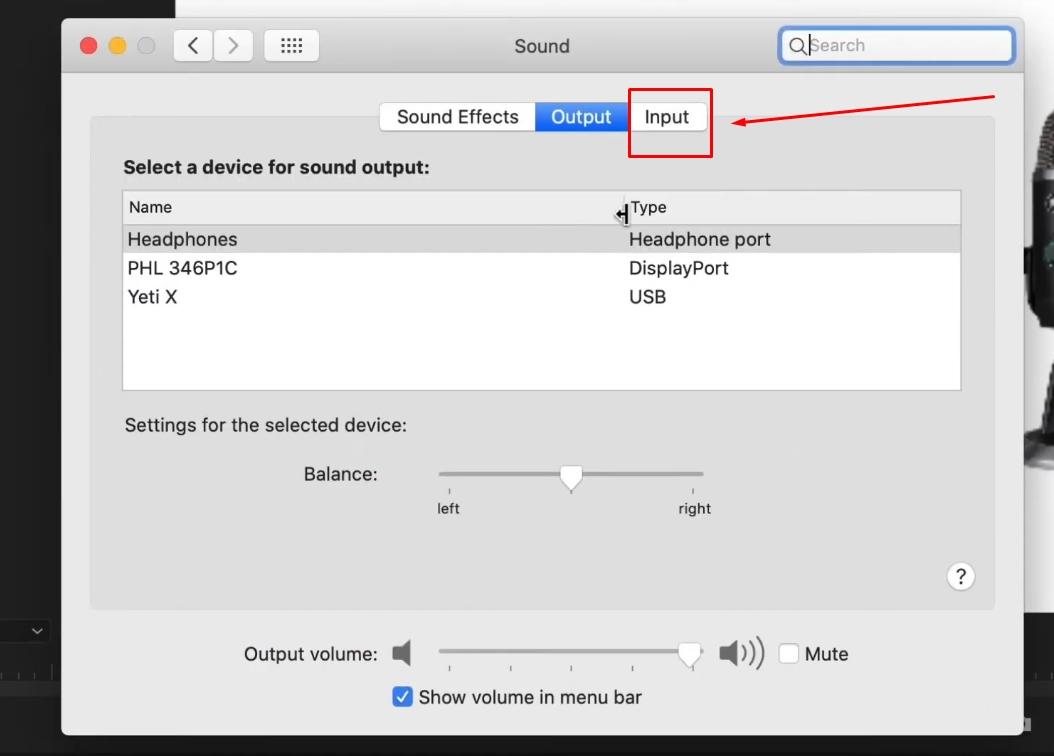
- Step 5: When the “Sound” window appears, select the “Input” tab
- Step 6: Then, click on the microphone name under the “Select a device for sound input” section
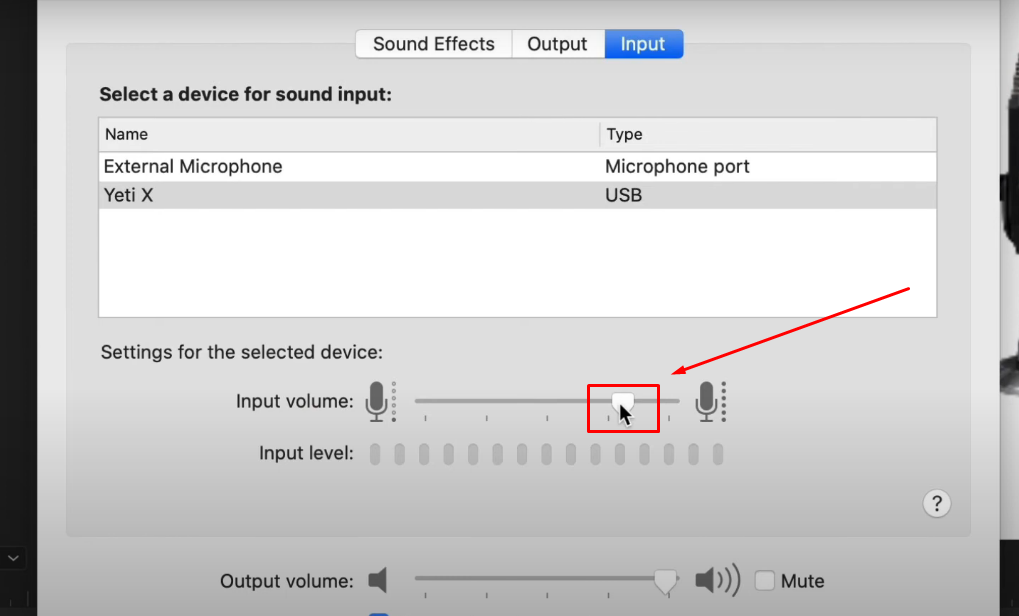
After that, click on the slider button and bring it down to 5%.
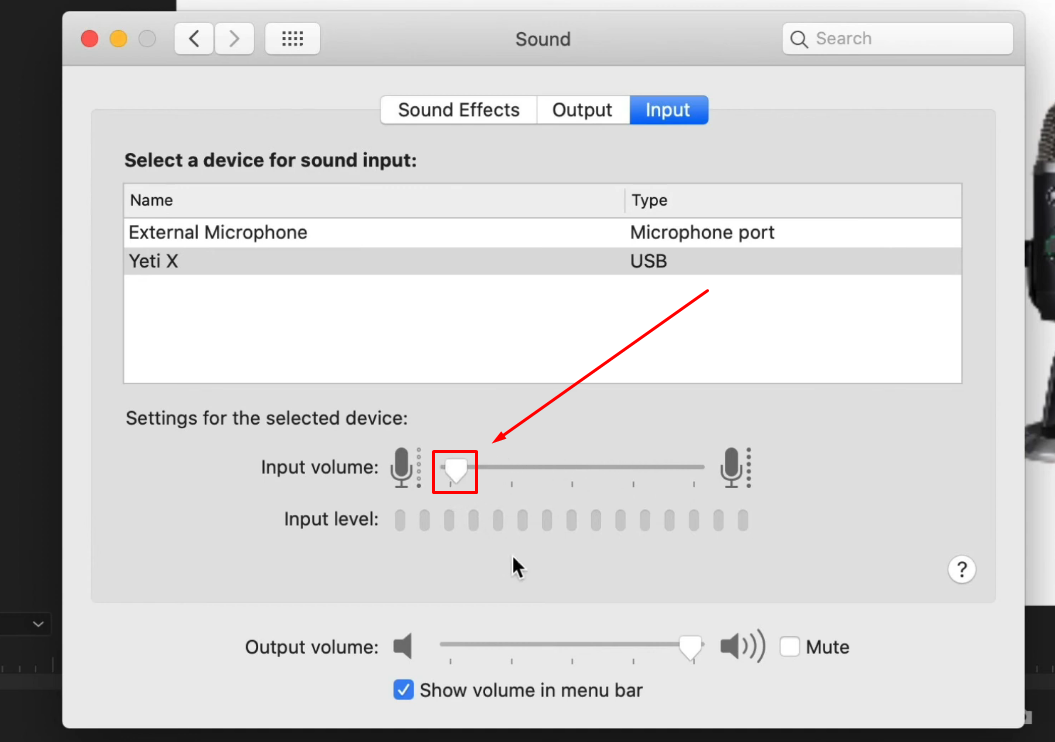
This should help control the microphone gain and mitigate the noise it captures.
- Step 7: Now, open any recording tool to check the improvement. Ideally, there shouldn’t be noise in your recordings.
Part 3: How to Reduce Background Noise from a Microphone in OBS/Streamlabs? (For Streamers)
If you use streaming platforms like OBS or Streamlabs, you can modify the audio input settings by choosing noise-reduction features.
These instructions can reduce background noise from your microphone for both tools, which have somewhat similar functions.
NOTE: The steps are performed on OBS.
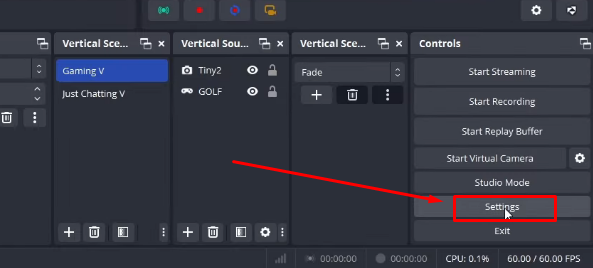
- Step 1: Launch OBS on your PC. On the main screen, go to the “Controls” section at the bottom-right corner and click “Settings”
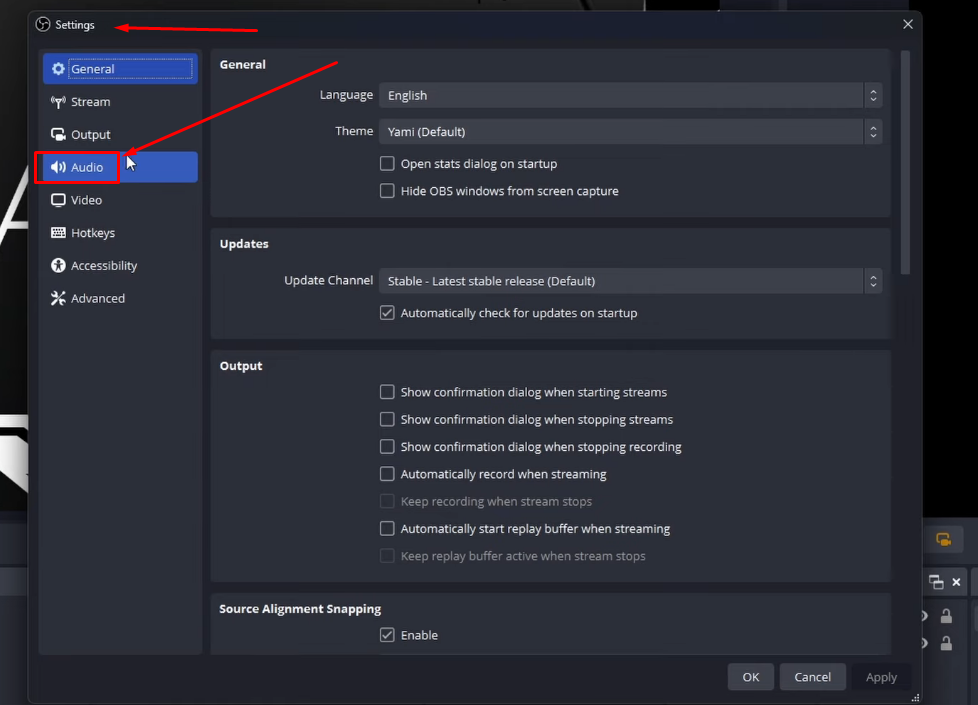
- Step 2: When the “Settings” menu shows up, look for the “Audio” option in the left panel of the screen and click on it
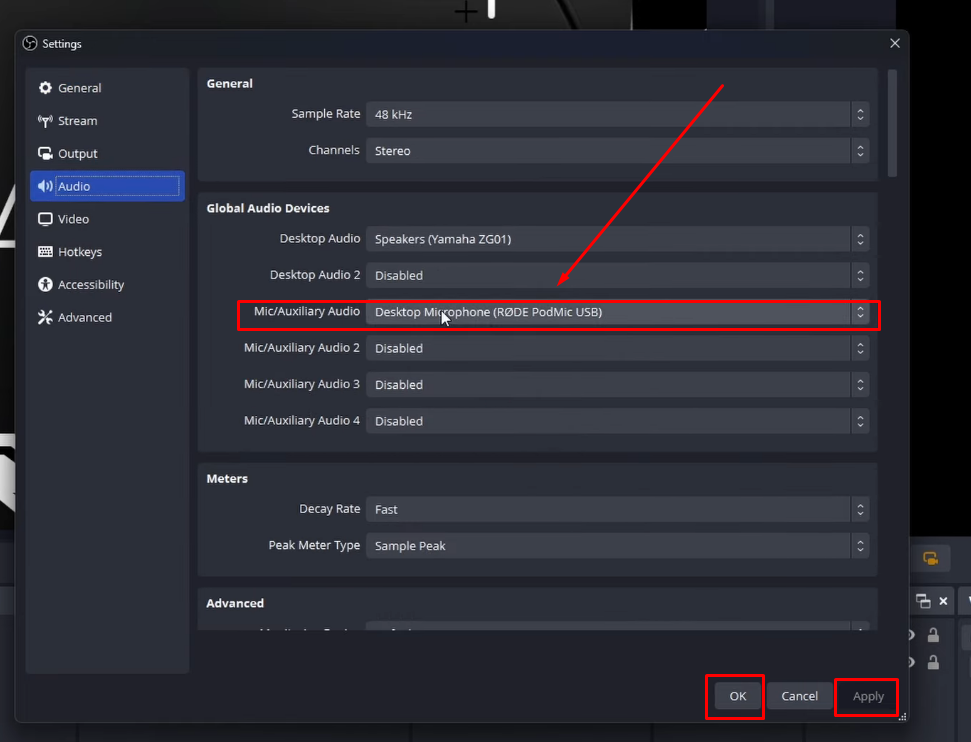
- Step 3: Now, stay in the “Global Audio Devices” section on the right panel, and click on the dropdown menu of “Mic/Auxilary Audio.” Here, you need to select the correct microphone (or make sure OBS has already selected it) and click “Apply” and “OK”
- Step 4: Next, return to the main screen and look for the “Mic/Aux” bar under the “Audio Mixer” section. As you can see in the screenshot, the mic/aux level is set to full
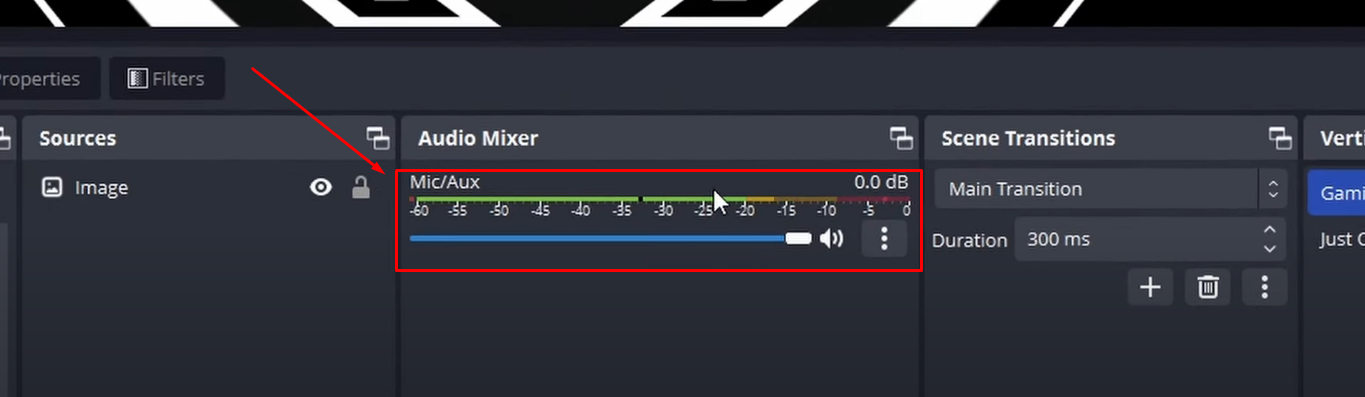
That means it will clip the sound, which may cause noise during streaming.’
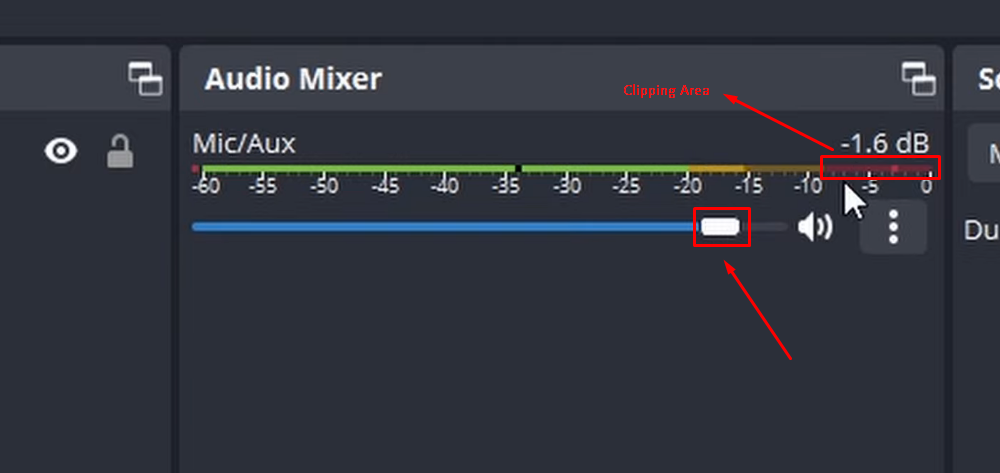
- Step 5: Click on the slider button and lower the level that prevents audio from clipping. Ensure that whoever you speak in the mic, the sound stays below the clipping area
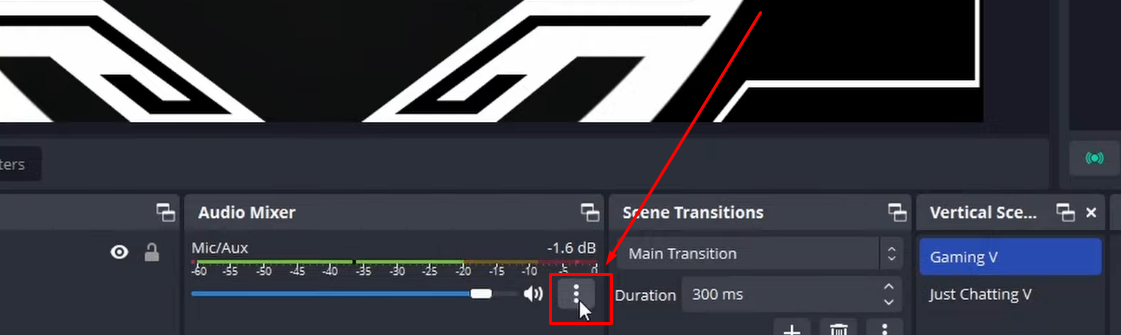
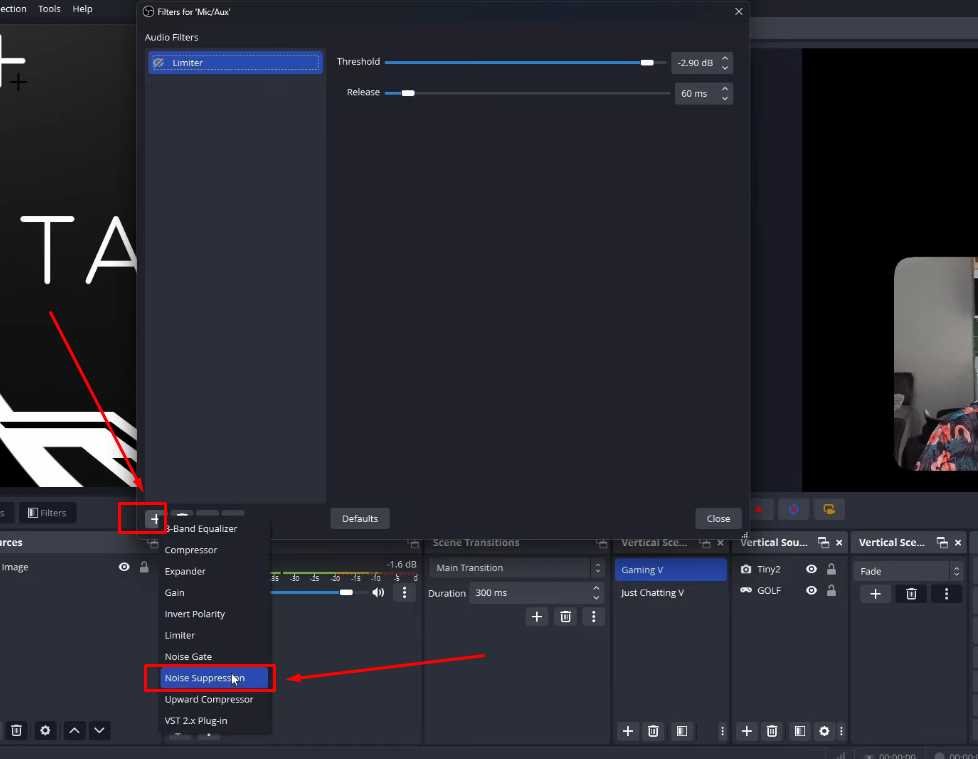
- Step 6: Now, it’s time to set filters to mitigate microphone noise further. So, click on the “three vertical dots” button next to the slider and choose “Filters” from the menu
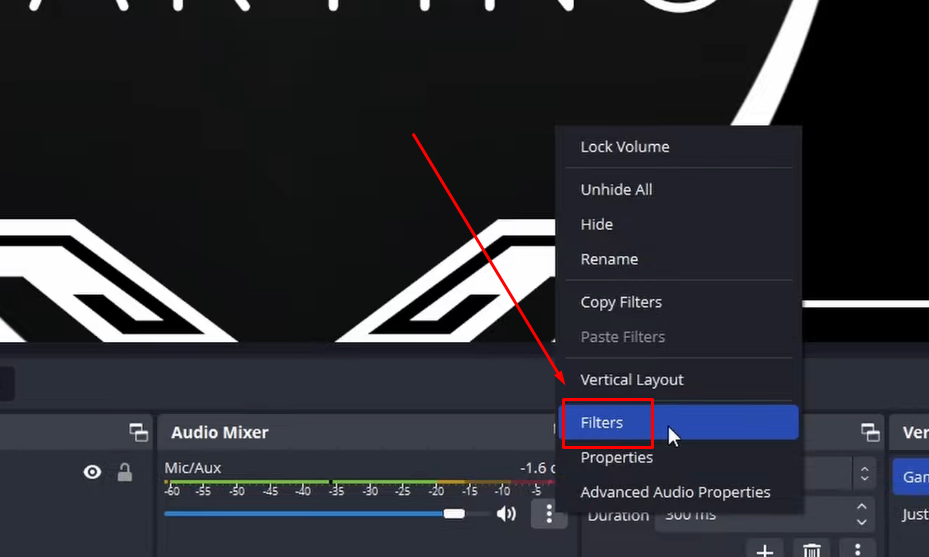
- Step 7: Click the small “+” button at the bottom of the filters window and choose “Noise Suppression”
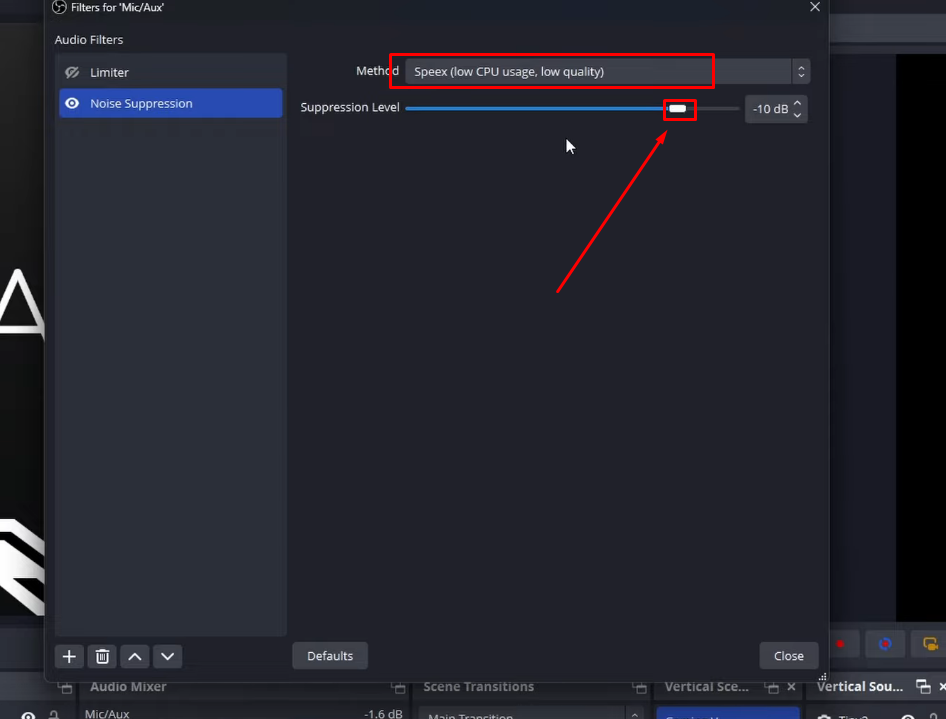
- Step 8: Then click on the “Noise Suppression” from the left panel. Click on the “Method” dropdown menu and choose “RNNoise”
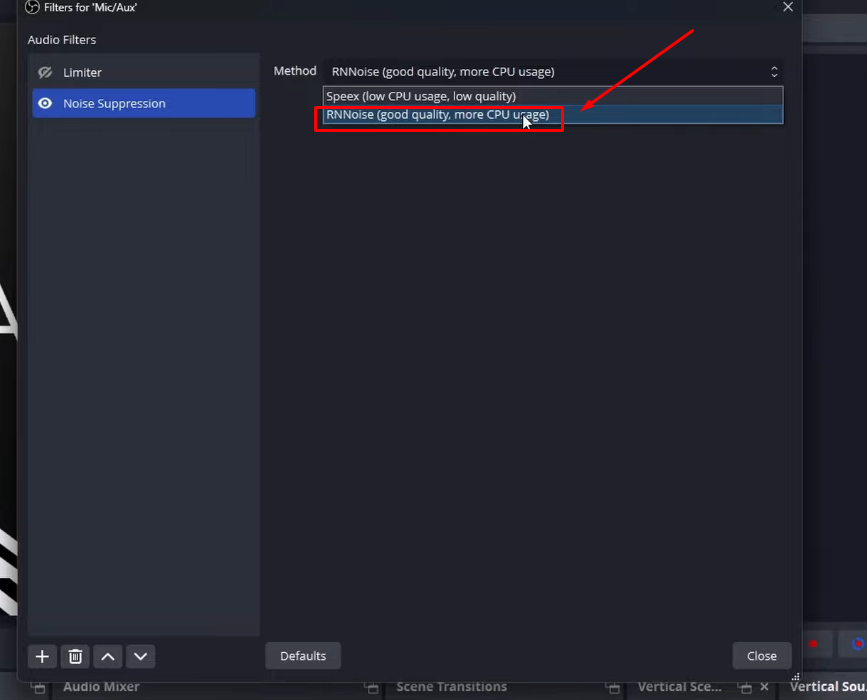
Contrarily, if you don’t have a high CPU system, you can select “Speex” from the method menu and set the suppression level until the noise is reduced. However, keep in mind that this option may affect the audio quality. That’s why the RNNoise option is recommended in the first place, but it requires powerful CPU usage.
- Step 9: Now stream with the connected microphone, and you should notice that the issue is resolved.
Part 4: How to Reduce Background Noise from a Microphone with Online Tools?
If you’re looking for an easy way to lessen background noises from your microphone, tools like Krisp.ai and Adobe Podcast can be really helpful.
While these tools can be purchased, you can still use their free versions, as they are good enough to do the job.
So, let’s explore the steps for each.
Steps to Reduce Background Noise from a Microphone with Krisp.ai
- Step 1: Visit krisp.ai from your PC’s browser and sign up by clicking the “Get Krisp for free” button

- Step 2: Download the software on your computer, open its preferences, and go to the “Audio” tab
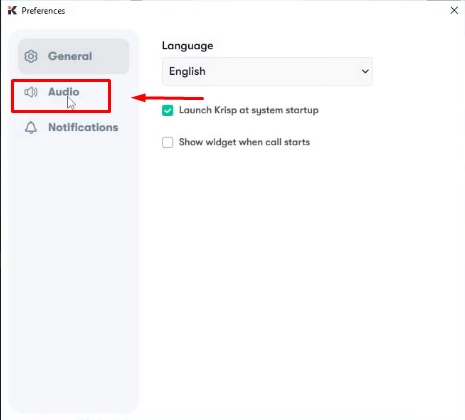
- Step 3: Next, make sure that the “Background Voice Cancellation” is checked. Likewise, select the “Auto” or “Best Noise Cancellation” (recommended) option from the “Performance mode” section
- Step 4: Return to the main screen and click on the microphone dropdown menu to choose your microphone
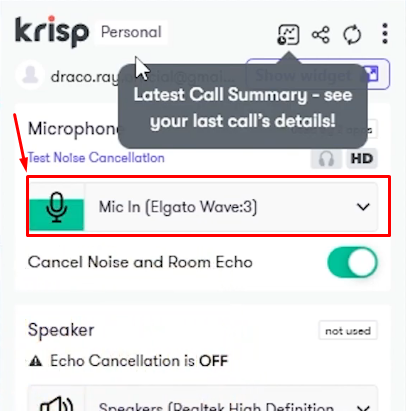
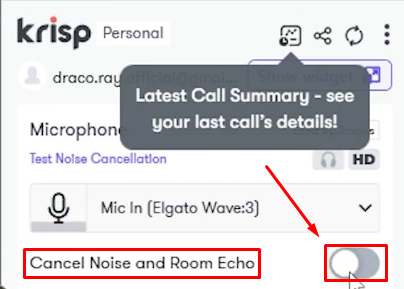
- Step 5: After selecting the correct microphone, look below the dropdown menu to see the “Cancel Noise and Room Echo” option. If the toggle is turned off, turn it on to activate noise cancellation
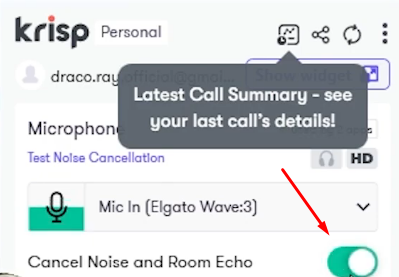
Now, feel free to record audio, livestream, or even take online meetings with noiseless audio.
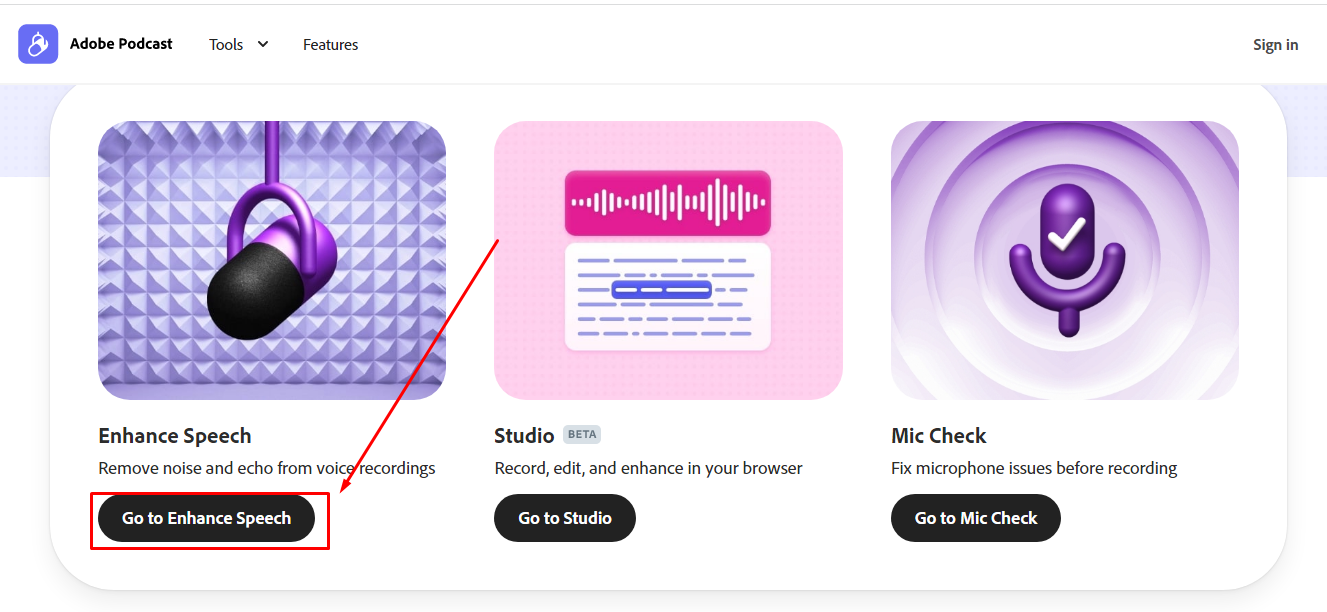
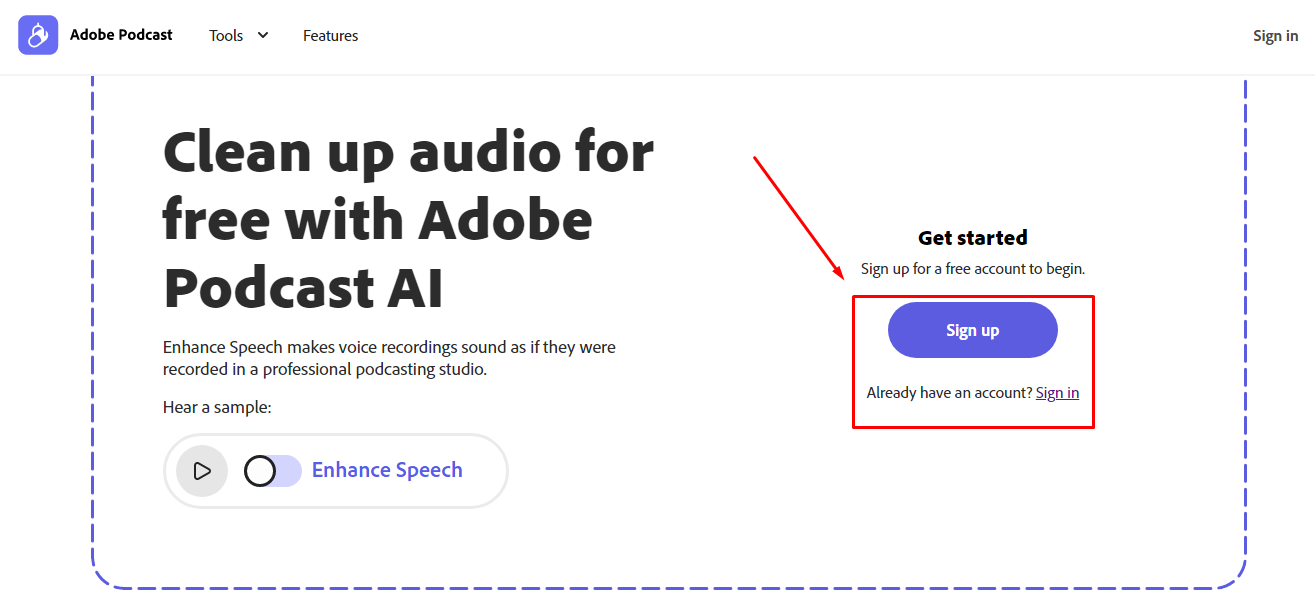
Steps to Reduce Background Noise from a Microphone with Adobe Podcast
- Step 1: Go to the Adobe Podcast official site

- Step 2: Scroll down to the “Enhance Speech” tile and click on the “Go to Enhance Speech” button
- Step 3: At this stage, make sure to sign up if you haven’t already
- Step 4: Once done, sign in with the same account and click on the “Choose files” option to upload the recorded audio
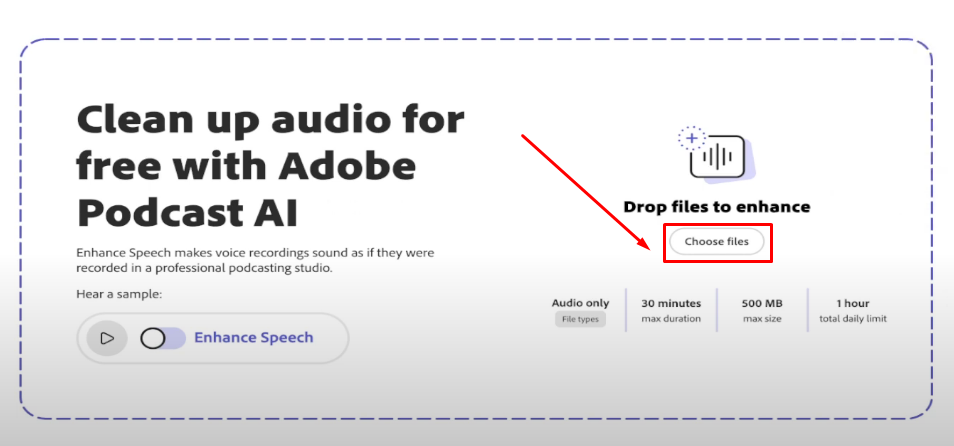
NOTE: You should have the pre-recorded audio file on your computer to make it cleaner.
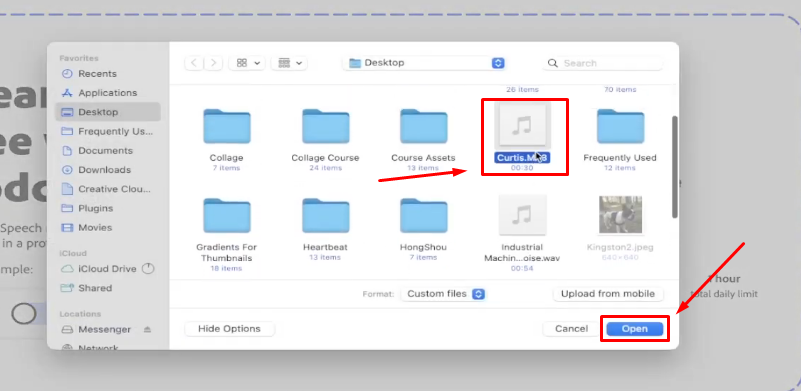
- Step 5: Now, locate the audio file in your local directory, select it, and click the “Open” button to upload the file on Adobe Podcast
Adobe Podcast will reduce noise from the uploaded audio file in a few minutes. You can download the file to your laptop or PC when the process completes.
Tips to Reduce Background Noise from a Microphone
Here are a few suggestions that can help minimize background noise from being captured in your microphone.
Keep the Mic Near the Speaker’s Mouth
This is a valuable tip, especially for those who create podcasts. One of the relieves of such content is that both host and guest can keep their mouths closer to the microphone. This is called the high speech-to-noise ratio.
Ideally, your microphone should be at palm’s length from the mouth. If the speaker is at a distance, you will need to increase the microphone’s sensitivity, which can elevate noise levels.
Also, you should remember that a microphone with less sensitivity is likely to pick up fewer background noises.
Use Pop Filters
Placing the microphone closer to your or the speaker’s mouth can greatly decrease noise. But what about the extra sounds that come from the mouth? They may also contribute to noise. Therefore, the best escape from such a situation is to use pop filters. They can help block popping and plosive sounds.
Choose a Quiet Room for Recording
It’s all right if you don’t have a studio to record your voice. But, finding a place with fewer audio distractions can be a great alternative and a source to capture a voice with minimal noise. So, try to pick a room where there are fewer chances of audio intrusion from different mediums, such as traffic, roommates’ voices, and fans.
Get Yourself a Noise-Canceling Microphone
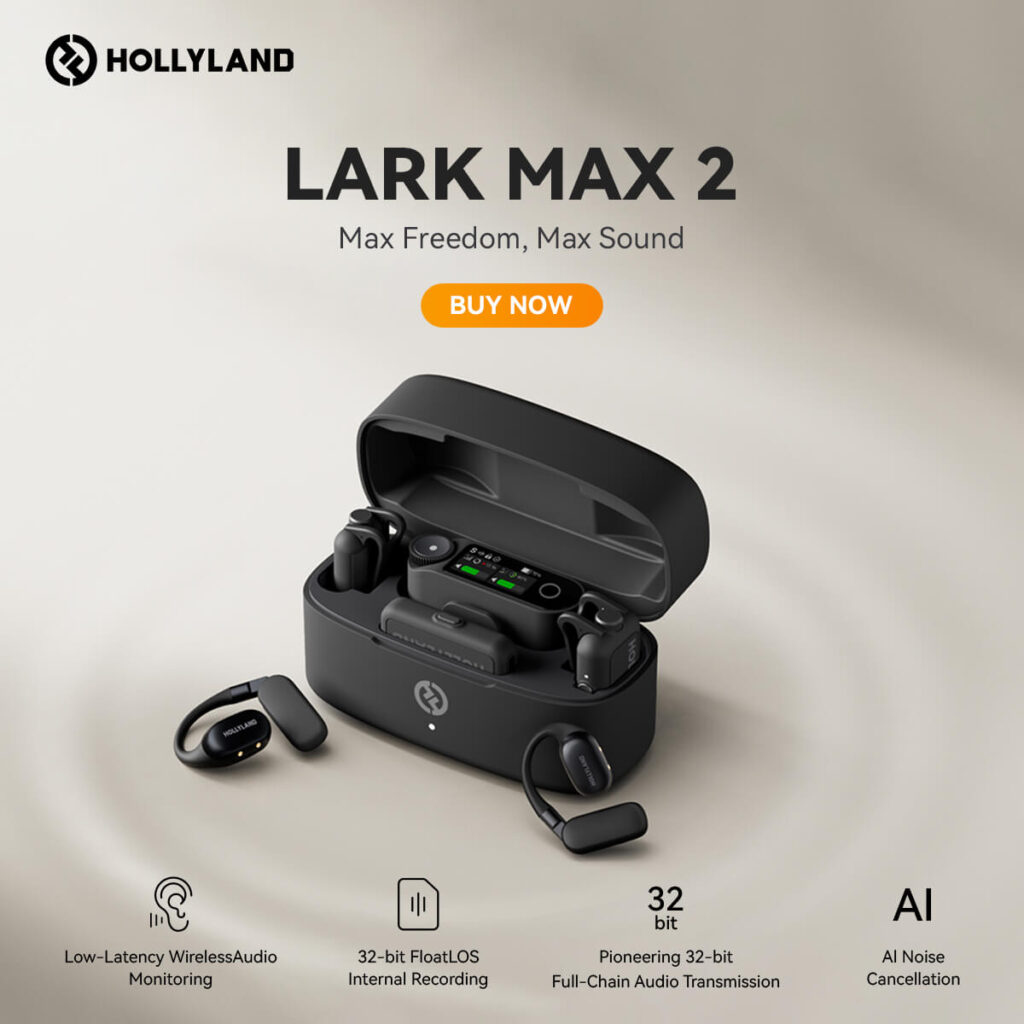
Lastly, and the “best of all” suggestion, is to get a microphone with a noise cancellation feature. Some great brands offer both wired and wireless mic types. One of the top-rated wireless microphones, the Hollyland Lark M2S, offers everything you need for crystal-clear audio.
With its logo-free design and titanium clip-on, Lark M2S ensures wireless freedom of movement up to 1000ft. Plus, it works with all major recording devices and operating systems. And most importantly, it prevents your audio from background noise with its built-in dual-level Environmental Noise Cancellation feature. All you have to do is click the noise-canceling button.
Conclusion
Even highly visualistic content may lose its charm if the audio is full of background noises. Bad audio can also become a great obstacle between your career and your growth as a creator. Many users don’t know how to reduce background noise from their microphones, although it’s an easy process.
You can minimize background noises by adjusting the audio input settings from your Windows/Mac computer. If you’re using OBS or other streaming software like Streamlabs, you can apply noise suppression filters. Moreover, you can use Krisp.ai and Adobe Podcast to enhance your audio and make them noise-free to a great extent. If that’s too technical, you can save your time and energy by opting for a noise-canceling microphone.
If you’re consistently struggling with background noise despite trying various methods, upgrading your hardware could be the ultimate solution. A high-quality wireless lavalier microphone effectively minimizes unwanted ambient sounds and enhances vocal clarity, ensuring your recordings sound professional every time.
Best Seller
Sale
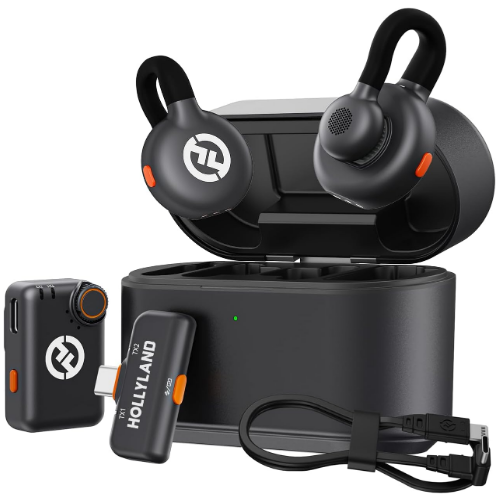
Hollyland LARK M2S – Wireless Clip-on Microphone
- 7g Lightweight, Titanium Clip, Discreet Design
- Clear sound with 24-bit/48kHz, 70dB SNR, 116dB SPL
- Noise Cancellation & 300m Long-Range Stability
- Works with Camera/iPhone/Android/Laptop
- Perfect for Content Creators, Online-Teaching, Streaming
$139
$159
Frequently Asked Questions about Reducing Background Noise from Microphones
Q1. How do I stop my microphone from picking up background noise?
Start by adjusting the microphone sensitivity or gain. Lowering these levels can reduce the mic’s ability to capture ambient noise. You can also use noise reduction filters or plugins on your computer.
Q2. What mic cancels background noise?
If you’re looking for a wireless microphone that cancels background noise, the Hollyland Lark M2S, M2, and Lark Max are excellent options. On the other hand, the Shure MV7 and RODE NT-USB mini are great wired microphones for noise cancellation.
Q3. How do I make my microphone not pick up background noise on Discord?
You can use Discord through Krisp.ai. While you’re connected, toggle on the noise cancellation option on Krisp to get a clear sound on Discord.