


.png)
Audio capture in Windows 10 is a fundamental feature that allows users to record sound from various sources, such as microphones, system sounds, and external devices. Whether you’re a podcaster, gamer, or simply want to record a voice memo, understanding how to effectively capture audio on your Windows 10 device is essential.

In our daily lives, recording internal audio on a Windows 10 computer serves various purposes. Whether it’s capturing lectures, conversations, interviews, or extracting audio from websites, the need arises frequently. Yet, many individuals struggle to grasp the process of capturing system audio on Windows 10. This post provides a solution to this challenge. Continue reading to discover a hassle-free method for recording internal audio on Windows 10!
Utilizing the Voice Recorder App
Windows 10 incorporates a pre-installed application known as Voice Recorder, offering a seamless solution for capturing lectures, conversations, and various sounds.
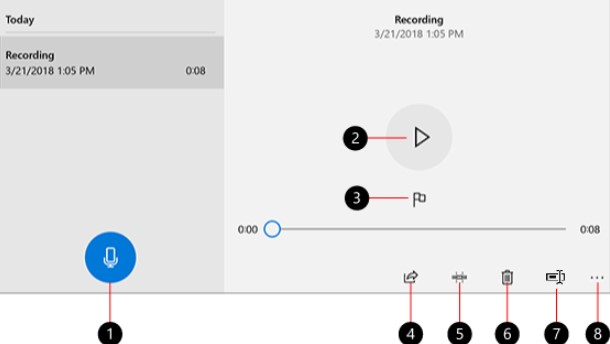
The Voice Recorder app serves as a tool for capturing lectures, conversations, and various sounds, formerly known as Sound Recorder. Simply tap the prominent Record button (1) and utilize the Add a marker feature (3) to mark significant moments during recording or playback (2). Subsequently, options such as Trim (5), Rename (7), or Share (4) your recordings are available, with saved recordings located in Documents > Sound recordings. To remove a recording, select the Delete icon (6), or explore additional options by clicking See more (8).
This guide demonstrates how to easily record computer audio on Windows 10 using the Voice Recorder. Follow the steps outlined below:
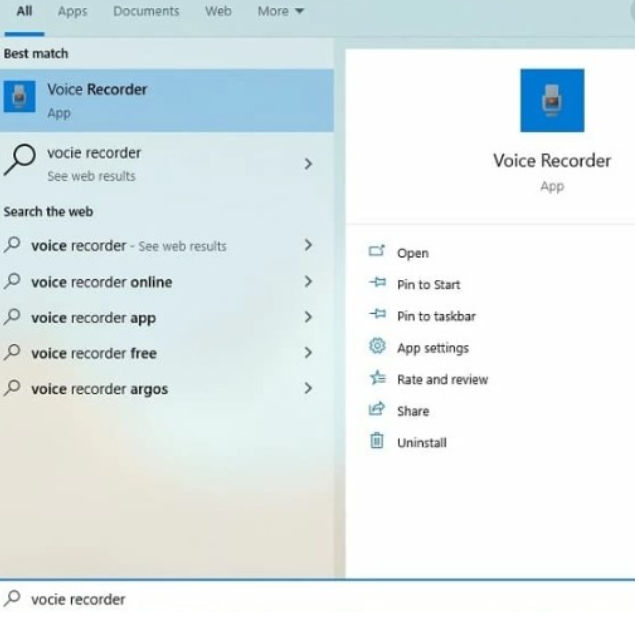
- Search for Voice Recorder in the Windows search bar and select the top result to open the application.
- Click on the “Record” button or the microphone icon. For easy navigation to important segments of the audio later, utilize the “Flag” button to add markers during recording. This action does not disrupt the recording process.
- Press the “Pause” button to temporarily halt recording, or click on “Stop” to conclude the voice recording session.
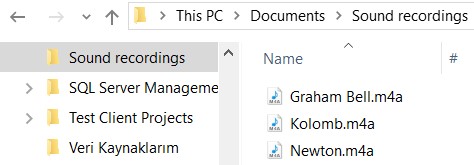
- Upon completion, the audio file will automatically save in .m4a format within the “Sound recordings” folder located under “Documents”.
Capturing Audio Using Windows Game Bar
While primarily intended for capturing game audio and video, the Game Bar feature can also be utilized to record audio from various applications.
- Initiate the Game Bar by pressing Win + G.
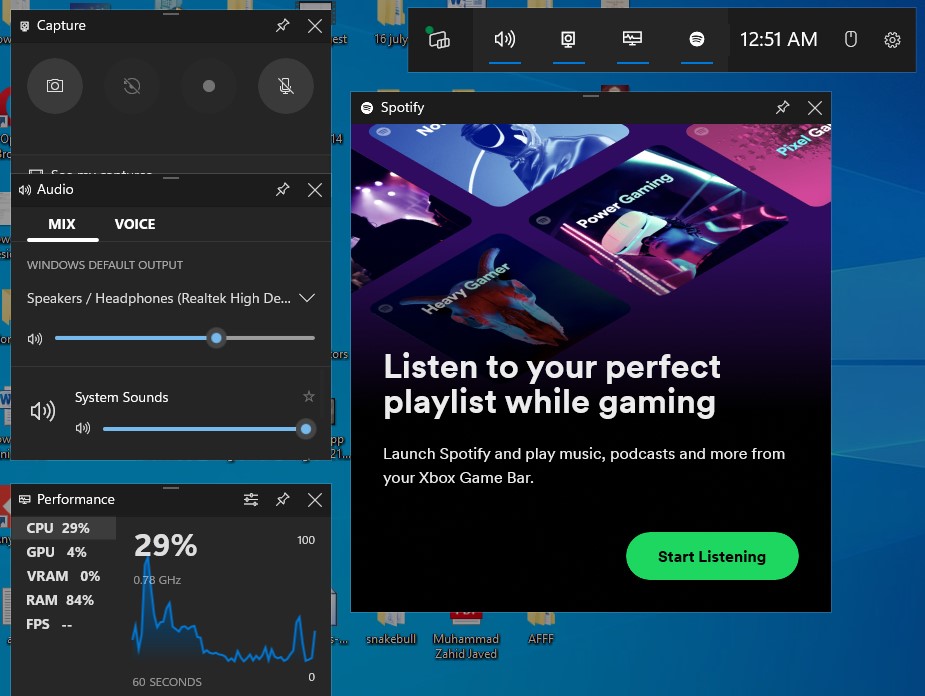
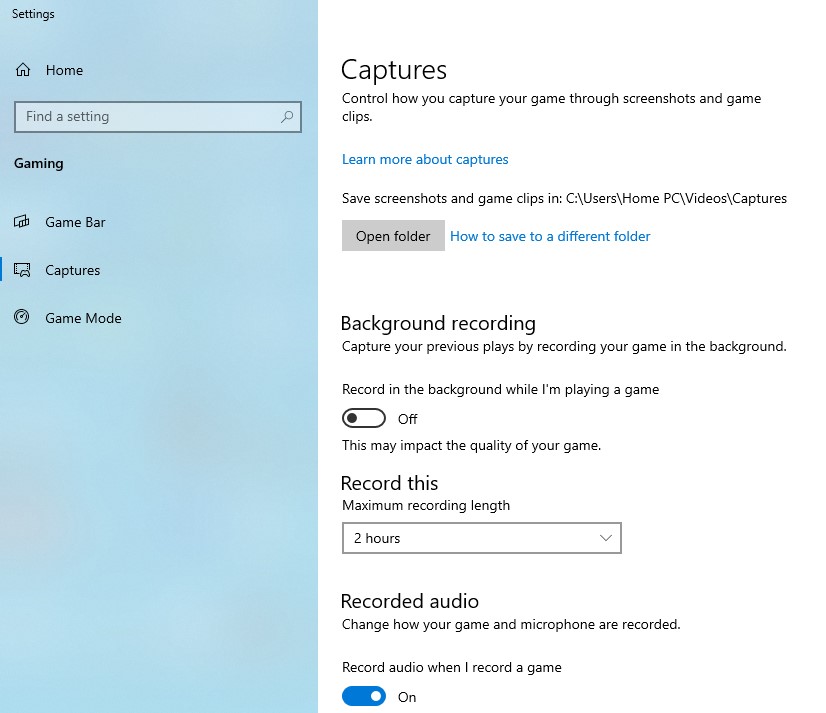
- Adjust the Game Bar Settings to enable audio recording. Navigate to Settings > Capturing and tick the box for Record in the background.
- Begin playing the desired game or performing tasks while capturing system audio. Click the Start Recording button in the Game Bar. Alternatively, use the keyboard shortcut Win + Alt + R.
- Cease recording by clicking the Stop button or pressing Windows key + Alt + R. Access the recorded audio through the Show All Captures option.
Harnessing Audacity for Enhanced Audio Capture
Audacity stands out as a freely available, open-source, and cross-platform audio software, offering extensive control over recording and editing processes.
Audacity, developed by a collective of volunteers, stands as a no-cost, user-friendly, and multi-track audio editor and recorder. It facilitates live audio recording via a microphone or mixer and allows for the digitization of recordings from various media sources. Following recording, users can seamlessly manipulate their audio files by employing functions such as cutting, copying, pasting, and deletion.
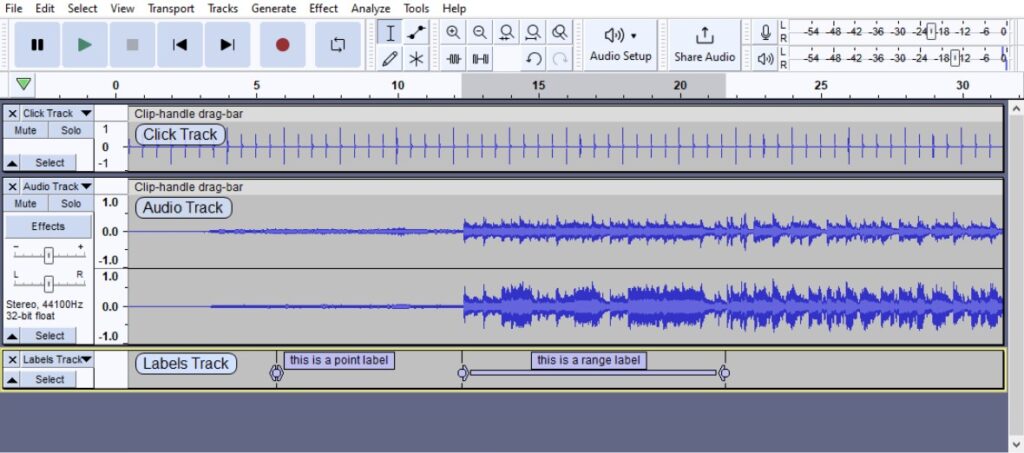
Of utmost significance is Audacity’s capability to export recordings in numerous file formats, including multiple files simultaneously. This feature proves invaluable for individuals seeking to distribute recordings across diverse platforms in varying formats. Below are the steps to commence recording sound on Windows 10 using Audacity.
- Ensure your microphone is connected to your computer.
- Access Audacity settings. Navigate to “Edit” > “Preferences” to configure audio quality and channels.
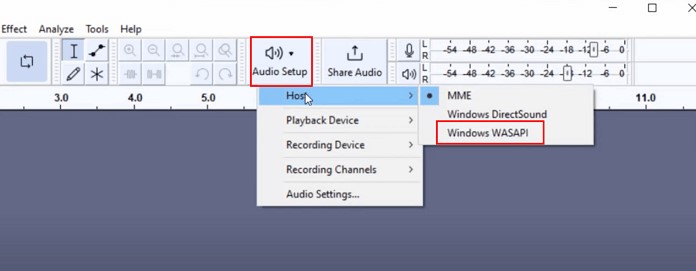
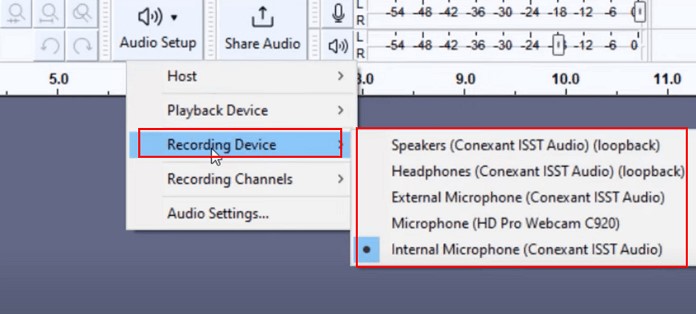
- Click on the Audio Setup option within the top toolbar, then select Host > Windows WASAPI.
- Again, opt for the Audio Setup button, this time selecting the recording device.
- Initiate the audio recording process. Select the red record button and begin speaking into the microphone. Adjust the recording level within the Windows volume control as needed.
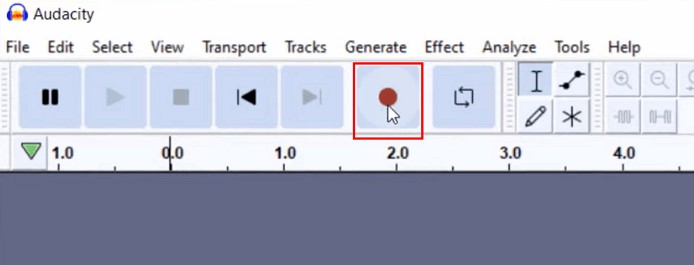
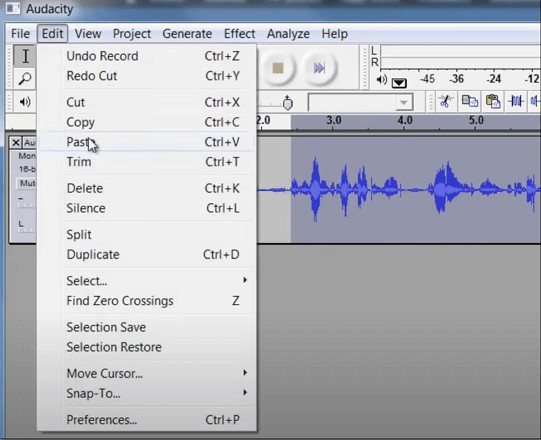
- Upon completion, click the yellow stop button to halt the recording. For further refinement, utilize the “Edit” option to trim, delete, or split your audio file.
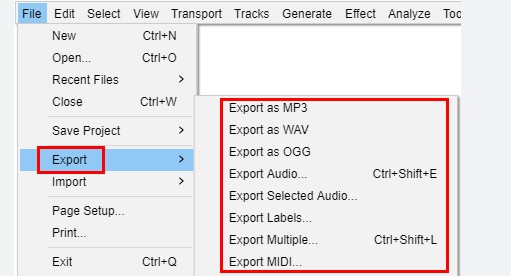
- Once your audio recording is finalized, navigate to File > Export to save the audio recordings in MP3, WAV, or OGG format. (By default, recordings are saved in MP3 format.)
Employing OBS Studio for Multi-Source Recording
OBS Studio stands as a robust open-source software designed for video recording and live streaming, boasting support for multi-source audio capture as well.
Utilizing OBS Studio to capture all desktop audio on Windows requires a few steps. Rest assured, we’ll walk you through configuring OBS to enable Desktop Audio Capture, simplifying the process of creating audio recordings on your Windows 10.
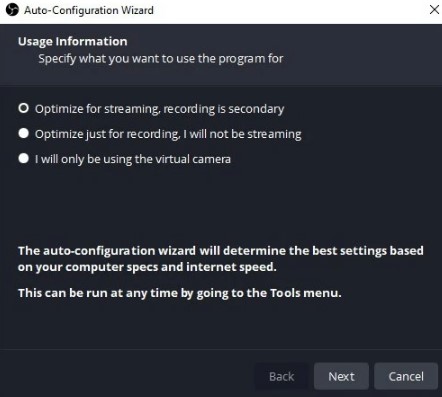
Step 1: Launch OBS and Complete the Auto-Configuration Wizard
Ensure OBS for Windows is installed on your computer. If not, visit the OBS website to obtain the software.
Once installed, initiate the OBS application. Upon opening the Auto-configuration wizard, follow the prompts to complete the setup tailored for Windows. For desktop audio recording, select “Optimize just for recording, I will not be streaming.”
Step 2: Configure Audio Recording
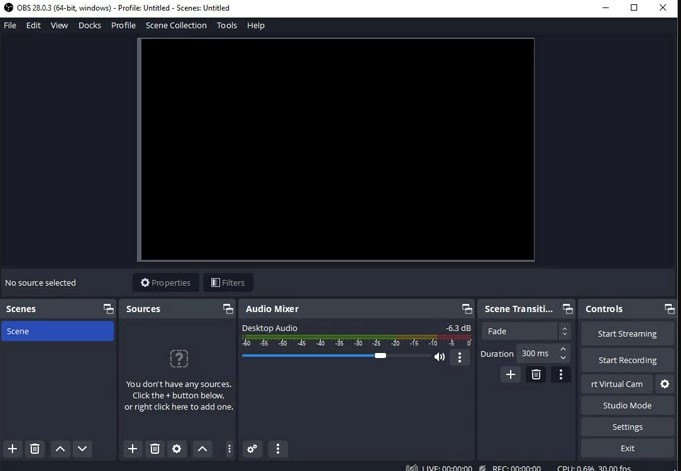
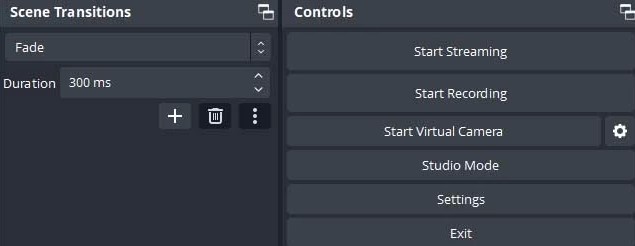
In the main interface of OBS, you’ll notice several recording panes at the bottom: Scenes, Sources, Audio Mixer, Scene Transition, and Controls.
By default, desktop audio, app audio, and microphone input (if available) are automatically added to the Audio Mixer. To ensure desktop audio is captured in the recording, monitor the volume meter of Desktop Audio to verify movement and assess sound levels. Click on the three dots > Properties beneath Desktop Audio and choose Default audio device to capture the sound.
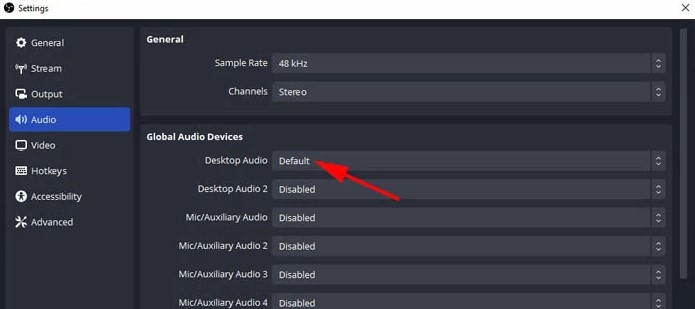
If there’s no movement or you wish to change the audio input device to be captured, navigate to the upper-left corner, click File > Settings. Then select Audio, followed by manually choosing your audio device input under Desktop Audio. Setting Desktop Audio to Default under Global Audio Device ensures OBS records computer sound.
Bonus Tip: If your computer has a built-in or external microphone connected, you’ll see Mic/Aux in the Audio Mixer pane. You can add your voice for narration or commentary during desktop audio recording with Windows.
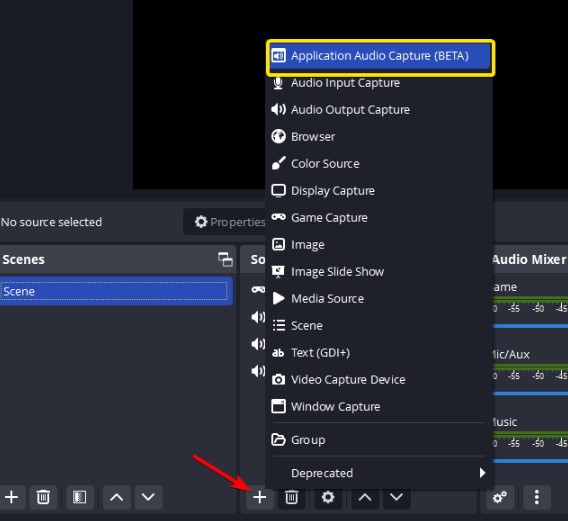
Step 3: Add Sources to Capture Audio
Click the “+” symbol in the Sources pane, then select a source to record entire desktop audio or audio from specific applications:
- Display Capture: Captures all desktop audio, including audio files played in web browsers, applications, games, etc.
- Window Capture: Records audio only from the selected window or application.
By default, OBS Studio records the visible screen along with desktop audio. If you only want to capture audio without displaying visuals, disable visual capture by clicking the eye icon next to the added source. This will result in a video file with a black display but normal audio, which you can then extract into an audio file. You can record audio from the entire desktop or specific Windows applications.
Step 4: Initiate Desktop Audio Recording
Once prepared, click the Start Recording button in the Controls pane at the lower right of the window.
While recording, commence playing the media containing the audio you wish to capture. After adding desktop audio to OBS, press Start Recording to capture sound from the computer.
Step 5: End Recording and Test the Captured Windows Audio
Upon capturing all desktop sounds, conclude the recording process. To stop recording in OBS, return to the main window and click the Stop Recording button in the Controls pane.
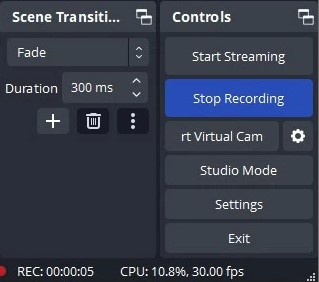
The completed recording with desktop audio will be saved in the default MKV output format in the Videos folder. Play the desktop audio recording using a media player and test the sound quality.
Capturing Audio Using Stereo Mix
Stereo Mix enables the recording of your computer’s sound card output, including audio from speakers or headphones. Stereo Mix serves as a unique recording feature available on Windows computers, focusing on capturing the same audio output emitted from your computer’s speakers or headphones. Once activated, you can effortlessly record system sound from Windows 10 using Stereo Mix.
While some users may initially find it challenging to utilize due to the need to adjust computer settings, the recording process becomes straightforward once the settings are configured. Don’t overlook the potential of this tool.
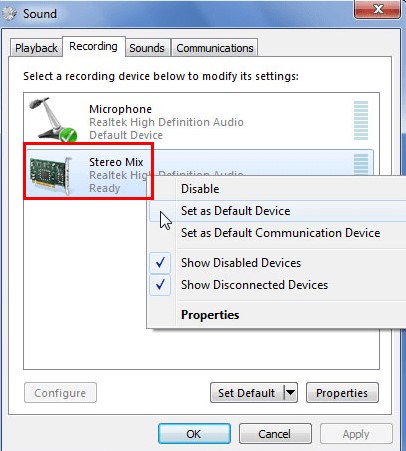
- Enable Stereo Mix: Click on the Windows icon > Settings > System > Sound > Sound Control Panel. Within the Sound window, navigate to “Recording” to locate Stereo Mix. Right-click on it and select the “Enable” option.
- Optionally, click the Flag button to insert markers during recording. Upon completion, click the “Stop” button. A new window will appear displaying the available recordings.
- Select the recorded audio file and click the “Play” button to preview it. Here, you can also export, trim, or delete the audio files stored on your computer.
- Designate Stereo Mix as the default recording device.
- Utilize any recording software and designate Stereo Mix as the input source.
Tips for Quality Audio Capture
To ensure high-quality audio recordings in Windows 10, consider the following tips:
- Use a high-quality microphone: Invest in a good microphone for clear and crisp audio capture.
- Minimize background noise: Record in a quiet environment to avoid background noise interference.
- Monitor audio levels: Keep an eye on input volume levels to prevent clipping or distortion.
- Experiment with settings: Adjust recording settings such as sample rate and bit depth to optimize audio quality.
Troubleshooting Audio Capture Issues
If you encounter problems with audio capture in Windows 10, try the following troubleshooting steps:
- Ensure Proper Connection: Verify that your microphone is correctly connected to your computer’s audio input port. Additionally, check for any loose connections or damaged cables that may affect its functionality.
- Driver Updates: It’s essential to keep your audio drivers up to date to ensure optimal performance. Visit the manufacturer’s website of your audio device and download the latest drivers compatible with your operating system.
- Privacy Settings: Access your computer’s privacy settings to ensure that applications are granted permission to access your microphone. Sometimes, changes in privacy settings can restrict app access to your microphone, leading to issues with recording or communication applications.
- Test the Microphone: Use built-in Windows tools or third-party applications to test your microphone’s functionality. This helps determine if the issue lies with the microphone itself or with software settings on your computer.
- Check Sound Settings: Open your computer’s sound settings and ensure that the correct microphone input device is selected. Sometimes, the default microphone may not be set correctly, leading to issues with recording or communication applications.
By following these troubleshooting tips, you can effectively address microphone issues on your Windows computer and ensure smooth audio recording and communication experiences.
Conclusion
Mastering audio capture in Windows 10 opens up a world of possibilities for content creators, educators, and professionals. By understanding the built-in tools, utilizing third-party software, and following best practices, you can capture high-quality audio recordings for various purposes. Experiment with different techniques and tools to find the best solution that suits your needs. With the comprehensive knowledge gained from this guide, you’re well-equipped to embark on your audio capture journey in Windows 10.
We value your feedback! If you found this troubleshooting guide helpful or have any suggestions for improvement, please share your thoughts in the comments section below. Your feedback helps us enhance our content and provide better support to our readers. Alternatively, you can email us directly with your comments or questions. We look forward to hearing from you!
Capturing clear, professional-quality audio on Windows 10 starts with the right microphone. A wireless lavalier microphone provides convenient setup, excellent portability, and consistent audio clarity, ensuring your recordings sound professional every time.
Frequently Asked Questions
How can I improve the quality of my audio recordings in Windows 10?
To enhance the quality of your audio recordings in Windows 10, consider several factors. Firstly, invest in a high-quality microphone to ensure clear and crisp audio capture. Secondly, record in a quiet environment with minimal background noise to improve audio clarity. Thirdly, experiment with microphone settings in Windows 10 to optimize input levels and reduce distortion. Lastly, consider using audio editing software to further enhance and polish your recordings.
What are the best audio recording settings for Windows 10?
Determining the best audio recording settings in Windows 10 depends on your specific recording needs and hardware setup. However, some general recommendations include setting the sample rate to 44.1 kHz or 48 kHz for standard audio recordings, choosing a bit depth of 16-bit for most recordings (or 24-bit for higher quality if supported by your hardware), and adjusting microphone input levels to prevent clipping and distortion while ensuring sufficient volume.
How do I record internal audio in Windows 10?
Recording internal audio in Windows 10 can be achieved using either third-party software or built-in features like Stereo Mix. To use Stereo Mix, enable it in your sound settings, set it as the default recording device, and use recording software to capture the audio output.
Can I record a phone call on Windows 10?
Recording phone calls on Windows 10 typically requires third-party software or specialized hardware. While Windows 10 does not offer native support for recording phone calls, various apps and devices are available for this purpose.
Why is my audio recording so quiet in Windows 10?
A quiet audio recording in Windows 10 could be due to several reasons, such as low microphone input levels, faulty hardware connections, or microphone sensitivity settings. Adjusting microphone settings and ensuring proper hardware connections can help resolve this issue.
How to fix echo in audio recordings on Windows 10?
To fix echo in audio recordings on Windows 10, consider several approaches. Firstly, adjust microphone placement to position it away from reflective surfaces. Secondly, use acoustic treatments like sound-absorbing materials in your recording environment to minimize echo. Lastly, experiment with microphone settings in Windows 10 to reduce echo and improve audio clarity.
What formats can I export my audio recordings to in Windows 10?
In Windows 10, you can export your audio recordings to various formats, including MP3, WAV, FLAC, AAC, and more. The specific formats available may depend on the software or application used for recording and exporting.
How do I share my audio recordings from Windows 10?
To share your audio recordings from Windows 10, you have several options. You can upload your recordings to cloud storage services like Dropbox or Google Drive and share the download link. Alternatively, you can attach the audio files to an email and send them to your recipients. Additionally, you can use messaging apps like WhatsApp or Messenger to share audio recordings directly with contacts.
Can I edit audio recordings in Windows 10 without third-party software?
Yes, Windows 10 includes built-in audio editing tools like the Voice Recorder app, which allows basic editing functions such as trimming and deleting parts of recordings. However, for more advanced editing features, third-party software may be necessary.
How to schedule an audio recording in Windows 10?
Scheduling an audio recording in Windows 10 can be achieved using task scheduling tools built into the operating system. You can create a scheduled task to start recording at a specific time using recording software or command-line tools. Alternatively, some third-party recording software may offer built-in scheduling features.


