.png)
Using Zoom is a reliable way to host meetings, record interviews, and even create content for YouTube, podcasts, and live streams. Ever since the COVID pandemic made it a remote-work essential, most people have become comfortable with the platform.
But Zoom is built to prioritize real-time conversation, not production quality. That means it often compresses your audio, filters out subtle mic detail, or introduces background noise reduction that flattens your voice.
In this guide, we’ll explore the most important Zoom audio settings to change so your microphone sounds as natural as it should.
1. Open the Zoom Audio Settings Panel
Before you even join a call, open the Zoom desktop app. Click the gear icon in the top-right corner to open Settings, then go to the Audio tab (it has a small headphones icon).

This panel gives you access to everything from mic input levels to background noise suppression. This is where you’ll make all the key adjustments that affect your mic quality.
2. Select the Correct Microphone and Speaker Device
At the top of the audio settings panel, you’ll see dropdown menus to select both a speaker (your output device) and a microphone (your input).

One of the most common mistakes users make in this setting is mixing devices—for instance, choosing laptop speakers for output while using an external microphone for input. This often leads to echo, audio lag, or uneven sound levels.
You can use an external USB microphone with a headphone jack, which will appear in both dropdowns. In this case, you’ll select the same external device for input and output. An even better option is a quality lavalier microphone for a discreet yet professional audio experience during meetings. The Hollyland LARK M2S is highly recommended. Weighing only 7 g, it is ultra-light and pearl-sized, with a titanium clip that makes it comfortable to wear during long calls. Plus, it’s 24-bit/48 kHz audio capture ensures your voice sounds detailed and clear while minimizing interference from speakers.

Hollyland LARK M2S - Wireless Hidden Microphone
An ultra-discreet wireless microphone featuring a clip-on transmitter for an “invisible” fit.
Key Features: No-Logo Fit | Ti+ Design | 48 kHz/24-bit
3. Test Your Devices Before Joining a Meeting
Just below the device selectors, you’ll see buttons labeled “Test Speaker” and “Test Mic.” Here’s how to use them:
How to Test a Speaker
- Click the button, and Zoom will play a ringtone through your selected speaker.

If you can hear the chime, you know the output device is working. If not, try adjusting your computer’s volume or selecting a different device from the dropdown.

How to Test a Mic
- Click this button and speak for a few seconds.

- Zoom will record a quick sample of your voice and then play it back to you.

- If you hear your voice clearly and without distortion, you’re good to go. If it’s too loud or too quiet, adjust the input volume slider just below.
This is an essential step before any live call, especially if you’re recording.
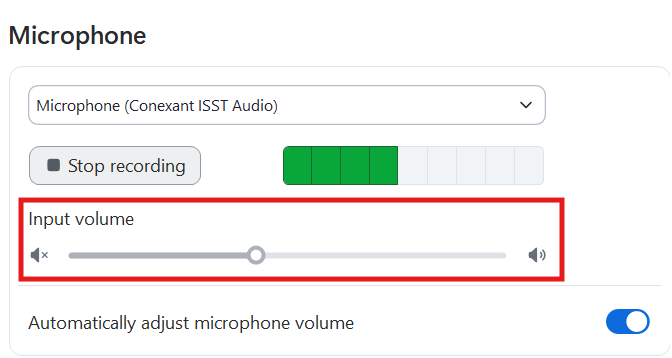
4. Disable “Automatically Adjust Microphone Volume”
By default, Zoom is set to constantly adjust your mic volume based on how loud or soft you’re speaking. This sounds helpful in theory, but it creates an inconsistent sound, increasing background noise when you’re quiet or cutting off louder moments.
To take control:
- Uncheck the box next to “Automatically adjust microphone volume.” Now you can set the mic volume manually using the slide.

- As you speak, watch the blue input level meter. Aim to have your voice peak around 70–80% on the bar. Too low and you’ll sound distant; too high and you risk clipping or distortion.

This manual setting gives you a much more natural, stable sound throughout your call.
5. Set Background Noise Suppression to Low
Zoom includes built-in background noise filtering, which tries to remove things like keyboard clicks or ambient hum. While this can be useful for laptop mics, it often works against high-quality microphones, suppressing the very details that make them sound good.
To fix this:
- Scroll down to “Suppress background noise”

- Change the dropdown from Auto to Low
This keeps Zoom from over-processing your voice. If you’re recording in a quiet space with a proper mic, you don’t need aggressive noise suppression; your gear is already doing the job.
6. Enable “Original Sound” to Bypass Zoom’s Compression
Zoom typically applies audio compression and bandwidth-saving filters to optimize live calls. However, if you’re recording podcasts, streaming, or working professionally, this can make your microphone sound dull or lifeless.
To override this:
- Check the box labeled “Show in-meeting option to enable original sound”

- Now, when you start a meeting, you’ll see a small button in the top-left corner that says “Original Sound: Off.” Click it to turn original sound ON.

What this does:
- Disables Zoom’s audio filters and compression
- Preserves your mic’s full range of sound
- Sends a cleaner, more natural audio signal, especially helpful for music, instruments, or voiceover work
7. Enable Music and Professional Audio Features
Once the original sound is enabled, a few more advanced options become available. These settings are found in the same audio panel, just under the Original Sound section.
Make sure to check:
- Tick High fidelity music mode: This enables higher bitrate audio for richer sound.

- Untick Echo cancellation: Turn this off if you’re using headphones (which you should be). It prevents Zoom from interfering with your clean signal.

- Tick Stereo audio: Allows your mic to capture spatial sound (instead of mono). Great if you’re recording instruments or ambient sound.

These are especially important if you’re using a good mic and want the best possible fidelity. They’re safe to enable as long as your internet connection is stable and you’re wearing headphones.
8. Explore the Advanced Audio Tab
At the bottom of the audio settings panel, click “Advanced” to fine-tune even further. These are mostly optional, but useful if you’re chasing maximum control.

Recommended settings:
- Signal processing by Windows audio drivers: Set to OFF

- Echo cancellation (advanced): Leave it on Auto, but definitely not aggressive

The goal here is to let your mic do the work, not Zoom’s software filters.
Conclusion
Zoom is incredibly popular, and for good reason; it’s easy to use and works nearly everywhere. But when it comes to audio, the default settings aren’t doing your microphone any favors.
By disabling auto gain, switching noise suppression to low, and enabling original sound with professional audio settings, you can dramatically improve your Zoom call quality.
FAQs
Q: Why does my microphone sound muffled on Zoom?
A muffled sound usually comes from Zoom’s default noise suppression and compression. Switch Background Noise Suppression to “Low” and enable Original Sound. This stops Zoom from over-filtering your mic and preserves its natural clarity.
Q: Should I disable “Automatically adjust microphone volume”?
Yes, in most cases. Leaving it on means Zoom will keep raising and lowering your gain, which often creates unnatural volume shifts. Instead, uncheck the box and set the volume manually so your voice stays steady in the green range of Zoom’s level meter.
Q: How do I know if my mic volume is set correctly?
Go to Settings → Audio → Test Mic and record yourself speaking normally. Aim for your levels to peak around halfway to three-quarters of the green bar. If the bar barely moves, your volume is too low; if it’s maxing out, it’s too loud and may distort.
Q: What does “Enable Original Sound” actually do?
Original Sound bypasses Zoom’s default audio filters and sends your mic signal with far less processing. This gives you a much clearer, more natural voice, almost like a studio recording. It’s especially useful for musicians, podcasters, and anyone using an external mic.
Q: Do I need to enable High Fidelity Music Mode and Stereo Audio?
These settings are optional. High Fidelity Music Mode increases audio bitrate for richer sound, while Stereo Audio lets you capture left/right sound separation. Both are excellent if you’re recording music or creating professional content, but for everyday calls, Original Sound alone is enough.