


.png)
If you’ve found yourself frustrated by the unexpected silence of your iPhone microphone, rest assured that you are not alone in facing this common challenge. The ability to communicate effectively through calls, voice memos, and other audio features is integral to the iPhone experience. Recognizing the importance of a fully functional microphone, this guide embarks on a journey to demystify and resolve the intricate issues that may plague your device.
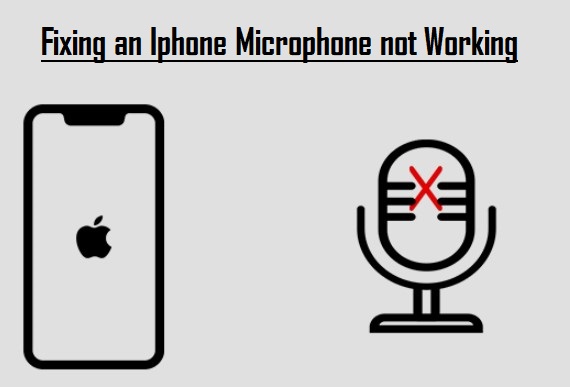
Whether it’s a hardware glitch causing a sudden hush or a subtle software hiccup affecting your voice clarity, we are here to delve into the depths of iPhone microphone troubleshooting. This comprehensive exploration will equip you with practical solutions, ensuring that your iPhone regains its voice, resonating seamlessly in your daily interactions.
Why Your iPhone Microphone Fails to Function
Several factors can contribute to the malfunction of your iPhone microphone. Potential issues include:
- Microphone obstruction
- Bluetooth connectivity problems
- Permissions related to specific apps
- Outdated iOS version
Typically, the specific problem becomes evident only when the corresponding solution is applied.
How to Fix an Iphone Microphone not Working?
Addressing the perplexing dilemma of a malfunctioning iPhone microphone requires a systematic approach and a keen understanding of potential underlying issues. Following steps will navigate you through the troubleshooting steps and practical solutions to restore seamless audio functionality.
- Reviewing Microphone Configurations
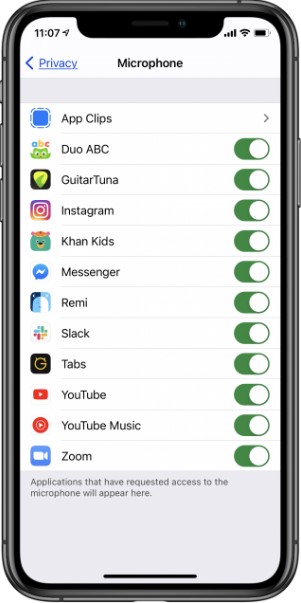
Checking your iPhone’s microphone settings is paramount to resolving audio challenges. Confirming proper app permissions and fine-tuning noise reduction settings can significantly contribute to a more seamless and enhanced audio experience on your device.
- Navigate to Settings > Privacy > Microphone to confirm that the necessary applications have been granted microphone access.
- Enhance audio clarity by turning off Phone Noise Cancellation. Access this feature through Settings > Accessibility > Audio/Visual for optimal results.

- Assessing Microphone Performance
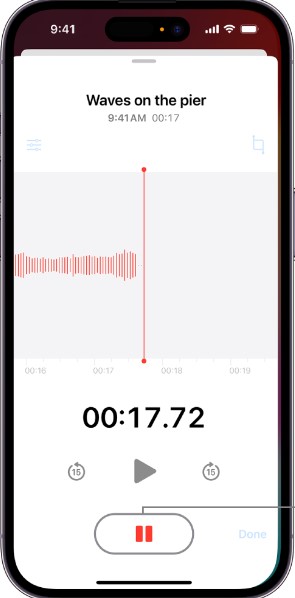
Thoroughly testing the functionality of your iPhone’s microphone through both the Voice Memos app and a live call scenario allows you to accurately assess its performance. These practical steps serve as a valuable diagnostic tool to ensure reliable audio output during various usage scenarios.
- Record a brief voice memo to gauge the microphone’s operational status. A clear recording suggests the microphone is functioning correctly.
- Place a call and activate the speakerphone option. If the recipient can hear you clearly, it indicates the primary microphone is in proper working order.
- Cleaning the Microphone
Prioritizing the cleanliness of your iPhone’s microphone ports is pivotal for sustained optimal performance. By diligently checking for blockages and employing a gentle cleaning approach, you contribute to the longevity of your device’s audio capabilities, promoting clear and uninterrupted communication.
- Examine the microphone ports meticulously to identify and remove any debris or dust that may be hindering functionality.
- Employ a soft, dry brush to delicately cleanse the microphone ports, ensuring thorough removal of any accumulated particles.
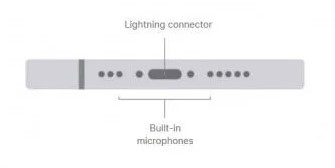
Identifying the microphone’s location on your iPhone is crucial for targeted cleaning. iPhones, dating back to at least the iPhone 8, generally have three microphones. The initial two are situated to the left and right of the lightning port at the bottom of the device, complementing both speakers and the bottom microphone. While the exact appearance may vary with different iPhone models, this approximate microphone placement remains consistent. Regular maintenance of your iPhone’s microphone port ensures optimal functionality and uninterrupted audio quality.
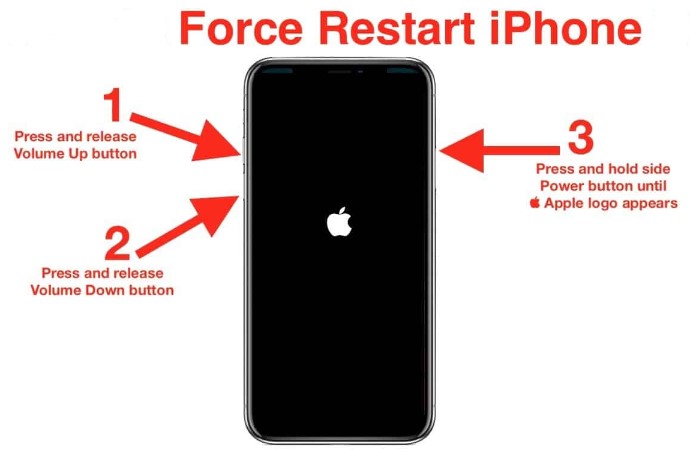
- Rebooting Your iPhone
The process of restarting your iPhone, whether through a soft reset or force restart, serves as a fundamental troubleshooting step. By gracefully powering off or compelling a restart, potential glitches and temporary issues are often resolved, allowing for a refreshed and more stable performance.
- Hold down the side button and either volume button until the slider materializes. Slide to power off, then restart by pressing the side button.
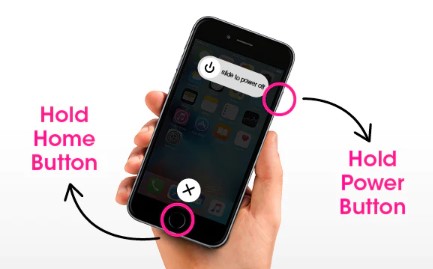
- While the specific button combination may differ based on the iPhone model, this method usually requires pressing a designated set of buttons to force a restart without impacting stored data.
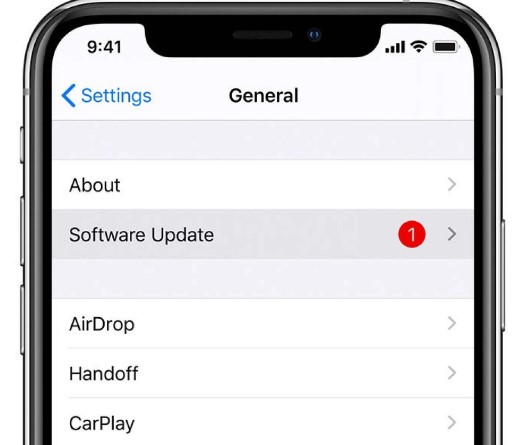
- Check for iOS Updates
Keeping your iOS up-to-date is integral to the optimal functioning of your iPhone. Regularly checking for and applying software updates guarantees access to the latest features, security enhancements, and bug fixes, ultimately contributing to a seamless and efficient user experience.
- Navigate to Settings > General > Software Update to ascertain the availability of any pending updates. Proceed to download and install the updates to ensure your iPhone’s operating system remains current.
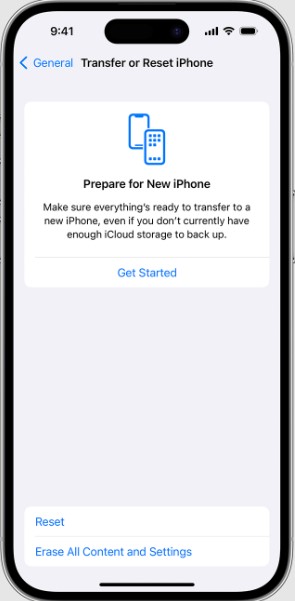
- System Reset
In certain scenarios, restoring default system settings can rectify persistent issues without compromising personal data. This non-destructive reset is a strategic approach to troubleshooting and optimizing your iPhone’s performance.
- Do the system reset by navigating to Settings > General > Reset > Reset All Settings. Do not forget to safeguard your data first.
- Seek Professional Assistance by Apple
In the event that the aforementioned measures prove ineffective, it suggests a potential hardware-related concern. For expert guidance and resolution, reach out to Apple Support or visit a nearby Apple Store. Trained professionals will provide comprehensive assistance, ensuring a thorough examination of your iPhone and the implementation of suitable solutions to address any underlying hardware issues.
Consider Having an External Mic for your iPhone
When it comes to elevating the audio quality of your iPhone recordings, considering an external microphone is a prudent choice. The Hollyland Lark M1, in particular, stands out as a noteworthy option for users seeking an exceptional audio experience.
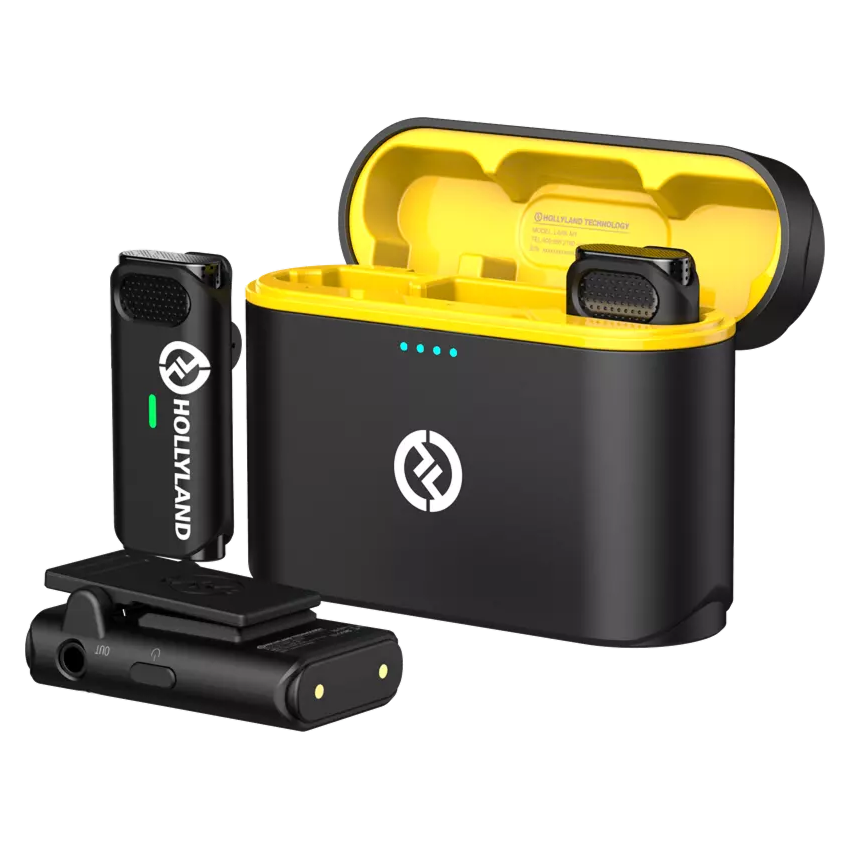

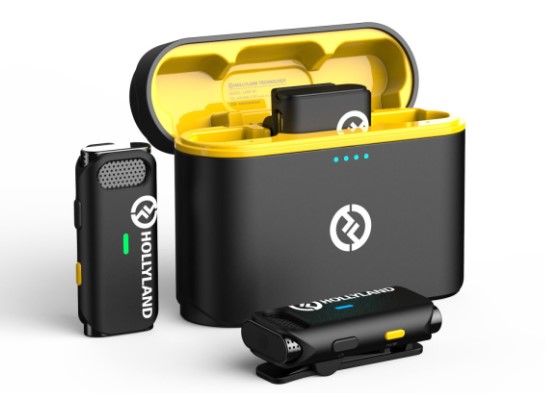
While the iPhone’s built-in microphone is capable, an external mic like the Hollyland Lark M1 provides an extra layer of audio excellence. Whether you’re conducting interviews, recording podcasts, or capturing memorable moments, investing in a high-quality external microphone enhances the overall audio experience, ensuring your recordings stand out with clarity and precision.
Conclusion
In navigating the complexities of iPhone microphone issues, this comprehensive guide has armed you with practical solutions to address a range of potential challenges. From inspecting settings and performing tests to cleaning the microphone ports and exploring advanced troubleshooting steps, each recommendation contributes to the restoration of optimal audio functionality on your iPhone.
Remember, the key to resolving microphone problems lies in a systematic and patient approach. By following the outlined steps, you not only troubleshoot the issues at hand but also gain a deeper understanding of your iPhone’s audio components.
As we strive to provide valuable insights, your feedback is invaluable. Have you found this guide helpful in resolving your iPhone microphone issues? Share your thoughts and experiences in the comments below. Your feedback not only helps us refine our content but also serves as a resource for fellow readers facing similar challenges.
Frequently Asked Questions
Why is my iPhone microphone not working during calls?
Several factors could contribute to your iPhone microphone not working during calls. It may be due to software glitches, app-specific issues, or even physical damage to the microphone. Following the troubleshooting steps outlined in this guide can help identify and resolve the specific cause of the problem.
Can a software update fix my iPhone microphone issues?
Yes, often a software update can address microphone issues on your iPhone. Apple frequently releases updates to address bugs and improve device performance, including microphone functionality. Ensure your iOS is up-to-date by going to Settings > General > Software Update and installing any available updates.
How can I tell if my iPhone microphone is physically damaged?
Physical damage to the iPhone microphone may not always be visible, but you can look for signs like distorted audio, muffled sounds, or complete silence during recordings or calls. If you suspect physical damage, it’s advisable to consult with Apple Support or visit an Apple Store for a professional assessment.
Is it safe to clean the iPhone microphone with compressed air?
It’s generally not recommended to use compressed air on the iPhone microphone. Compressed air can force debris deeper into the device, potentially causing more harm. Stick to gentle cleaning methods using a dry toothbrush or cotton swab to ensure safe maintenance.
Will resetting my iPhone settings delete my data?
Resetting your iPhone settings, as outlined in this guide, won’t erase your data. It only resets system settings, ensuring a fresh start for your device while preserving your personal information and apps.
How long does it take to get an iPhone microphone repaired at an Apple Store?
The repair duration at an Apple Store can vary depending on the extent of the issue and the store’s current workload. Apple Support can provide more accurate information based on your specific case.
Can third-party apps cause my iPhone microphone to stop working?
Yes, certain third-party apps may interfere with the iPhone microphone. Ensure that the apps you use have the necessary microphone permissions, and consider uninstalling or updating any apps that may be causing conflicts.
What are the signs of a failing iPhone microphone?
Signs of a failing iPhone microphone include distorted or muffled audio during calls or recordings, intermittent microphone functionality, or complete silence during usage. If you notice these signs, it’s crucial to explore the troubleshooting steps mentioned in this guide.
How do I improve microphone sensitivity on my iPhone?
To enhance microphone sensitivity, ensure that the microphone ports are clean and free of debris. Additionally, you can explore third-party microphone accessories or external microphones, like the Hollyland Lark M1, for improved audio quality.
Are there any DIY fixes for a non-working iPhone microphone?
Yes, this guide provides several DIY fixes for a non-working iPhone microphone, ranging from checking settings and testing the microphone to cleaning the ports and performing a system reset. These steps are designed to address common issues and restore your iPhone’s microphone functionality.
