.png)
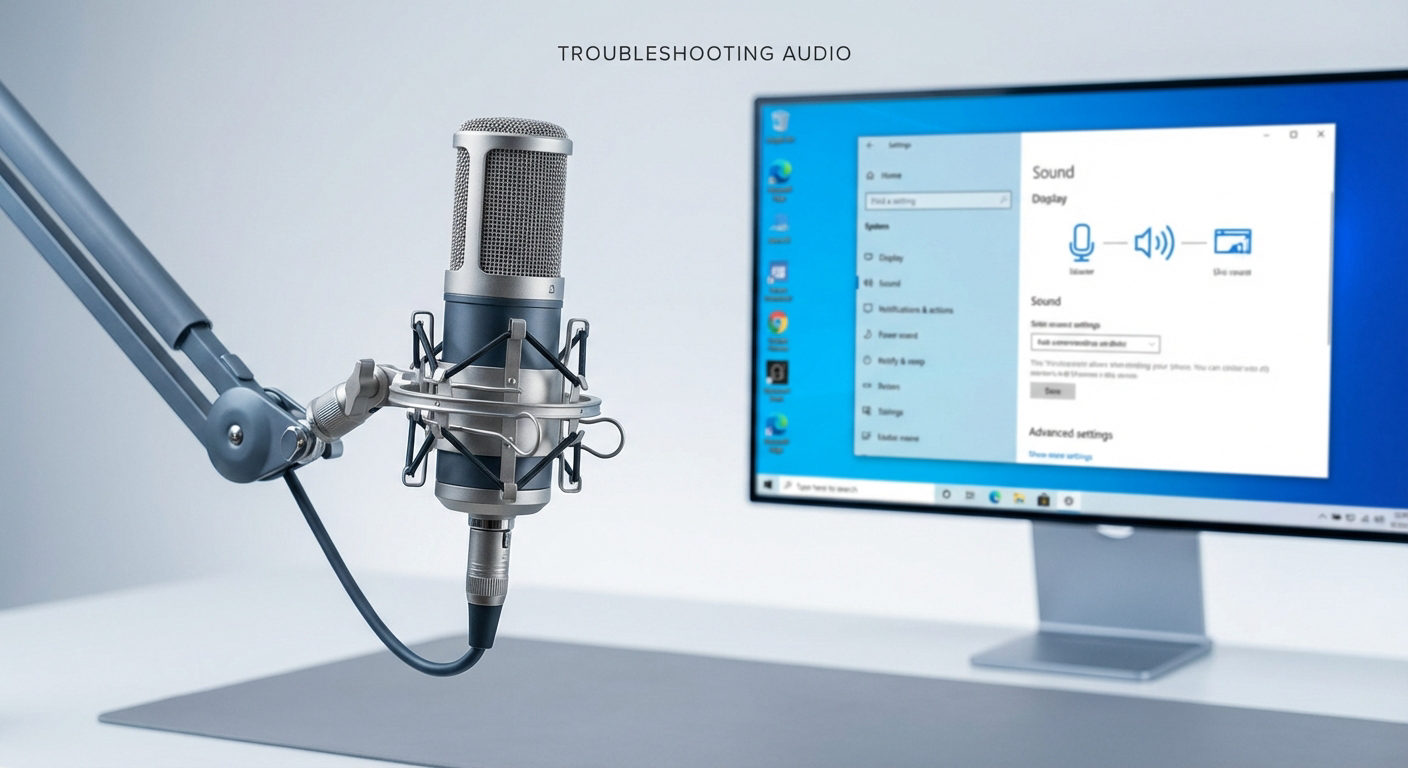
The microphone is crucial for professional communications during recordings or video calls in today’s digitally connected world. However, with Windows and many updates, things go wrong when your mic stops working on your computer. Therefore, understanding the reasons for this and using potential solutions will restore functionality.
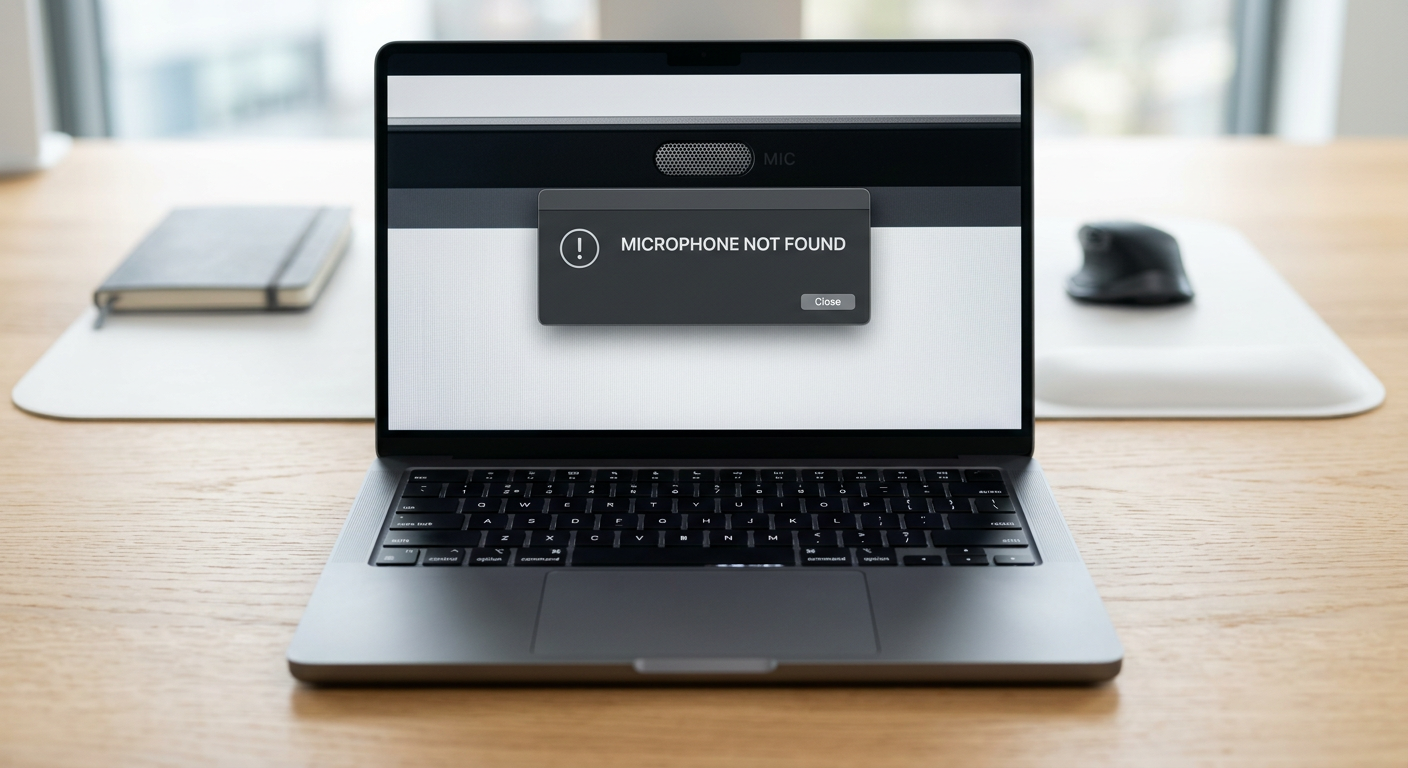
Why is the microphone not working on Windows 10/11?
Seeing your microphone not working is frustrating, and understanding its reasons is the first step in troubleshooting the issue. Several reasons exist, from improper settings to outdated drivers or software, for the mic to stop working. Here are some of the most common causes:
- Privacy Settings Issues
The privacy settings of Windows 10 are strict and prevent the apps or websites from accessing or using the microphone. Also, these settings allow the app to use the mic, and incorrect configuration will stop the mic from working efficiently.
Moreover, some apps require permission to use a mic, which will stop working if the “permission” is not granted.
- Outdated or Corrupted Drivers
Drivers are essential for the smooth and efficient working of the system, but corrupted or outdated drivers lead to failure. Also, if the wrong microphone drivers are installed, notably different from Windows 10, the mic will not work. Furthermore, ensure the drivers are correctly installed and are compatible with the device.
- Poor Quality Hardware
The issue arises when using a poor-quality microphone with physical damage and does not work well with the system. Besides this, using incompatible ports will result in connectivity issues, and your device will not be able to understand the microphone.
- Audio Input Muted
If audio input is muted on your computer or external microphone, no audio can be transmitted from the mic. The muted mic on Windows occurs because of improper settings or conflict between third-party apps and services.
- Conflict between external and Internal Microphone
Sometimes, Windows 10 cannot automatically switch between the audio input source after connecting the external mic. It happens when the drivers are not fully compatible, and the device switches between mics unpredictably.
Fixes to microphone not working on Windows 10/11
The seamless microphone connectivity is essential to communicate effectively during video calls or recordings. However, because of the abovementioned reasons, it’s common for the mic to stop working on Windows 10. So, follow this guide to troubleshoot and resolve the issues:
Check Microphone Hardware
Sometimes, using advanced microphones will stop working on your system because of hardware compatibility issues. So, hereunder, a step-by-step guide will provide
Physical Connection
- Ensure the microphone is connected correctly to your PC and there are no signs of physical damage.
- For USB mics, ensure they are correctly attached to the USB ports, or try plugging them into different ports.
- Also, ensure that the wireless mics are correctly charged and placed at an appropriate distance.
Ports Compatibility
- According to the type of the microphone, USB ports are compatible with 2.0 and 3.0 USB devices.
- The 3.5mm jack has built-in audio and a mic and is compatible with the same headset port.
- Some older computers have separate ports with pink for mic and green or red for audio.
Testing on other device
After properly connecting the USB microphone, plug it into a different USB port if it’s not working. Also, connect the mic to a different device or computer, and if it starts working, there’s an issue with the ports. By the way, you can also test another microphone, Hollyland Lark Max is a great choice.

Hollyland LARK MAX - Professional Wireless Microphone
A professional wireless microphone system featuring studio-quality audio with advanced noise cancellation.
Key Features: Studio-Quality Audio | Magnetic Attachment | 8GB Internal Recording
Enable the Microphone in Windows Settings/check mic access.
Windows 10 has built-in settings that prevent the apps from accessing the microphone. So, the mic will stop working on different apps, and enabling applications to use it is essential. Also, in case you have accidentally removed the permission, allow the mic by following these steps:
Step 1- Open Privacy Settings
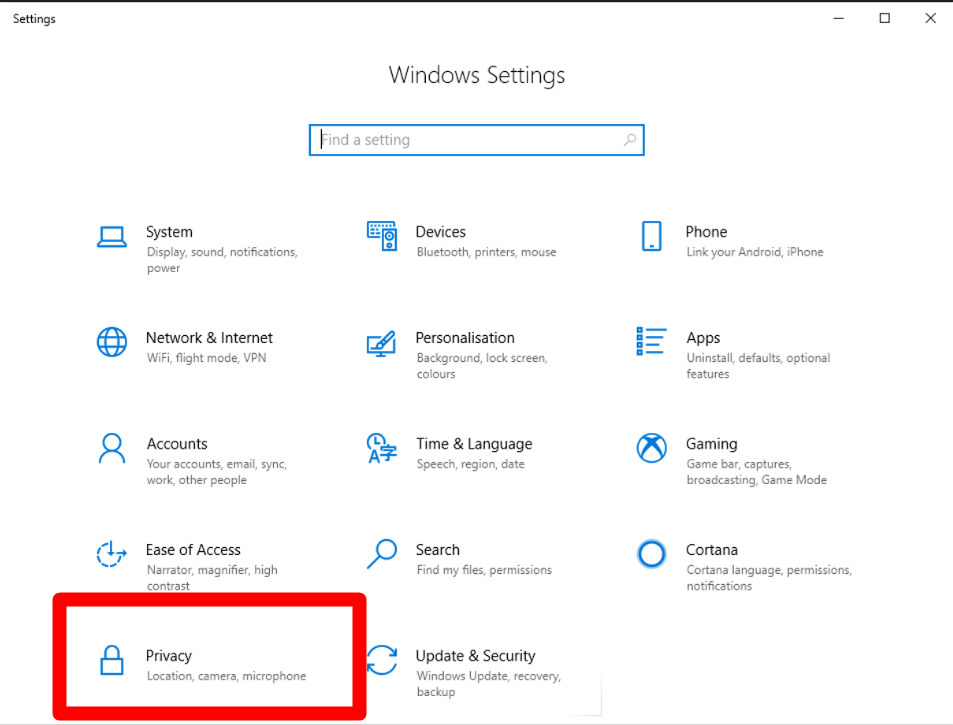
- Click on the “Windows” icon from the bottom-left corner of the taskbar and select “Settings.”
- Then click on “Privacy” to open the mic settings.
Step 2- Allow microphone access
- From the left menu bar, click on “microphone.”
- If it shows “Microphone access for this device is off,” click the “Change” button.
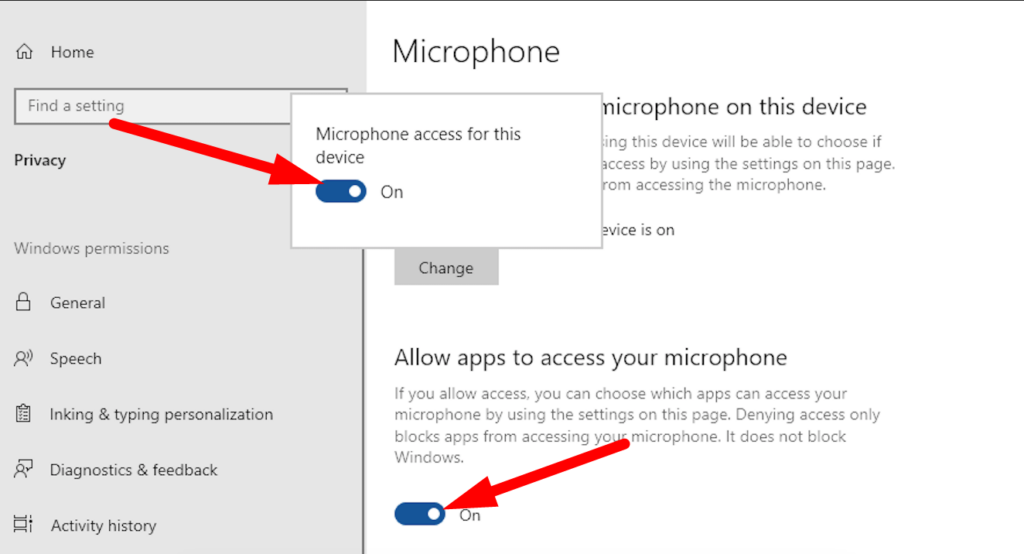
Step 3- Microphone access
- Turn the toggle to allow the “Microphone access to this device.”
- Also, if “Allow apps to access the microphone” is off, turn on the toggle.
- Scroll down to check the apps and ensure that the microphone access is enabled for the ones you are trying to use.
Note: Only newly installed apps will show under the list because default apps always have access to your microphone.
Set the Microphone as the Default
Your PC has different microphone inputs, so setting the mic as the default is crucial to ensure it works smoothly. So, Windows provides a feature to choose a default recording by the following process:
Step 1- Open Control Panel
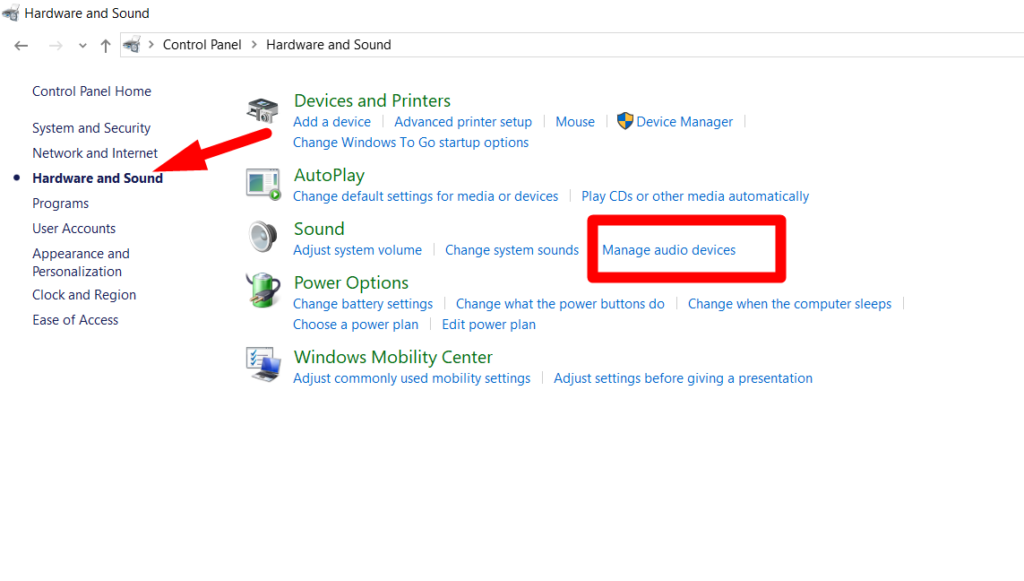
- From the taskbar, search “control panel” or press right-click on the “sounds icon” and select “sound.”
- Then select “Hardware and Sound” and click “Manage Audio Devices” under the sound section.
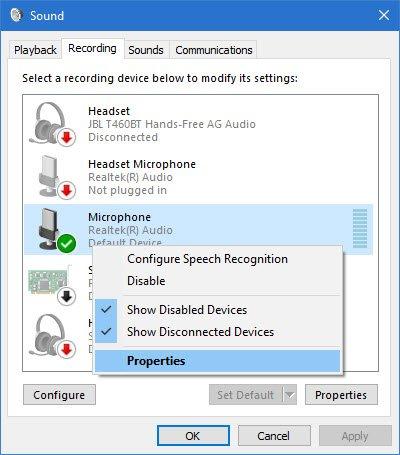
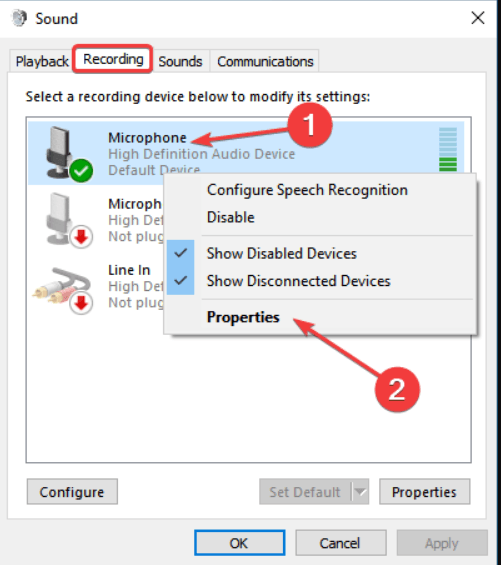
Step 2- Recording tab
- Go to the “Recording” tab for a list of your recording devices.
- First, right-click an empty area to check “Show Disabled Devices” and “Show Disconnected Devices.”
Step 3- Choose the default microphone
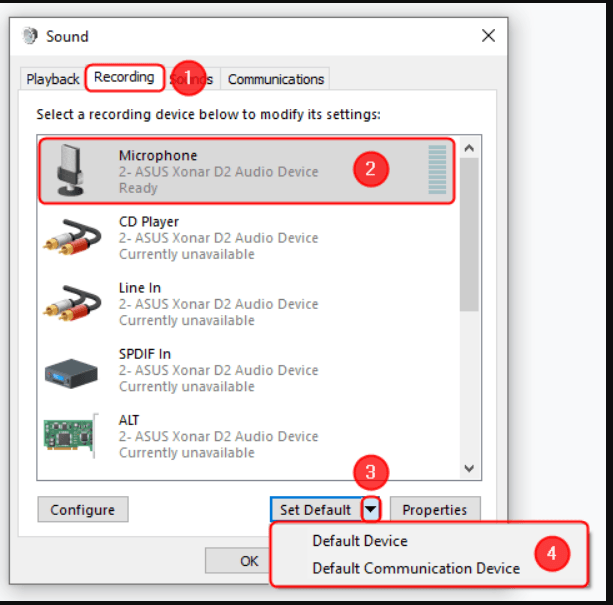
- Find your microphone and ensure that it’s enabled. Then, right-click on the microphone and click the “Set Default” button.
- Click “OK” to save your current settings.
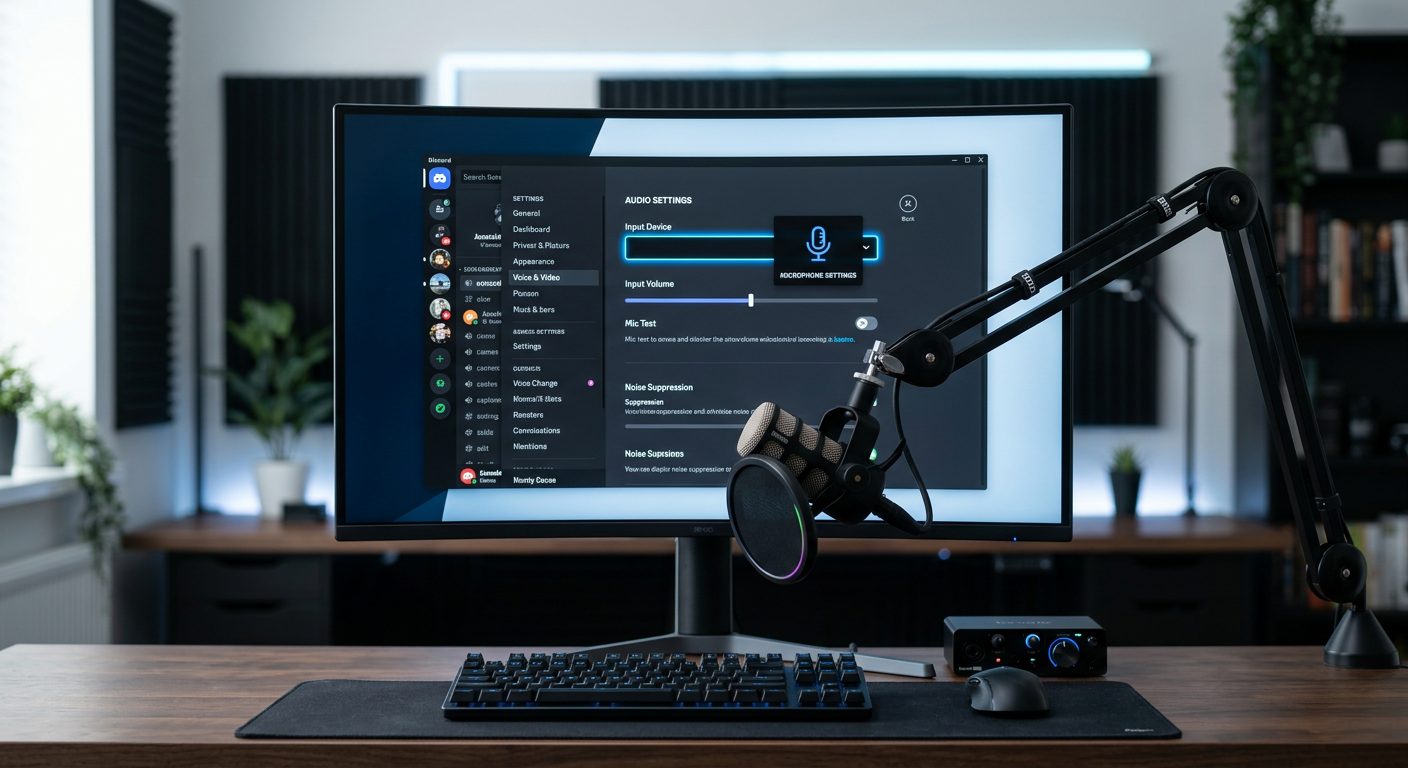
Note: Sometimes, applications do not use the default microphone you select. So, opening the particular app and choosing the mic as the default audio input is essential. For example, Skype lets you select the microphone as the “default communication device” by the following process:
Open the Skype settings and click on the “Audio and Video.” Then click “Microphone” to choose the desired mic as the default communication device.
Update the drivers
After connecting the microphone, Windows will not get the latest updates if you have disabled automatic driver installation. So, to ensure your drivers are updated, follow the process:
Step 1- Device Manager
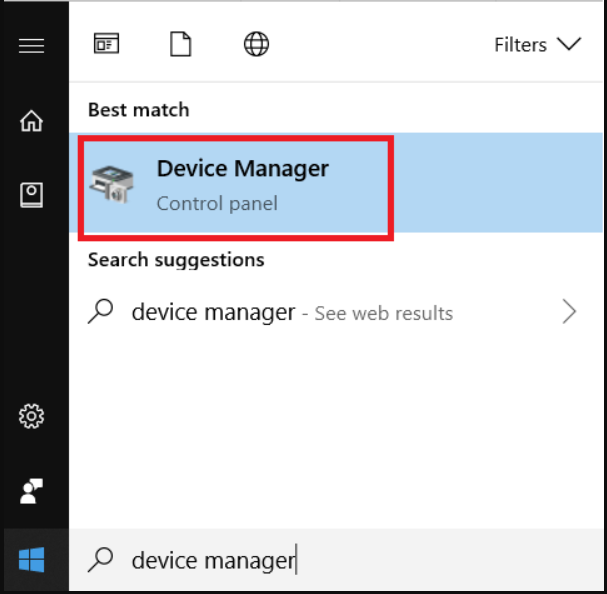
- Right-click the Windows icon, press the “Windows + X” key, and click “Device Manager.”
Step 2- Audio Inputs and Outputs
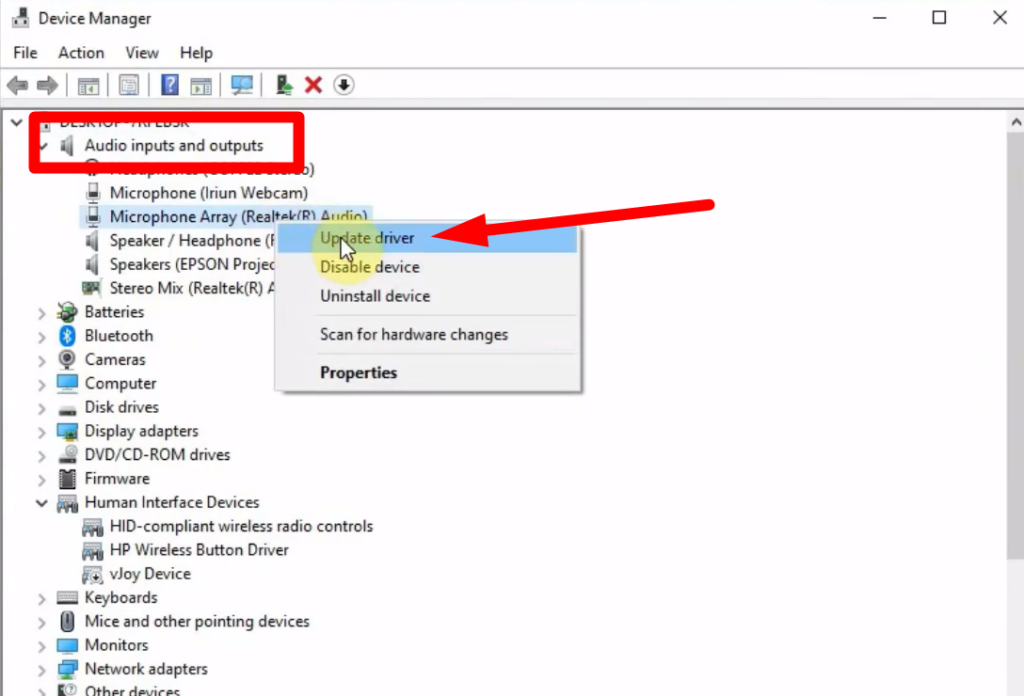
- Expand the “Audio Inputs and Outputs” section, and a list of available devices will appear.
- Locate your microphone. The yellow exclamation mark beside it means drivers need to be updated.
Step 3- Updating the Drivers
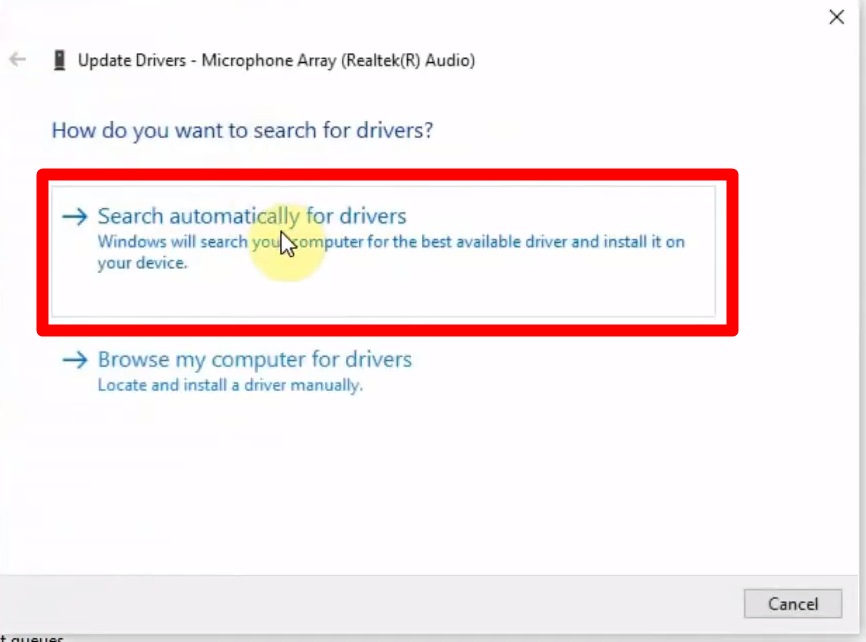
- Right-click on the microphone and select “Update Driver.”
- Click “Search Automatically for Drivers,” and the device will automatically install the updated drivers.
- However, if you have already installed the drivers from the websites, click “Browse my computer for drivers.
After completing the drivers’ installation process, restart your computer and check if the microphone starts working.
Adjust Microphone Levels
The microphone will stop working if the volume is too low, so follow the step-by-step process to increase the mic volume.
Step 1- Sound Settings
- Search for “control panel” in the taskbar or right-click on the “sounds” icon, then select “Sounds.”
Step 2- Microphone Properties
- Click in the “Recording” tab, and if the mute button displays on the microphone, then click to turn it off.
- Right-click on the microphone and select “Properties.”
Step 3- Adjust the Audio Levels
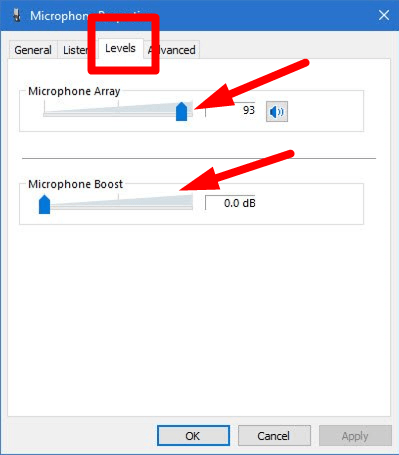
- Go to the “Levels” tab and use the slider to adjust the “Microphone” and “Microphone Boost” as needed.
- However, it is recommended that the microphone level be above 50 and Boost be adjusted to +20.0 db.
- Click “OK” to save the changes.
After that, disconnect and reconnect your microphone and test your microphone to see if the settings work. If it’s not working, you can change the volume by repeating and increasing the process.
Disable App-Exclusive Control
App-Exclusive settings allow the apps to control the device and change the system according to the requirements. So, follow the steps to turn off the app-exclusive control:
Step 1- Open Sound Settings
- Right-click on the “Sounds icon” from the taskbar and click “Sounds.”
- Go to the “Recording” tab and search for the default microphone.
Step 2- Microphone Properties
- Then right-click on the mic and select “Properties.”
Step 3- Disable exclusive control
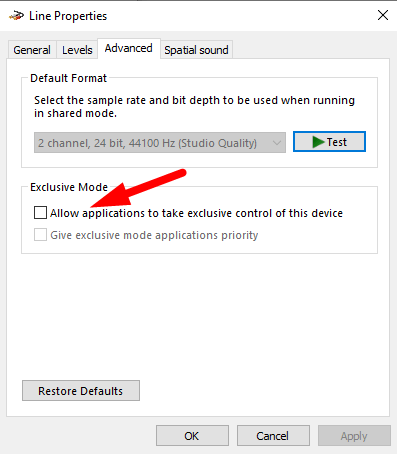
- Select the “Advanced” tab and, under the “Exclusive mode” section, ensure that “Allow applications to take exclusive control” is unchecked.
- Click “Apply” and select “OK” to save the changes.
Furthermore, if a particular app isn’t detecting the microphone, then close the apps running simultaneously to avoid the issue.
Troubleshoot Sound Problems
Windows has a built-in audio troubleshooting tool that automatically identifies and resolves the issues. Follow the steps to run the Windows Troubleshooter effectively:
Step 1- Troubleshooting Settings
- Search for “troubleshoot” from the Windows taskbar and click “troubleshoot settings.”
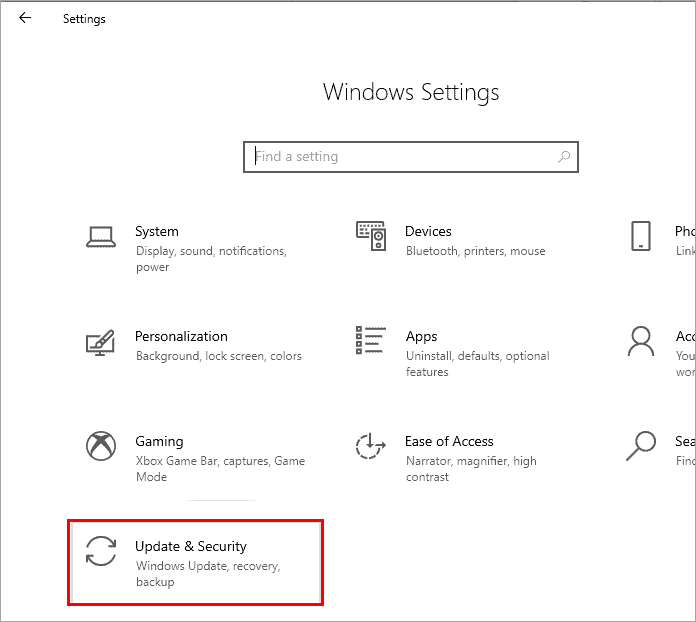
- Or go to “Windows settings,” then select “Update and Security” and click troubleshoot.
Step 2- Run the troubleshooter
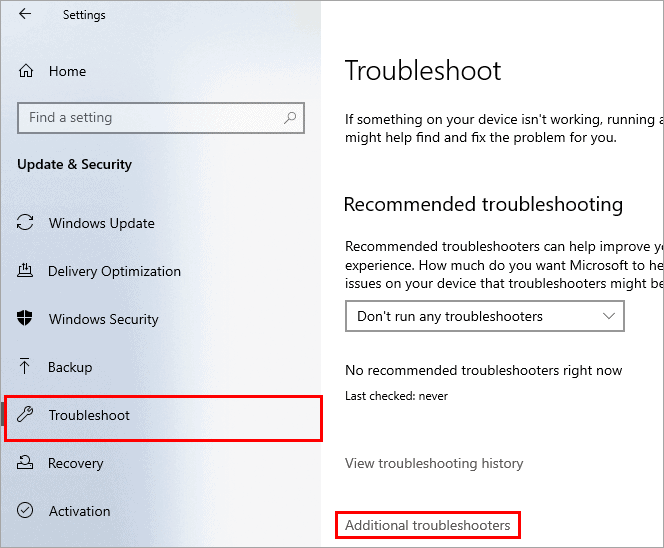
- Then select “Additional Troubleshooters,” and under the “Get up and Running” section, click “Playing Audio.”
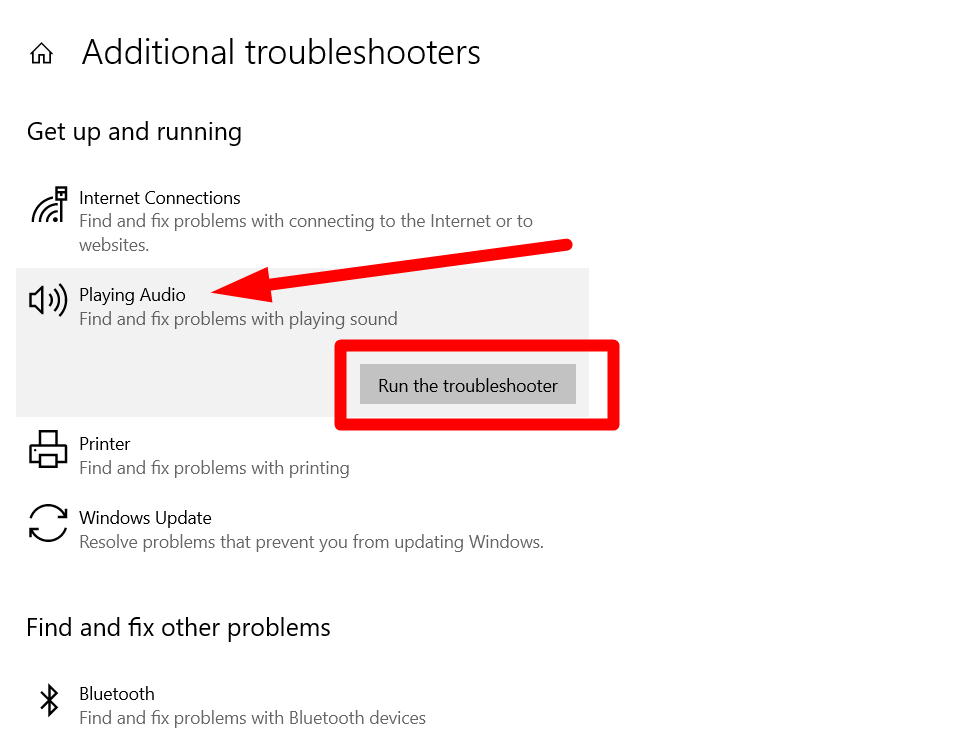
- Click “Run the Troubleshooter” and select the microphone device you want to run troubleshooting.
Furthermore, running the “Speech Troubleshooting” diagnoses the connection between the mic and the computer. It detects and solves hidden issues if other troubleshooting fails to detect the problems.
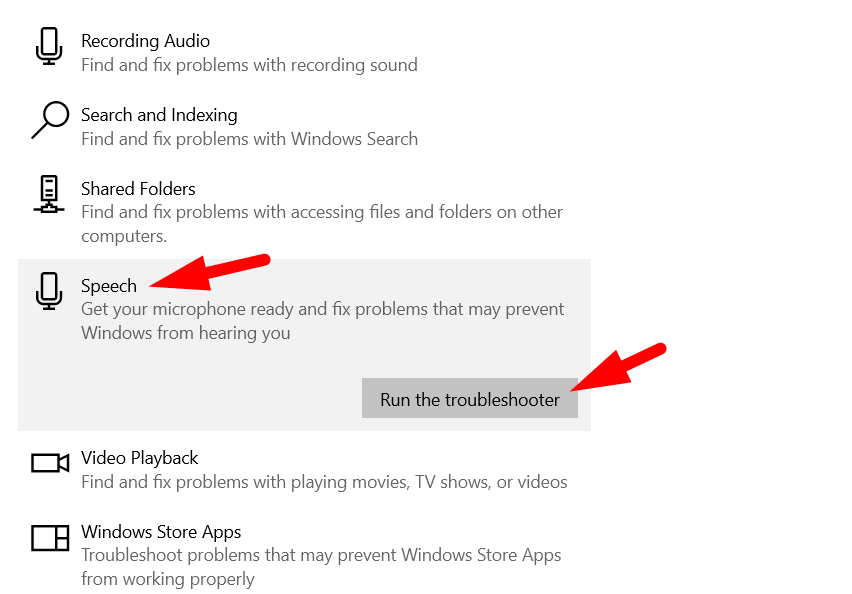
- After selecting “Additional troubleshooters,” scroll down and click on “Speech” under the “Find and Fix other problems” section.
- Then click “Run the Troubleshoot” and follow the instructions to start the process.
Check for Windows Updates
Updating Windows updates the operating system and drivers and contains the fixes for numerous errors. So, ensure that Windows is updated to the latest version by following the process:
Step 1- Update and Security
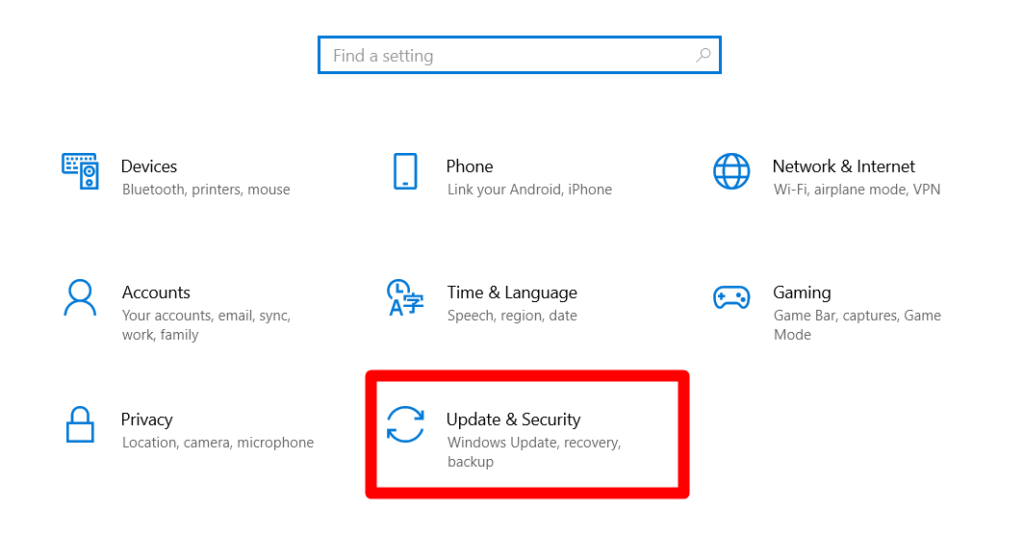
- Click on the “Windows” icon from the search bar and select “Settings.”
- Then click “Update and Security” and tap “Windows Updates.”
Step 2- Check Updates

- The yellow exclamation mark indicates updates are available, or you can click on “Check for Updates.”
Step 3- Install the Updates
- If any updates are available, it will show you and a simple click will start the download.
- After installation, restart your computer and check if the microphone begins working.
Disable Audio Enhancements
Although audio enhancements provide an immersive sound experience, this can also lead to performance and compatibility issues. So, follow the process to turn off the Enhancements and fix the microphone working on Windows:
Step 1- Sound settings
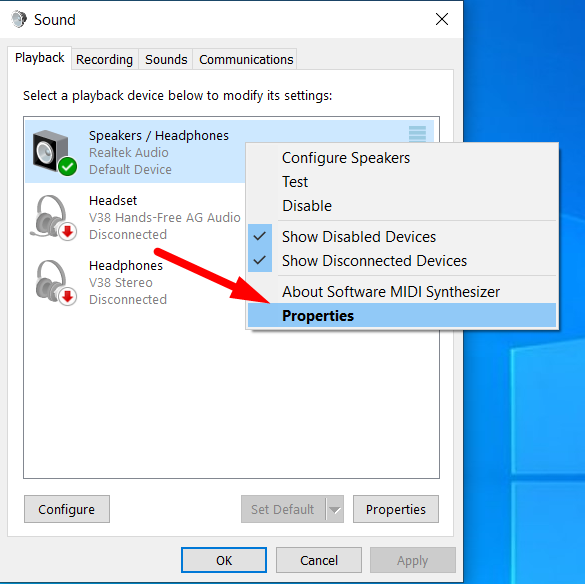
- Right-click on the “Sounds” icon in the taskbar or search for “Control Panel” and select “Sounds.”
- Go to the “Playback” tab, right-click on the default microphone you want to troubleshoot, then select “Properties.”
Step 2- Disable enhancements
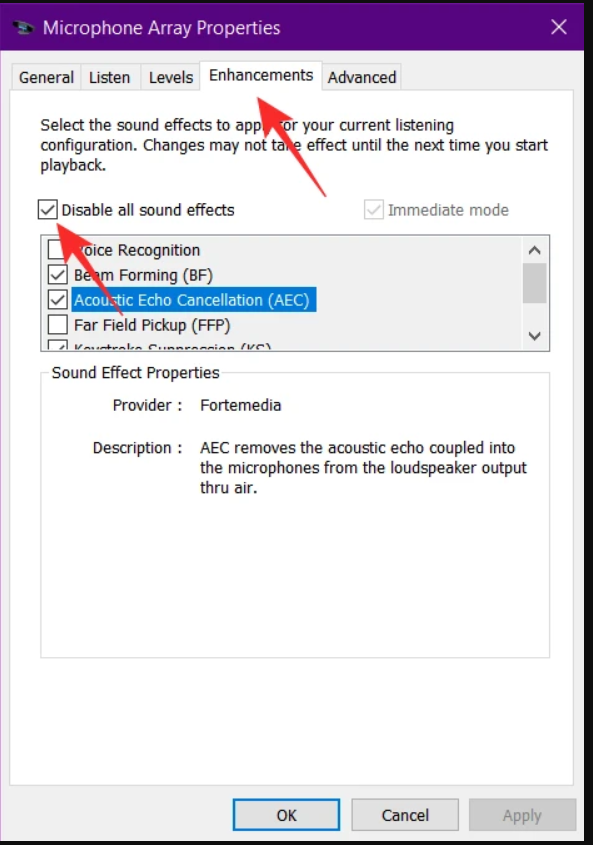
- Open the “Enhancements” tab and select “Disable all sound effects” box.
- Click “OK” to save the changes.
- Open the “Advanced” tab if the enhancements tab is missing and uncheck “Enable audio enhancements.”
Note: Sometimes, the “enhancement tab” is missing due to improper mic connection or type of the mic. Also, sometimes outdated drivers are the reasons for missing enhancements, and updating the drivers will solve the issue.
Restore Your System
If microphone issues arise after updating the system, then consider restoring your system to when the mic is working correctly. Here’s the step-by-step guide to restore if none of the above solutions work.
Step 1- Open System Properties
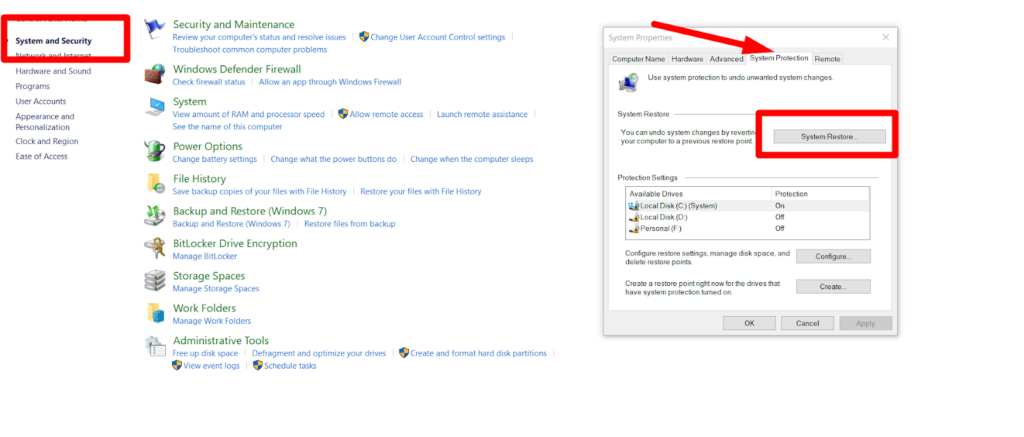
- Search for “Create a restore point” in the Windows search bar or open “Control Panel” and select “restore point” under “system and security.”
Step 2- System Restore
- Go to the “System Protection” tab and click the “System Restore” button.
- Follow the on-screen instructions and confirm your system restore selection.
- Your computer will restart and restore your system to the selected restore point.
System restoration will not affect personal files, but it is recommended that a system backup is performed to avoid data loss.
FAQs
How do I enable microphone access on Windows 10?
- Step 1- Click the “Windows” icon from the taskbar and select “Settings.”
- Step 2- Select “Privacy” and click “Microphone” from the left menu.
- Step 3- Click on the “Change” and turn the toggle to allow the “Microphone access for this device.”
- Step 4- Scroll down and turn the toggle to enable “apps to access your microphone” or enable the app access from the apps list.
Why is my microphone not showing up in Device Manager?
Sometimes, the microphone will not show in the device manager because of corrupted, incompatible, or outdated drivers. So, update the drivers to solve the issue and re-enable the microphone.
How can I update my microphone drivers in Windows 10?
- Step 1- Right-click the “Windows” icon from the taskbar and click “Device Manager.”
- Step 2- Select “Audio Inputs and Outputs” and right-click on your microphone.
- Step 3- Click “Update Driver” and select “Search automatically for updated drivers.”
- Step 4- After the installation, restart your computer and use the microphone.
What should I do if my microphone levels are grayed out?
You cannot adjust settings or volumes through system controls if microphone levels are greyed out on Windows. Here are some methods to troubleshoot the issue:
- Check the device manager and update or reinstall the drivers.
- Uninstall third-party apps
- Ensure the correct device is selected from the audio settings
- Run the audio troubleshooter
How do I reset my microphone settings on Windows 10?
- Step 1- Right-click on the sounds icon from the taskbar and click on “Sounds.”
- Step 2- Go to the “Recording” tab and right-click on your default microphone.
- Step 3- Select “properties” and go to the “Advanced” tab.
- Step 4- Click “Restore Defaults” and select “OK” to apply and save the changes.
Can Windows 10 updates cause microphone issues?
Yes, updates cause microphone issues. While updates are intended to enhance performance, they cause problems because of corrupted or outdated drivers, software errors, or incorrect mic settings. Here are quick fixes to solve this problem:
- Allow apps access to the microphone
- Run audio troubleshooting
- Update or reinstall the drivers
- Uncheck “allows apps exclusive control of this device.”
How do I test my microphone on Windows 10?
- Step 1- Click the “Windows” icon and select “Settings.”
- Step 2- Go to “System” and choose “Sound” from the left window menu.
- Step 3- Under the “Input” section, select the microphone you want to test.
- Step 4- Speak in the microphone and check the “blue bar” movement rises and falls.
What are audio enhancements, and should I disable them for my microphone?
In general, audio enhancements clarify audio recordings using non-destructive techniques to improve the listening experience. Despite its significance, it provides poor audio quality and leads to microphone not working issues. Therefore, turning off the audio enhancements is crucial to solve audio or microphone issues.
How can I troubleshoot microphone echo issues on Windows 10?
Microphone echo happens if the microphone and speakers are placed close to each other or if there are improper audio settings. Here are the methods to troubleshoot the issue:
- Place the microphone away from the speakers
- Disable “Microphone Boost” from microphone properties
- Run the Audio troubleshooter
- Turn off the “Listen to this device” option
- Update or reinstall microphone drivers
Is there a way to enhance microphone quality on Windows 10?
Yes, along with Windows built-in enhancements, there are several ways to enhance the microphone quality. Here are some methods:
- Increase Microphone Levels
- Enable Spatial Sound
- Reinstall or update audio drivers
- Activate Mono Audio
- Adjust microphone gain