.png)
Going live on an iPad sounds easy, but in practice, it often isn’t. Stream buttons are hidden, follower thresholds block access, and technical setups can feel overwhelming. For many users, what should be quick and simple turns into trial and error.
If you want a pro-level live setup that runs nonstop, the Hollyland VenusLiv Air is a strong option. With 24/7 live streaming and 4K 30fps clarity, it’s built for creators who need reliability and professional visuals.
For everyone else, this guide breaks down the most reliable methods, whether you’re using iPad streaming apps, connecting to desktop software, or mirroring wirelessly, so you can go live with confidence.
Method #1 – Stream Directly From the iPad App
This method includes simply opening the platform’s app and going live. Use it for quick chat, casual streams, or when you don’t need overlays, multi-cam, or desktop encoders.
Let’s take a look at some applications to stream on iPad.
Twitch on iPad
- Install Twitch app → Download from the App Store and sign in.

- Start a live stream → Tap the camera / + icon or go to your profile → Go Live.

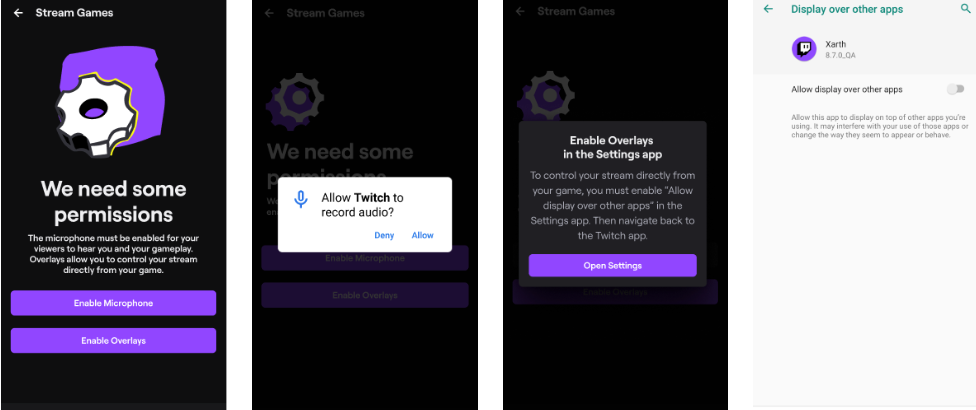
- Choose content type → Select Stream Games or Stream IRL.

- If you choose to stream games, next, search for your game and click on it.
- Add a title, adjust audio levels. Tap the Record button.

- Scroll down and select Twitch → stream starts.

- End the stream → Tap Stop Recording.

Note: First-time users must grant mic, camera, and overlay permissions.
YouTube Live on iPad
You can live stream on your iPad through YouTube. To get started, you must have:
- At least 50 subscribers
- No live streaming restrictions in the past 90 days
- Verified channel
- Live streaming turned on (may take up to 24 hours to activate)
- iOS 8+ device
- Open YouTube app → tap Create ( + ) → Go Live.

- Choose to stream Right Now or for a Later Date.

- Right Now: Select Built-in Webcam if you don’t need extra setup or overlays.
- Later Date: Schedule your stream for the future.

- Check the required box for age-restricted content.

- Complete title/description, and category, then Go Live.

Facebook Live on iPad
- Install Facebook app → Download from the App Store.

- Click on the ‘What’s On Your Mind?’ option at the top.

- Select the Live Video option.

- Switch your camera with the top right button.
- Next, add the description, → Go Live button.

Method #2 – Use a Dedicated iPad Streaming App
These apps turn your iPad into a professional encoder (RTMP/SRT) with overlays, scenes, and multi-source options.
Larix Broadcaster for iPad (free RTMP/SRT)
Larix supports SRT, RTMP, RTMPS, and background streaming. Look at how we can use it for the Dacast stream on iPad.
- Install Larix Broadcaster app from Apple store.

- Open the Larix app.

- Look for the Settings icon.

- Next, click on Connections.

- Click on + icon in top right corner.

- Move to Dacast Dashboard → Live Streams in left corner.

- To add a new channel → Create Live Stream button in the top right corner.

- Add the title and source region → Create.

- Click on the Encoder setup button.

- This window contains the credentials to log in to the Larix app.

- Copy or export the Stream URL and Stream Name.

- Get back to the Larix app → Paste the Stream URL.

- Add a forward slash ‘/’ after the stream URL.

- Paste the Stream Name after the forward slash.’

- Click on Target Type.

- Choose Limelight Networks as the default CDM.

- Add the Login and Password from the Dacast Encoder.

- Click Save → get back to Connections.

- Ensure that the Dacast connection is selected→ return to Settings.

- Select Capture and encoding.

- Allow microphone and camera access.

- Return to the Larix app, press the Record button.

- Return to Dacast and check Live Stream Online is enabled.

- To check if you are live, click Preview or copy share link and paste it in a browser.

Switcher Studio (for Multi-cam iPad studio)
Install Switcher Studio on iPad(s). One device acts as the director, and others act as the cameras.
- Download and log in to Switcher on all your devices.

- Click on Go Live from the left menu.

- Select your preferred layout → Enter Studio.

- See the Preview of your Live from the same iPad.

- Now, to add another camera angle.
- Click on the Camera icon in the bottom bar → select one of your connected devices.

- See the preview of your second cam video now.

- Also, you can see both the previews from your multicam setups.

Now we are all set to go live on different platforms (YouTube, Facebook, Twitch, and RTMP).
- Click the Broadcast icon at the bottom.

- Click on New Event → select preferred option. Click on Create New Event.

- Select YouTube → click Next.

- Log in to YouTube.

- Add Title, Description, select the Stream quality → Go Live button.

Method #3 – Use iPad as a Camera for Desktop Encoders
This works only on iPads and iPhones. It is the most flexible; you capture the iPad feed on a computer and stream with full desktop power (overlays, chat, multi-scene, recording).
Option A – HDMI/USB/CType Capture with Camo/OBS/Streamlabs
You will need an iPad, a C to C type cable, and a PC (Windows or Mac).

- Download the Camo app from Apple store on your iPad.

- Open the app → Continue.

- Give all the necessary permissions → Continue.

- Next, click on Get Started and then turn to your PC.
- Open your browser and search for reincubate.com/camo/.
- Download for Windows directly. For Mac(click on other platforms).

- Once the download is complete, install the software.

- Open the software and click Continue.

- Continue to create your account or Skip for now.

- By default, it uses the camera of your PC.

- Now connect the C to C type Cable to your iPad and

- In your PC, click on Device, and you will find your iPad, click on it.

- Optimize your Audio and Video settings.

- Now to test the stream, open Zoom→ Stop Video.

- Select the Camo option.

- The Zoom camera will switch to your iPad.
Option B – QuickTime Player on iPad
- Connect the iPad to the Mac with a USB-C/ USB-C/Lightning Cable.
- Search for QuickTime on your Mac and tap on it.

- You will see your iPad is connected, click to Continue.

- Open QuickTime Player → File → New Movie Recording.

- You will see your iPad screen on Mac. Click on the Record button → iPad (serial number).

- Now, we open the Zoom meetings → Share Screen.

- Select QuickTime player.

- Now you can use your iPad to stream.

Method #4 – Wirelessly Mirror iPad to Mac/PC (AirPlay, AirServer, Reflector, NDI)
Wireless mirroring is convenient for untethered setups. Use this when you want a cable-free workflow.
Let us see how we can use AirServer to stream through OBS on iPad.
- Install AirServer or Reflector on your Mac/PC.

- On iPad, open Control Center → Screen Mirroring.

- Choose the computer running AirServer/Reflector.
- In OBS, click on + icon below and select Display Capture (AirServer window) as instructed by the mirroring app to stream.

Conclusion
Going live from an iPad no longer has to feel complicated. Choose the method that suits your requirements best. Before you go live, test your setup privately, check audio and internet stability, and choose the method that best matches your content style and streaming goals.
FAQs
Q. Can I stream console games from my iPad?
A. If you’re streaming games running on the iPad itself, use the platform app or an RTMP app (Larix/Streamlabs).
Q. Why does my mirrored iPad lag when I stream wirelessly?
A. Wireless mirror lag is usually Wi-Fi congestion, a weak signal, or router limitations. Move devices closer to the router, use 5GHz, reduce interference, or switch to wired/NDI for lower latency.Q. How do I show taps or pointer actions on the iPad during tutorials?
A. iPad doesn’t natively show taps. Use a Bluetooth mouse to display a pointer, enable screen recording options that show touches, or add on-screen highlights in your encoder software during post or live with overlays.