.png)
Keeping important audio files, like interviews, lectures, or voice memos, on a single device isn’t always the safest choice. A lost phone, failed update, or accidental deletion could wipe them out instantly.
That’s why it’s a smart move to transfer your recordings to a computer, where you can organise, edit, and back them up with more control. Below, you’ll find the easiest and most reliable ways to move audio recordings from your iPhone to your computer.
Method 1: Transfer Audio Using iCloud
If you want a simple, wireless way to access your recordings from both your phone and your computer, iCloud is a great option. Since it’s built into every iPhone, there’s no need to download anything extra; just sign in with your Apple ID on both devices.
Once iCloud is set up, your voice memos can sync automatically, letting you download them from any computer using a web browser. Follow these steps:
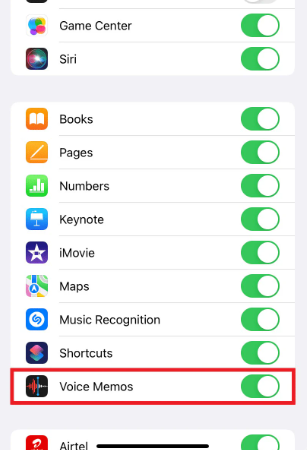
- On your iPhone, go to Settings and tap your name at the top to open your Apple ID settings.

- Tap iCloud from the list of options.

- Scroll down and turn on the toggle next to Voice Memos
- On your computer, open a browser and go to iCloud.com, then log in with your Apple ID.
- Open the Voice Memos app in iCloud, select the recordings you want, and download them to your computer.

Make sure you’re connected to a stable internet connection so the sync and downloads aren’t interrupted.
Method 2: Using Google Drive
If you have a Google account, you also have 15GB of free cloud storage through Google Drive. Google Drive works a lot like iCloud. You upload the audio file from your iPhone, then log in to your Drive account on a computer to download it. Here’s the step-by-step:
- Make sure you’re signed into your Google Drive account on your iPhone.
- Open the Voice Memos app, tap on the recording you want to send, then tap the More icon (three dots) and select Share.
- Choose Google Drive from the sharing options.

- Pick the folder you want to upload to, then tap Upload.
- On your computer, go to drive.google.com and log in with the same Google account.
- Find the uploaded recording, right-click on it, and select Download.

Since Google Drive stores your files in full quality, starting with clean audio is key. A mic like the Hollyland LARK MAX 2 reduces background noise with AI-powered noise cancellation. It captures 32-bit float audio at 48 kHz, so even simple voice memos stay crisp when downloaded later.

Hollyland LARK MAX 2 - Premium Wireless Microphone System
A premium wireless microphone for videographers, podcasters, and content creators to capture broadcast-quality sound.
Key Features: Wireless Audio Monitoring | 32-bit Float | Timecode
Method 3: Transfer Audio Recording Using Email
Another simple way to move recordings from your iPhone to your computer is by emailing them to yourself. It’s not the fastest option, especially if you have many files, but it’s free and works with any email provider like Gmail, Outlook, or Mail.
Here are step-by-step instructions:
- Open the Voice Memos app and tap on the recording you want to send.
- Tap the More icon (three dots), then choose Share.
- Select the Mail app from the sharing options.
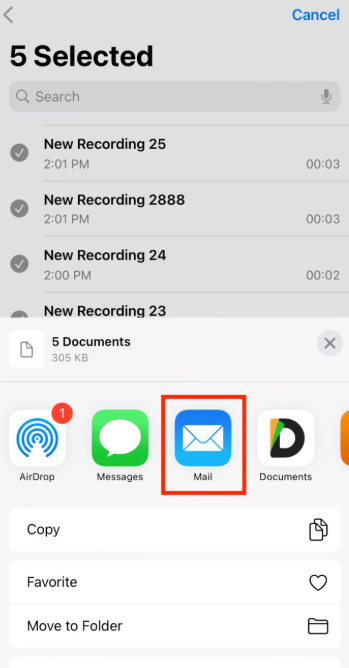
- Enter your own email address and tap the Send button.

- On your computer, open your email and download the audio file attachment.
Method 4: Use iTunes for Bulk Transfers
If you want to move multiple or all of your voice memos to your computer at once, iTunes is a solid option, especially for Windows users. Once your device is connected, iTunes can sync your voice memos automatically with your music. Here’s what to do:
- Connect your iPhone to your computer with a USB cable and open iTunes.
- Click the device icon in the top left corner, then go to the Music section in the sidebar.

- Make sure the “Sync Voice Memos” box is checked.

- Click Apply to begin syncing.
After syncing, you’ll find your recordings saved locally in a folder called Voice Memos on your computer. The files will be in .m4a format, which can be played in iTunes or any media player. This method works best when you need to move several recordings at once, without emailing or uploading them one by one.
Method 5: Use a Third Party App to Export Voice Memos
If you’re looking for a way to move multiple voice memos to your Windows 10 or 11 computer and prefer not to rely on cloud services or email, a third-party app like EaseUS MobiMover can help.
It gives you direct access to your iPhone’s audio files and lets you export them to your computer in just a few steps. Here’s how:
- Download and install EaseUS MobiMover on your computer from the official site: https://www.easeus.com/phone-transfer/mobimover-free.html.
- Connect your iPhone to your computer using a USB cable and open EaseUS MobiMover.
- From the main screen, click Content Management, then navigate to Audio > Voice Memo.
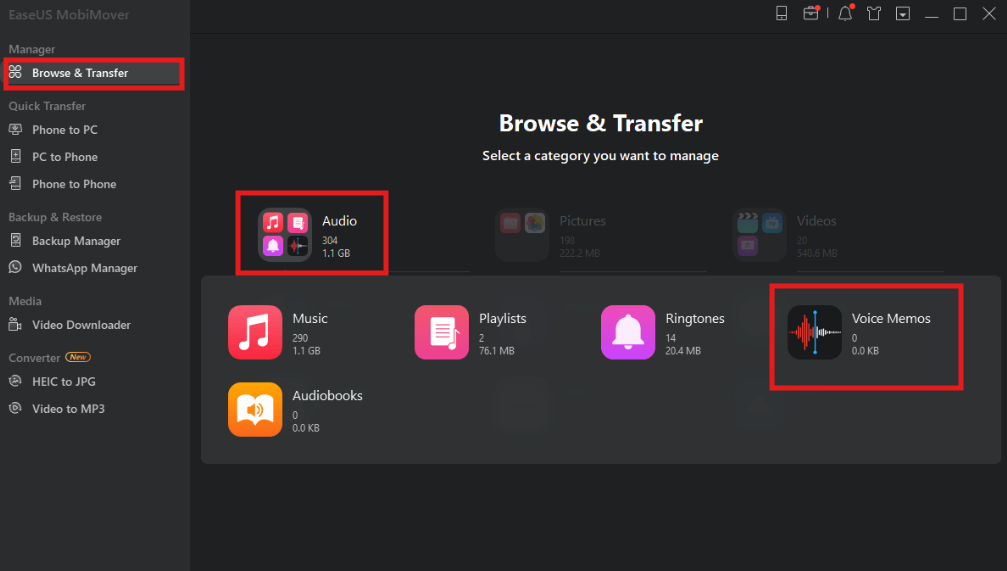
- Select the recordings you want to transfer. Click the Settings icon to choose where you’d like the files saved on your PC.

- Click Export to PC to begin. Keep your iPhone connected until the transfer is complete.

This is a useful option if you need more control over the transfer process or want to manage several voice memos at once without using email or cloud storage.
Conclusion
Moving voice memos from your iPhone to your computer is simple once you know how. You can use email, iCloud, Google Drive, iTunes, or a third-party app that best suits your needs. This makes it easier to organize your files, create backups, and free up space on your phone, so you don’t have to worry about losing anything or running out of storage.
FAQs
Q: Are voice memos saved to iCloud?
A: Yes, if iCloud Drive is turned on and Voice Memos syncing is enabled, your recordings are automatically saved to iCloud. You can access them from any device signed in with the same Apple ID, including on a PC through iCloud.com.
Q: Do voice memos expire on iPhone?
A: No, voice memos don’t expire. They stay on your device until you delete them manually. To avoid losing recordings when storage is low, it’s best to back them up to a computer or iCloud.
Q: Where are voice memos stored on an iPhone?
A: Voice memos are stored in the built-in Voice Memos app. They’re saved locally on your iPhone and synced to iCloud if you’ve enabled that option.
Q: Where do audio notes get saved on iPhone?
A: Audio recordings made through the iPhone’s microphone are saved in the Voice Memos app by default. If you’re using a different app to record, the audio may be saved within that app’s storage.