.png)
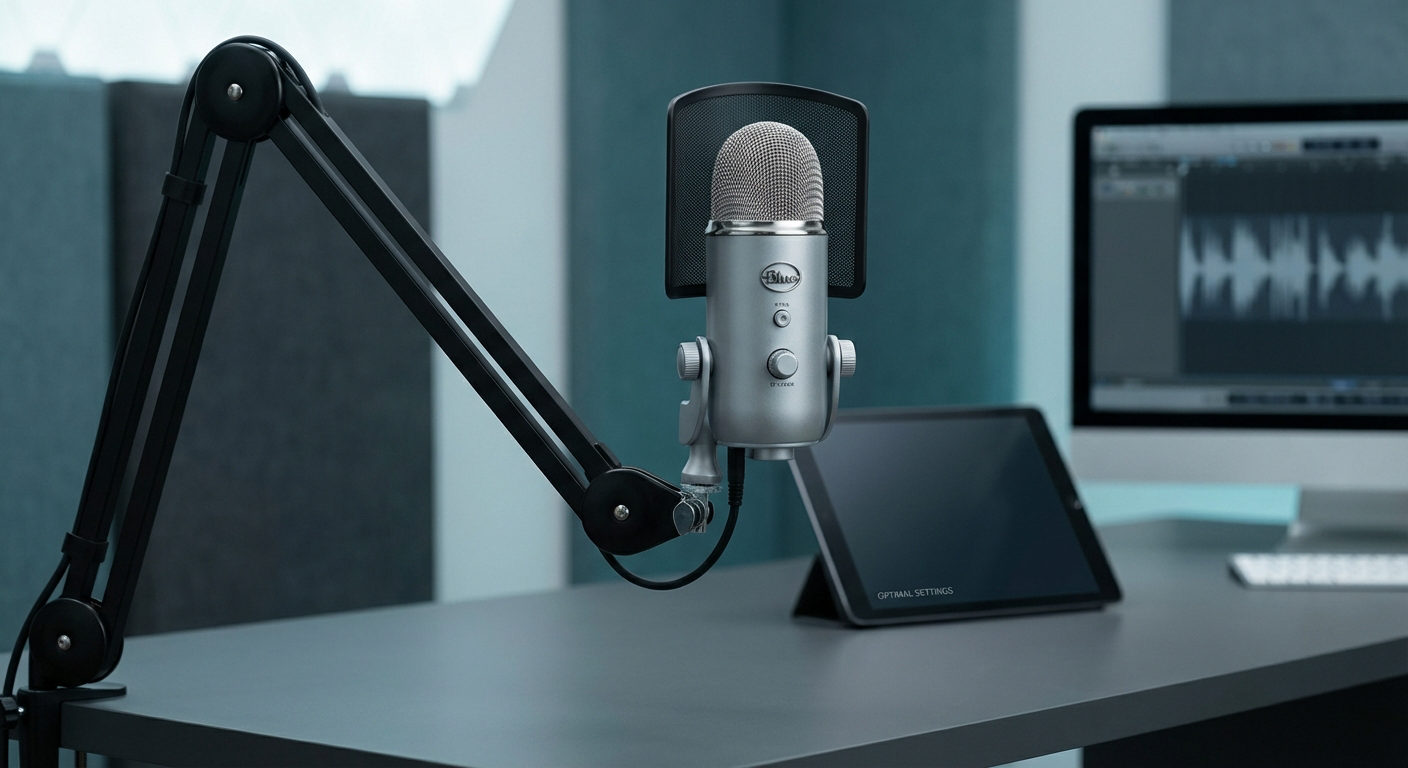
The Yeti microphone is one of the best budget-friendly alternatives in the world of USB mics. It was first launched by Blue Microphones back in 2009, and Logitech later acquired the company. Even after the passing of many years, the Logitech Blue Yeti microphone is still under the spotlight due to its multiple polar pattern selection and plug-and-play functionality.
However, its setup can still be a complicated task for first-time users. That’s why this article shows you step-by-step instructions on how to use the Yeti microphone on a computer, OBS, and mobile. To ensure you understand everything, each section contains images for most steps, so everything becomes a piece of cake for you. Also, you can apply these methods on all Yeti versions, including Blue Yeti X and Blue Yeti Nano.
Let’s get started!
How to Use the Yeti Microphone on a Windows PC?
Setting up and using the Blue Yeti mic is quite straightforward. So, after unboxing it, assemble the components together, tighten the knobs, and erect its stand. You can also mount it to a boom arm.
Once the assembling process is over, follow these instructions:
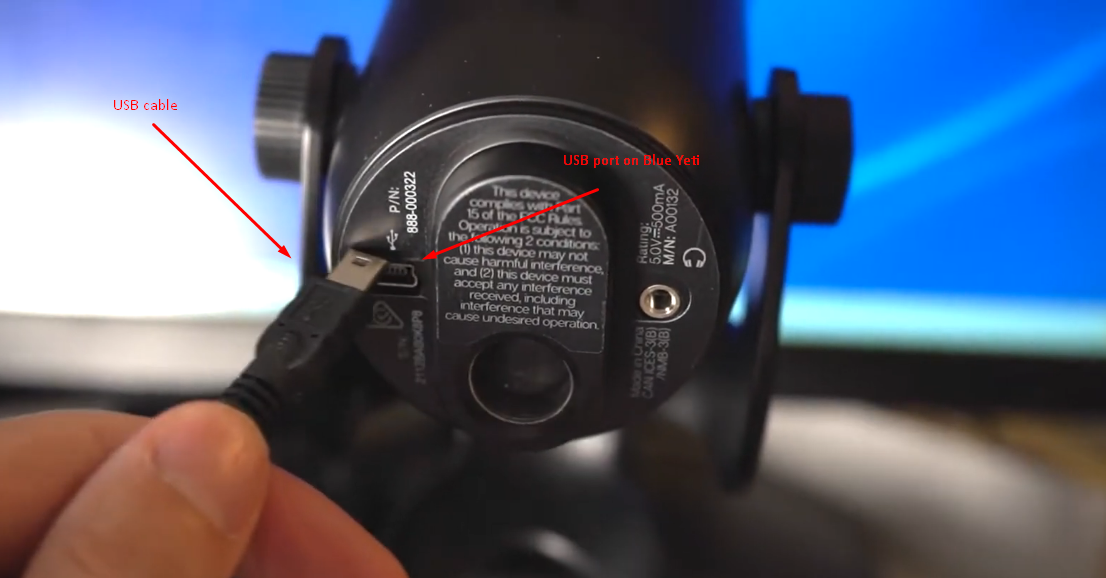
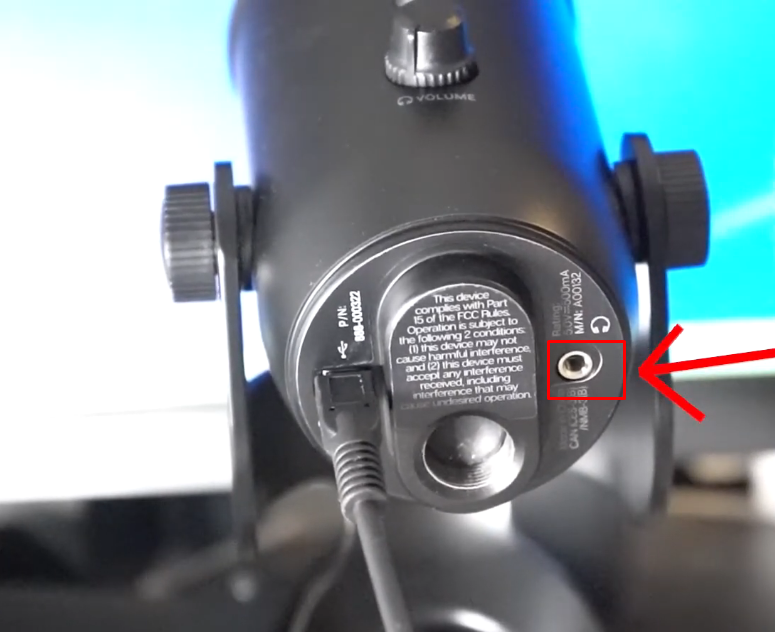
- Step 1: Slightly tilt the microphone upside down to see its bottom area
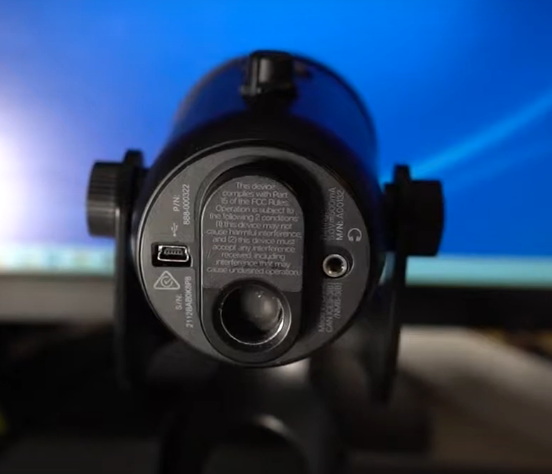
You will find a few ports, including a micro USB and a 3.5mm headphone jack.
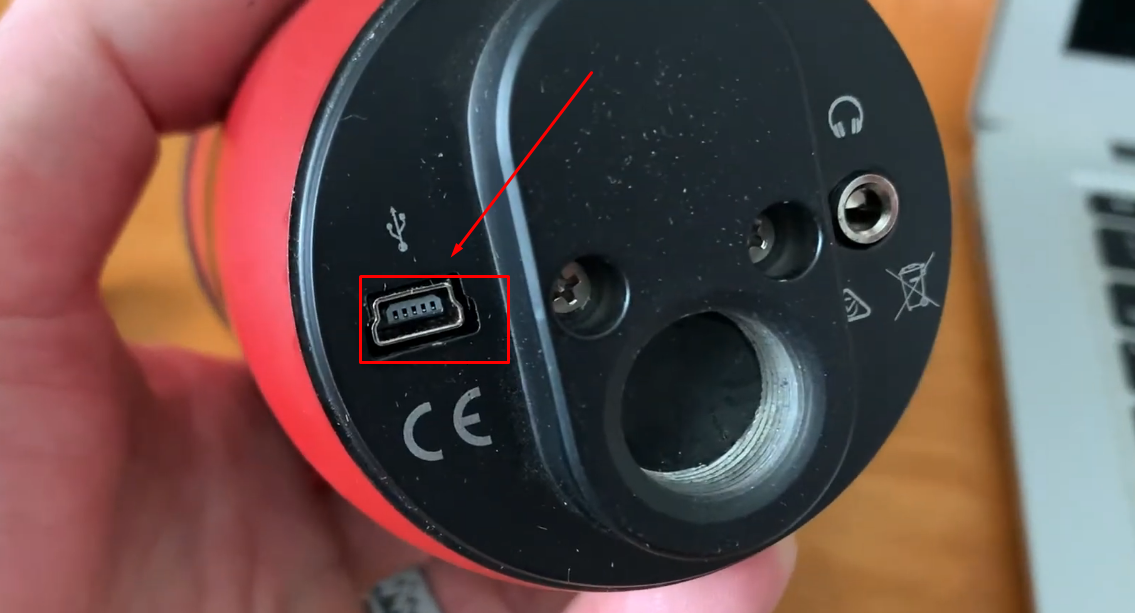
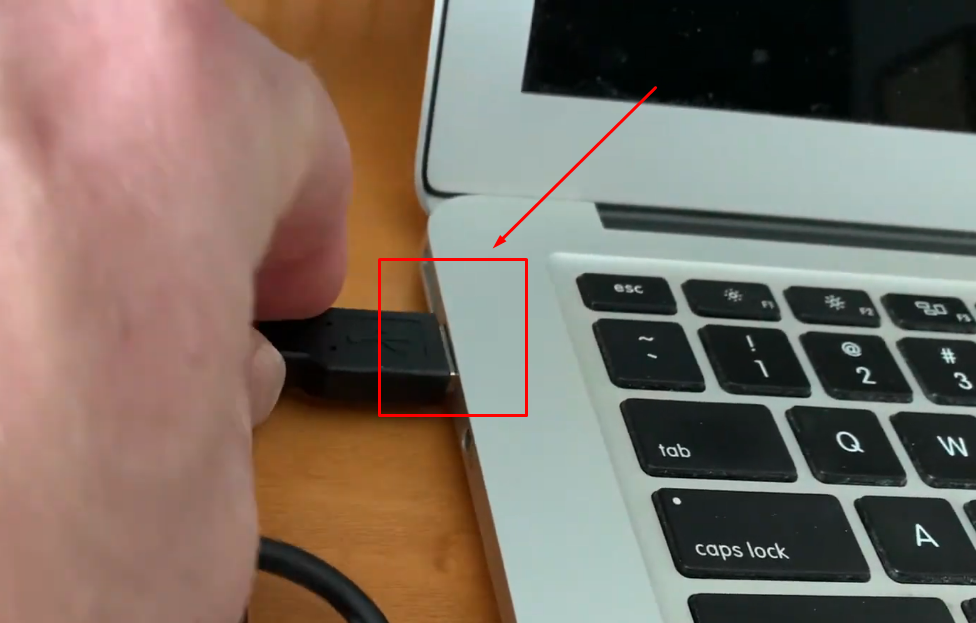
- Step 2: Upon unboxing the Yeti mic, a micro USB cable will be included in the box. It will have a USB-A plug on one side and a micro USB on the other. So, enter the micro USB connector into the microphone’s USB port
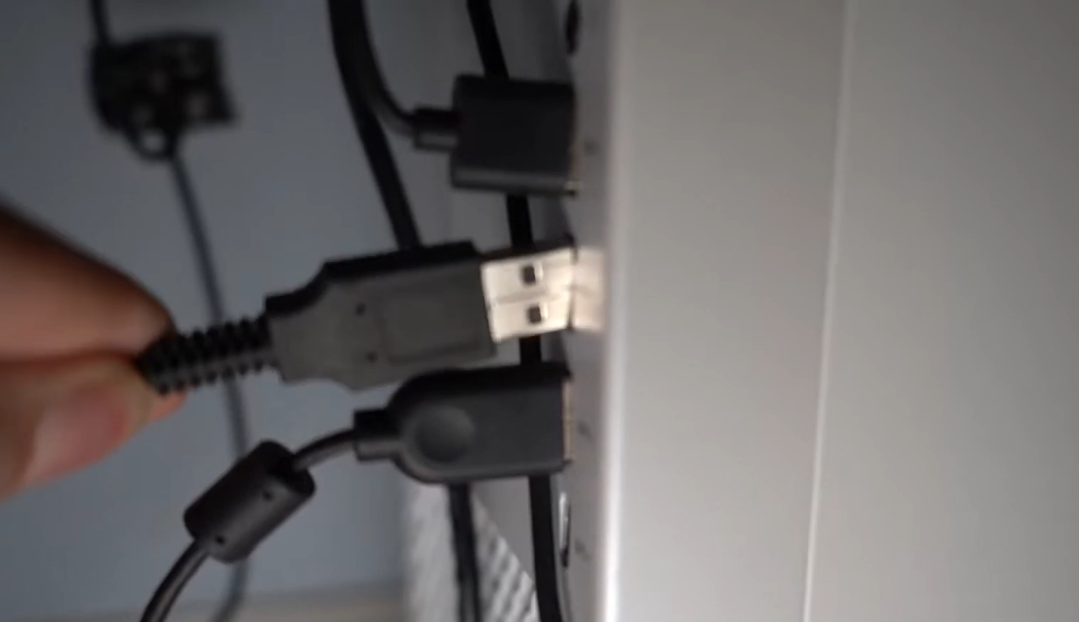
- Step 3: Plug the USB-A connector into your Windows computer or laptop
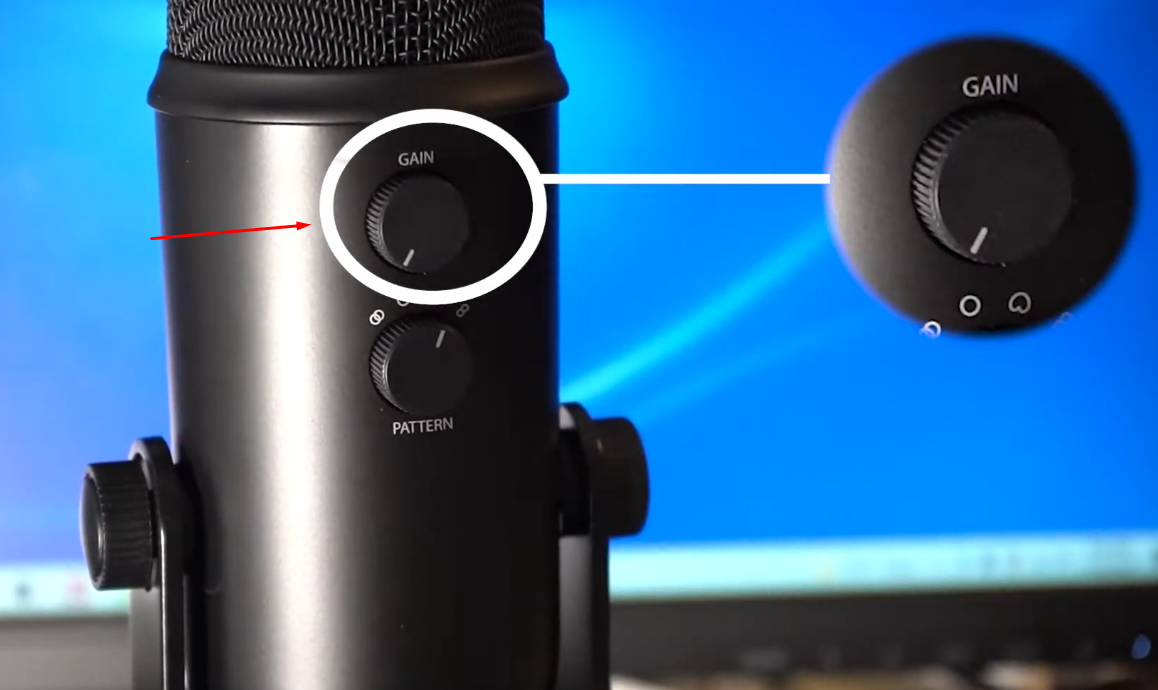
- Step 4: Now, at the back of the microphone, you will see two knobs – a “Gain” and “Pattern” controls. Slightly adjust the gain knob but don’t keep it full; otherwise, your microphone will become sensitive and start capturing unwanted background noise
- Step 5: In the next step, adjust the pattern knob as per your preference
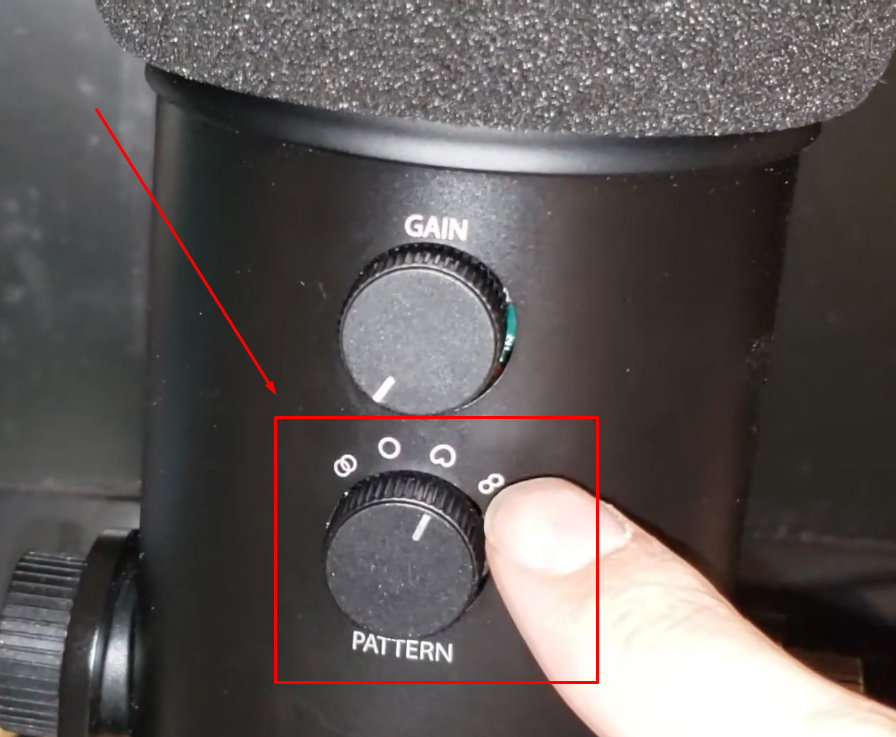
You can set it to omnidirectional, cardioid, or any other mode of your choice.
- Step 6: Now, plug your headphones into the jack on the mic
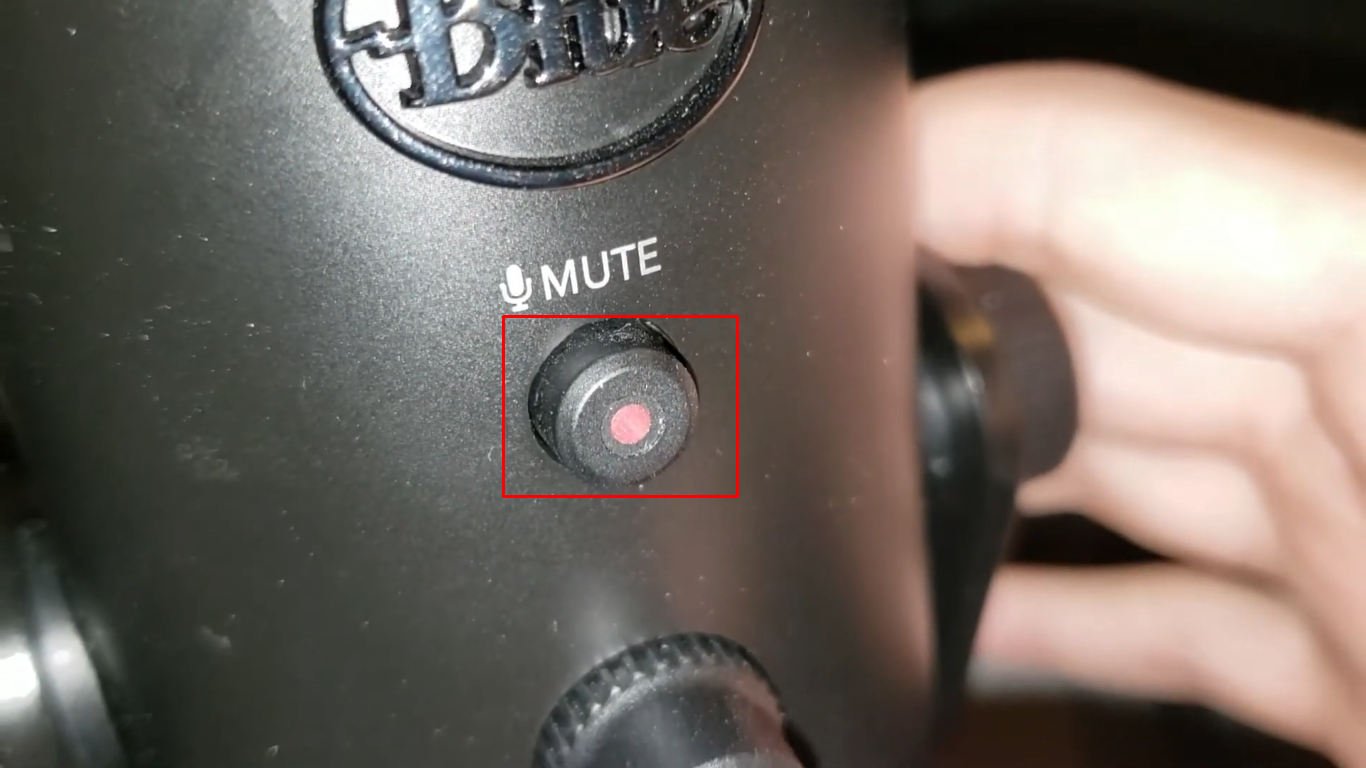
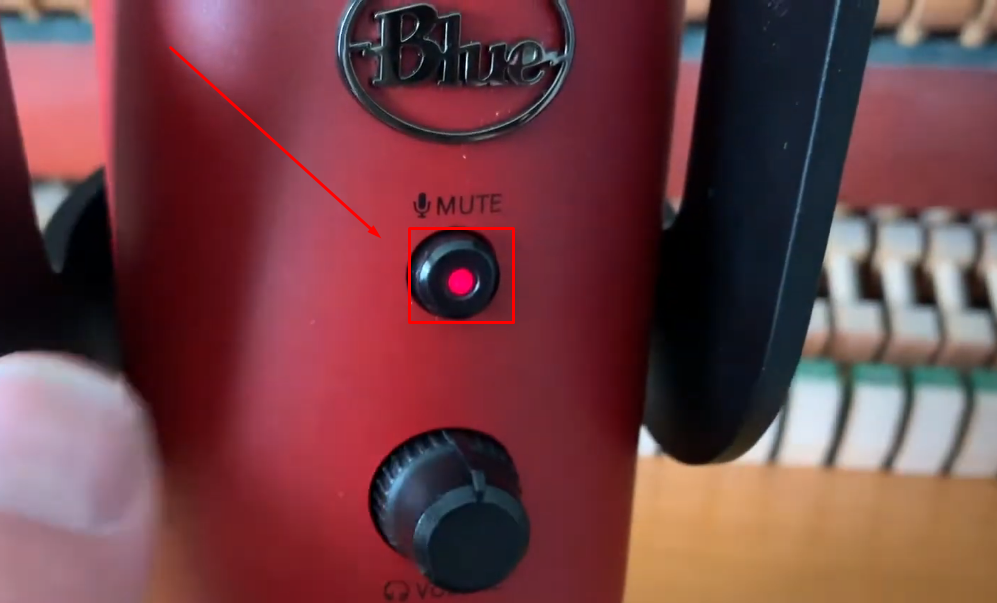
- Step 7: Once the entire setup is complete, you will notice that the mute button’s light will turn on
Technically, your microphone is ready to be used on your computer. However, if you’re using multiple microphones or if your laptop is set to use its internal mic, you may need to select Yeti as your default mic.
- Step 8: Go to your PC’s settings and choose the “System” option
- Step 9: Then, click on the “Sound” option and scroll down to the “Input” section
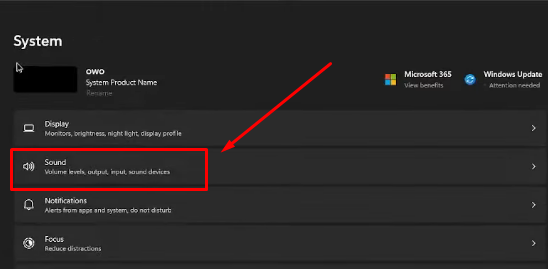
- Step 10: Ensure the Blue Yeti microphone is selected as your default microphone
How to Use the Yeti Microphone on the Mac?
Fortunately, the Yeti microphone requires no additional drivers to be used with your Mac computer. However, you will need to choose the Yeti mic in your system’s audio input settings.
NOTE: If your audio recording software requires a driver update, you may need to install or upgrade the drivers for smooth functionality on a Mac or Windows computer.
- Step 1: Insert the micro USB cable into your mic’s port at the bottom
- Step 2: Insert the USB-A port of the cable into your Mac computer
If you have a newer Mac system, you may need to use an adapter cable to convert USB-A into USB-C or USB-A to the lightning port.
- Step 3: After connecting the Yeti mic to your Mac, the mute button light will turn on, indicating that the microphone has been successfully picked up by your system
- Step 4: Set the gain and pattern modes as per your requirement using the knobs
- Step 5: Now, go open “System Preferences” or “System Settings” by clicking the “Apple” menu on the top-right corner of the screen
- Step 6: Look for the “Sound” option (with a speaker icon) and click on it

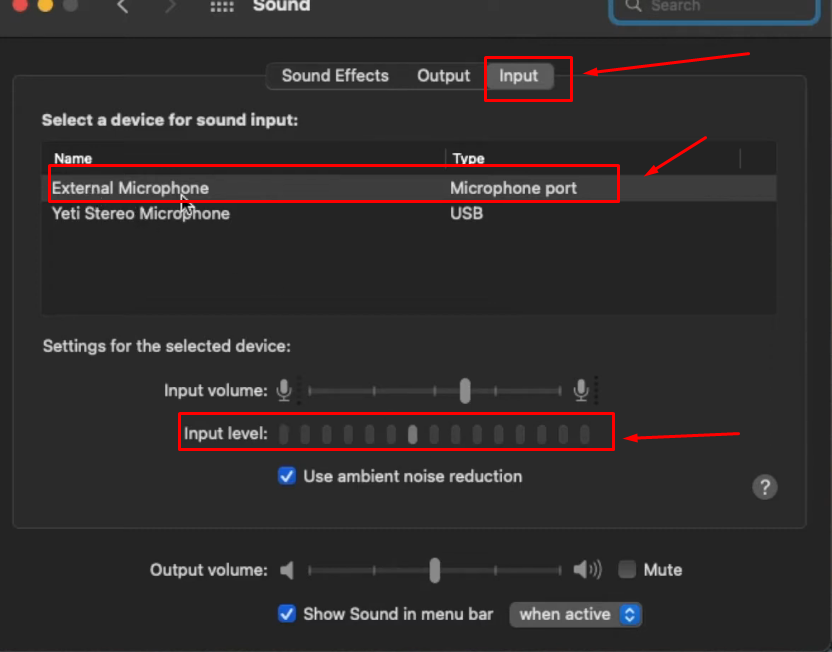
A new window will open with three different tabs on the top. By default, you will be in the “Sound Effects” tab

- Step 7: Click on the “Input” tab to view the current audio input settings. You will notice that an internal or external microphone (if connected previously) will be selected as your mic. As you speak, the input level will go back and forth, confirming that another microphone is hearing your voice than Yeti
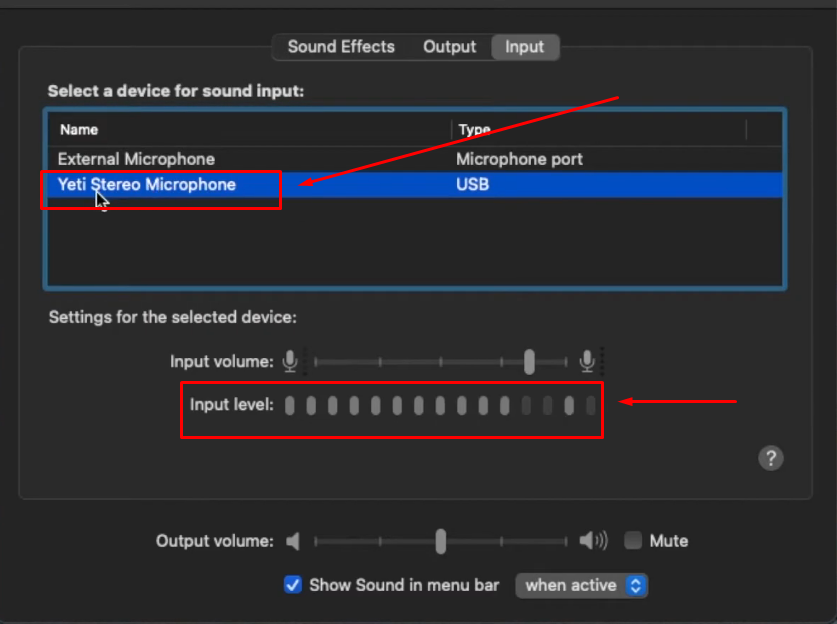
- Step 8: So, in order to use the Yeti mic on your Mac, click on the “Yeti Stereo Microphone” to select it. Speak and observe the input level now, if it is showing movements, it means that now your Yeti mic is capturing your voice
How to Use the Yeti Microphone on OBS?
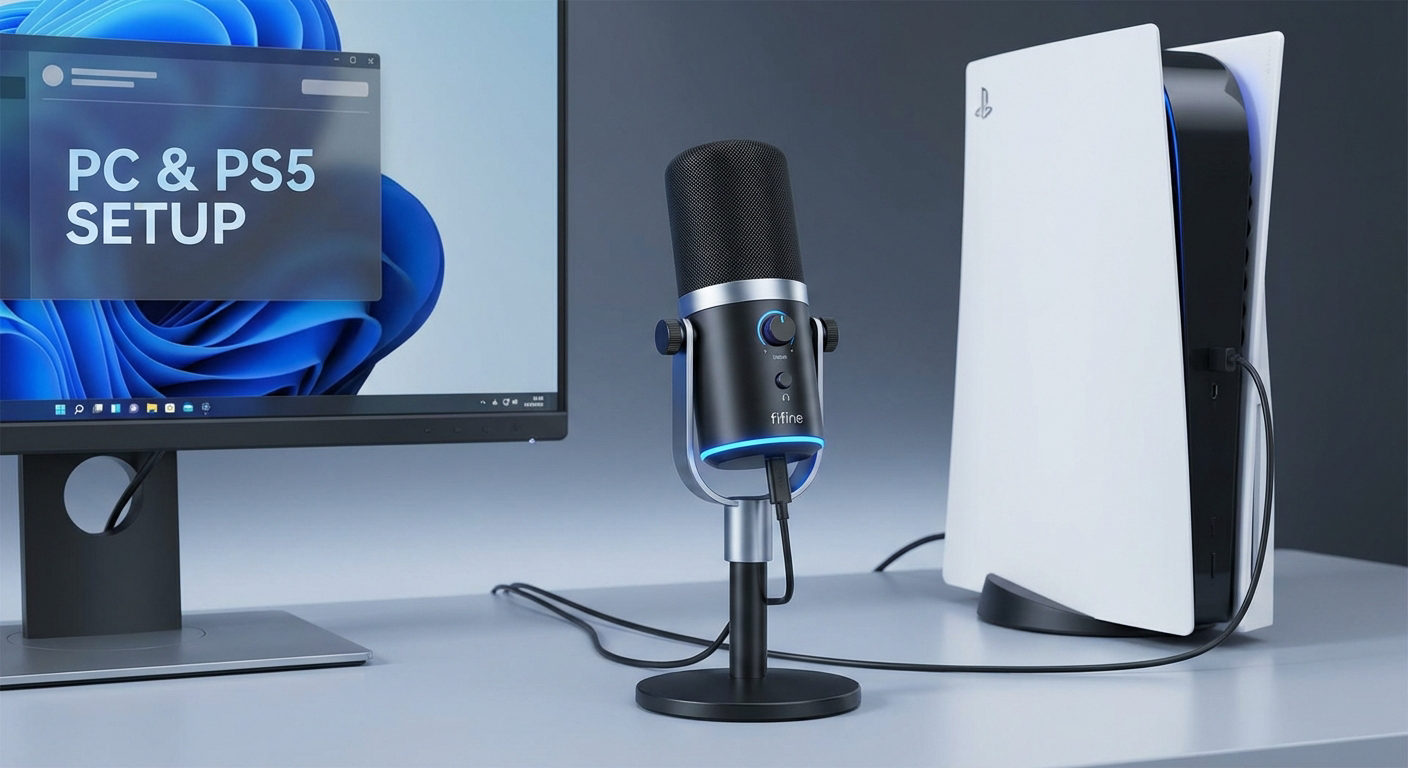
Whether you have a Mac or Windows laptop or computer, if you have successfully connected the Blue Yeti microphone, then using it on OBS is simple. Why so? Because OBS will mostly detect Yeti as your audio input device.
However, if you are not able to use Yeti on OBS, you may need to choose it as your device manually.
So, here’s what you need to do.
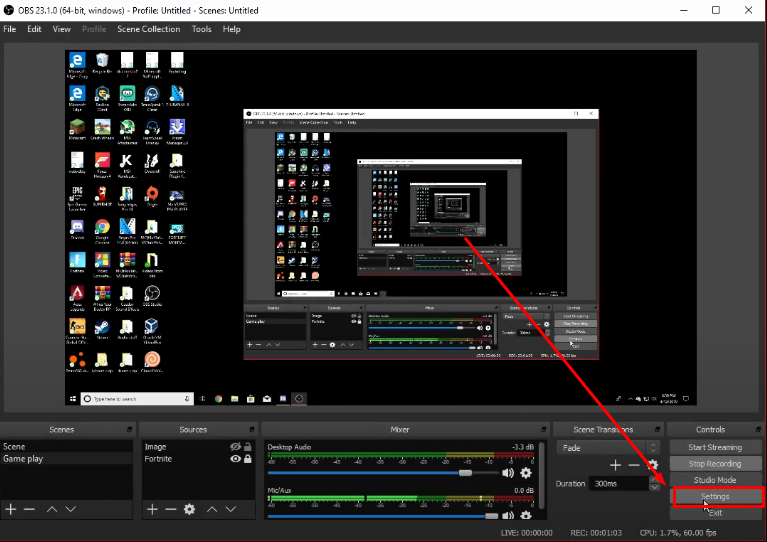
- Step 1: Open your OBS desktop application and click on the “Settings” button
- Step 2: Look for the “Audio” option in the left panel and click on it
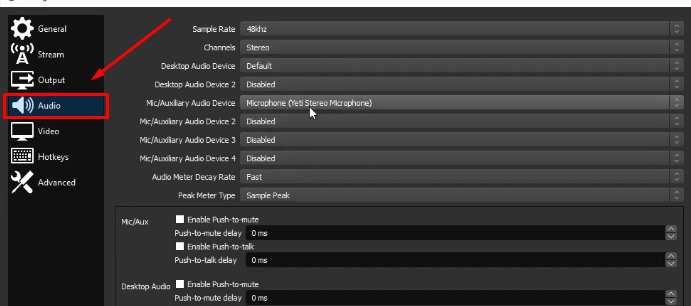
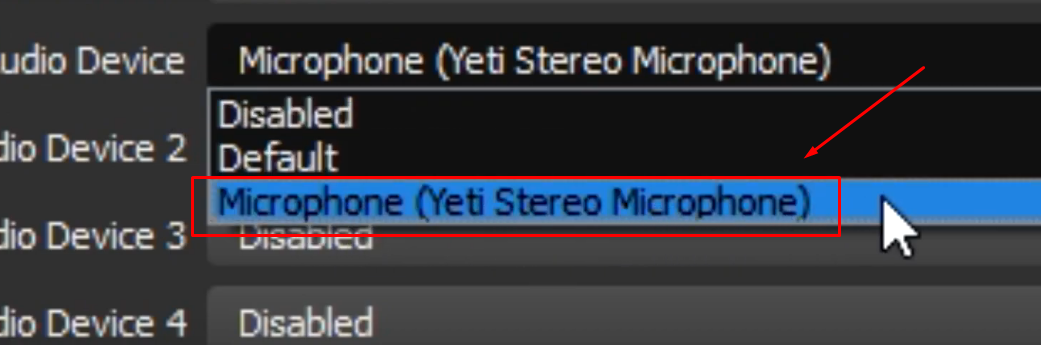
- Step 3: Now, pay attention to the options on the right side of the screen. Find the “Mic/Auxilary Audio Device” option and click its dropdown menu to choose Yeti as your microphone
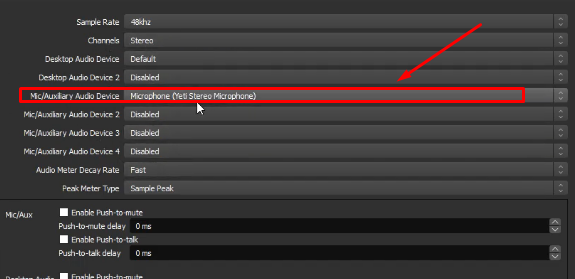
- Bonus Step: To stream high-quality audio with your Yeti microphone on OBS, click on the dropdown menu next to the “Channels” option and choose “48kHz”

How to Use the Yeti Microphone on Android Smartphone?
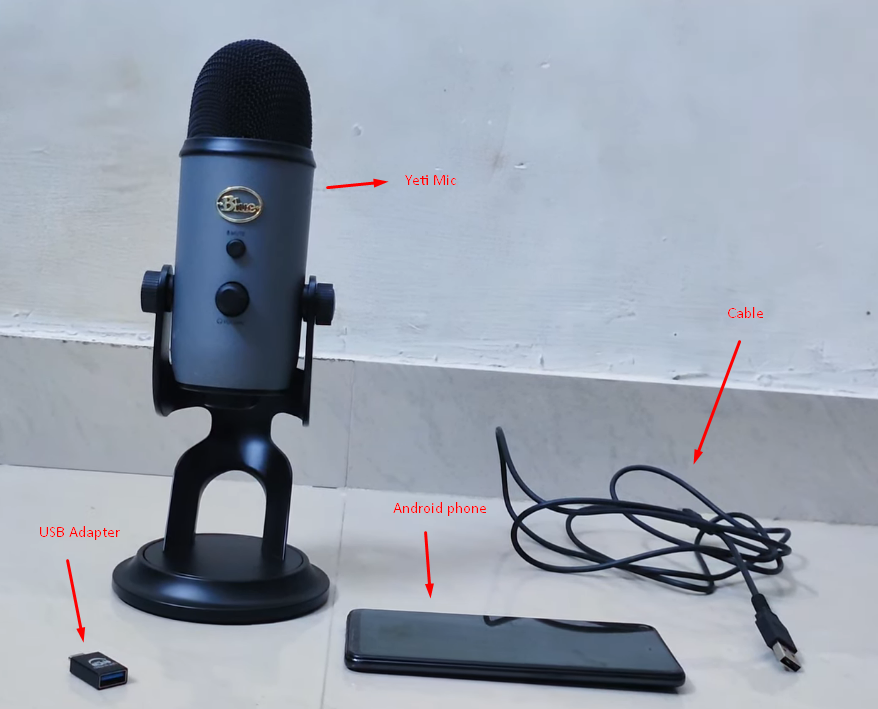
To use the Blue Yeti mic on your Android device, you will need the following things:
- A USB-A to USB-C adapter (if your phone has a USB-C port)
- Open the Camera application installed on your device
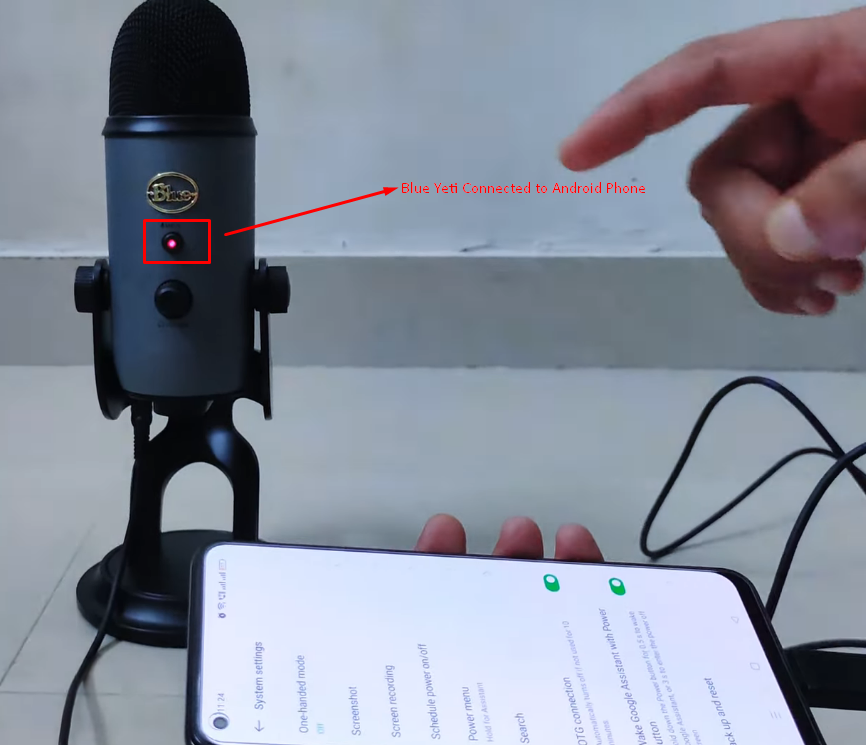
Your overall setup should look like this.
Then follow these instructions:
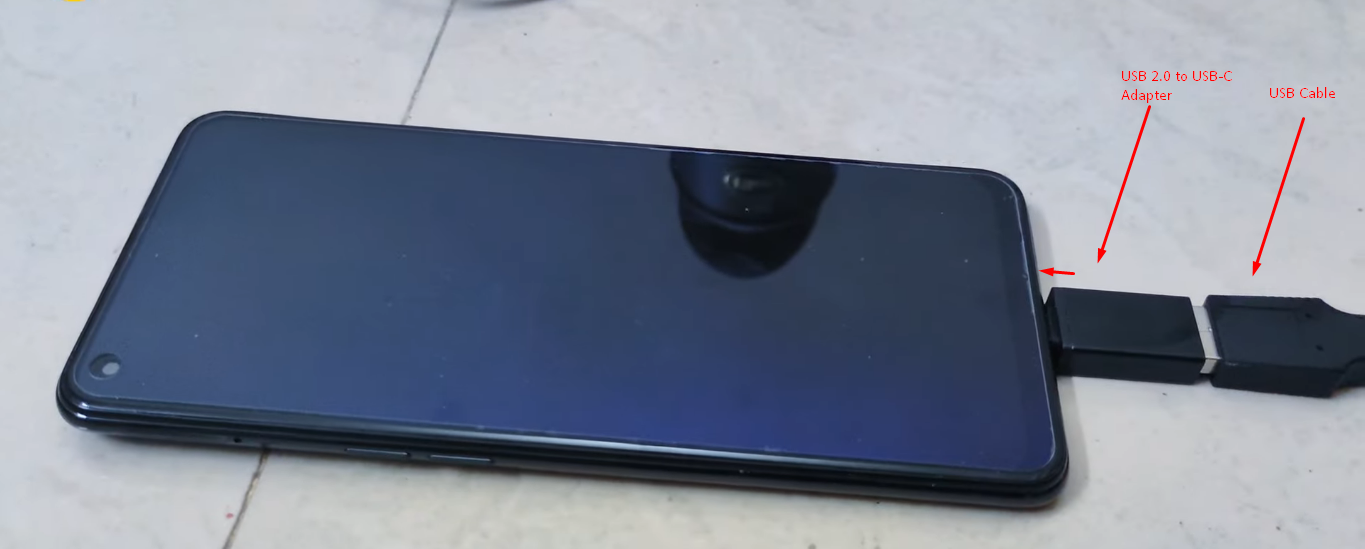
- Step 1: Connect the micro USB port to the Yeti mic
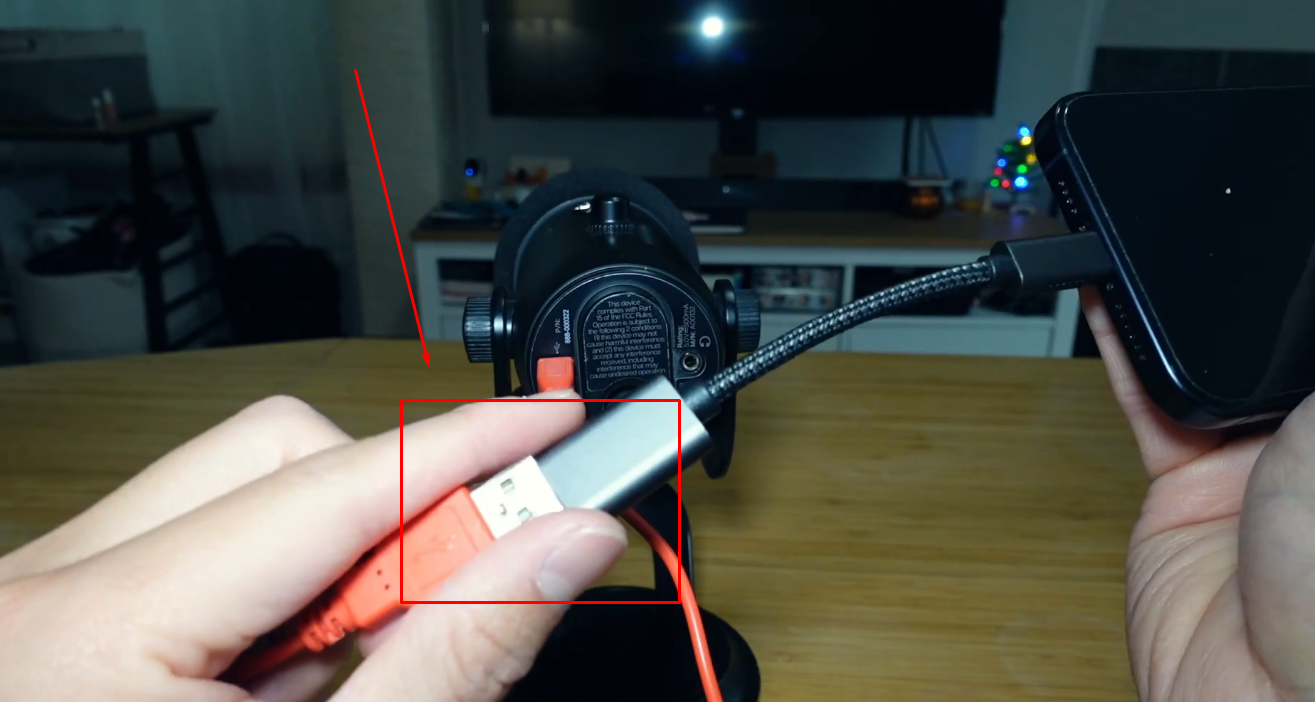
- Step 2: Then, connect the USB-A port of the microphone’s cable to the adapter
- Step 3: Next, carefully plug the adapter, connected to the USB-A plug, into your phone’s USB-C port

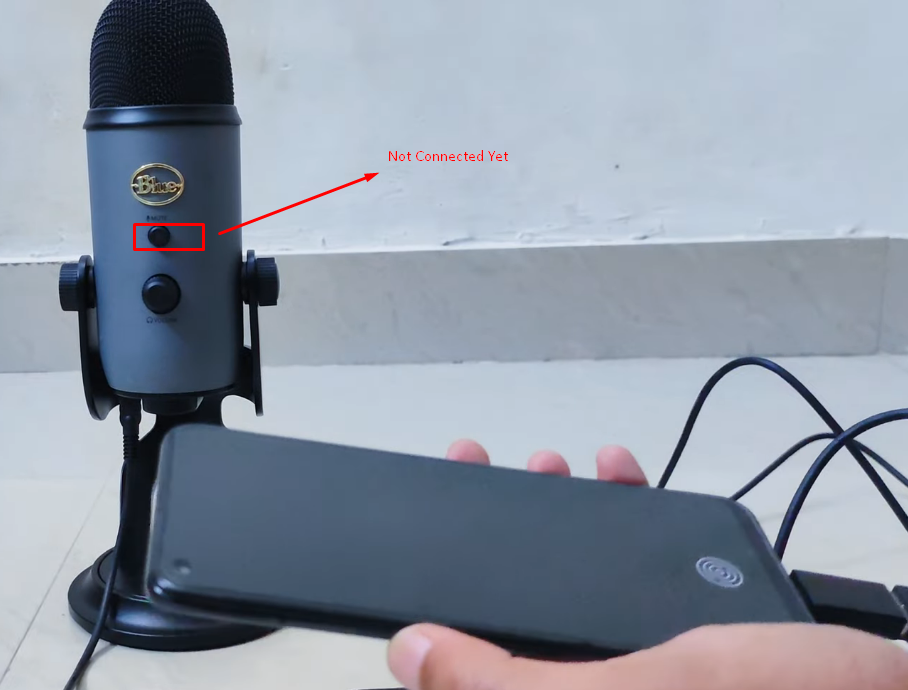
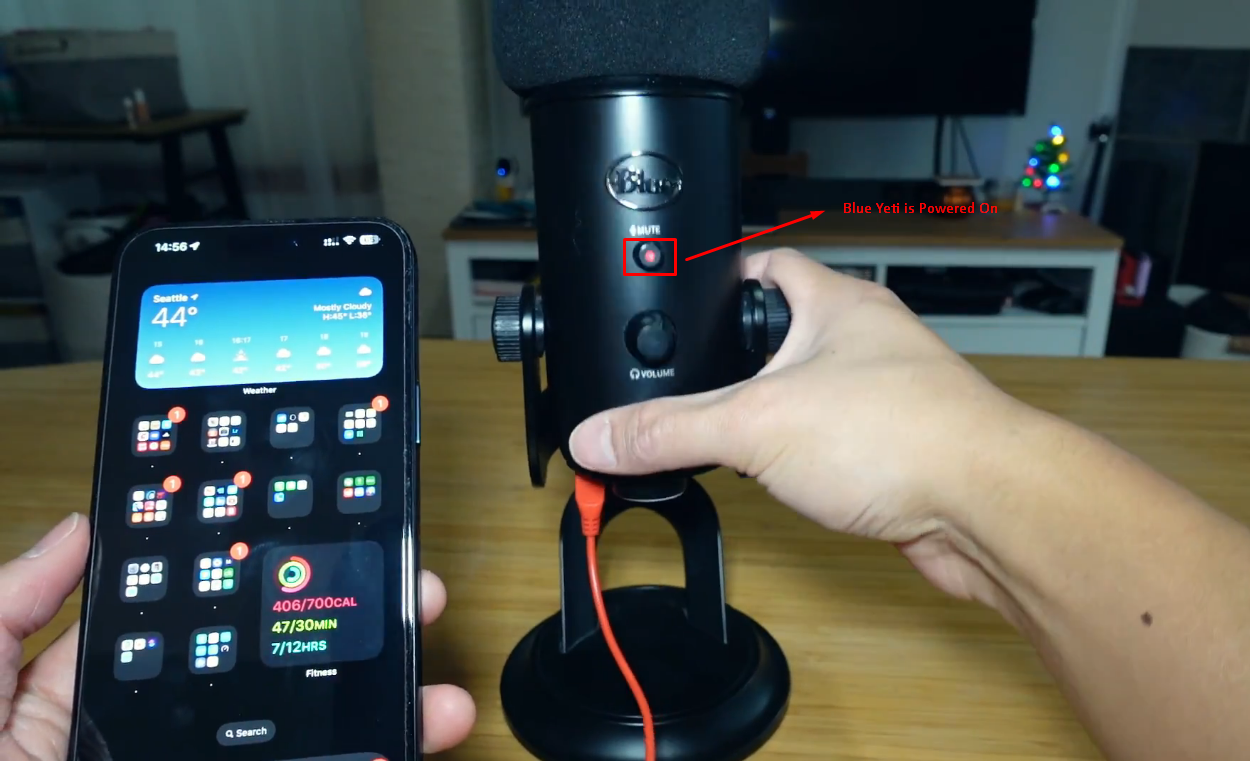
At this stage, you will notice that the mute light will still be turned off, which means the microphone is not detected by your phone
- Step 4: So go to your “Settings” and type “OTG” in the search bar
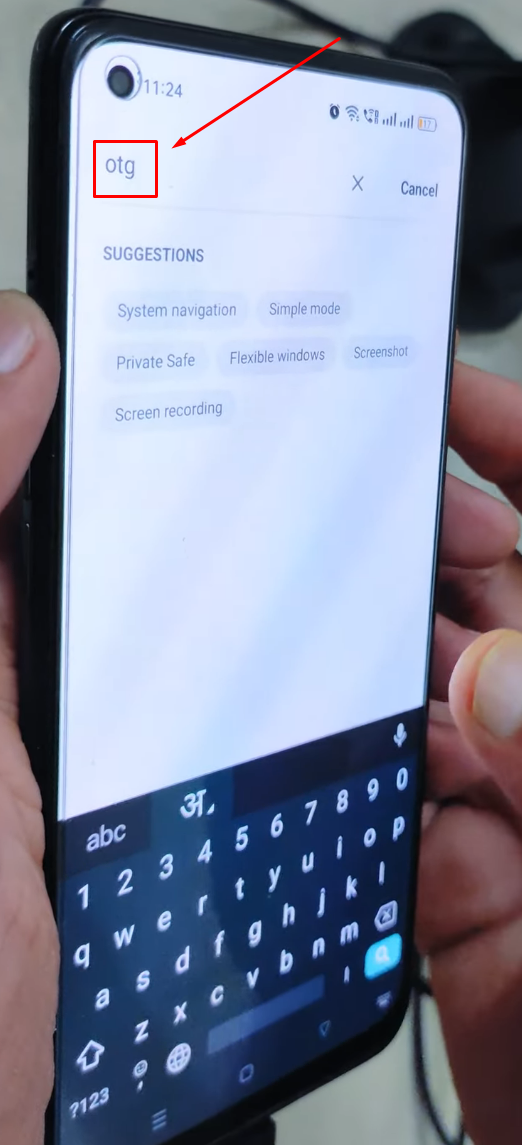
You will notice that the “OTG connection” option is turned off, and the toggle button will be disabled.
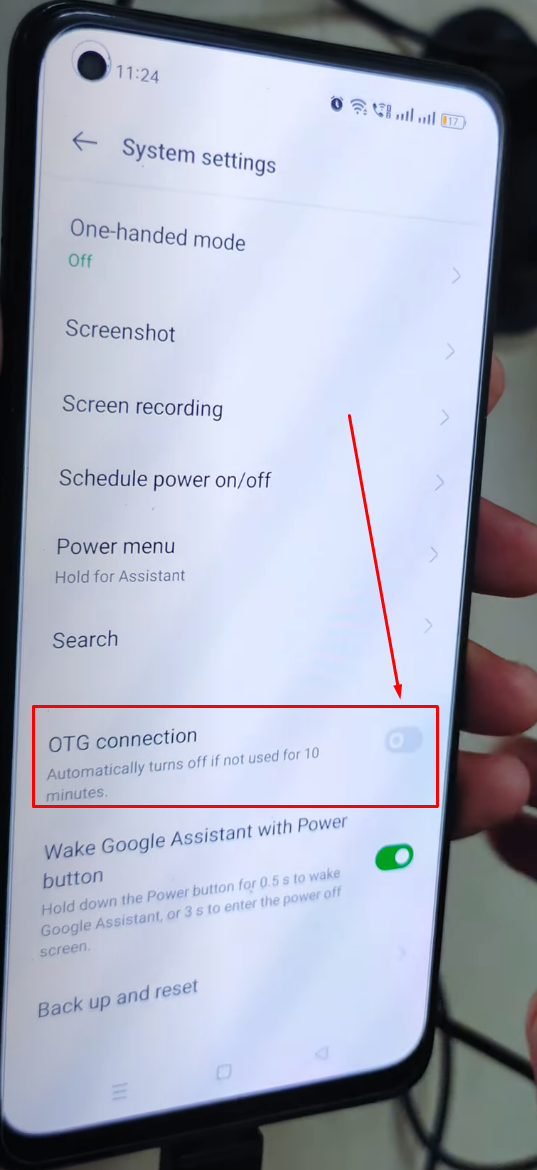
- Step 5: Tap on the toggle button to enable OTG connection
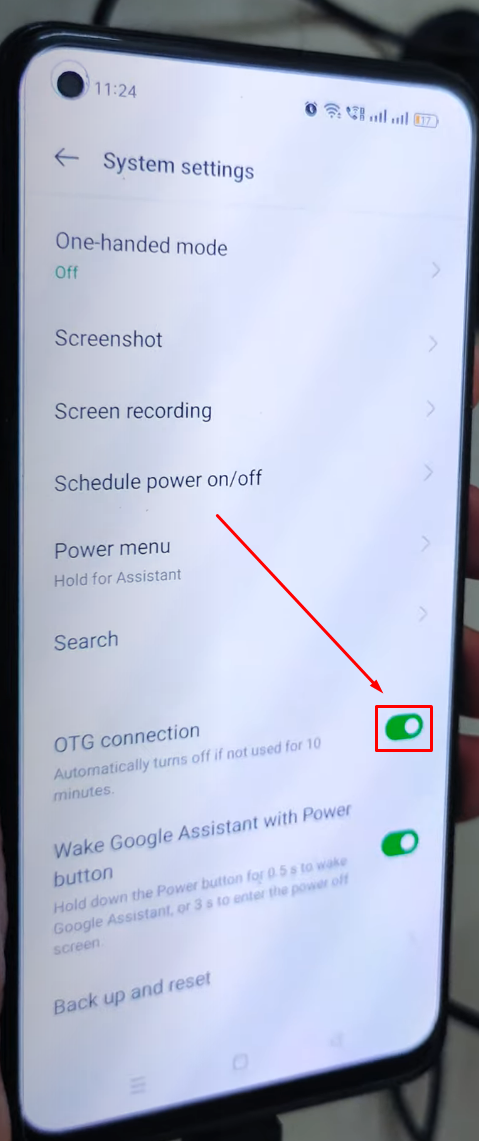
As soon as you do that, you will observe that the light on the mute button will turn on, ensuring that the microphone is now connected
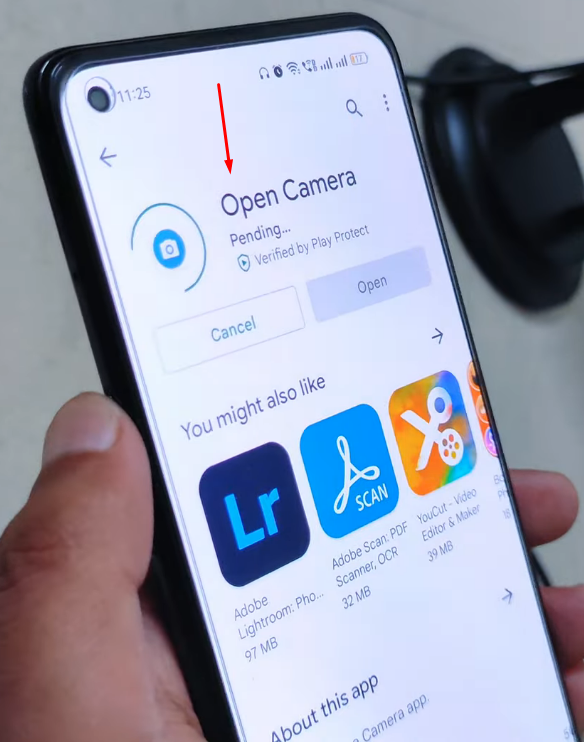
Try using the Yeti microphone with your phone’s internal camera or voice recording app. However, in some cases, the Blue Yeti mic may require a third-party app on Android to record voice for your video recordings. Therefore, you will need to download and install the Open Camera app.
- Step 6: Open your Play Store, search for the “Open Camera” app, and install it on your phone
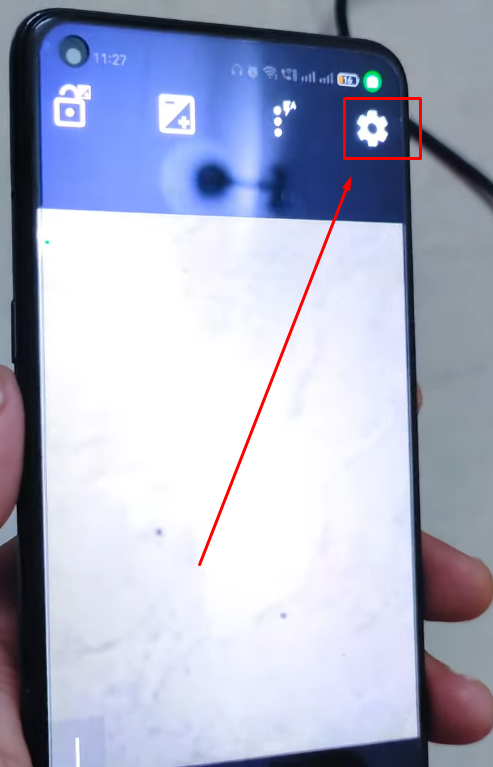
- Step 7: Open the app and tap on the “gear icon” to view the app’s settings

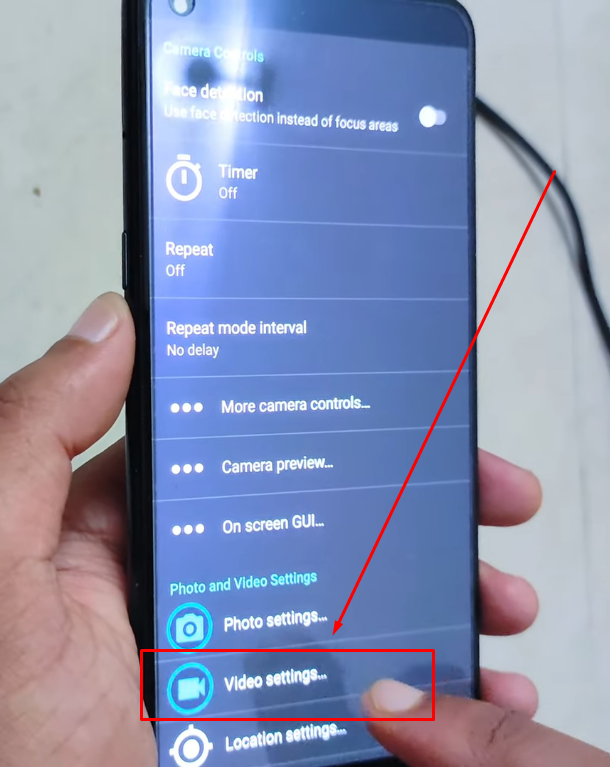
- Step 8: Scroll down to the “Video settings…” option and tap on it
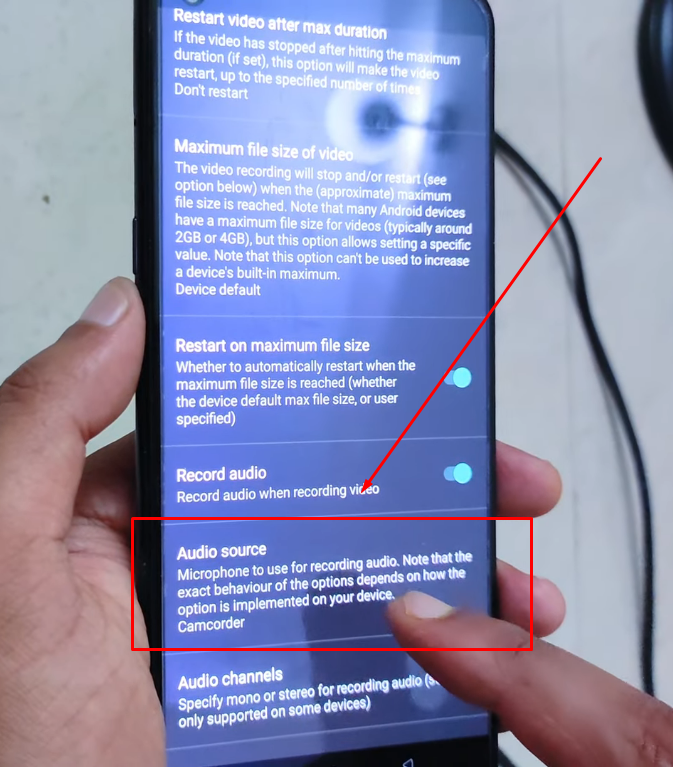
- Step 9: Navigate to the “Audio source” option and tap on it
- Step 10: Select the “External mic (if present)” option
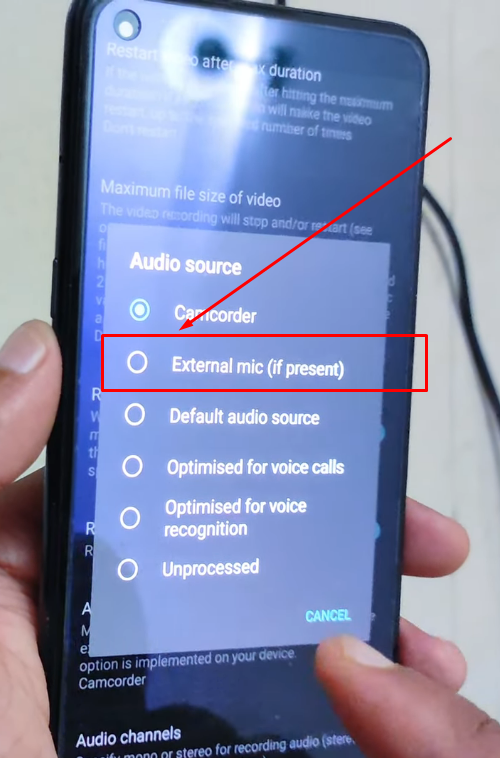
Now, you should be able to use the Yeti microphone to record video on your Android phone.
How to Use the Yeti Microphone on Your iPhone?
You can use your Yeti mic on your iPhone, but you will need an adapter cable to make a successful connection. If your phone has a Lightning port, you will need a USB-A to Lightning connector. Likewise, a USB-A to USB-C adapter will do the job if you have the latest iPhone.
- Step 1: Insert the micro USB cable at the back of the mic’s port

- Step 2: Plug the USB-C connector of the adapter into your iPhone’s port
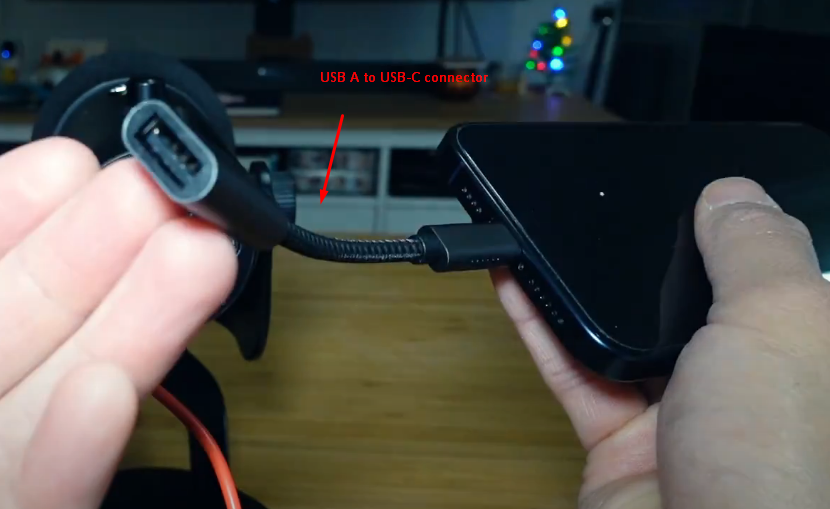
- Step 3: Now, attach the USB-A connector of the mic’s cable to the USB-A port of the adapter
Once done, the mute light will turn on, ensuring your iPhone has connected and detected the mic.
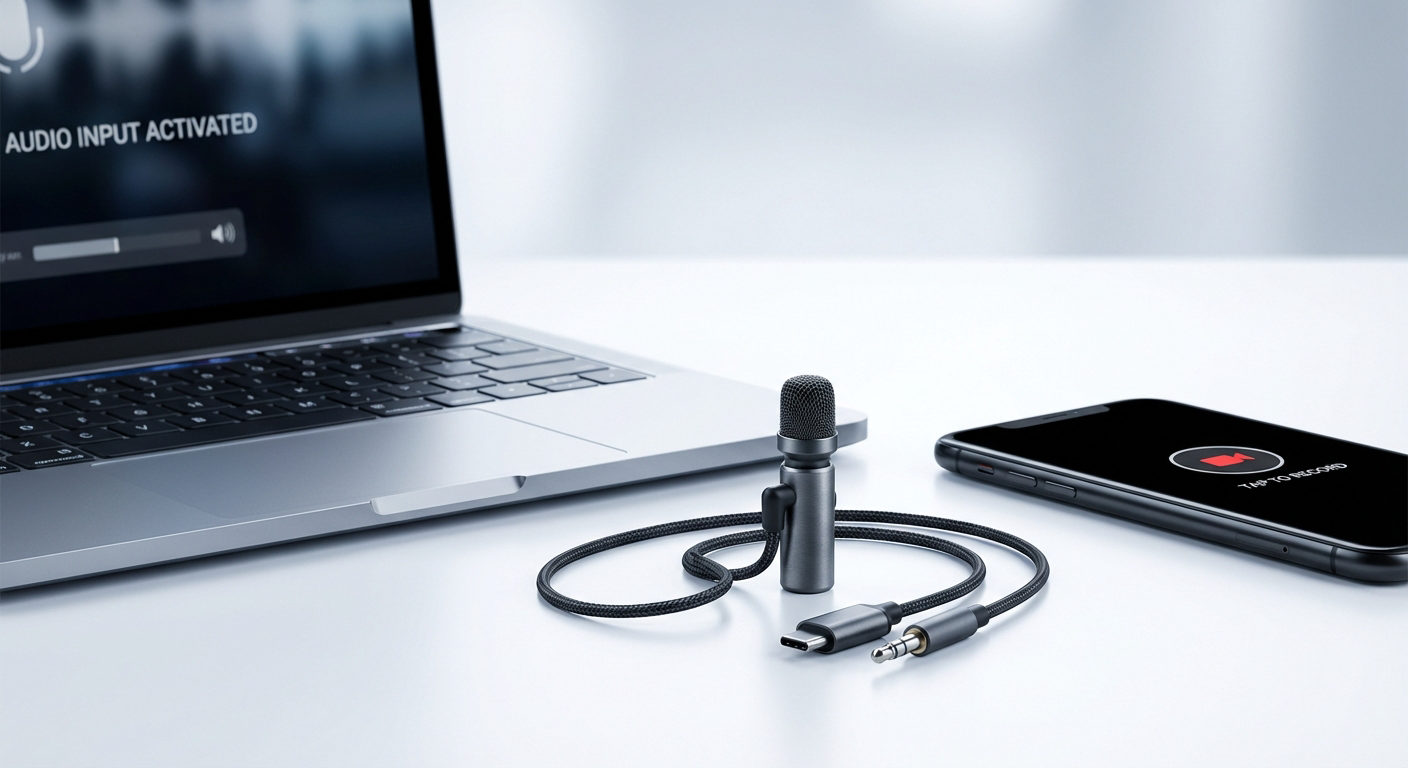
Pro Tip: For maximum audio quality, you can mount your Yeti microphone after connecting it to your mobile. However, to enjoy the freedom of movement while creating content, you can opt for wireless external microphones with remarkable audio-capturing qualities, such as the Hollyland Lark M2.

Hollyland LARK M2 - Mini Lavalier Microphone
An incredibly lightweight and compact wireless button microphone that captures high-fidelity audio.
Key Features: 9g Button Size | 48 kHz/24-bit | 40 Hours Battery
Lark M2 is an MFi-certified wireless microphone kit with universal compatibility. It connects almost every device capable of recording audio and video, including your iPhone, Android mobile, Windows, Mac, or camera. Appearance-wise, the Lark M2 is not bigger than a button. Yet, it offers impeccable features, like Environmental Noise Cancellation, plug-and-play functionality, and up to 10 hours of battery life on a single charge. But that’s not all! Lark M2 takes your creativity to a whole new level by ensuring freedom of movement through its stable wireless transmission range of up to 1000ft.
Tips to Get the Best Sound from Blue Yeti
Do you want to experience high-quality audio after connecting Blue Yeti to your recording device? Here are a few things to remember.
Proper Microphone Positioning
The Blue Yeti must be positioned vertically for sound. Sound is not effectively captured from above the microphone. Avoid holding it like a karaoke mic during recordings. Keep the mic very close to the sound source. Proper positioning greatly enhances overall clarity and recording quality. Ensure the complete setup avoids unwanted echoes and reflections. Vertical placement reliably delivers crisp sound in every recording session.
Selecting the Right Pickup Pattern
The Blue Yeti offers four distinct audio pickup patterns today. Cardioid is ideal for solo recordings and voiceovers in studios. Bi-directional captures sound from the front and rear precisely. Omnidirectional mode records every sound from all directions clearly and effectively. Stereo captures left and right channels for balanced vocal performances. Selecting the correct pattern significantly improves the recording experience overall very much.
Adjusting the Gain for Optimal Audio Levels
The gain dial controls the microphone’s sensitivity accurately and precisely. Adjust the gain to capture sound without distortion or clipping. Proper gain setting prevents audio peaks and preserves sound clarity. Subtle adjustments yield professional recordings every single time consistently. Test different levels to find the optimal recording balance easily. Carefully monitor the input to avoid unwanted noise and interference at all times.
Monitoring Audio with Headphone Volume Control
The volume dial adjusts the headphone monitoring level accurately. It helps verify the audio during live recording sessions clearly. Listening through headphones ensures that no sound details are missed completely. Low computer volume does not necessarily indicate poor recording quality. Therefore, adjustments can be made later during post-production with DAW software easily. This monitoring process ensures a detailed audio capture for creators consistently.
Enhancing Audio in Post-Production
Boosting audio during post-production preserves recording integrity truly superbly. Avoid maxing out the volume to prevent unwanted sound distortion. Also, try to record at moderate levels to get continuous high-quality results. Relying on software enhancements allows volume boosts without giving up the audio quality. At the same time, editing tools can amplify soft sounds with minimal noise.
Conclusion
Blue Yeti is a popular desktop microphone with selectable polar patterns. While it is plug-and-play, learning how to use the Yeti microphone correctly can save you a lot of time, as you may need to choose this mic as your default audio input device in your Windows and Mac operating systems. Likewise, Yeti microphones can be connected to smartphones and tablets with adapters. It is a great mic to enhance the audio quality of your podcasts and live streams.
While the Yeti microphone offers excellent desktop audio capture, sometimes your recording needs require mobility and freedom of movement. For interview scenarios, vlogging, or presentations, a wireless lavalier microphone can complement your setup perfectly, allowing you to capture crisp audio without constraints.
Frequently Asked Questions about Using a Blue Yeti Microphone
Q1. Why isn’t my Blue Yeti working?
To begin with, confirm that the microphone is powered on. Ensure the cable is firmly connected to the port. Unplug and replug the cable if the connection seems faulty. Try a different USB port or swap the cable. Test the microphone on another computer for faults. Set the Blue Yeti as the default recording device immediately. Moreover, check the sound settings in Windows to confirm the configuration.
Q2. Do you have to use headphones with Blue Yeti?
High-quality headphones are not strictly required with Blue Yeti. But if you look at the bright side, they assist in monitoring audio during recording. Listening to recordings improves overall sound accuracy greatly. Contrarily, gamers may connect headphones via the PC’s sound card, as optimal audio ensures enhanced gaming and recording experiences.
Q3. What cord does the Blue Yeti use?
Blue Yeti uses a Mini-B USB cable normally. Some models, especially the newer releases, also support the USB-C connection. The cable links the mic to the computer securely, and the connection is reliable and simple to configure. Additionally, a 3.5mm headphone jack exists for monitoring. It offers real-time sound checks by simply plugging in your headphones.
Q4. What settings should I use on Blue Yeti for voice?
Blue Yeti offers four recording patterns for voice. Cardioid mode is recommended for focused voice capture. This setting minimizes background noise from the sides effectively. It ensures clear and consistently professional audio recordings. Stereo mode offers balanced left and right channels. Omnidirectional mode captures sounds from all directions widely. The bidirectional mode suits interviews and paired conversations precisely.
Q5. Does Blue Yeti need drivers?
Blue Yeti connects via USB without extra drivers. The device features easy plug-and-play functionality for simplicity. Also, it is fully class-compliant on macOS systems. This signifies that extra drivers are unnecessary for basic functionality. However, you will need a recording software, like Audacity or Cubase, as a medium to record audio from your Yeti mic. So, if any of those software requires drivers, you will need to install or update them in order for these programs to work.