.png)
Content creators, broadcasters and gamers equally find great use for Open Broadcaster Software Studio commonly known as OBS Studio. It is free, efficient and gives you total flexibility over how you log your screen, camera, games or any combo of these. Seeing what you have just stored comes next once you have completed filming your video and have clicked the record button.
This is the moment at which many individuals become confused. You might be interested in the absent recordings, the recording technique used or the cause of their not playing. This page will guide you through all you need to know to find and view your OBS videos without running across any problems.
Why Use OBS for Recording?
OBS Studio is used by gamers, content creators, teachers and streamers because:
- Creators all around use the free and adaptable OBS Studio tool.
- It clearly sounds and sharp visual quality grabs your whole screen.
- Perfect for instructional, live feeds, gaming videos without requiring expensive programing.
- Gives complete control over audio, frame rate and visual resolution.
- Compatible with all main systems including Linux, Mac and Windows.
- Simple set up and use on any machine
But after recording many people ask, “Where is my video?”
Let’s walk through how to find and watch it.
Step 1: Open OBS and Check Your Recording Path
When you hit “Start Recording” in OBS, the video is saved to a specific folder on your computer. Here’s how to find out where OBS is saving your files:
For Windows and Mac:
- Open OBS Studio.
- Click on “File” in the top left corner.

- Select “Settings”.

- In the Settings window click “Output”.

- Under the Recording section look for “Recording Path”.
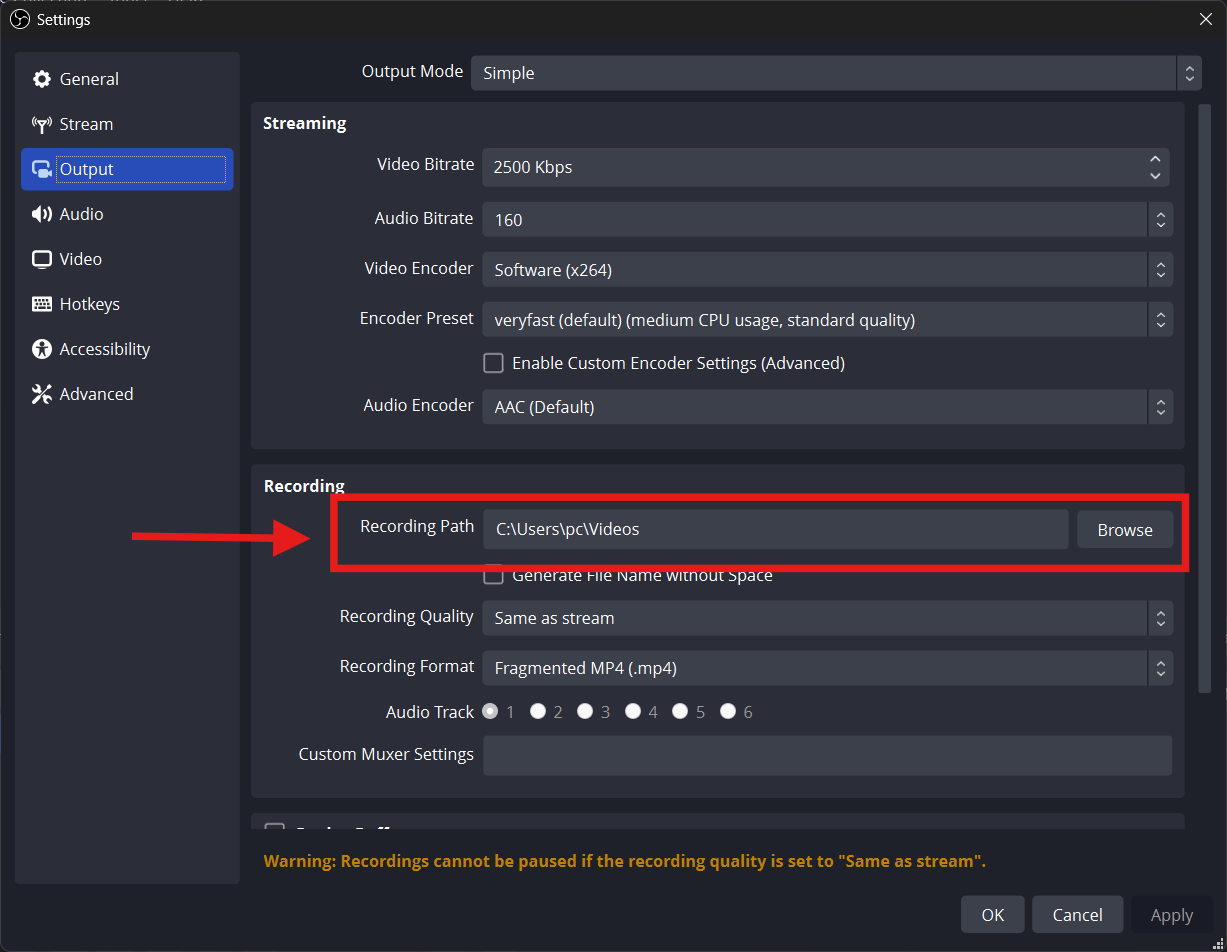
This shows the exact folder where your videos are being saved.
Copy or note down this path so you can access it quickly later.
Step 2: Use “Show Recordings” Shortcut (Quick Way)
OBS has a built-in shortcut that takes you straight to your recording folder.
Here’s how:
- Open OBS
- Click on “File” in the top left corner
- Select “Show Recordings”

This will open the folder on your computer where your OBS recordings are stored.
From here, you can click on any video file and it will open with your default media player.
Step 3: Find the Files in File Explorer or Finder (Manually)
If you want to go to the folder without opening OBS here’s how you can do it.
On Windows:
- Press Windows + E to open File Explorer
- Go to the folder shown in your OBS Recording Path
(Example: C:\Users\YourName\Videos\OBS)

- Double click the video file to open it
On Mac:
- Open Finder
- Go to Movies or the path set in OBS
- Find your video file and double click to play it
Step 4: Know Your File Format (MP4, MKV, FLV)
OBS lets you choose what file format your videos are saved in.
Go to;
- Settings > Output > Recording Format
The most common formats are:
- MP4 – Easy to open, best for editing or uploading
- MKV – More stable if OBS crashes during recording
- FLV – Small file size, not always supported by video editors
If your file won’t open, check the file type and change the format in OBS settings for future recordings.

Step 5: Open Your Recording with a Media Player
After finding the file you can view your recording using your computer’s media player.
Here are some good options:
On Windows:
- Windows Media Player (built-in)
- VLC Media Player (free and supports all file types)
On Mac:
- QuickTime Player (built-in)
- VLC Media Player (great for MKV or FLV files)
If your video doesn’t play install VLC, it plays almost everything.
Convert MKV or FLV to MP4 in OBS
If you record in MKV or FLV and want to convert it to MP4, OBS makes it easy.
- Open OBS
- Click File > Remux Recordings

- Click the “…” button to browse and select your video file
- Choose where to save the new MP4 file
- Click “Remux”

Your video will be converted and saved as an MP4 great for editing or uploading to YouTube.
How to Change the Save Folder in OBS
You can choose a different folder to save future recordings.
- Open OBS
- Click File > Settings > Output
- Under the Recording Path click “Browse”
- Choose the folder where you want to save your recordings
- Click Apply then OK
From now on all new recordings will be saved in that location.
Tip: Create a folder named “OBS Recordings” on your desktop or in your Videos folder to keep things organized.
Where to Use Your OBS Recordings
Once you have your video you can:
- Edit it in video software (like CapCut, iMovie or Premiere Pro)
- Upload it to YouTube, Instagram, TikTok or Facebook
- Send it by email or store it on a cloud service (like Google Drive or Dropbox)
- Keep it as a backup or training video
Your OBS recordings can be used for anything gaming, tutorials, online classes or vlogs.
Troubleshooting: Can’t Find or Open OBS Recordings?
Here are some quick fixes:
I can’t find my video file
- Open OBS > File > Show Recordings
- Check the “Recording Path” under Settings > Output
- Search your computer for .mp4, .mkv or .flv files
The video has no sound
- Make sure Desktop Audio or Mic/Aux was enabled during recording
- Go to Audio Mixer in OBS and check the volume levels
- Test your setup with a short recording
The video won’t open
- Try using VLC Media Player
- Check if the file is corrupted, rerecord if needed
- Convert the file using OBS’s Remux feature
Tips to Manage Your Recordings Better
- Name your recordings right after saving them (e.g, “gameplay1.mp4”)
- Keep all your OBS videos in one folder for easy access
- Backup your important recordings to a cloud or USB drive
- Use video editing software to cut, trim or enhance your footage
- Test your audio and video before long recordings to avoid mistakes
Conclusion
Finding and watching OBS recordings is easy once you know where to look. OBS stores your videos in a folder on your computer that any media player can play. Change the save location or file format to simplify things further.
Knowing how to access your recordings lets you watch, share, or edit your videos. OBS gives you full control over your material; you can find it now.
FAQs
1. Where are OBS recordings saved by default?
By default, OBS saves your video files to a specific folder on your computer once you hit the record button. If you’re using Windows your recordings are usually saved in:
C:\Users\YourName\Videos.
2. What file format does OBS use for recording?
OBS gives you a choice of different formats so you can decide how your recordings are saved based on what works best for your workflow. The most common options are MP4, MKV or FLV in OBS settings.
3. Can I change the folder where OBS saves videos?
Yes, you can absolutely change the default save location for your OBS recordings. This is especially useful if you want to keep your videos on an external hard drive, SSD or a separate folder. To do this:
Go to OBS > Settings > Output and change the “Recording Path”.
4. What if my video has no sound?
- Make sure Desktop Audio and Mic are enabled in your Mixer
- Open Settings > Audio to confirm the correct input and output devices are selected also the audio is not set too low.
- Play the video in a media player which handles multiple audio tracks.
5. How can I make OBS recordings easier to watch or share?
- Rename videos for easy searching.
- With a reliable media player
- Adjust videos before sharing.
- MKV/FLV to MP4 converter.
- Share videos on a private YouTube URL, Google Drive or Dropbox.