



































.png)
 简体中文
简体中文 
How to Prepare for a Singing Performance: A Step-by-Step Guide
You’ve rehearsed the song a hundred times in your bedroom. You know every word, every breath, every note. But the moment the spotlight hits, something shifts — your voice tightens, the backing track feels too loud, and the confidence you had an hour ago vanishes.
This happens to almost every singer before a performance. Not because they lack talent, but because preparation and performance are two completely different skills. Knowing your song is the starting point. Being ready to perform it — in front of people, under pressure, with live audio — is something you build deliberately, in stages.
This guide walks you through exactly that: six stages of preparation that cover every technical and psychological layer between private rehearsal and a confident live performance. Whether you’re preparing for a venue gig, a live stream, or a recording session, follow them in order.
Choose the Right Song for Your Voice and Venue

Match the Song to Your Vocal Range
The most expensive mistake a singer can make costs nothing — it’s choosing the wrong song. A performance built around a song that consistently strains your voice will unravel under pressure, because nerves tighten the instrument before you even open your mouth.
Before committing to any song, sing through its full range in a relaxed, private setting. Identify where your chest voice transitions to head voice, locate the peak note, and ask yourself honestly: can I hit that reliably on a bad day? If the answer is uncertain, it’s either the wrong song or the wrong key.
Transposing is not a compromise. Audiences respond to emotional connection and vocal control, not the original key of a song. A controlled performance in a lower key lands infinitely better than a strained attempt at the original pitch.
Match the Song to Your Performance Context
Song selection doesn’t end at vocal fit. The right song for your voice still needs to suit your performance setting.
Live streaming audiences behave differently from venue crowds. Attention drops faster, and a slow build that works in a concert hall can feel punishing on screen. Favor songs with immediate emotional presence — ballads with strong opening hooks, or uptempo tracks with clear, recognizable energy from the first bar.
For venue performances, consider the room size. An intimate space rewards vulnerability and quiet dynamics. A large stage demands projection and songs with natural performance peaks. Also confirm your backing track availability before committing — discovering that a high-quality instrumental version doesn’t exist two days before the show creates pressure that preparation should have eliminated.
Secure and Test Your Backing Track Early
Use high-quality instrumental versions and confirm the key and tempo match your voice before rehearsal begins. More critically, keep your backing track and vocal microphone on completely independent channels — once blended, you lose the ability to adjust one without affecting the other, and that balance is the most important mix decision in live performance.
Prepare Your Voice — Starting a Week Out
Build a Daily Vocal Routine the Week Before
Vocal preparation is a week-long discipline, not a morning-of ritual. The voice is a physical instrument — it responds to consistent care the way muscles respond to training.
Hydrate consistently — at least eight glasses of water daily. Avoid dairy, alcohol, and excessive caffeine in the days before the performance. Practice your song daily, but don’t run it at full power for hours at a stretch. Over-rehearsing fatigues the voice and can leave you hoarse exactly when you need to sound your best.
Warm Up With Purpose on Performance Day
A warm-up is not optional, and it is not the same as practice. Practice builds skill. A warm-up prepares the instrument for immediate use — think of it the way a runner treats a pre-race stretch.
A complete vocal warm-up takes 20 to 30 minutes and follows a specific arc:
- Lip trills and gentle humming — low-intensity vibration that activates vocal folds without strain
- Sirens — slow, smooth glides from chest voice through head voice and back
- Soft run-throughs of your hardest sections at 60–70% power, not full performance intensity
Never perform cold. A warm voice adapts — a cold one breaks.
Use Breath as Your Performance Foundation
Breath control is simultaneously a vocal technique and an anxiety management tool. Diaphragmatic breathing — expanding the belly rather than lifting the chest — provides the full support base your voice needs for sustained phrases and high notes. It also directly counteracts the shallow, rapid breathing that anxiety triggers and that causes the thin, shaky vocal tone singers fear most.
Set Up Your Microphone and Audio System
Hollyland is a Shenzhen-based audiovisual technology brand with a long track record in professional wireless transmission systems for broadcast and film — and the MELO P1 brings that same engineering philosophy to solo performers.

Choose the Right Microphone for Your Environment
The microphone you choose shapes every sound decision that follows. Understanding the fundamental difference between condenser and dynamic capsules is baseline knowledge for any performing singer.
Condenser microphones are sensitive and detailed — ideal for quiet indoor environments like bedroom live streams, studio sessions, or acoustic performances. They capture the full texture of a voice beautifully, but that sensitivity also means they pick up everything, including room noise and ambient sound.
Dynamic microphones are forgiving. They reject off-axis sound, handle high volume levels, and perform reliably outdoors and in noisy environments. Keep a dynamic mic two fingers to one fist from your mouth for optimal signal.
Position Your Microphone Correctly
Mic technique is a rehearsable skill, and poor technique ruins more performances than poor singing ever does. A few rules that apply regardless of capsule type:
- Tilt the capsule 15°–30° downward — never hold it face-on
- Maintain consistent distance; moving the mic away from your mouth causes dramatic volume drops, especially with condenser capsules
- Outdoors with a dynamic mic, keep it close to maximize signal against ambient noise
- Never point the capsule at a speaker or monitor — feedback is instant and destructive
Build a Clean Signal Chain Before Rehearsal
Connect the MELO P1 Smart Audio Mixer to your recording or streaming device via the top USB-C port. In your software, set “Audio Interface” as both input and output. Connect your backing track phone via Bluetooth by searching for “MELO P1” in your Bluetooth settings. Once connected, the mixer receives backing track audio and microphone audio as two independent streams, controlled individually through the HollyAudio App — Hollyland’s dedicated companion app for the MELO P1 system.

Shape Your Sound and Set Up Monitoring
Select and Refine Your Vocal Preset
Raw vocal input, even from an excellent microphone in a treated room, rarely sounds performance-ready without processing. Reverb, EQ, and compression are not artificial enhancements — they are standard tools that translate a voice into a polished, professional sound. The challenge for most solo performers is that dialing these in manually requires audio engineering experience most singers don’t have.
The HollyAudio App, available on iOS 12.0+ and Android 8.0+, solves this directly. It provides over a hundred professionally tuned presets organized by genre and style — apply any preset with a single tap and hear the result in real time through your monitoring earphones.

Match reverb intensity to your genre as a starting point:
- Low reverb — pop, folk, rap: intimate, upfront, maximum vocal clarity
- Medium reverb — R&B, retro ballads: natural stage presence, vocal detail preserved
- High reverb — classical, choir, anthems: spacious and cinematic, but clarity decreases at high levels
From there, fine-tune using the app’s controls: Low for warmth and body, Mid for presence and cut-through, High for airiness and brilliance, and Compression to smooth dynamic range and help the voice sit consistently in the mix.

The app’s “Record for Preview” feature transforms the preset selection process. Record a short vocal clip, loop it, and audition presets against the same material repeatedly — without singing live each time. This eliminates the perceptual bias of evaluating your voice while simultaneously producing it, and makes genuine A/B comparison possible.
Balance Vocal Volume Against the Backing Track
The most critical mix decision in live performance is the ratio between your voice and the music. Vocals too quiet and you disappear behind the track. Too loud and the performance feels thin and disconnected. The target: vocals sitting slightly above the backing track, integrated enough that the two feel like parts of the same performance, distinct enough that the voice always leads.
In the HollyAudio App, a reliable starting point for indoor condenser mic use at medium gain: mic volume 10–12, backing track 13. Test this balance during the chorus specifically — the loudest section exposes imbalances that quieter passages mask. Keep USB output volume between 15 and 20; exceeding this triggers automatic compression on most streaming platforms that degrades audio quality in ways you cannot fix after the fact.
Set Up Wireless In-Ear Monitoring
Performing without accurate monitoring means making real-time decisions based on incomplete information. Pitch drifts, timing loosens, and confidence erodes — not from lack of ability, but from lack of feedback.
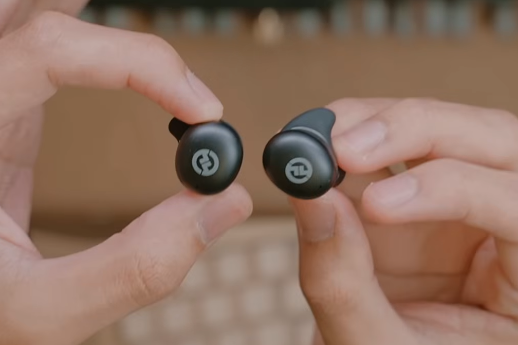
The MELO P1’s wireless monitoring earphones connect to the Smart Audio Mixer via 2.4G with low latency. What you hear is your processed voice with effects applied, exactly as your audience hears it — not the dry signal from your mouth. The difference is significant: monitoring a dry voice while the audience hears a processed one means responding to a sound that isn’t being delivered. Volume adjustments are handled through the MELO P1’s Bluetooth Remote Control — no phone required, no break in performance focus. Start at monitoring volume 36 and adjust from there.
Rehearse Like It’s the Real Performance
Run Complete, Uninterrupted Full Performances
There is a significant and underappreciated gap between knowing a song well and being able to perform it under pressure. Section practice builds skill with individual components while leaving you completely unprepared for the experience of managing all of them simultaneously, for the full duration of the performance.
Full, uninterrupted run-throughs are the only rehearsal format that closes that gap. Use your actual microphone, actual backing track, and actual monitoring setup. Perform standing up, in your performance outfit, in front of a mirror or camera. When mistakes happen — and they will — do not stop. Recovery under pressure is a performance skill that can only be built by practicing recovery, not by stopping every time something goes wrong.
Record yourself on video. Audio feedback alone is insufficient — video reveals posture drift, inconsistent mic distance, jaw tension, and physical habits that undermine stage presence without ever being audible. Review the footage critically. Aim for at least three complete run-throughs in the 48–72 hours before the performance.
Rehearse Real-Time Audio Control
Live audio management is a motor skill. A preset switch that takes two confident seconds in rehearsal becomes an awkward interruption on stage if it hasn’t been automated through repetition.
Assign your key presets to the MELO P1’s Bluetooth Remote Control buttons before rehearsal begins. Practice transitioning from a speaking preset to a singing preset at the exact moment in the song where that switch occurs. Engage the Ducking feature — which automatically lowers the backing track when your vocals are detected — and rehearse the transition between addressing your audience and singing until the audio shift is seamless.

Rehearse muting and unmuting without looking at the remote. Every button operation that becomes muscle memory in rehearsal is one fewer conscious decision competing for your attention on stage.
Sound Check and Take the Stage
Run a Systematic Pre-Show Sound Check
A sound check is a diagnostic, not a performance. Its purpose is to confirm that every technical element is functioning correctly before you go live, so nothing you encounter during the performance is a surprise. Work through this sequence every time:
- Power on all devices — confirm indicator lights are solid, not flashing
- Check battery levels on mic, earphones, and remote; the MELO P1 mic delivers up to 12 hours of battery life, but verify before every performance
- Play a section of your backing track and watch the HollyAudio App volume meter — confirm correct routing and level
- Sing at full performance volume through a verse and chorus — verify monitoring balance and output signal to your recording or streaming device
- Use “Record for Preview” for a final 30-second full mix check — no second person needed
This takes 15 minutes. It can be done entirely solo. It eliminates the category of problems that only appear when everything runs simultaneously.
Frequently Asked Questions
What’s the best microphone for a singing performance?
Environment determines the answer. Dynamic microphones handle noise, movement, and outdoor conditions reliably. Condenser microphones capture more vocal warmth and detail in quiet indoor settings. The Hollyland MELO P1 offers both capsule types on the same wireless mic body — switchable in under a minute — making it the practical choice for performers who work across different environments without wanting to manage multiple microphones.
How do I balance my vocals with a backing track?
Test the balance during the loudest section of the song — the chorus or climax — because that is where imbalances are most exposed. Vocals should sit slightly above the backing track: present and leading, but not isolated. In the HollyAudio App, start with mic volume at 10–12 and backing track at 13, then adjust by ear through your monitoring earphones. Keep USB output between 15 and 20 to avoid triggering platform compression.
Do I need a sound engineer for a live singing performance?
Not necessarily. The right setup gives a solo performer complete control over source separation, channel balance, preset selection, and output levels — the core functions of live sound engineering. The MELO P1 and HollyAudio App handle all of this from a smartphone or Bluetooth remote, without requiring technical expertise or a second person at a mixing desk.
How do I practice performing without a full band or audience?
Replicate every condition of the actual performance: microphone in hand, backing track running, monitoring active, standing in your performance outfit in front of a mirror or camera. The physical and sensory conditions of performance are what create performance anxiety — making those conditions familiar in rehearsal is what reduces it. Record yourself on video and review the footage critically every time.
Can I change my vocal effects during a live performance?
Yes — and with proper preparation, it is seamless. Assign your presets to the MELO P1’s Bluetooth Remote Control buttons before the show and rehearse every transition during run-throughs until the button press is automatic. The remote handles preset switching, reverb adjustment, earphone volume, and Ducking activation in real time without phone interaction. A transition rehearsed fifty times takes two seconds on stage and attracts no attention from the audience.
Conclusion
Performance preparation is not a talent — it is a system. And systems can be learned, practiced, and improved with every show you give.
Hollyland built the MELO P1 for exactly this reality — a wireless microphone with swappable capsules, a smart audio mixer that keeps every source cleanly separated, low-latency monitoring earphones, and a Bluetooth remote, all in one portable charging case. It doesn’t replace preparation. It removes the technical ceiling that preparation alone cannot overcome.
Do the work. Build the system. The performance takes care of itself.
Ready to Perform with Professional Sound — Anywhere?
The Hollyland MELO P1 is the all-in-one wireless performance system built for singers who want studio-grade sound without a production crew.
Explore the Hollyland MELO P1


Subscribe us
to get the latest news!


