


.png)
CapCut Video Editing: Complete Beginner’s Guide to Editing Like a Pro
CapCut has become one of the most widely used video editors for social media creators, and for good reason. It packs a desktop-grade toolset into a free, mobile-first app. Whether you’re editing your first TikTok or refining a multi-clip Reel, this guide covers every stage of the CapCut workflow, from importing footage to exporting platform-ready video, so you can produce polished content faster.
What CapCut Can Do and Who It’s Built For
CapCut is a free, cross-platform video editor available on iOS, Android, Windows, and Mac. It’s built primarily for short-form social content: TikTok videos, Instagram Reels, YouTube Shorts, and vlog-style footage. The app combines a simple template library with a full timeline editor. This makes it useful for quick social posts. It also supports more planned and detailed video editing.
Timeline editing, keyframe animation, audio tools, auto-captions, and many AI tools, like background removal and auto-reframe, are available on the free plan. But availability can change based on platform and region. It may also depend on your subscription status. An optional CapCut Pro subscription unlocks additional AI tools and premium assets.
This guide walks through the full workflow from first import to final export. No prior editing experience required.
Getting Started: Importing Footage and Understanding the Interface
The first few minutes inside CapCut can feel disorienting. Here’s how to get oriented quickly.
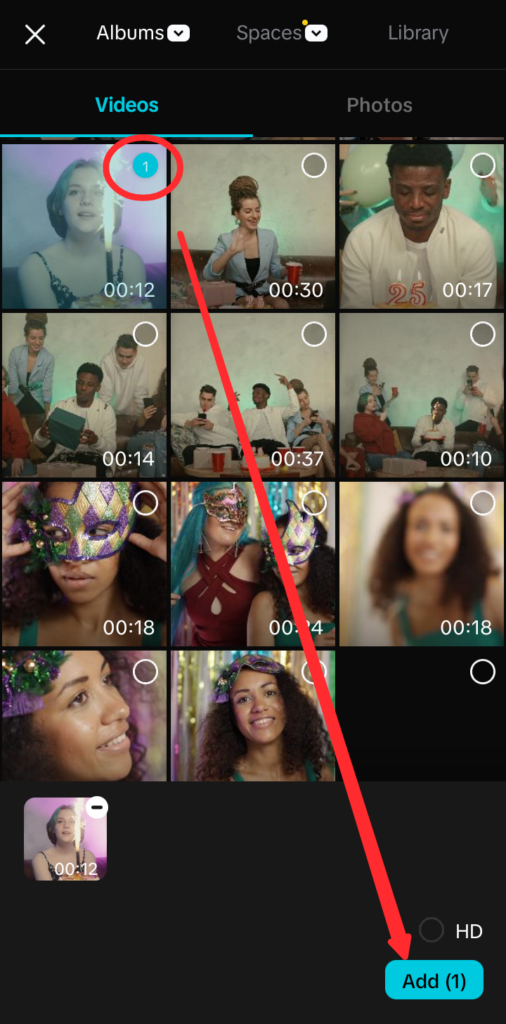
Starting a new project:
- Open CapCut and tap New Video on the home screen.
- Select your clips from the camera roll or cloud storage. You can import multiple clips at once; CapCut places them in the timeline in the order you select them.
- Tap Add to enter the editing workspace.
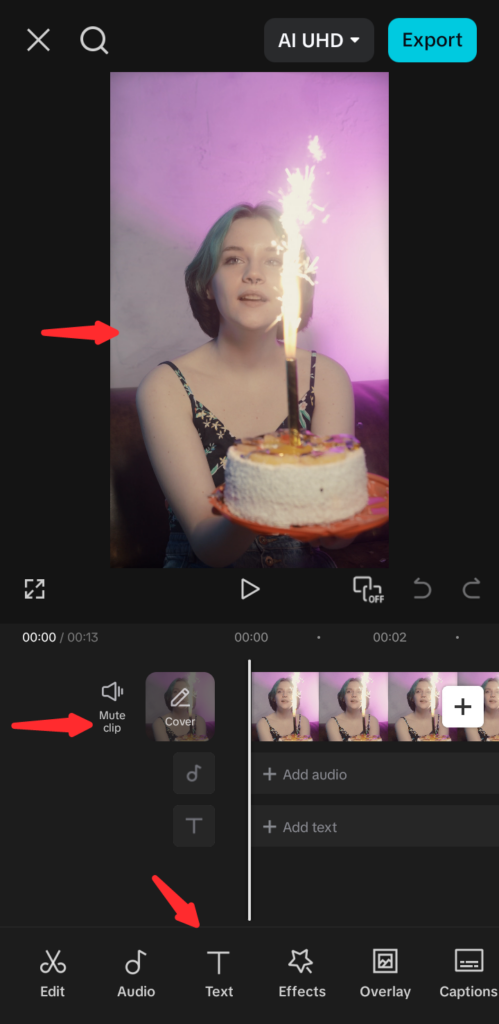
Once your project opens, three core interface zones define the workspace:
- Preview window (top): Shows the current frame at the playhead position. Tap play to preview your edit in real time.
- Timeline (center): Your editing canvas. Clips appear as horizontal blocks. Drag them left or right to rearrange. Pinch to zoom in or out.
- Toolbar (bottom): Context-sensitive. When no clip is selected, this bar displays global tools (audio, text, stickers, effects). When a clip is selected, it switches to clip-level tools (split, trim, speed, and others).
Pro Tip: Pinch to zoom into the timeline before making cuts. Working zoomed in significantly reduces the chance of accidentally splitting a clip one frame too early or too late.
The CapCut Timeline Explained
The CapCut timeline is layer-based. Each layer type handles a specific kind of content, and understanding which layer does what prevents most early confusion:
- Main video track: Your primary sequence of clips runs here as a horizontal chain. This is where you cut, trim, and rearrange footage.
- Audio track: Sits below the video track. Background music, voiceover recording, and imported audio live here as independent clips.
- Text track: One or more horizontal layers for captions, titles, and animated text. Each element’s on-screen duration is controlled by dragging its edges in the timeline.
- Sticker and effect track: Overlays for stickers, GIFs, and clip-level effects. Each overlay sits as an independent layer with its own duration.
Layers appear stacked in the preview window as you edit. Items placed higher on the timeline appear above others. Tap any layer to select it and open its controls. You can then adjust that layer from the toolbar menu.
Mobile vs. Desktop Interface Differences
CapCut mobile and desktop share the same main tools. The layout changes based on screen size. On desktop, the timeline is wider and easier to see. Panels stay open at the same time instead of being hidden. Keyboard shortcuts also help with scrubbing through playback. On mobile, tools appear in a scrollable row under the timeline. If a guide mentions swiping on desktop, use the nearby button instead. The functions stay the same; only navigation looks different.
Core Editing Tools: Cut, Trim, Split, and Speed
These foundational tools appear in every project. Getting comfortable with them before layering in effects or music will save significant time.
Split (Cut at Playhead)
Splitting divides a clip into two independent segments at your preferred frame of the playhead.
- Tap the clip in the timeline to select it.
- Drag the playhead to the frame where you want the cut.
- Tap Split in the toolbar.

The clip becomes two separate pieces. Delete either half, rearrange them, or leave a gap for pacing purposes. Split is the most frequently used action in CapCut.
Pro Tip: Use rapid splits to remove pauses and filler words from talking-head footage. Play the clip, pause at each moment of dead air, split, then delete that segment. The result plays back cleanly with no visible jump.
Trim Handles
Trimming shortens a clip from either end without shifting the rest of the timeline. Select a clip and drag the white edge handle inward from the left or right side to shorten it. Trimmed frames are hidden, not deleted; drag the handle back outward to restore them. Use trim to cut out a shaky camera start or an awkward moment before the subject settles.

Rearranging Clips
Press and hold any clip in the timeline, then drag it to a new position. Surrounding clips shift automatically to close the gap or make space. This is the tool to reach for when restructuring the narrative flow of footage after importing.
Speed Controls

CapCut offers two distinct speed tools, and knowing the difference is important:
- Normal speed: A flat multiplier applied across the full clip. Select a clip, tap Speed, and choose a value from 0.1x (extreme slow motion) to 100x (hyperlapse). Enable Maintain Pitch if you don’t want audio to distort with the speed change.
- Speed Curve: Allows you to ramp speed up or down within a single clip rather than applying one flat value. Use a built-in preset (Montage, Hero, Bullet, Jump) or draw a fully custom curve. This is the technique behind the cinematic slow-motion ramps common in travel and action content.

Pro Tip: For a speed ramp that lands with real impact, position the curve’s slowest point at the visual peak of the action: the highest point of a jump, the widest extension of a movement, the moment before impact. The contrast between the fast lead-in and the slow peak creates the cinematic effect.
Reverse
Select a clip, tap Edit, then choose Reverse from the toolbar below. The clip plays backward. This works especially well with in-camera motion: a liquid pour, a door swinging open, or a camera pull-back. Combine with a speed change for a stylized rewind effect.
Freeze Frame
Move the playhead to the exact frame you want to hold. Tap Edit, then Freeze. CapCut inserts a still image of that frame as a separate clip in the timeline. Drag its edge to adjust how long it holds. Use freeze frame for a comedic pause, a reaction beat, or to dwell on a visual detail while voiceover continues over it.

Transitions, Effects, and Filters
How to Add and Adjust Transitions
Transitions in CapCut appear between two clips in the timeline, represented as small icons at each clip junction rather than as separate track elements.
- Tap the white square icon where two clips meet.

- Browse the transition panel by category: Slice Zoom, Burn Split, Zoom Swipe, Paper Burn, and many more.

- Tap any transition to preview it live in the preview window.
- Tap Apply to All to use the same transition throughout the edit, or leave it applied only to the selected junction.

- Use the duration slider to set the transition length, typically between 0.3 and 1.0 seconds.
A clean hard cut between clips is a legitimate choice. Not every junction needs a visual transition, and many professional social videos use cuts almost exclusively.
Clip Effects vs. Filters: What’s the Difference?
Both tools change how a clip looks, but they operate differently and serve different purposes:
- Clip effects alter a clip’s visual appearance dynamically: camera shake, glitch distortion, echo trails, zoom bursts. They’re applied from the Effects panel and occupy the sticker/effect track as overlay layers. They’re best used sparingly, at specific moments where you want to emphasize action or signal an energy shift.
- Filters apply a static color grade to a clip or across the full project, adjusting tone, contrast, and saturation similarly to a photo preset. The intensity slider controls how strongly the filter is applied.

For a consistent look, use one filter across all clips. Apply it at the same strength level every time. Strong filters can look too bright on small screens. They may also reduce clarity and make visuals harder to read.
Text, Auto-Captions, and Subtitle Editing
Captions are one of the highest-impact additions you can make to a social video. Most users scroll with sound off, and on-screen text is the primary reason they keep watching when audio is unavailable.
Adding Basic Text
- Tap Text in the main toolbar (with nothing selected in the timeline).

- Tap Add Text, type your content, and confirm.

- A text block appears in the preview window and as a layer in the timeline.
- Drag the edges of the text layer in the timeline to control when it appears and disappears.
- Tap and drag the text in the preview window to reposition it on screen. Use the corner handles to resize.
In the formatting panel, adjust font, color, alignment, background fill, and drop shadow. For social video, high-contrast text with a filled background (white text on a dark pill, or dark text on a light background) is the most consistently legible choice across varied footage.
Animating Text: In and Out Animations
Select the text layer and tap Animation in the toolbar. Three tabs control behavior:
- In: How the text enters the frame. Options include fade, slide, pop, typewriter, and bounce.
- Out: How it exits. Options include fade, blur out, and wipe.
- Loop: Continuous animation while the text is visible on screen: shake, pulse, wave.


A 0.3-second fade-in reads as clean and polished. Over-animated text draws attention away from the video itself and can make content feel less professional.
Auto-Captions
Auto-captions transcribe the spoken audio in your video and generate time-synced subtitle segments automatically. This is one of CapCut’s most useful features for social content.
- With dialogue or voiceover already present in the timeline, tap Text in the main toolbar.
- Tap Auto Captions.

- Select the spoken language and tap Generate.
- CapCut processes the audio and populates the text track with synced caption segments.
- Review each segment by tapping it in the timeline. Correct any misheard or mistranscribed words.
- Apply a caption style from the preset panel. The style applies to all segments at once.
Pro Tip: Fix transcription errors before applying a style. Styling first, then discovering errors, means correcting segments individually after formatting is already set. A quick read-through pass before styling takes less time than fixing mismatches afterward.
Captions vs. Manual Subtitles
Auto-captions work by transcribing existing audio from your video. If you need subtitles in a different language, or if you’re working from a script and want to place each line manually, use the standard Add Text approach and drag each text segment to its precise position in the timeline.
Audio Editing in CapCut: Music, Voiceover, and Sound Design
Audio quality has an outsized effect on how professional a video feels. Viewers will tolerate imperfect visuals far longer than they’ll tolerate poor audio. CapCut’s audio layer gives you the tools to handle every part of the audio workflow.

Adding Background Music
- Tap Audio in the main toolbar.

- Tap Sounds to open the CapCut music library.
- Browse by mood or category, or use the search bar. Tap the preview icon to audition a track.
- Tap the + button to add the track to your project. It appears as a clip in the audio track beneath your video.

- Trim the audio clip by dragging its edges, the same way you trim a video clip.
To use locally stored music, tap the Folder icon. Then tap on the Device option to import audio files saved to your device.
Volume Adjustment and Audio Fades
Select the audio layer and use the Volume slider to set the overall level.


To add fades:
- Select the audio layer and tap Fade in the toolbar.

- Set a fade-in duration at the start and a fade-out duration at the end.

A 1 to 2 second fade-out prevents an abrupt audio cutoff when the music track extends past your final video frame.
Extracting Audio from a Video Clip
Go to Audio, then Extract, and select a video file. CapCut separates the audio from the video and places it in the audio track as an independent clip. You can then delete the video file and work with only the sound.
Syncing Music to Your Edits with Beat Sync
Beat Sync identifies rhythm markers in your music track and uses them as suggested cut points.
- Add your music to the audio track first.
- Select the audio layer and tap Beats in the toolbar.

- CapCut automatically places beat markers on the waveform.
- Toggle individual markers on or off to select which beats guide your edits.
- Use these markers as reference points when splitting your video clips. Cuts that land on the beat feel tight and rhythmically deliberate.
For more precise control, zoom into the audio waveform until amplitude peaks are visible and place your split points manually on the visual peaks. This is especially useful when the auto-detection misses irregular or syncopated rhythms.
How to Record and Clean Up Voiceover
Recording inside CapCut:
- Tap Audio, then Record (microphone icon).

- Move the playhead to the point where narration should begin.
- Tap the Record button. Speak clearly after the countdown, then press the Record button again to stop.

- The recording appears as a clip in the voiceover track.
Trim dead air from the start and end using the edge handles. When balancing voiceover against background music, set music volume to roughly 20 to 30 percent of full while narration sits at full level. This keeps dialogue legible without removing the music from the mix entirely.
Noise reduction:
Select any audio clip and tap Reduce Noise in the audio tools panel. The filter reduces background hum, wind noise, and room reverb.
Noise reduction tools work best when the source audio is already reasonably clean to begin with. If you’re recording voiceover or on-location interviews, starting with clean captured audio reduces how much CapCut needs to correct. A compact wireless microphone like the Hollyland LARK M2 (9g, 40-hour battery) is purpose-built for this use case: it captures isolated, low-noise audio on the move, giving CapCut’s noise reduction less to correct and reducing the risk of artifacts in the final output. Cherry on top! There’s a dedicated Environmental Noise Cancellation (ENC) feature that helps you capture super clean audio.
CapCut AI Tools: What’s Worth Using
CapCut’s AI feature set has expanded quickly, and quality varies considerably across tools. These are the features with clear, practical value for everyday editing:

- AI Background Remover / Smart Cutout: Removes or replaces the background in a standalone video clip. Performs well on clips with consistent, high-contrast backgrounds. Struggles on busy or low-contrast footage where the subject and background share similar colors. Useful for title sequences, product inserts, and graphic overlays. Available on the free tier with some processing limits.
- Auto Reframe: Detects the primary subject in a horizontal clip and reframes it for a vertical format (9:16). Saves significant time when repurposing landscape footage for Shorts or Reels. Review the output manually; subject tracking can drift on fast-moving footage.
- AI Voiceover / Text-to-Speech: Converts typed text into synthesized narration. Voice quality ranges from natural to robotic depending on the voice selected. Multiple languages and speaking styles are available. Several premium voices require a CapCut Pro subscription.
- AI Color Match: Matches the color grade of one clip to another. Useful when clips come from different cameras or shooting conditions. Output typically requires manual fine-tuning before it reaches a production-ready state.
- Auto-Generated Captions: Covered in the Text section above. Among the most reliable and consistently useful AI features in the app.
Note: Several AI features are restricted to CapCut Pro, including extended text-to-speech voice libraries, AI background generation, and access to certain premium templates. Before building a workflow around a specific AI tool, confirm whether it’s available on the free tier.
Using CapCut Templates
Templates are pre-built video formats that include preset clip timing, effects, music, and text. For creators who want a polished output without building a timeline from scratch, templates are the fastest available path.
To use a template:
- From the CapCut home screen, tap Templates in the bottom navigation bar.

- Browse by category (Daily life, Selfie, Family, Friendship, and others) or search by keyword. Trending templates frequently pair with currently popular TikTok sounds.

- Tap a template to preview it in full, then tap Use Template.
- Replace each clip placeholder with your own footage by tapping the slot and selecting from your camera roll.
- Tap Edit to open the full project and adjust any text or additional elements.
Templates tie your clips to a defined duration set by the original format. To use a template as a starting point rather than a rigid structure, open the full editor after applying it and adjust timing, remove elements that don’t serve the video, or swap the audio.
Pro Tip: If the template’s original music isn’t licensable for your context, swap it. Select the music layer, tap Change, and replace it with a track from the CapCut library or your own imported audio. Most of the template’s visual pacing carries over cleanly with a different track.
Exporting Your Video: Resolution, Frame Rate, and Platform Settings
Export settings determine how much quality survives the delivery process. The goal is the highest quality that the target platform will actually preserve, without generating unnecessarily oversized files.
Resolution: 1080p vs. 4K
- 1080p is the standard for all major social platforms. Every platform recompresses video on upload, and 1080p exports handle that compression cleanly. For TikTok, Reels, and Shorts, 1080p is the right choice.
- 4K is worth selecting only when your source footage was captured in 4K, and you’re uploading to a platform that delivers 4K to viewers, currently YouTube in most cases. Uploading 4K to TikTok or Instagram provides no visible quality benefit and produces a significantly larger file.
Frame Rate
- 24fps: The cinematic standard. Best for narrative, vlog, and travel content where a film-like quality of motion is intentional.
- 30fps: The standard for social video. Compatible across all platforms and appropriate for the majority of content types.
- 60fps: Best for fast-motion content including sports, action, and gaming, where smooth motion is a priority.
Aspect Ratio
On the desktop application, it is recommended to set your project’s aspect ratio before adding clips, not at the export stage. You can do this by clicking the Modify button on the PC app’s interface.
On the mobile app, tap the Aspect ratio button in the project toolbar and choose your target format from the preset options.
| Platform | Aspect Ratio | Recommended Resolution | Frame Rate |
|---|---|---|---|
| TikTok | 9:16 | 1080p | 30fps |
| Instagram Reels | 9:16 | 1080p | 30fps |
| YouTube Shorts | 9:16 | 1080p | 30–60fps |
| YouTube (standard) | 16:9 | 1080p to 4K | 24–60fps |
| Instagram Feed | 1:1 | 1080p | 30fps |

Bitrate and File Size
Higher bitrate produces better visual quality at the cost of larger file size. In CapCut’s export panel, the Recommended bitrate setting balances quality and file size for most use cases. Increase the bitrate value if exported videos show compression artifacts such as blockiness or color banding. Keep in mind that platforms apply their own compression after upload regardless of your export bitrate.
Export steps:
- Set resolution, frame rate, and bitrate.
- Tap the Export button (the arrow icon) in the top-right corner of the editor.
- Tap Export to render the final file.

- Save to your camera roll, share directly to a platform, or both.
7 Tips to Make CapCut Videos Look More Professional
These CapCut techniques fix common quality issues for beginner and intermediate social videos. You can apply each one using CapCut’s built-in tools.

1. Use Speed Curves Instead of Flat Speed Changes
A uniform 0.5x slow-motion clip looks mechanical. A speed curve that starts fast, ramps down to a slow point at the action’s peak, and then accelerates back out reads as intentional and cinematic. In the Speed panel, select Curve and use the Hero or Montage preset as a starting point before adjusting the control handles.
2. Sync Your Cuts to the Beat Using the Waveform View
Zoom into the audio track until the waveform’s amplitude peaks are clearly visible. Place each split point directly over a beat peak. Cuts that land on the beat feel energetic and precise. Cuts between beats feel slightly off, even when viewers can’t explain why.
3. Apply One Filter Across All Clips at a Consistent Intensity
Clips shot at different times, under different lighting conditions, or with different cameras will have inconsistent color profiles. Choosing a single filter and applying it at the same intensity (typically 30 to 60 percent) across every clip creates visual cohesion without heavy grading. Extreme filter settings tend to look overwrought on small mobile screens.
4. Keep Transitions Minimal and Purposeful
A clean hard cut is the correct default for most fast-paced social content. Transitions earn their place only when they serve a specific purpose: a swipe transition that mirrors a physical camera pan in the footage, or a blur transition that clearly signals a change in time or location. Applying the same loud transition to every clip junction makes the edit feel cluttered and amateurish.
5. Shoot in Your Target Aspect Ratio Before You Import
If your content destination is vertical (TikTok, Reels, Shorts), shoot vertically. Reframing a horizontal clip to 9:16 inside CapCut crops out a large portion of the original frame. You risk losing faces, action details, or contextual visual information that the horizontal composition included.
6. Use Keyframes for Subtle Motion on Static Shots
A completely static shot between dynamic clips feels flat and inert. A barely perceptible slow zoom using keyframes adds life to the frame without drawing attention to itself. Tap the diamond keyframe icon at the start of the still shot, move the playhead a few seconds ahead, and increase the scale slightly. The resulting push-in is felt rather than seen.
7. Always Preview at Full Resolution Before Exporting
Tap the full-screen preview icon and play back from the beginning before hitting export. Check for caption misalignment, audio sync drift, abrupt volume changes, and transitions that run too long. Catching these during the review saves an entire export cycle per issue.
Frequently Asked Questions
Is CapCut free to use?
Yes. CapCut is free to download and use on iOS, Android, Windows, and Mac. An optional CapCut Pro subscription unlocks additional AI tools, premium templates, extended text-to-speech voices, and certain export options. Core editing tools including trim, split, speed controls, transitions, and auto-captions are fully available on the free tier without restriction.
Can I use CapCut on a desktop computer?
Yes. CapCut has dedicated desktop applications for both Windows and Mac. The desktop version includes the same core editing tools as the mobile app, with a larger timeline canvas, simultaneous panel visibility, and keyboard shortcut support. Projects sync between mobile and desktop through CapCut’s cloud backup feature, though sync is not automatic unless enabled in settings.
Does CapCut add a watermark?
Regular videos edited manually in CapCut can be exported without a watermark. This applies when you only use free assets. You must also remove the default ending logo clip. Some templates and advanced AI tools in the free version add a required CapCut watermark. This watermark cannot be removed by editing text elements. To export those projects without restrictions, a CapCut Pro subscription is usually needed. Another option is using built-in methods, such as saving and sharing to TikTok. You can also trim or crop the exported video afterward.
What video format does CapCut export?
CapCut exports video as MP4 files encoded with H.264 or H.265 (HEVC). MP4 with H.264 encoding is compatible with all major social platforms and video players. H.265 produces smaller files at equivalent quality but is not accepted by all platforms, making H.264 the safer default for broad compatibility across destinations.
Can I edit a video without losing quality in CapCut?
Most quality loss in CapCut happens during the export stage. The editing process usually does not reduce video quality. To keep quality as high as possible, match export resolution to your source footage. Choose the highest available bitrate before exporting the final file. Avoid exporting a video again after it has been compressed. Starting with the best export settings gives more flexibility later. This can help when uploading to platforms that add compression.
Is CapCut safe and private?
CapCut is developed by ByteDance, the company behind TikTok. Like most cloud-connected apps, it requests camera roll access and may process content through remote servers when cloud-based features are active. If data privacy is a concern, review CapCut’s current privacy policy and disable cloud backup in the app settings. For a complete breakdown of the privacy considerations, refer to a dedicated CapCut privacy explainer.
Conclusion
CapCut is often seen as an easy video editing app to learn. You can import files with a quick drag or tap. Visual effects, filters, and transitions are easy to browse and preview. Applying them to your timeline takes only a few clicks. Adding background music or recording a clear voiceover is also straightforward. Exporting a high-resolution video to social platforms takes little effort. The clean interface keeps common editing tasks simple and easy to follow.


Subscribe us
to get the latest news!


