


































.png)
 简体中文

After connecting an external webcam, your video call app may still select the laptop’s built-in camera. You might look for a Windows 11 setting to change the default camera, just as you would for audio output. Unfortunately, Windows 11 has no system-wide setting for this. Two reliable methods can help you select your external webcam in your apps. This guide explains both methods step by step, using the Hollyland Lyra and HollyStudio app as examples.

Hollyland Lyra - 4K AI Webcam
A flagship 4K AI webcam featuring a large 1/1.5″ CMOS sensor, smart auto-framing, and studio-grade 48 kHz/24-bit audio for effortless streaming and conferencing.
Key Features: 1/1.5″ CMOS & 4K30 | AI Tracking & Auto Framing | 48 kHz/24-bit Audio

Windows 11 Doesn’t Have One “Default Camera” Button — Here’s Why That Matters
Unlike audio, which has a dedicated default output selector in Sound settings, Windows 11 has no central toggle for cameras. Each application decides which camera to use based on your last saved selection or the first camera device Windows detects at launch.

That leaves you with two practical methods:
- Per-app selection: Set the camera source inside each video app’s own settings. This is the recommended method for most users.
- Device Manager disablement: Disable the built-in camera at the system level so every app automatically uses the only camera Windows can see.
Step 1: Connect Your Webcam and Confirm Windows 11 Recognizes It
Before changing any app settings, check whether Windows 11 detects your webcam. If Windows cannot detect it, changing app settings will not help.

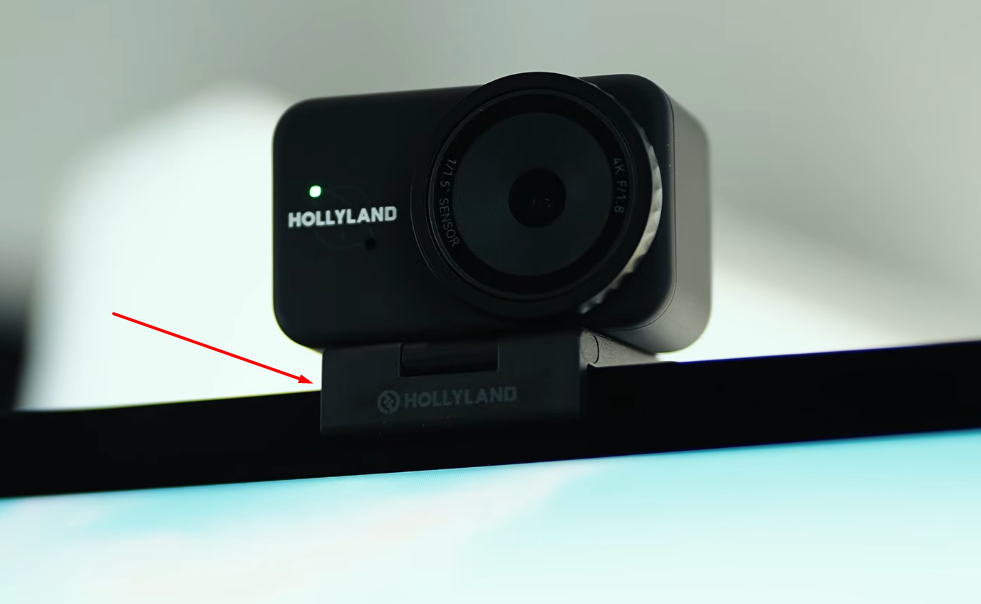
- Mount the webcam on your monitor. Clip the Lyra onto the top bezel of your monitor. Press the clip down until it sits flush, then tilt the camera body forward or back to direct the 82° field of view at face level.
- Connect via USB-C. Plug the included USB-C cable into the Lyra’s USB-C port, then connect the other end to a USB 3.0 port on your PC.


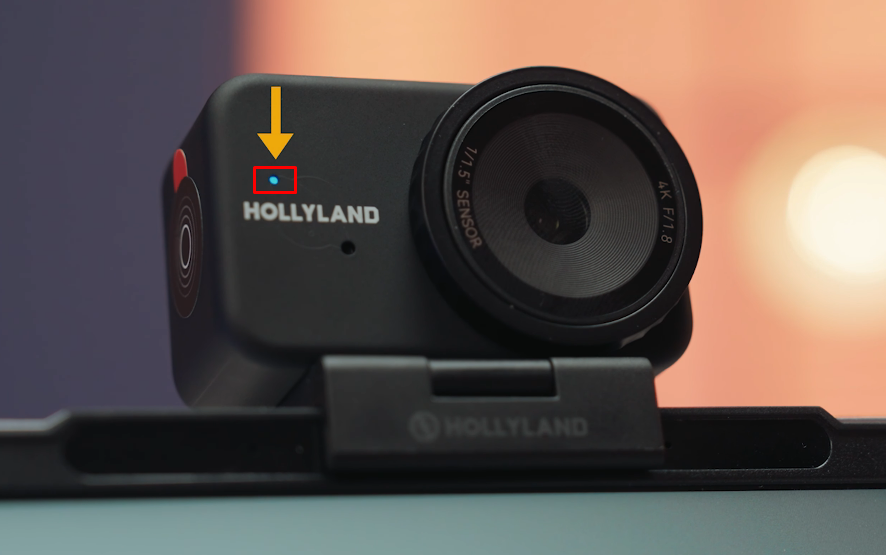
- Watch the LED indicator. After connection, the Lyra’s LED blinks blue briefly while Windows initializes the device. It then settles to solid blue, confirming the camera is powered, connected, and ready for use. If the LED stays off, the cable is not fully seated, or the port is not supplying sufficient power.
- Check the Windows notification. A “device is ready” toast notification should appear in the taskbar notification area within a few seconds of connection.
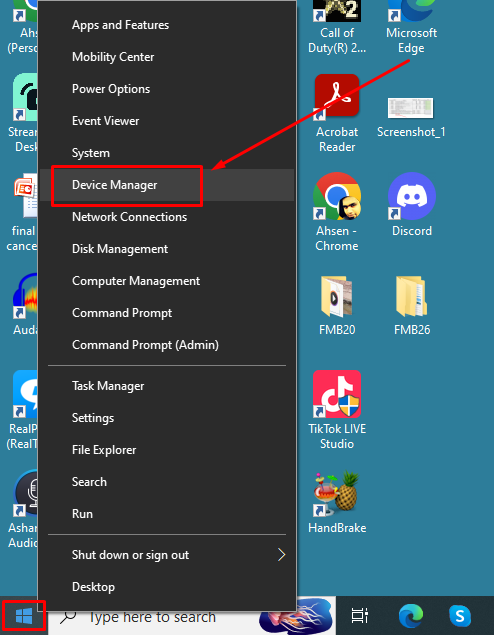
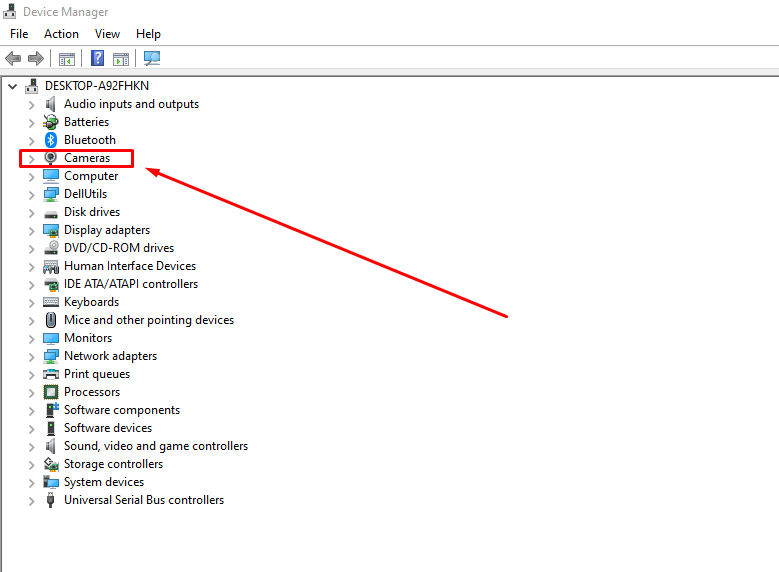
- Verify in Device Manager. Right-click the Start button and select Device Manager. Expand the Cameras or Imaging Devices category. You should see Hollyland Lyra listed there. This means Windows installed the UVC driver automatically. You don’t need to install any drivers manually because Lyra supports UVC and plug-and-play. If Lyra doesn’t appear here, check the Troubleshooting section before continuing.
Step 2: Change the Camera Inside Each Video App
The safest and most flexible approach is to select your external webcam directly in each app’s settings. This method keeps the built-in camera available as a backup whenever the Lyra is disconnected.
Zoom
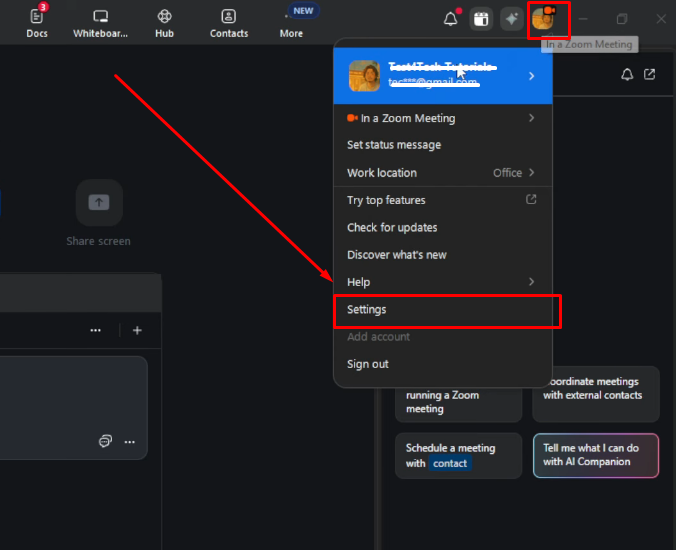
- Open Zoom, click the profile image icon, and select Settings from the menu.
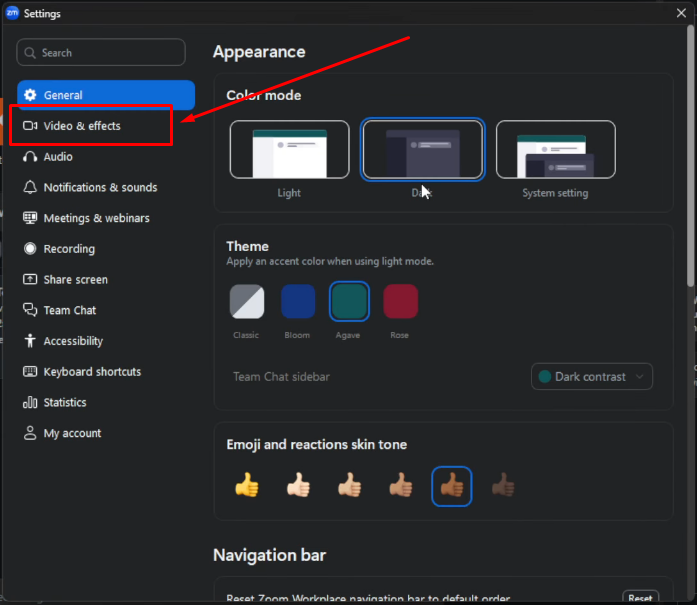
- Select the Video & effects tab in the left sidebar.
- Click the Camera dropdown and select Hollyland Lyra.
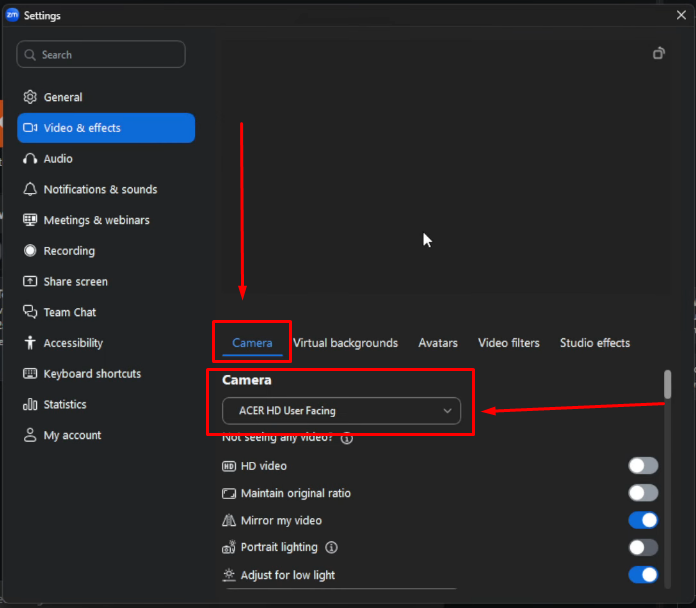
- The preview thumbnail updates immediately to show the Lyra’s wider 82° feed. You will notice the difference compared to the narrower view of a typical built-in camera.
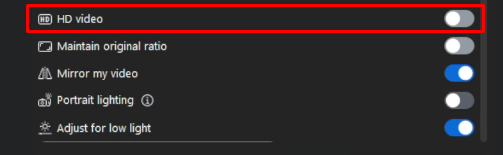
- Check the HD video toggle below the camera dropdown to allow Zoom to request 1080p output from the Lyra.
- Zoom saves the selection automatically and applies it to all future calls.
Microsoft Teams
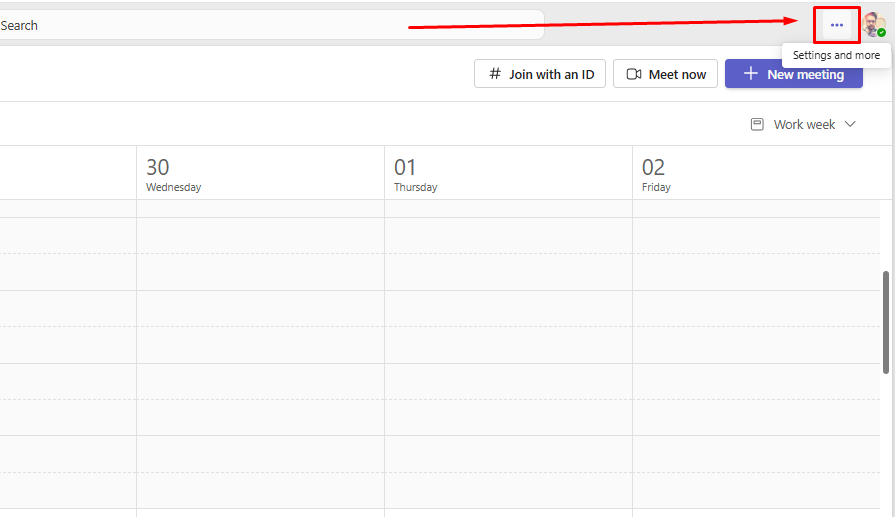
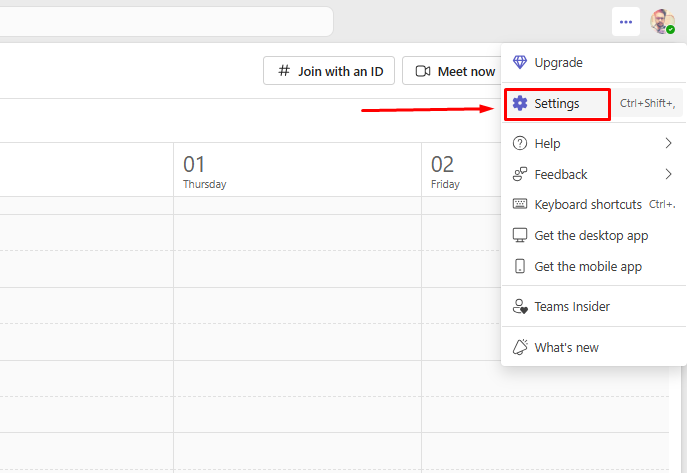
- Click the Settings and more option (three-dot menu), and select Settings from the menu.
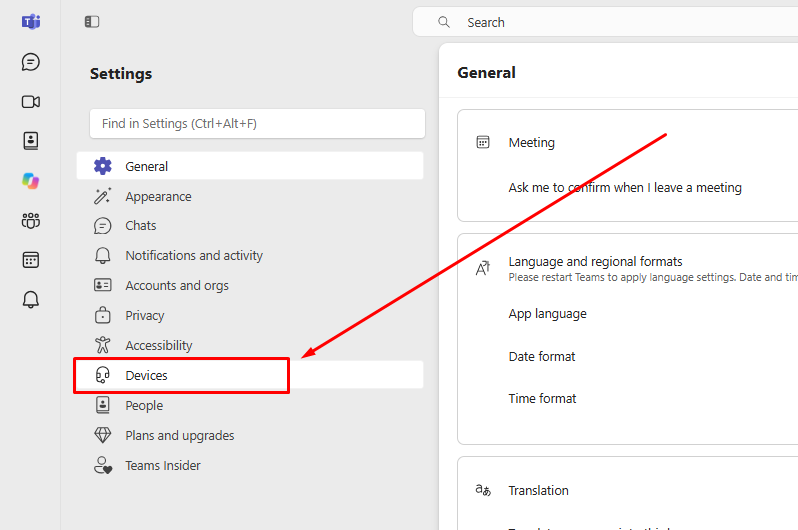
- Go to the Devices tab in the left panel.
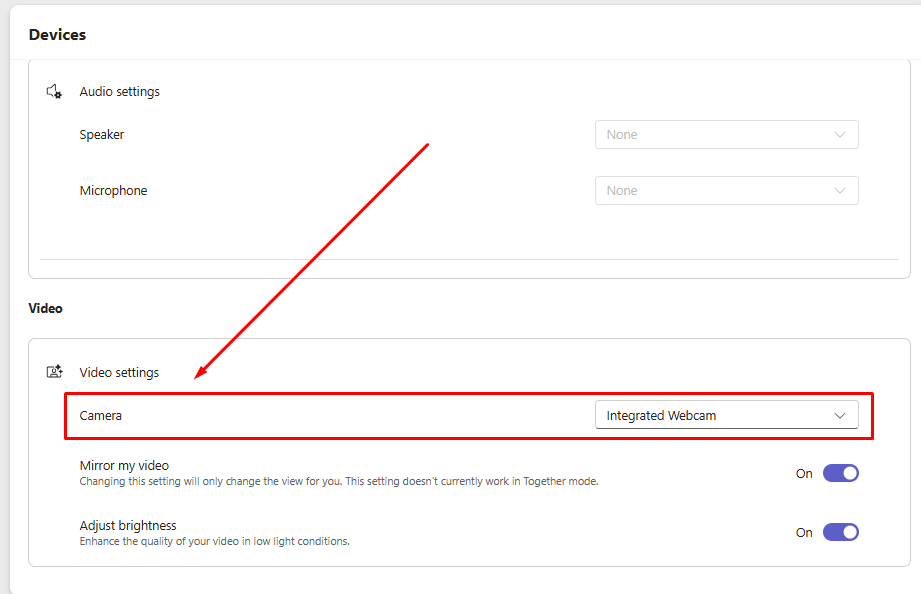
- Under the Video section and Video settings option, click the Camera dropdown menu and select Hollyland Lyra.
- Close Settings. Teams saves the selection and applies it to all future calls.
Google Meet (Chrome)
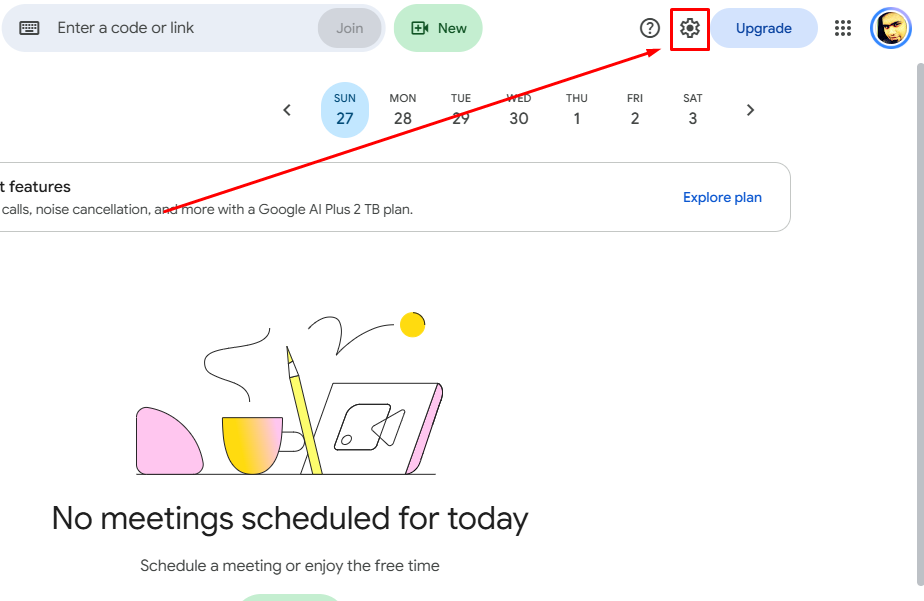
- Before joining the call, click the gear icon to open Settings.
- Select the Video tab.
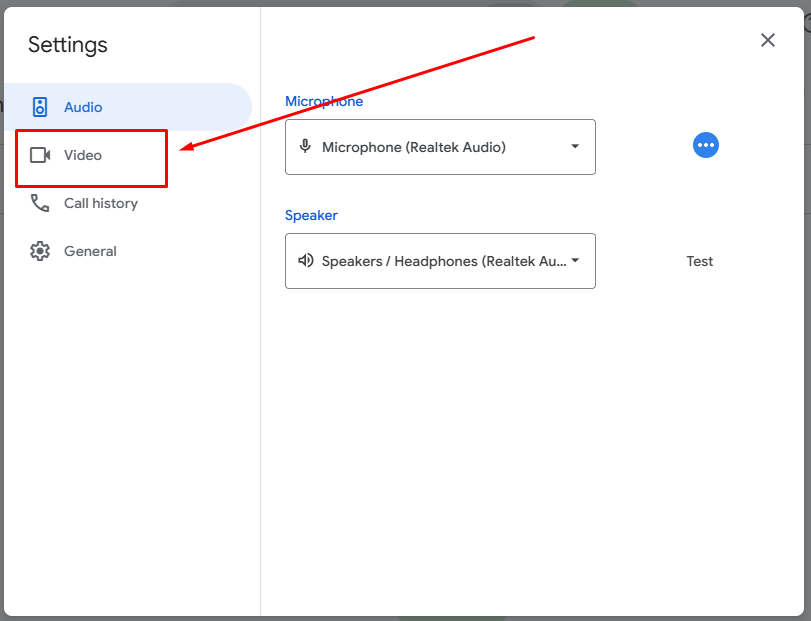
- Click the Camera dropdown and choose Hollyland Lyra. Google Meet lists cameras by the device name reported by Windows, which matches the name you saw in Device Manager.

Step 3: Force a System-Wide Default by Disabling the Built-in Camera
For users who want every app to automatically use the external webcam without configuring each one individually, disabling the built-in camera in Device Manager is the solution. With the built-in camera disabled, Windows has only one camera to present to any application.
Note: Disabling the built-in camera only removes it from the list of available camera inputs. It has no effect on your laptop display, keyboard, trackpad, or any other hardware. The change is fully reversible.
- Right-click the Start button and select Device Manager.
- Expand the Cameras or Imaging Devices category.
- Right-click the built-in camera entry. It is typically labeled Integrated Camera, HP TrueVision HD, Lenovo EasyCamera, or a similar brand-specific name.
- Select Disable device from the context menu and confirm the prompt.
- The entry now shows a small down-arrow icon indicating it is disabled. Only Hollyland Lyra should remain active under the Cameras category.
- Open the Windows 11 Camera app as a quick verification. The Lyra’s feed should load immediately. The Lyra’s LED will glow solid white as the Camera app accesses the device, confirming the camera is live.
To re-enable the built-in camera later – for example, when traveling without the Lyra – return to Device Manager, right-click the disabled camera entry, and select Enable device.
Optimize Your Webcam Settings After Switching
Once the Lyra is your active camera in apps, the free HollyStudio companion app (available from Hollyland’s website) unlocks image controls that go beyond what individual app settings can provide. Launch HollyStudio with the Lyra connected. The main dashboard displays a live preview window alongside a sidebar of controls.
Key settings to configure:
- Resolution and frame rate: On the main HollyStudio interface, look for the Resolution menu at the top of the preview screen. Select 3840×2160 at 30 fps for maximum 4K detail, or 1920×1080 at 60 fps for smoother motion. A USB 3.0 connection is required for both.

- AI Tracking and Smart Auto Framing: The first step is to turn on AI Tracking. To do that:
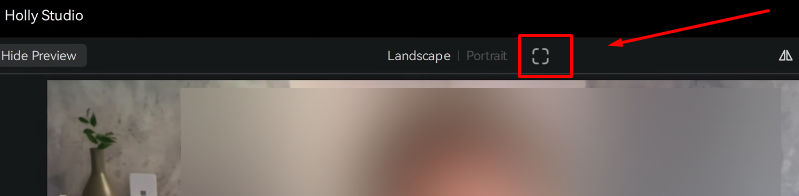
- Click the frame icon above the preview screen. Once it is enabled, you will see a padlock icon inside it.

- Then, click on the gear icon below the preview screen to open Settings.

- Now, choose the Camera Settings tab from the menu on the left. Toggle Face Priority Focus on and close Settings.

Since Smart Auto Framing works side by side with AI Tracking:
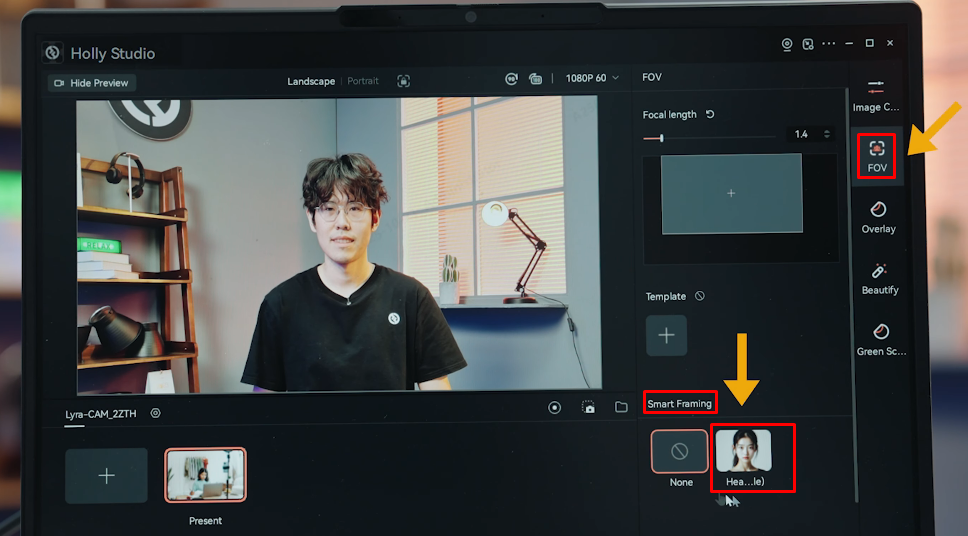
- Select the FOV page.
- Scroll down to the Smart Framing section.
- Deselect the None tile and turn on the auto framing option (image tile) shown beside it.
- Exposure: On the Image Control page and under the Advanced section, drag the Exposure slider to adjust brightness. The current EV value is displayed numerically as you drag.
- White Balance: Switch between Auto and a manual Kelvin value to match your room lighting. You can find the White Balance slider on the same Image Control page of the HollyStudio app.
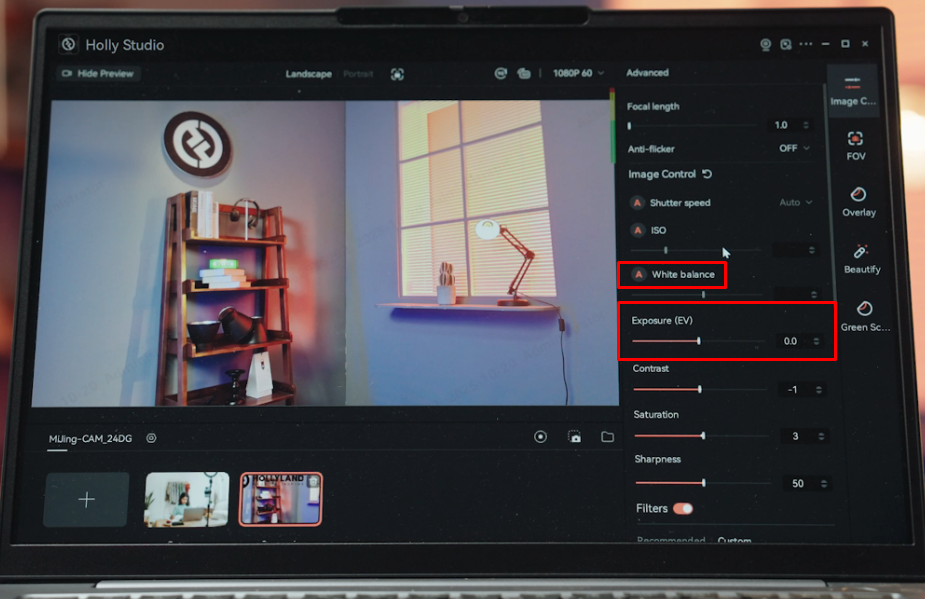
- Digital Zoom: Look for the Focal Length slider on the Image Control page. This slider helps with digital zooming, ranging from 1x to 4x. It is useful for tightening the frame without physically repositioning the camera.

Troubleshooting: Webcam Not Showing Up in App Camera Lists
If the Lyra is connected but does not appear in an app’s camera dropdown, work through these steps in order.
- Check the LED first. A solid blue LED confirms USB power is reaching the camera. If the LED is off, try a different USB port or connect through a powered USB hub. Proceed to software checks only after confirming solid white.
- Scan for hardware changes in Device Manager. Right-click the Device Manager window header and select Scan for hardware changes. Hollyland Lyra should appear under Cameras within a few seconds.
- Check Windows Privacy settings. Go to Settings > Privacy > Camera. Confirm the master toggle labeled Allow apps to access your camera is On. Scroll down and verify that the specific app you are using (Zoom, Teams, etc.) is also individually toggled On.
- Fully restart the app. Camera dropdowns populate at app launch, not while the app is already running. Close the app entirely, including removing it from the system tray, then relaunch it.
- Re-seat the cable. Unplug the USB-C cable from both the Lyra and the PC port. Wait five seconds, then reconnect. Watch for the LED initialization blink followed by solid white before reopening the app.
- Check for firmware updates. If the Lyra still does not appear, visit Hollyland’s support page for the latest firmware. Windows 11 handles the UVC driver automatically, but a firmware update can resolve edge-case device recognition issues.
FAQs
Can I set a default camera for all Windows 11 apps at one time, without disabling the built-in camera?
No. Windows 11 has no system-wide camera setting like its default audio device option. You can select your external webcam separately in each app’s video settings. Another option is to disable the built-in camera through Device Manager. This leaves your external webcam as the only available camera for apps.
Is it safe to disable the built-in camera in Device Manager?
Yes. Disabling the camera device only removes it from the list of available camera inputs. It does not affect your laptop display, keyboard, or any other hardware component. You can re-enable it at any time by right-clicking the disabled entry in Device Manager and selecting Enable device.
My webcam shows up in Device Manager but not in Zoom’s camera dropdown. What should I do?
If Device Manager detects your webcam but Zoom doesn’t, check camera permissions. Open Settings, select Privacy & security, then choose Camera. Turn on Camera access and enable Let desktop apps access your camera. Next, close other programs that might be using your webcam. These include Microsoft Teams, OBS, and any open web browsers. If Zoom still cannot find your webcam, restart the application. Right-click Zoom’s system tray icon and select Exit. Then reopen Zoom to refresh its camera list.
Do I need to install drivers for a UVC webcam like the Hollyland Lyra on Windows 11?
No. The Lyra is UVC-compliant and plug-and-play. Windows 11 installs the generic UVC driver automatically on connection. HollyStudio is optional; it unlocks advanced controls (resolution selection, AI tracking, exposure, and white balance) but is not required for the camera to be recognized in apps.
Every time I restart my PC, the app reverts to the built-in camera. How do I prevent this?
Zoom and Microsoft Teams remember the last camera selected after restarting. If your laptop keeps switching back, the external webcam may initialize slowly over USB. This can cause apps to select the first available camera instead. To stop this, open Windows Device Manager and expand Cameras or Imaging devices. Right-click your laptop’s built-in camera and select Disable device. This makes your external webcam the only available camera for apps.
Conclusion
Windows 11 has no single setting to select a default camera. You can choose your webcam separately in each video app’s settings. Conversely, disable the built-in camera through Device Manager. This makes your external webcam the only available camera. First, confirm Windows recognizes your webcam before changing any settings. If problems arise, check USB connections, privacy permissions, and app settings. With Hollyland Lyra connected, HollyStudio also lets you adjust resolution, framing, exposure, white balance, and zoom. These steps help you get your external webcam ready for video calls.
